[3 Official Ways] How to Downgrade macOS 27 Beta to 26

5 mins read

Updated on 2026-08-17 18:59:59 to Mac Update

As of August 2026, macOS 27 has not reached its public release, so this guide focuses on how to downgrade macOS 27 beta to macOS 26. You may want to go back if the Beta is unstable, drains the battery, slows down your Mac, or causes compatibility issues with important apps.

Since a major macOS downgrade typically requires erasing your Mac before reinstalling the older version, back up your important files first. Below, we'll cover three practical options: restoring from a Time Machine backup, using macOS Recovery, and creating a bootable macOS 26 installer.

how to downgrade from macos 27 to 26

Can You Downgrade macOS 27 Beta to 26?

Yes, you can downgrade from macOS 27 beta to 26.

Unlike a regular update, a major macOS upgrade does not come with an "Uninstall Update" or "Roll Back" option. In most cases, going back to macOS 26 requires erasing the startup disk and reinstalling an older macOS version. The exact method depends on whether you have a Time Machine backup and which macOS version Recovery can install on your Mac.

If you only want to stop receiving future macOS 27 Beta updates, turn off Beta Updates in Software Update. This prevents new Beta updates from being offered, but it does not remove the macOS 27 Beta already installed.

What to Do Before Downgrading macOS 27 Beta to 26?

A successful downgrade starts with data protection and a compatibility check. Back up your files, confirm that your Mac supports macOS 26, and prepare a stable internet connection before erasing anything.

Step 1. Back Up Your Mac to Avoid Data Loss

A major macOS downgrade usually involves erasing the startup disk. The safest approach is:

"Back Up → Downgrade → Restore Files".

Time Machine can help protect your apps, accounts, settings, documents, photos, and other personal data, so you can use it to back up your Mac to an external drive before downgrading. After installing macOS 26, you can restore your files from the backup.

Also, make a separate copy of critical files. This includes work documents, family photos, videos, and project files. Do not rely on only one backup.

📝 Note:

A Time Machine backup created while using macOS 27 beta can protect your personal files, including files that existed before the upgrade and new files created afterward. However, it is not the same as rolling your Mac back to the exact macOS 26 state you had before. Some apps, settings, and system-related data may need to be set up again after downgrading.

Check Your Mac and macOS 26 Compatibility

Confirm that your Mac supports macOS 26 before you erase macOS 27 beta. Apple provides official compatibility information for supported Mac models.

If your Mac was running macOS 26 before you joined the macOS 27 beta program, it will normally remain compatible with macOS 26. Still, check your exact Mac model and the installer you plan to use.

You can find your model through "Apple menu > About This Mac". Then compare it with Apple's current macOS compatibility information.

Compatibility guidance should be checked again after the public release of macOS 27. Apple may update its support pages and installation options.

Prepare Power, Internet, and Enough Time

Complete this checklist before starting:

  • Connect your Mac to power.
  • Use a stable internet connection.
  • Keep your Time Machine drive nearby, if available.
  • Prepare a suitable USB drive if you may need a bootable installer.
  • Confirm that all important files have been backed up.
  • Allow enough time for downloading, installation, and file restoration.
Important:

Do not begin the erase process until you have checked your backup.

How to Downgrade macOS 27 Beta to 26?

Choose the downgrade method based on what you have available.

  • A Time Machine backup created before upgrading to macOS 27 beta is the easiest way to return to your previous setup.
  • If you do not have a macOS 26 backup, you can use macOS Recovery to reinstall an available macOS version.
  • When Recovery does not provide macOS 26, a bootable installer gives you another option.

Method 1: Revert macOS 27 to macOS 26 from a Time Machine Backup

Use this option if you created a Time Machine backup while your Mac was still running macOS 26. A backup created after installing macOS 27 beta can still protect your personal files, but it is not a complete macOS 26 restore point.

On current versions of macOS, Time Machine is mainly used to restore your files, apps, accounts, and settings. You may need to install macOS 26 first, then transfer your data from a backup created before the macOS 27 beta upgrade during setup.

  • Connect the Time Machine backup drive to your Mac.

  • Start your Mac in macOS Recovery:

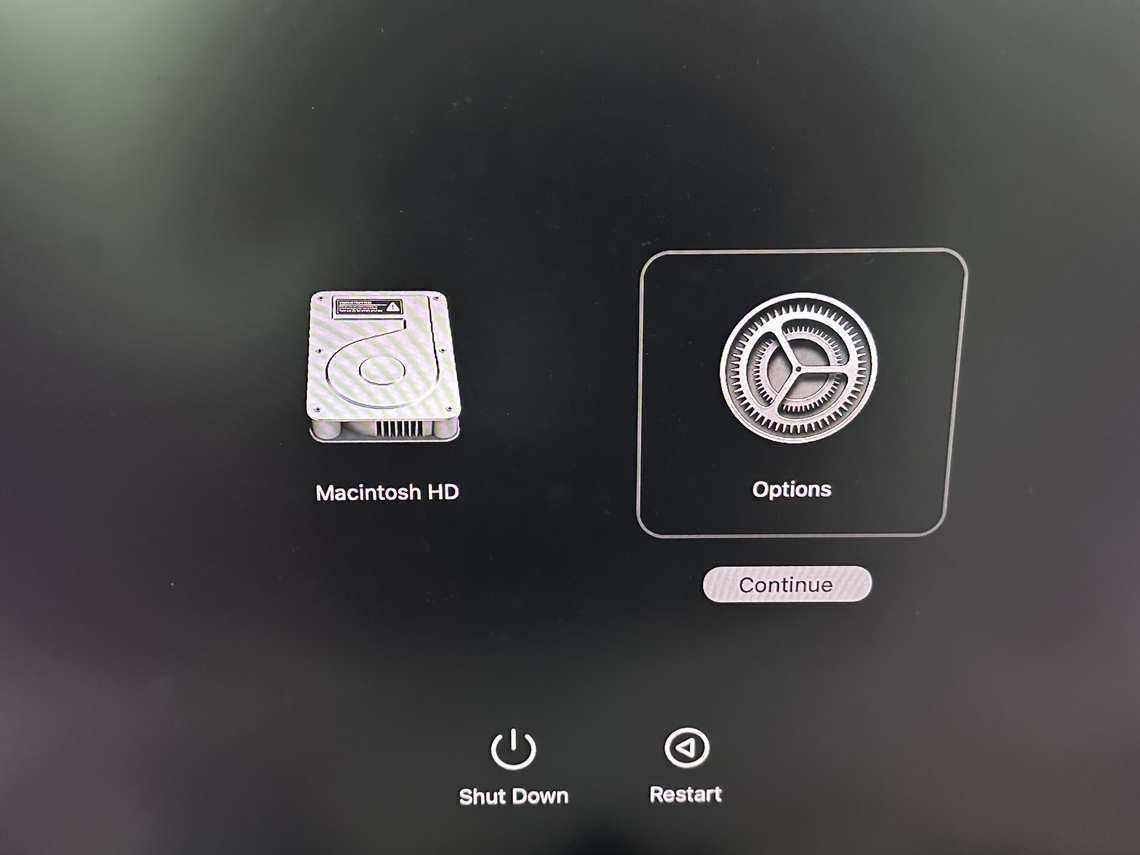
    • "Apple silicon Mac:" Shut down the Mac. Press and hold the power button until startup options appear. Select "Options", then click "Continue".
    • "Intel Mac:" Restart the Mac. Immediately press and hold Command-R until the startup screen appears.
  • If Recovery offers "Restore from Time Machine", select it and follow the prompts. Choose a backup created before you installed macOS 27 beta.

    choose restore from time machine
  • If Recovery asks you to reinstall macOS first, install macOS 26. If Recovery does not offer macOS 26, use Method 3 to create a bootable installer.

  • During Setup Assistant, choose the option to transfer information from a Time Machine backup.

    transfer data to mac after downgrading
  • Select the backup created while your Mac was running macOS 26. Choose the accounts, apps, settings, and files you want to transfer.

  • Finish setup and sign in.

  • Open "Apple menu > About This Mac" and confirm that macOS 26 is installed.

  • Check your Desktop, Documents, Photos, and other important folders to make sure your data is available.

Apple's current guidance also explains that you may need to reinstall macOS before restoring files from Time Machine.

Method 2: Erase macOS 27 Beta and Reinstall macOS 26 from Recovery

If you do not have a suitable macOS 26 backup, macOS Recovery may allow you to erase the current startup disk and reinstall an available macOS version. The exact version depends on your Mac model, the macOS version previously installed, and how Recovery is started.

Warning:

Erasing the startup disk removes the data stored on your Mac. Make sure your important files are backed up before continuing. If files are missing after the downgrade, stop using the drive to avoid overwriting the lost data.

  • Start your Mac in macOS Recovery. Use the steps described in Method 1 above.

  • Enter an administrator password if Recovery asks for one.

  • Open "Disk Utility". Then choose "View > Show All Devices" if the sidebar does not show the full storage structure.

  • Select the macOS startup disk or volume group. It is usually named "Macintosh HD".

  • Click "Erase" or "Erase Volume Group", depending on the option shown.

    erase apfs volume group
  • Use "APFS" as the format when prompted. If Disk Utility asks for a scheme while erasing the full device, select "GUID Partition Map".

  • Complete the erase process. Then close Disk Utility.

  • Select "Reinstall macOS" in the Recovery window. Check the macOS version shown by the installer before proceeding.

    reinstall macos tahoe
📝 Note:

macOS Recovery does not always provide macOS 26. The available installer depends on your Mac model, the macOS version previously installed, and the Recovery option you use.

  • On an Apple silicon Mac, Recovery normally reinstalls the version of macOS most recently installed on the Mac. After erasing the disk, it may offer the version used before the upgrade.
  • Command-R on an Intel Mac normally reinstalls the current version of the most recently installed macOS.
  • Option-Command-R may offer the latest macOS compatible with your Mac.
  • Shift-Option-Command-R may offer the original macOS version or the closest available version.

If the installer offers macOS 26, follow the onscreen instructions. Set up the Mac when installation finishes, then restore your personal files from a backup or separate copy.

If Recovery offers macOS 27 beta or another version instead, stop and use a macOS 26 bootable installer.

Method 3: Downgrade macOS 27 with a macOS 26 Bootable Installer

Use a bootable installer when Recovery does not offer macOS 26. This option gives you more control over the installer version, but it requires another working Mac and a suitable external drive.

💡 Tip:

In this case, you need to create a macOS 26 bootable installer manually. 4DDiG can simplify this process by helping you download the required macOS ISO and create a bootable USB installer without searching for installer files or using complex Terminal commands.

The process to go back from macOS 27 to 26 is:

"Download macOS 26 Installer → Create Bootable Installer → Boot from Installer → Erase macOS 27 → Install macOS 26".

  • On a compatible Mac, download the full macOS 26 installer from Apple. The installer should appear in the Applications folder as "Install macOS Tahoe".

  • Connect a USB drive or another external volume and create the bootable installer.

    Warning:

    Creating the installer erases the selected external drive. Copy any files you need from that drive before continuing.

    Rename the external volume "MyVolume", then open Terminal and run Apple's createinstallmedia command:

    sudo /Applications/Install\ macOS\ Tahoe.app/Contents/Resources/createinstallmedia --volume /Volumes/MyVolume

    Enter the administrator password when prompted. Terminal will not show the password as you type. Type Y when asked to erase the external volume, then wait until the installation media is ready.

    run command to downgrade macos 27
  • Connect the bootable installer to the Mac you want to downgrade and start from the external installer:

    • "Apple silicon Mac:" Press and hold the power button until startup options appear. Select the bootable installer and click "Continue".
    • "Intel Mac:" Turn on the Mac and immediately hold Option. Select the bootable installer when the startup volumes appear.
  • Open Disk Utility and erase the macOS 27 startup volume. Follow the same backup warning and disk guidance described in Method 2.

  • Close Disk Utility. Select "Install macOS 26" and follow the onscreen instructions.

  • Complete Setup Assistant and restore your personal files from a backup or separate copy.

The target Mac must support macOS 26. It may also need an internet connection for firmware and model-specific information. Intel Macs with a T2 Security Chip may require Startup Security Utility to allow startup from external media.

Lost Files After Downgrading macOS 27 Beta? Recover Missing Data with 4DDiG

After downgrading macOS 27 beta, missing files do not always mean they are permanently lost. First, check your Time Machine backup, external drives, cloud storage, iCloud Drive, and recently restored user accounts.

If you cannot find your files in any available backup, 4DDiG Mac Data Recovery can help scan your drive and find the lost files after a macOS downgrade.

4DDiG may be useful in situations such as:

  • You erased the startup disk before creating a backup.
  • Your backup does not contain the files you need.
  • Some files are still missing after restoring a backup.
  • The downgrade process was interrupted and files became inaccessible.

It can scan HDDs, SSDs, and other storage devices to find deleted, formatted, lost or unsaved files, including documents, photos, videos, and other personal data.

FREE DOWNLOAD

Secure Download

FREE DOWNLOAD

Secure Download

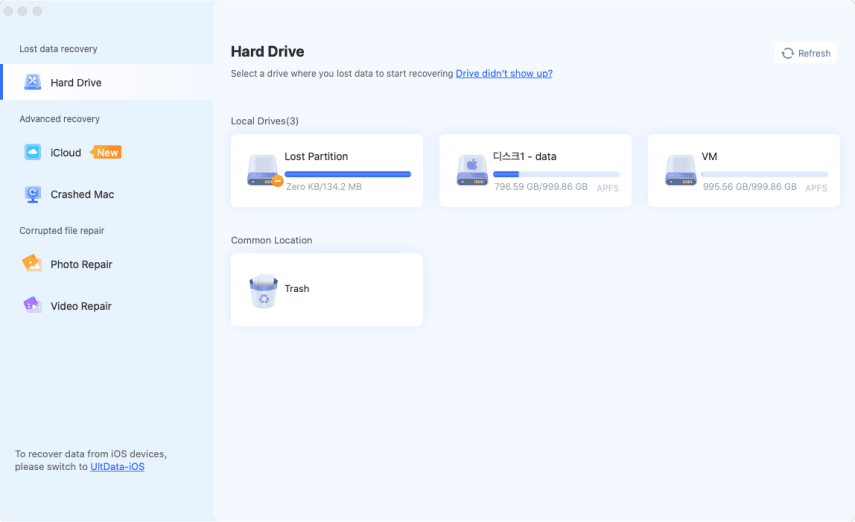
  • Download and open 4DDiG. Select the drive where your missing files were stored before the macOS downgrade, then start the scan.

    4ddig mac main interface
  • 4DDiG will scan your drive for recoverable files. Use file filters or search to quickly find missing documents, photos, videos, and other personal files after the downgrade.

    preview all recoverable files on mac 4ddig
  • Preview the found files to check whether they are recoverable. Select the files you need and click the "Recover" button.

    click to recover files on mac 4ddig
  • Choose a different location to save the recovered files. Avoid saving them back to the original drive to prevent possible data overwriting.

    save recovered files on mac 4ddig

What to Do After Downgrading from macOS 27 Beta to 26?

After the downgrade, confirm that macOS 26 works correctly before returning to normal use. Check the system version, restore your files, and prevent the Mac from downloading another macOS 27 Beta.

Complete these steps:

  • Open "Apple menu > About This Mac". Confirm that macOS 26 is installed.

  • Go to "System Settings > General > Software Update". Install available macOS 26 updates.

  • Reinstall apps that support macOS 26.

  • Restore personal files from Time Machine, an external drive, or cloud storage.

  • Sign back into iCloud and allow your data to sync.

  • Check important locations. Review Desktop, Documents, Downloads, Photos, Videos, and project folders.

  • Open your main apps. Confirm that their data and settings are available.

  • Go to "System Settings > General > Software Update > Beta Updates". Set "Beta Updates" to "Off".

FAQs About Downgrading macOS 27 Beta to 26

Can I downgrade macOS 27 beta without losing data?

Yes, you can downgrade macOS 27 beta without losing data if you create a backup first. However, a major macOS downgrade usually requires erasing the startup disk, so apps, settings, and system data may not return exactly as they were. Restore your files from a Time Machine backup or another copy after installing macOS 26.

Can I uninstall macOS 27 Beta?

No, you cannot uninstall macOS 27 beta like a normal app. Removing the beta usually requires erasing the current system and reinstalling macOS 26. Turning off Beta Updates only stops future beta updates; it does not remove the installed beta.

Can I downgrade from macOS 27 to 26 without a USB?

Yes, you may be able to downgrade without a USB. You can use macOS Recovery or restore from a Time Machine backup created before upgrading to macOS 27 beta. If Recovery does not offer macOS 26, you need a bootable installer.

Will downgrading macOS 27 erase my files?

Usually, yes. Downgrading between major macOS versions often requires erasing the startup disk. Back up important files before starting, then restore your data after macOS 26 is installed.

Can I restore a macOS 27 Time Machine backup to macOS 26?

Personal files from a macOS 27 beta Time Machine backup may still be recoverable, but it is not a complete macOS 26 restore point. Apps, settings, and system-related data from the newer macOS version may not transfer correctly. A backup created before upgrading to macOS 27 beta is the safer option.

Why do I still see macOS 27 beta updates after downgrading?

Downgrading to macOS 26 does not automatically remove your Mac from the Beta Updates program. Turn off Beta Updates in "System Settings > General > Software Update > Beta Updates" to stop receiving future beta updates.

Conclusion

Downgrading macOS 27 beta to macOS 26 is not just about removing a beta version. It helps restore your Mac to a more stable and reliable system. Choose the downgrade method that fits your situation, and always protect your files before making system changes. If files are missing after the downgrade, 4DDiG can help scan your drive and recover lost personal files when possible.

FREE DOWNLOAD

Secure Download

FREE DOWNLOAD

Secure Download

William Bollson (senior editor)

William Bollson, the editor-in-chief of 4DDiG, devotes to providing the best solutions for Windows and Mac related issues, including data recovery, repair, error fixes.

(Click to rate this post)

You rated 4.5 ( participated)