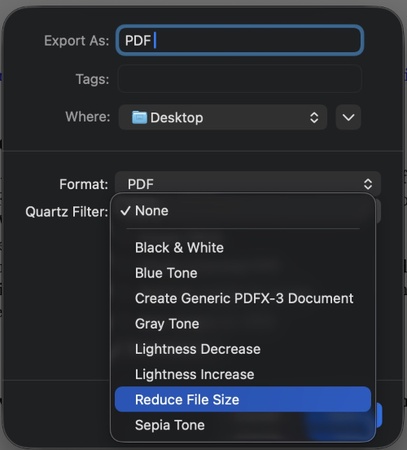
[2026 Step-by-Step Guide] How to Snip on Mac in 7 Ways?

5 mins read

Updated on 2025-12-12 14:23:43 to Mac Tips

Taking screenshots is something almost every Mac user needs to do, whether it’s saving a receipt, sharing an error message, or capturing part of your screen for school or work. macOS includes powerful built-in tools that make snipping extremely easy once you know the right shortcuts and settings.

If you’re wondering how to snip on Mac, this guide walks you through every method, from basic keyboard shortcuts to advanced tips, organization tricks, and troubleshooting solutions.

how to snip on mac

How to Snip on Mac?

macOS offers several ways to capture your screen, and each method is designed for a different type of snip. Whether you want the full screen, a specific area, a single window, or even the Touch Bar, there's a shortcut for it.

Below are the primary methods for taking a screenshot on a Mac, along with detailed instructions.

1. Capture the Entire Screen

If you want to grab everything displayed on your Mac at that moment, use this shortcut. It instantly captures your full screen and saves it as a file. Here is how to use the Snipping Tool on Mac.

shift command 3
  • Press “Shift + Command + 3” on your keyboard.

  • You’ll hear a shutter sound, and a thumbnail may appear in the corner. Click it to edit or wait for it to save automatically.

This shortcut is perfect for capturing complete desktop layouts, full-screen apps, or error messages.

2. Capture a Selected Area

When you only need part of your screen, such as a portion of a webpage or a paragraph from a document, this method gives you full control.

shift command 4
  • Press “Shift + Command + 4” and your cursor will turn into a crosshair.

  • Click and drag to select the area you want to snip. Release the mouse or trackpad to save the screenshot.

This is the most flexible method for quick section-snips.

3. Capture a Window

macOS makes it easy to capture a clean snip of a specific window including its shadow effect.

shift command 4 space
  • Press “Shift + Command + 4”, then press “Space”.

  • Your cursor becomes a camera icon. Click the window you want to capture.

This produces polished, window-only screenshots which are ideal for presentations or documentation.

4. Take a Snip on Mac with Screenshot Toolbar Options

This toolbar brings all screenshot options in one place, including recording features. Follow the steps below to see how to take a snip on Mac.

shift command 5
  • Press “Shift + Command + 5” and choose from:

    • Capture Entire Screen
    • Capture Selected Window
    • Capture Selected Portion
    • Record Entire Screen
    • Record Selected Portion
  • Click “Options” to adjust the timer, save location, microphone, or floating thumbnail.

  • Click “Capture”.

This is the most complete snipping feature macOS offers.

5. Use Preview App to Snip on Mac

Preview isn’t just for opening images. It includes basic screen capture tools.

  • Open “Preview” from “Applications”.

  • Go to “File” and select “Take Screenshot”.

    use preview app to snip on mac
  • Choose the following feature you like:
    • From Entire Screen
    • From Window
    • From Selection
  • Save or edit the screenshot directly in Preview.

This method is useful if you want to snip and edit it in the same app.

6. Use the Built-in Screenshot App via Spotlight Search

macOS includes a standalone Screenshot application.

  • Press “Command + Space’ to open Spotlight Search and type ‘Screenshot”.

    find screenshot app via spotlight search
  • Open the app to access the same tools as Shift + Command + 5.

It’s a great option for users who prefer clicking instead of keyboard shortcuts.

7. Capture the Touch Bar with Mac Keys

Touch Bar screenshots are often needed for developers, teachers, or troubleshooting. Here is how to snip something on a Mac Touch Bar.

shift command 6
  • Press “Shift + Command + 6”.

  • The Touch Bar image will be captured and saved as a file.

This only works on MacBook Pro models with a Touch Bar.

How to Find & Organize the Screenshots on Your Mac?

Once you’ve taken your snips, macOS helps you locate, organize, and manage them easily.

How to Find the Screenshot?

By default, screenshots save to your Desktop, unless you change the location.

  • Open “Finder” and navigate to “Desktop” or wherever you changed the save path.

    how to find the screenshot on mac
  • Search “Screenshot” in the Finder search bar if unsure.

How to Change the Screenshot Save Location

If your Desktop is getting cluttered, move screenshots elsewhere.

  • Press “Shift + Command + 5” and click “Options”.

  • Under “Save to,” choose:

    • Desktop
    • Documents
    • Clipboard
    • Mail
    • Messages
    • Other Location
    change the screenshot save location mac
  • Select your preferred folder.

Tips to Recover Deleted Files on Mac with 4DDiG

As you work with screenshots, losing them becomes a real possibility, especially if your saving locations are scattered. 4DDiG Mac Data Recovery helps recover deleted or lost images, documents, and media with deep scanning tailored for macOS file systems.

FREE DOWNLOAD

Secure Download

FREE DOWNLOAD

Secure Download

Instead of simply listing features, it guides you through recovery, ensuring your files are restored safely even after accidental deletion. Below are the steps to use 4DDiG Mac Data Recovery:

  • Download 4DDiG Mac Data Recovery software on your Mac and launch it, then select "Hard Drive" from the left side. Choose your hard drive and click “Scan” to begin scanning.

    select location from 4ddig
  • Once the scan is complete, you will see different files. You can shortlist the results with the help of the "Search" and "Filter" features. In this case, you can choose "Photo”.

    filter the files you want
  • Click a file to see its preview and click the “Recover” button to recover it.

    recover the selected files
  • Choose a location between your local drive and cloud storage options, then click “Save Now” to save the image.

    save the recovered files properly

How Can You Take Better Screenshots on macOS?

Beyond snipping, macOS includes useful options for quality, timing, shadows, and more. Let’s see how you can take better screenshots on macOS to improve your experience.

How to Change Screenshot Formats?

By default, Mac saves screenshots as PNG, but you can switch to JPG, TIFF, etc.

  • Open "Terminal" by searching for it in "Spotlight."

  • Run the commands one by one:

  • “defaults write com.apple.screencapture type jpg."

  • “killall SystemUIServer”

    change screenshot formats on mac

Here, you can replace JPG with any other format, and the default format will change to that, like PDF or TIFF.

How to Adjust the Screenshot Delay?

Timers make it easier to capture menus or hover states.

  • Press “Shift + Command + 5” then click “Options”.

  • Choose:

    • 5-second delay
    • 10-second delay
  • Capture your screenshot.

    adjust screenshot delay mac

How to Use the Floating Thumbnail for Quick Editing?

The thumbnail acts like a built-in mini editor. It stays there for a moment and then disappears, saving the image.

  • Take a screenshot.

  • Click the floating thumbnail before it disappears.

  • Click the "Markup" button and use the Markup app to crop, annotate, rotate, or highlight.

    use the floating thumbnail for quick editing
  • Save or share directly.

How to Include or Remove Window Shadows in Your Screenshots?

Window shadows make screenshots look polished, but you can disable them as well. Below are the commands you can run in the terminal to include or remove Window shadows.

remove or include window shadows mac

Remove Window Shadows:

  • Defaults write com.apple.screencapture disable-shadow true
  • killall SystemUIServer

Include Window Shadows:

  • Defaults write com.apple.screencapture disable-shadow false
  • killall SystemUIServez

How to Add the Snipping Tool to the Touch Bar?

If your Mac has a Touch Bar, you can add a quick screenshot button. Remember that the last MacBook to have a Touch Bar was launched in 2022, and this method does not work on newer hardware.

Here is how to snip on a Mac with its Touch Bar.

  • Open “System Settings” and go to “Keyboard”.

  • Click “Customize Touch Bar” and drag the Screenshot button onto the Touch Bar.

    add the snipping tool to the touch bar

Troubleshooting Common Screenshot Issues on Mac

Screenshot tools on macOS are generally reliable, but issues can still appear due to misconfigured settings, storage problems, or system glitches. This section walks you through the most common screenshot errors on Mac and shows you how to fix each one quickly.

Case 1: Why Is My Snip Not Working on My Mac?

Sometimes your screenshot shortcuts may stop responding entirely, making it feel like snipping on your Mac is broken. This issue usually comes from disabled settings or conflicting apps blocking the shortcut.

  • Go to “System Settings” and choose “Keyboard Shortcuts” in keyboard settings.

  • Go to “Screenshots” and ensure all the options are enabled.

    enable all options on screenshots mac

Case 2: Why Are My Screenshots Not Saving?

If you take a screenshot, but nothing shows up on your desktop, the saving location or storage path is likely misconfigured. This problem often happens after system changes or permission issues.

  • Check your save location by pressing “Shift + Command + 5” and going to “Options”.

  • Ensure you have enough disk space to save the images.

Case 3: Why Are Keyboard Shortcuts for Screenshots Not Working?

Screenshot shortcuts can fail when your keyboard settings are incorrect, or if your Mac is using an alternative input method. Keyboard conflicts or accessibility settings may also override standard screenshot keys.

  • Test each key individually.

  • Quit apps that override shortcuts (e.g., Snagit, CleanShot) by pressing "CMD + Q."

Case 4: Why Do My Screenshots Look Blurry or Low Quality?

Blurry screenshots usually happen when the wrong format affects the captured image. This is especially common when taking screenshots of low-resolution windows and saving as JPG.

  • Right-click the screenshot and go to "Quick Actions."

  • Click "Convert Image" and in the "Format" dropdown select "PNG," then click "Convert to PNG."

    change image format on mac

Conclusion

Learning how to snip on Mac is simple once you know the shortcuts and features macOS provides. From basic keyboard combinations to advanced options like the Screenshot Toolbar, Preview, and Touch Bar, macOS offers a complete snipping experience suited for casual and professional users.

If your screenshots ever go missing during organization or cleanup, Tenorshare 4DDiG for Mac provides a reliable way to recover deleted images and files with ease.

FREE DOWNLOAD

Secure Download

FREE DOWNLOAD

Secure Download

William Bollson (senior editor)

William Bollson, the editor-in-chief of 4DDiG, devotes to providing the best solutions for Windows and Mac related issues, including data recovery, repair, error fixes.

(Click to rate this post)

You rated 4.5 ( participated)