How to Recover Lost or Deleted Files on macOS Big Sur?"Is there any possible way to recover permanently deleted files on macOS Big Sur. I'm an artist and I was working on a project when I accidentally ended up deleting a lot of important project stuff. Please help!"
Mac has recently launched its brand new macOS version called Big Sur, the successor to macOS Catalina. macOS Big Sur comes in with a lot of new improvements and functions, solving many issues that were present in the previous versions. However, there are some issues that never really go away, they are consistent no matter the MacOS version. One of those problems is the problem of data loss. Data loss can occur anytime and on any macOS version. So in today's article, we will tell you all about how to recover files on macOS Big Sur in the event of data loss. We have curated a comprehensive list of solutions that have the highest probability to recover files from macOS Big Sur. From using utilities present in the macOS by default to using third-party recovery apps like the Tenorshare 4DDiG data recovery app, we will take you on a journey of data recovery. In the end, you will be fully equipped to handle these kinds of problems. Let's begin!
- Part 1: What Causes Data Loss on macOS Sequoia/Big Sur?
-
Part 2: How to Recover Lost or Deleted Files on macOS Sequoia/Big Sur?
- Solution 1: Recover Deleted Data in macOS Sequoia/Big Sur Using Undo Option
- Solution 2: Restore Deleted Files on Sequoia/Big Sur Using Mac Trash
- Solution 3: Recover Lost or Deleted Files from macOS Big Sur Using Tenorshare 4DDiGHOT
- Solution 4: Recover Lost Files from TemporaryItems Folder
- Solution 5: Retrieve Lost or Deleted Files from macOS Big Sur Using Time Machine
- Solution 6: Recover Lost or Deleted Files on macOS Big Sur Using Terminal
- Solution 7: Restore Deleted or Lost Files from macOS Big Sur via iCloud
- Part 3: How to Prevent Data Loss on macOS Sequoia/Big Sur?
- FAQs about Lost or Deleted Files on macOS Sequoia/Big Sur
Part 1: What Causes Data Loss on macOS Big Sur?
You can only apply fixes to a particular problem when you know what caused the specific problem. Knowing what caused your data loss is just as important as knowing how to recover it. So let's look at several prominent causes behind data loss on macOS Big Sur.
- Updates- Updating your MacOs can sometimes cause unnecessary data losses.
- Accidental deletion- Who hasn't deleted a file by mistake and repented it.
- Crashes- Occasional crashes can wreak havoc and cause significant data loss.
- Format- Formatting your system to get rid of errors can run you into data loss issues.
- Viruses and Malware.
Part 2: How to Recover Lost or Deleted Files on macOS Big Sur?
Solution 1: Recover Deleted Data in macOS Sequoia/Big Sur Using Undo Option
The first and the easiest way to bring back your deleted files is to immediately undo them by pressing the 'CTRL + Z' keys. Another way of doing that is to go to the Edit > Undo Move option just after deleting the files.
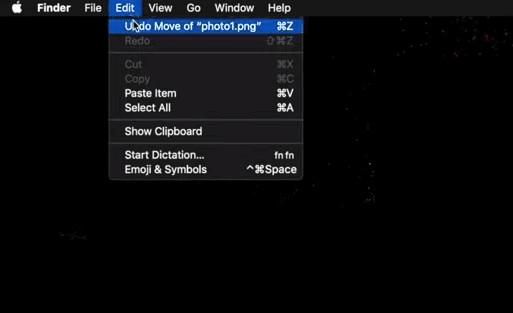
An important point to note is that this method only works if done immediately after deletion. If you close the window or delete the files from the trash, this method will not work.
Solution 2: Restore Deleted Files on Sequoia/Big Sur Using Mac Trash
When you delete a file by right-clicking on it they are not permanently deleted. They are stored in the Trash so that you can restore them in the future. To recover lost files on macOS Big Sur using Trash, follow the steps below.
Step 1: Open the Trash app by clicking on the 'Trash' icon on the desktop. Once you open it you'll see all files that you have deleted.
Step 2: Search for the file you want to recover and just drag it back to the desktop. Alternatively, you can right-click on it and click on the 'Put Back' option.
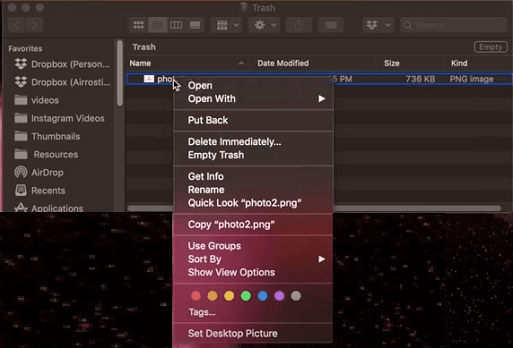
The main drawback of trash is that it doesn't store permanently deleted files. To recover those files you will have to look at the other fixes that we have in store for you.
Solution 3: Recover Lost or Deleted Files from macOS Sequoia/Big Sur Using Tenorshare 4DDiG
Oftentimes the tools available on Mac to recover deleted files on macOS Sequoia/Big Sur are not enough. In these situations, you need something that will take care of your lost data without too much of a hassle. That is exactly what the Tenorshare 4DDiG Data Recovery app promises. A fast and reliable data recovery software that makes use of modern algorithms to bring your deleted data back. Its amazing features include:
- Easily recover over multiple file types without disabling SIP
- Is equipped to recover files from local, external storage devices, encrypted devices, crashed computers, etc.
- Supported on both Mac and Windows OS
- Zero viruses, malware, ads, pop-ups, etc.
- Smooth, intuitive, and user-friendly interface for maximum usability
Secure Download
Secure Download
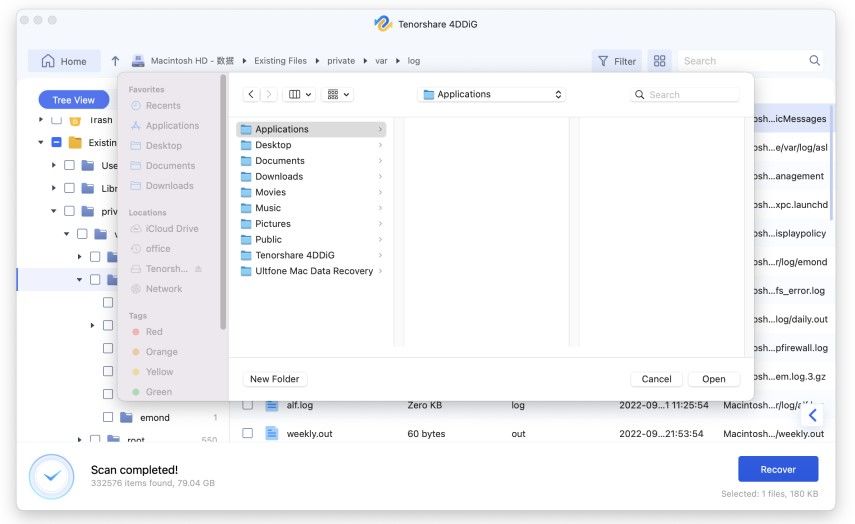
- After you open the app, you'll see all your devices and drives listed in the home interface. Select your desired drive from which you want to recover data and click 'Scan'.
- The app will start scanning your hard drive and find all the deleted files. It will slowly start displaying the found items on your screen as it finds them.
- Now, the files that have been found and are to be restored to your PC can be recovered by clicking on the recover button. Select the location you want the recovered files to go in and click on save and just like that, your files are back.


Solution 4: Recover Lost Files from TemporaryItems Folder.
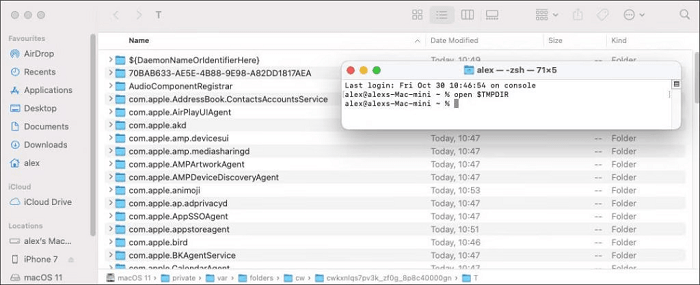
Unknown to many, Mac PCs have a Temporary Items folder that can come in handy in situations like these. Here's how you can use it to recover deleted files.
Step 1: Open Mac Terminal. Type in the following command, 'open $TMPDIR', and hit enter.
Step 2: The Temporary Items folder will pop up. Search and select the files you want to recover and copy them to your desktop.
Solution 5: Retrieve Lost or Deleted Files from macOS Big Sur Using Time Machine
As the name suggests, Time Machine is literally a time capsule from which you can recover your deleted files. However, to use it for macOS Big Sur data recovery, you must have enabled the Time machine backup. If not, this method will be of no use to you. To use the Time machine to recover your data follow the steps below.
Step 1: Click the Time Machine icon in the menu bar or search for Time Machine using Spotlight to open the Time Machine app.
Step 2: Here, you can browse through your backups and look for the files you want to recover. You can preview these files by using the Space bar.
Step 3: When you have selected the files, click the "Restore" button, and your file will be restored.

Solution 6: Recover Lost or Deleted Files on macOS Sequoia/Big Sur Using Terminal
The Terminal is a multifunctional utility and is a great tool to recover your deleted mac files. However, it can only restore files from the trash. So if you have permanently deleted a file, better move on to the next step. To use the Terminal:
Step 1: First up, navigate to Finder > Applications > Utilities and double-click on the Terminal button.
Step 2: When the finder window is open, type the command 'cd.Trash' and press the 'Return' key on your Mac.
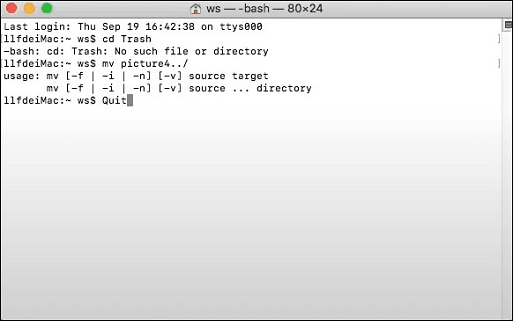
Step 3: Next, enter 'mv xxx../' and hit the 'Return' key. (Here, xxx means the name of the deleted file)
Step 4: When the recovery is done, type in 'Quit' in the Terminal to exit.
Solution 7: Restore Deleted or Lost Files from macOS Sequoia/Big Sur via iCloud
iCloud is the most widely used backup option for Mac users. So if you have backed up your data regularly to the iCloud, you can easily download the data you accidentally deleted from the cloud.
Part 3: How to Prevent Data Loss on macOS Sequoia/Big Sur?
Data recovery doesn't have to be the only solution to data loss. Data loss prevention is a good way to ensure that you never face this grim situation. Some good ways to ensure data loss prevention include:
- Think twice before deleting anything, you never know when you might need something.
- Create local backups in Time Machine whenever possible.
- Enable and explore iCloud Backup options.
- Scan your MacOS regularly for viruses and malware.
- Keep your Mac updated with the latest drivers and software as old drivers may cause performance issues and crash more often.
FAQs about Lost or Deleted Files on macOS Sequoia/Big Sur
1. How do I recover files after macOS Sequoia/Big Sur update?
After a macOS Sequoia/Big Sur update, the best ways to recover files include:
- Recovering Lost Files Using Tenorshare 4DDiG
- Retrieving Deleted Files Using Time Machine
- Restoring Lost Files via iCloud
2. Do you lose files when upgrading Mac OS Sequoia/Big Sur?
An upgrade doesn't delete your files. If you are still concerned you can create backups to ensure that you can recover your data in case it's lost.
3. How do you recover lost files on a Mac?
Is it possible to recover deleted files on Mac? Yes, it is possible to recover deleted files on Mac. You can do it in the following ways.
- Use Trash or the Undo delete option
- Recovering Lost Files Using
- Retrieving Deleted Files Using Time Machine
- Restoring Lost Files via iCloud
Summary
So you came in looking for answers to the question of how to restore macOS Sequoia/Big Sur and now we are leaving you with loads of fixes and a solid app, Tenorshare 4DDiG data recovery software to ease your journey of data recovery. So what are you waiting for, download it now and get to work.
 ChatGPT
 Perplexity
 Google AI Mode
 Grok
Grok
