How to Fix The Disk Macintosh HD Can't be Unlocked
Encountering 'The Disk Macintosh HD Can't be Unlocked' issue on your Mac? Find solutions and secure your data with 4DDiG Data Recovery.
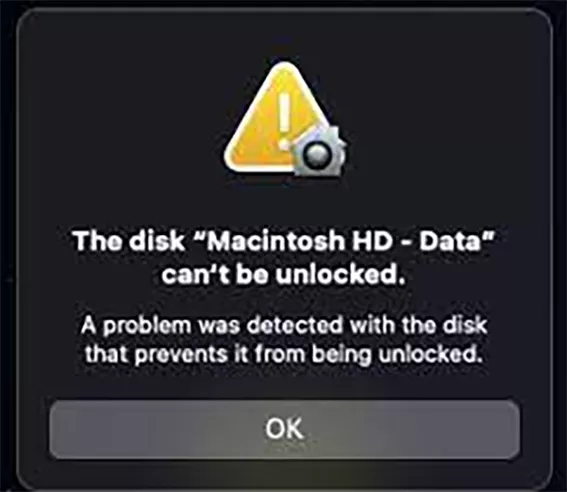
Many Mac users have reported the disk Macintosh HD Can't be unlocked Catalina error on Apple official forums. Most of the clients report that after updating to Big Sur, The Disk Macintosh HD - Data Can’t Be Unlocked error appears at Mac startup. One such example is:
“After updating to big sur I now get an error message on start up... the disk “Macintosh HD - Data” can’t be unlocked. If I click ok it goes away but comes back at next start up. Anyone have any ideas?”
-From Apple discussions
Part 1. What Does the Disk Macintosh HD Can't Be Unlocked Mean?
If your Mac is getting the disk Macintosh HD - data Can't be unlocked error, it means that the volume having the files is locked and can not be managed. Now the concern is what does the disk Macintosh HD Can't be unlocked mean? To answer that, we must know what the Macintosh HD does.
The Macintosh HD is a storage drive having the files and apps. It is a read-only volume where you can not create, edit, or delete files. As soon as the Macintosh HD is locked, you will not get access to those read-only files. The Macintosh HD is segregation of Mac startup disks used to isolate system files from viruses and corruption.
If you wish to view diskstartup, go to System Preferences from the Apple menu. From there, you can click "Startup Disk," and the startup disk will appear at the top pane.
Part 2: How to Fix "The disk Macintosh HD can't be unlocked"
Method 1. Run Fist Aid to Repair the Volume
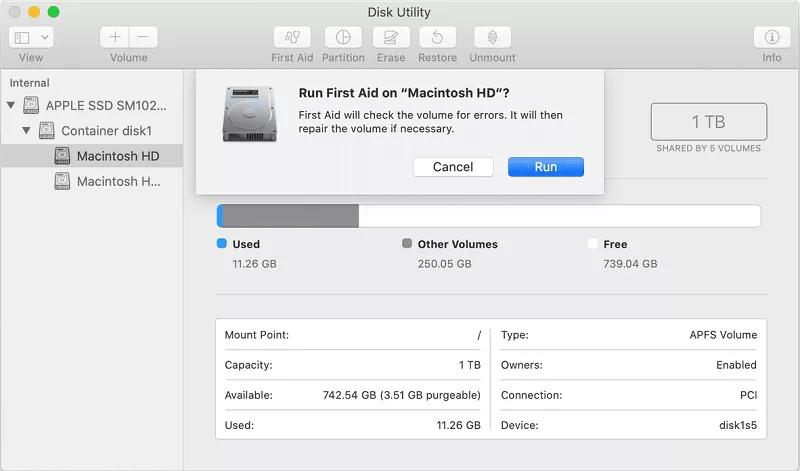
The First Aid utility can be run from Disk Utility and will look at the hard drive (internal), the Container, and all volumes inside it to fix it. That will be a bit time-consuming, but, is the most efficient method. The method below will guide you to solve the Mac HD issue that the disk macintosh HD can't be unlocked:
-
Go to the macOS Recovery mode and boot your system using one of the two methods:
- If you are using an Intel-based Mac, press and hold the Command + R keys on your keyboard while your Mac restart.
- If you are using an Apple M1 Mac, press and hold the Power key on your system while your Mac reboots. Keep holding until you see "Loading Startup Options." Select Options >> Continue to get going.
- Open the Disk Utility in Recovery mode.
- Go to the View menu from Disk Utility >> Show All Devices. It will show the desired disks and drives.
- From there, click the internal hard drive (Over the Container) situated at the left pane.
- Click First Aid.
- Run the pop-up window and let First Aid start checking the hard drive.
-
Run First Aid individually for the Container, Macintosh HD volume, Macintosh HD - Data volume, and any remaining volumes. Doing so will help fix the Mac HD error.

- Make sure to include all the Containers and volumes.
- Then, at that point, reboot your Mac to check whether the "Macintosh HD data" issue endures or not.
Method 2. Back-Up Your Mac
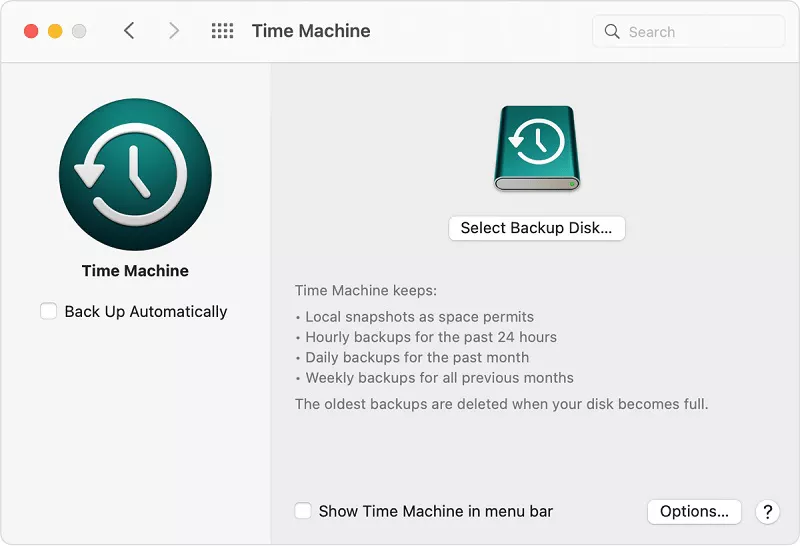
If the First Aid utility doesn't work, you need to delete the unused or duplicate partition. Before doing so, you need to have a backup of your Mac data. With the erase of the volume partition, your data saved on that volume will get deleted. So, to prevent an unexpected deletion of your important data, a backup is prescribed, and we will suggest you take a Time Machine backup and save the data to an external drive like USB, etc. To do so:
- Go to System Preferences from the Apple menu
- Open Time Machine and Select the desired Drive to perform the Time machine backup.
-
When backing up your files on an External Drive, you can Repair the redundant volume by erasing it.

Method 3. Erase the Redundant Volume
- Go to macOS Recovery: Turn on your Mac, then, at that point, press and hold Command + R keys on your keyboard.
- Select a user and enter its password if asked.
- Go to Disk Utility >> Continue from the utility window and click Macintosh HD in the sidebar.
-
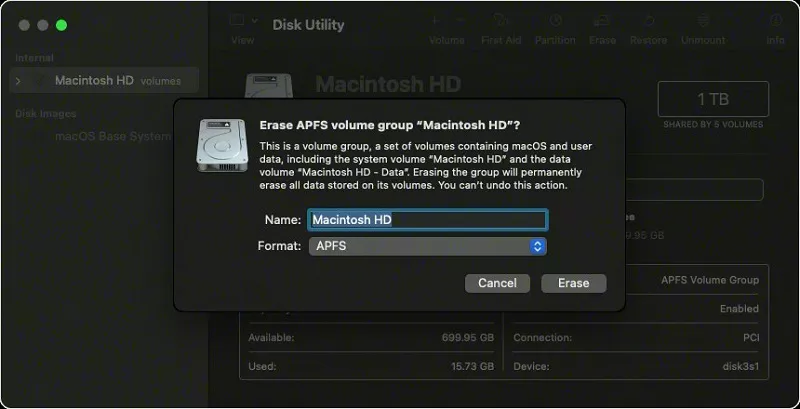
Click the Erase button in the toolbar, then, at that point, enter the following:
- Name: Macintosh HD
- Format: APFS or Mac OS Extended (Journaled)
-
Click the Erase Volume Group button, or Erase

- Enter your Apple ID credentials when asked
- After the Disk Utility is done deleting the volume, you can select other internal volumes in the sidebar and then erase them from your Mac by clicking "Delete Volume."
- During this progression, ignore Macintosh HD or Macintosh HD - Data volumes.
- Stop Disk Utility to get back to the utility window.
- Select Reinstall macOS in the utility window to start up again from the disk you erased. Install macOS by following the on-screen guidelines.
Part 3: How to Recover Volume on Mac with 4ddig mac data recovery
If a problem was detected that the disk macintosh HD can't be unlocked, you might end up erasing that volume. After erasing the redundant volume from your Mac, all your data will be lost. You can also try recovering data from a Time Machine backup. In the absence of a time machine backup, users may face difficulty getting their files back.
If you are in a situation like that, the Tenorshare 4DDiG Data Recovery Software for Mac can be helpful. It is such a Mac recovery tool that uses the patent technology. The software guarantees the best restoration of lost files on any Mac device. You can get back any file type from your Mac hard drive, including pictures, recordings, documents, and that is only the tip of the iceberg. One can also recover files from an external drive using this tool. Besides, this application can reestablish information from a crashed Mac by booting it up. Figure out how to get your data back on your Mac using three simple steps.
Secure Download
Secure Download
-
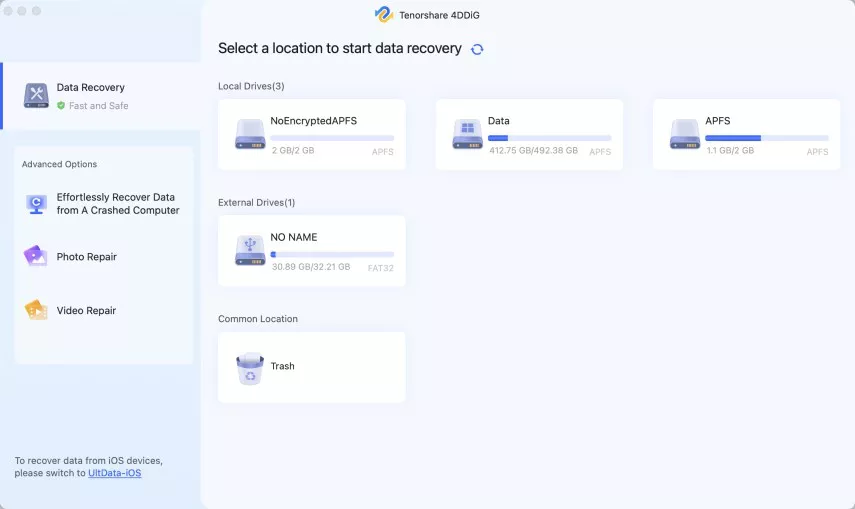
Select a Volume
After installing the Tenorshare 4DDiG Mac Data Recovery Software, launch it on your device and select an area like your hard drive to begin Mac recovering files information recuperation. Then, at that point, click the Scan button to let the tool look for every single lost document on your Mac.

Note:
If you are using macOS High Sierra and later software, you should disable SIP first to permit 4DDiG access to Mac documents.
-
Scan and Preview
The scanning process will take some time to check all erased documents. After the result is created, you can tap on explicit document types to see more files inside of it.

-
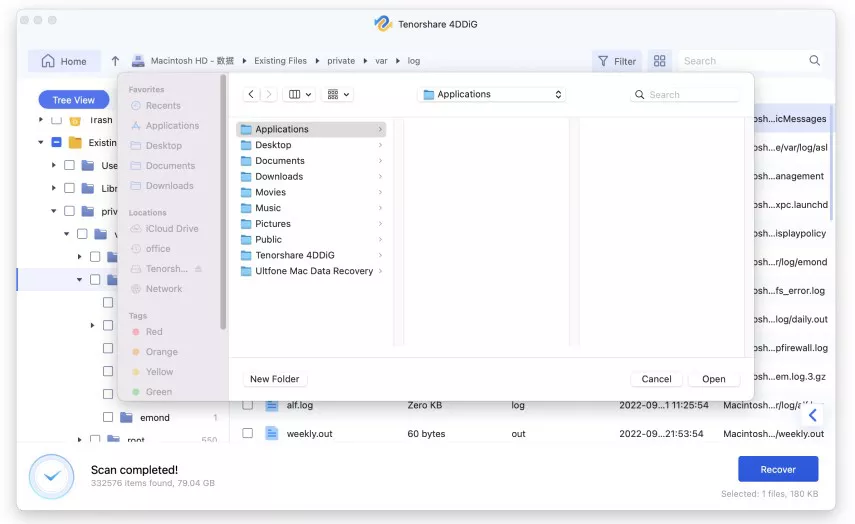
Recover Mac Files
After choosing the ideal files, click the "Recover" button and select an area to save those documents. It is never a good idea to save the restored documents back to the segment where you lost them first. Doing so can create an overwriting or permanent loss of files.
 FREE DOWNLOAD
Secure Download
FREE DOWNLOADSecure Download
The Bottom Line
In this guide, we discussed fixes and disk is locked mac recovery procedure. The "The disk Macintosh HD Can't be unlocked" issue can be disturbing and, therefore, must be taken care of. We hope this article will get you through this error and help you recover any lost files using Tenorshare 4DDiG Mac Data Recovery Software.

 ChatGPT
 Perplexity
 Google AI Mode
 Grok
Grok

