Photos are crucial. You rightly want to conserve and keep them since they record many of your memories, including your most important moments. But before you know it, your Mac's hard drive is clogged with hundreds or even thousands of photographs and you are unaware of how to delete photos on Mac? It's possible that your hard disc is complete, or you want to erase some old images. Regardless of the numerous causes, how to delete images on Mac remains the same. It may be accomplished in various methods, each achieving the same purpose but in various ways. If you're looking for a way to erase images from your Mac's photo library, you've come to the correct spot. This article will teach you how to delete images, save them, and even recover photos you accidentally erased.

- Part 1: Where Are Photos Stored on Mac?
- Part 2: Why Can't I Delete Photos from My Mac?
-
Part 3: How to Delete Photos on Mac?
- Solution 1: How to Delete Photos on Mac Using the Trash Bin?
- Solution 2: How to Delete Multiple Photos From Mac Using Photos App?
- Solution 3: How to Delete All Pictures on Mac?
- Solution 4: How to Delete Photos from Photo Library on Mac?
- Solution 5: How to Delete Albums from Photos on Mac?
- Solution 6: How to Delete Photos on Mac without Deleting from iCloud?
- Part 4: How to Recover Permanently Deleted Photos on Mac? HOT
- Mac Photos FAQs
Video Tutorial on How to Delete Photos on Mac
Secure Download
Secure Download
Part 1: Where Are Photos Stored on Mac?
The Photo libraries hold imported photographs and videos. The photo libraries are then saved to your Mac's Pictures folder. When using images for the first time, you may build a new library or utilize one.
System Photo Library is created from the photo libraries you make. If your images are mistakenly deleted, we don't advocate changing the library content in the Finder. Additionally, while moving or exporting photographs from the photo library, avoid manually altering or accessing the Library in the Finder.
Part 2: Why Can't I Delete Photos from My Mac?
How to delete multiple photos on mac? Search for "delete" in Photos Help (select Help from within the Photos App). Deleting photos is more complex than it used to be; in some instances, COMMAND-Delete, not simply the Delete key, is required. Following this, you can delete photos.
Part 3: How to Delete Photos on Mac?
Solution 1: How to Delete Photos on Mac Using the Trash Bin?
How to delete photos on a mac? Using the trash bin function on a Mac is one of the simplest methods to delete images. Learning takes only a few seconds. Here's how to remove individual photographs and numerous images on Mac and some helpful hints to make the procedure even more accessible.
Step 1: Open a new window in the Finder.
Step 2: Locate the folder containing the image you wish to remove.
Step 3: By clicking and holding the mouse button, you may select a photo.
Step 4: Drag the picture to the Garbage Bin in the lower right corner of your screen.
Step 5: The photo has been moved to the Trash Bin, which will be deleted.
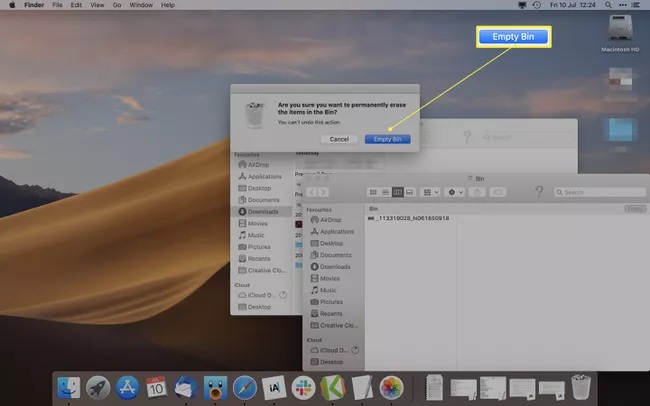
Step 6: You may empty it by right-clicking on the Trash Bin and selecting Empty.
Step 7: To permanently delete the photo and all other objects in the Trash Bin, click Empty Bin.
Solution 2: How to Delete Multiple Photos From Mac Using Photos App?
Using the Images app is another option to erase photos from your Mac. If you're trying to remove images, it's typically a more straightforward technique than searching through your Mac's hard disc. Here's How to delete photos on MacBook air and many photos on your Mac using the Photos program.
Step 1: Launch the Photos application.
Step 2: Go to Photos.
Step 3: Select the image you wish to remove.
Step 4: Hold the Command key down when clicking on photographs to choose several photos.
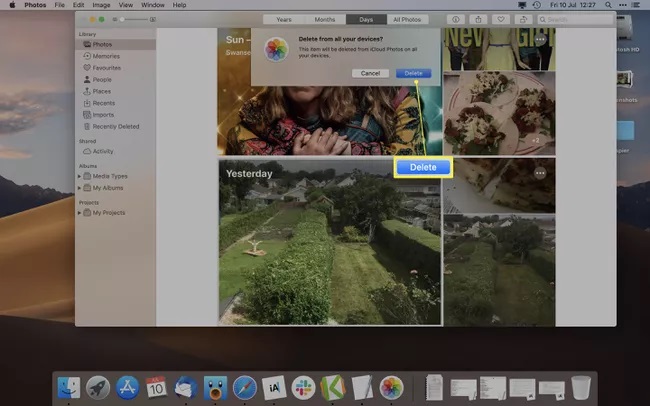
Step 5: Right-click and select Delete Photo or use the Delete key on your keyboard.
Step 6: Choose Delete.
Step 7: Your photos have been removed from your computer and any other devices associated with your iCloud account.
Solution 3: How to Delete All Pictures on Mac?
You may erase all of your photographs from the Photos app and iCloud Photo Library if you desire. It takes a few seconds and does not require you to remove each image individually. It is How to delete photos off mac.
Step 1: Launch the Photos application.
Step 2: Go to Photos.
Step 3: To select all photographs, use Command+A on your keyboard.
Step 4: You may also use the menu bar to select Edit and Select All.
Step 5: Right-click a photo, select Delete x elements, or press Delete.
Step 6: All of the photographs have been transferred to the Recently Deleted folder, and they have been deleted from all other devices connected to your iCloud account.
Step 7: Click Recently Deleted to erase them permanently.
Step 8: Then choose Delete All.
Step 9: Choose Delete.
Step 10: You can not reverse this step, and the photographs will be permanently destroyed.
Step 11: It's critical to realize that removing photographs from the Photos app also removes them from the iCloud Photo Library (should you have that enabled).

Solution 4: How to Delete Photos from Photo Library on Mac?
The Photos program allows you to remove photographs as you go through your photo library on your Mac. To do so:
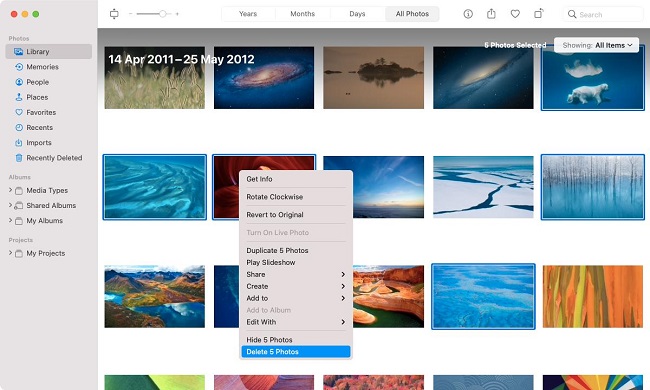
Step 1: Control-click a photo thumbnail in Library> All Photos and select Delete Photo.
Step 2: If you use iCloud Photographs, confirm that you wish to remove the photos from your Apple devices by selecting Delete.
Step 3: You may also choose numerous photographs by holding down the Cmd key. Control-click a selected thumbnail and choose to Delete Photos to delete all of them at once.
Solution 5: How to Delete Albums from Photos on Mac?
On the Mac, removing a picture album from the Photos program is much easier than on the iPhone and iPad. Here is how to delete photos from MacBook air?
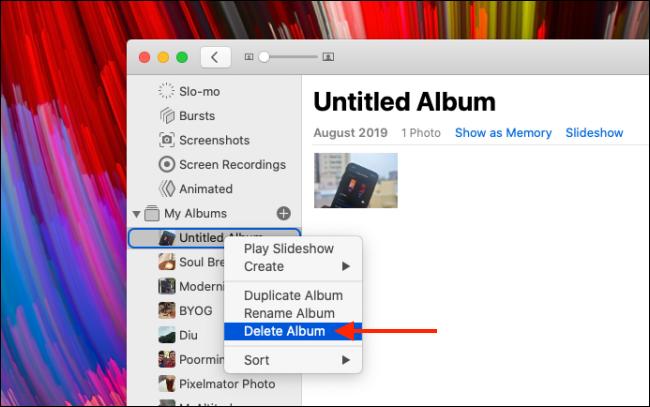
Step 1: On your Mac, open the "Photos" app. Expand the "My Albums" folder on the sidebar now. Find the folder you want to remove and right-click it.
Step 2: Select the album you wish to remove from the My Albums area.
Step 3: Select the "Delete Album" option from the context menu.
Step 4: Then select Delete Album.
Step 5: A pop-up will appear, requesting confirmation. Click the "Delete" button here.
Step 6: To remove the album, click Delete.
Step 7: The album has been removed from your iCloud Photo Library, and the change has been synchronized across all of your devices.
Solution 6: How to Delete Photos on Mac without Deleting from iCloud?
Apple syncs Photos with iCloud storage by default; however, because both devices are linked, removing a picture in your Photos app will automatically erase it on iCloud. The solution, on the other hand, is straightforward.
Step 1: Select System Settings from your Mac's menu bar by selecting the Apple logo.
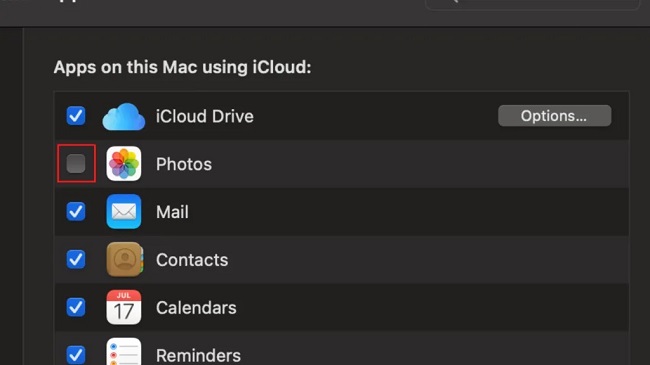
Step 2: On the left, click on the iCloud tab.
Step 3: Uncheck the box for Photos.
Step 4: You may be asked to verify your password by entering it again.
Step 5: You'll remove images on your Mac without removing them from iCloud after this is done.
Step 6: Your Photos app and iCloud are now totally separated, allowing you to delete photos from your Photo app without being destroyed from your iCloud account.
Part 4: How to Recover Permanently Deleted Photos on Mac?
You've now mastered all methods for deleting photos on a Mac. It's possible that you accidentally deleted important photos that you can't recover from recently deleted photos. In this case, you'll need a professional photo recovery tool to help you recover photos that have been permanently deleted. Tenorshare 4DDiG Mac Data Recovery is a powerful yet simple-to-use application that can recover any type of data from your Mac's hard drive or external drives, including photos, videos, audio and documents. Furthermore, it can boot and recover data from crashed Mac. This comprehensive guide will teach you how to recover permanently deleted photos from your Mac.
- Recover any lost files from M1-equipped and T2-secured Macs.
- Recover data from emptied Trash Mac.
- Recover files deleted by accident, formatting, partition loss, corruption, virus assault, and other causes.
- 4DDiG can extract data from various storage devices, including flash drives, hard drives, memory cards, digital cameras, and camcorders.
- 4DDiG supports over 1000 file types and all file systems, including NTFS, FAT, APFS, HFS+, HFS X, etc.
- A quick scan with a free preview to help you quickly locate your misplaced files.
Secure Download
Secure Download
- Select a Location
- Scan the Drive
- Preview and Recover Files
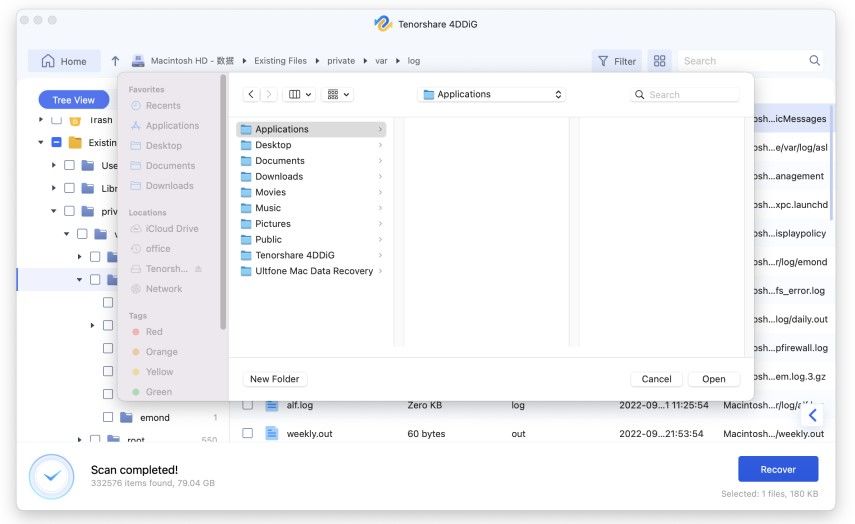
After download and install Tenorshare 4DDiG on your Mac, launch the program and select a location where you permanently deleted photos, then click Scan to proceed.

The scan will begin letting you see all the files that are found. If you can't find the files that you want and want a deeper scan of the drive you can select the 'Deep Scan' option.

Once the Scan is complete, search for the files you want, select them, and click on 'Recover'. Save these files in a secure location on your computer. Make sure that you do not save these files in the same location from where they were deleted as this may cause overwriting of the files.
That's it! That's all it takes to recover your permanently deleted photos using the powerful 4DDiG data recovery.
Video tutorial on how to Recover Permanently Deleted Photos on Mac
Mac Photos FAQs
1. What is the best way to delete photos on Mac?
Select Delete from the drop-down menu by right-clicking on the chosen photos or pressing the Delete key. Confirm the action, and Trash will receive the photographs. To permanently eliminate them, empty them.
2. Is there a faster way to delete photos on Mac?
The best and fastest way is to delete the photo by right-clicking on it and pressing Delete.
3. How to Recover Recently Deleted Photos?
You may restore recently deleted items to your Photos library by viewing them.
Step 1: Click Recently Deleted in the sidebar of the Photos program on your Mac.
Step 2: Choose the objects you'd want to restore.
Step 3: Choose Recover.
Summary
With the above extensive knowledge, you should be able to execute any activities related to how to delete albums from photos on mac, including recovering lost images. To retrieve the recently destroyed images, you must also be familiar with the file location of the photo library on Mac. Finally, the greatest Tenorshare 4DDiG has been supplied for recovering deleted data or photographs, and it will efficiently recover any deleted files on your Mac.
 ChatGPT
 Perplexity
 Google AI Mode
 Grok
Grok
