How to Fix Update Failed in Windows 11 0xc1900101 Error?
The update process for your computer gets severely disrupted when you encounter 0xc1900101 errors which prevent Windows 11 security protection and new features. This error known professionally as the "Windows update 0xc1900101" prevents Windows 11 updates from continuing which traps users in a state of dissatisfaction.
This widespread error affects individuals through various causes which may include driver conflicts and storage shortages as well as file damage. However, the solution will bring tranquility. We will examine error causes while presenting a comprehensive guide to fixing it using five easy solutions that will restore your system's optimal performance.
Part 1: Common 0xC1900101 Error Codes
The 0xc1900101 error brings additional specific codes that identify the update process failures. The error codes function as your pointers for repairing an update failed Windows 11. Microsoft support resources indicate errors with 0xC1900101 initial codes represent problems between drivers however disk space depletion along with hardware flaws can also cause this issue. Understanding Windows 11 update failures requires an examination of usual error codes that reveals their causes and solution methods.
- 0xC1900101-0x20017: This code signals trouble during the boot operation, often because of outdated or incompatible drivers. You might see this when upgrading from an older Windows version to 11. To fix it, update your drivers—especially for critical components like graphics or storage—through Device Manager or your hardware manufacturer’s website before retrying the update.
- 0xC1900101-0x30018: This version suggests a glitch in the first boot phase after the update begins installing. Corrupted system files or incompatible hardware usually cause it. Running a System File Checker scan, which we’ll cover later, can repair those files. Also, double-check that your PC meets Windows 11’s minimum requirements, like TPM 2.0 and Secure Boot.
- 0xC1900101-0x4000D: This error crops up during the second boot phase and often ties back to driver conflicts or insufficient disk space. Freeing up storage on your system drive and ensuring all drivers are current can resolve it. If third-party software like antivirus programs interferes, consider disabling them temporarily during the update.
Part 2: How to Fix Windows 11 0xC1900101 Error
Nobody wants to stare at a failed update screen, especially when it’s the 0xc1900101 error holding things up. Fortunately, you can tackle this problem with five practical methods that address its most common triggers—driver issues, limited storage, and corrupted files. We’ll guide you through each step-by-step so you can fix your Windows 11 update and get back to business.
Way 1. Use the Windows Update Troubleshooter
Microsoft built the Windows Update Troubleshooter to take the guesswork out of fixing update problems like 0xc1900101. This tool scans your system, spots issues like broken update files or settings conflicts, and tries to correct them automatically. It’s a quick first step that can save you from digging into more complicated solutions.
-
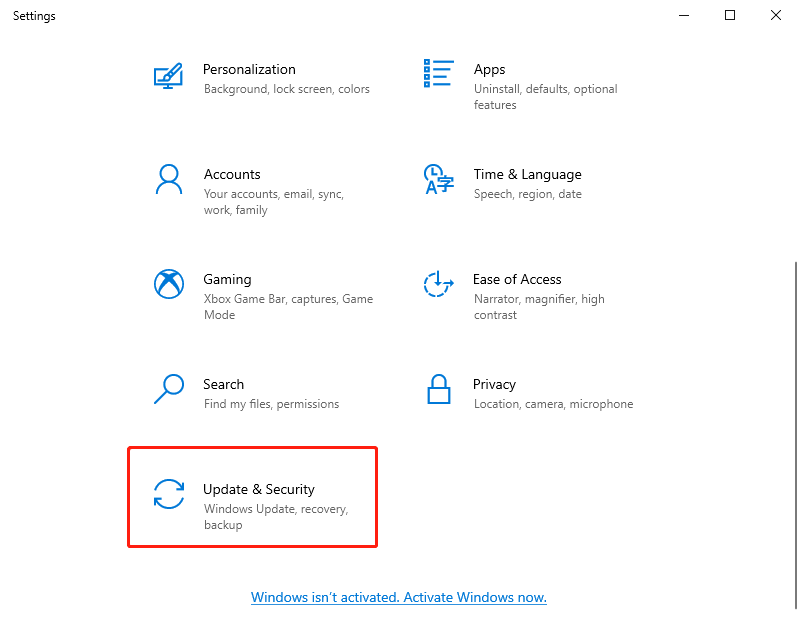
Press the Windows key and the I key together to open the Settings app on your computer and click on Update & Security.

-
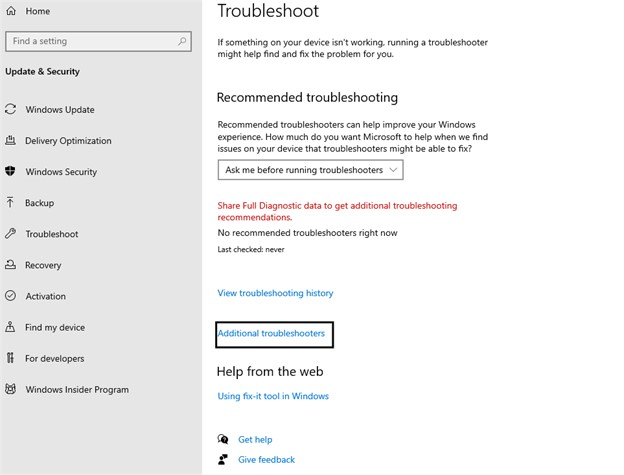
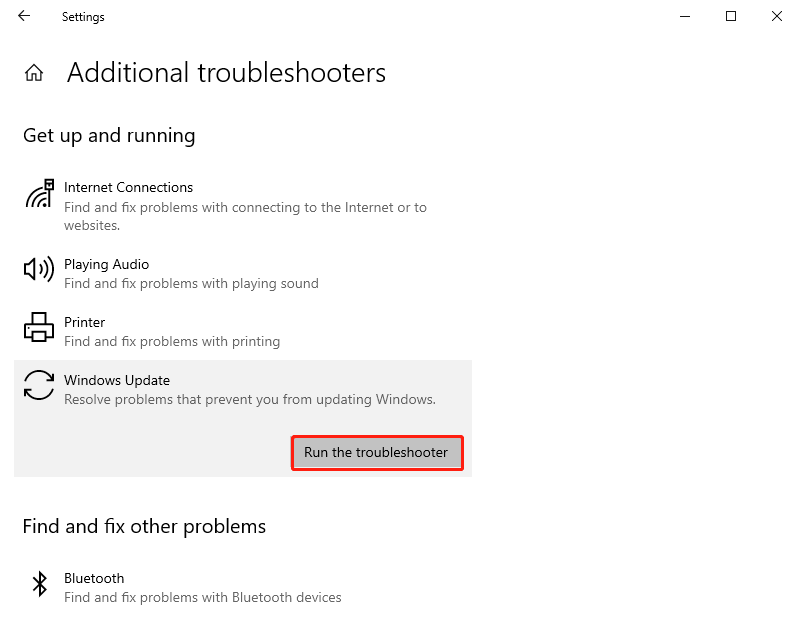
Scroll down to Troubleshoot, and click on Additional troubleshooters.

-
Look for the Windows Update option in the list of troubleshooters displayed on the screen.
-
Click on Windows Update and then select the button that says Run the troubleshooter.

-
Follow the instructions that appear on your screen to let the tool finish its job.
Way 2. Use Disk Cleanup
When your system drive lacks sufficient free space, it causes the 0xc1900101 error to stall a Windows 11 update process. The Disk Cleanup tool enables users to reclaim storage space through file deletion containing unused items like update caches and temporary data. The pending update needs this empty space to operate.
-
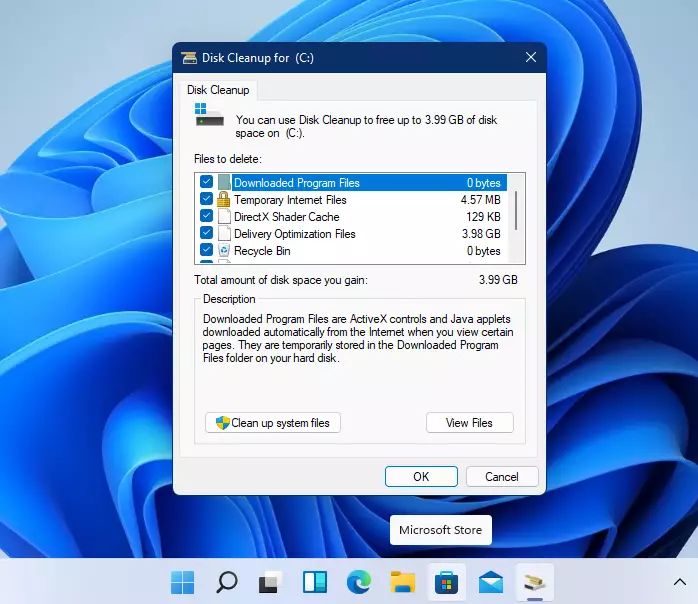
Open Search by pressing Windows key along with S key and type Disk Cleanup to display the Disk Cleanup application.
-
Select the Disk Cleanup from the search results to initiate its launch.
-
Find and select your system drive label C: then proceed with clicking OK.
-
The tool now requires a short time period to determine the potential free space capacity of your storage device.
-
Select the boxes for Temporary files, Recycle Bin and Windows Update Cleanup from the available list.
-
Select Delete Files and click OK to permanently remove the selected items.

Way 3. Update Disk Drivers
The update process may trigger the 0xc1900101 error when mismatched or outdated drivers from disk drives interfere with the installation. You must update these drivers to ensure Windows 11 compatibility which allows for a successful operation.
-
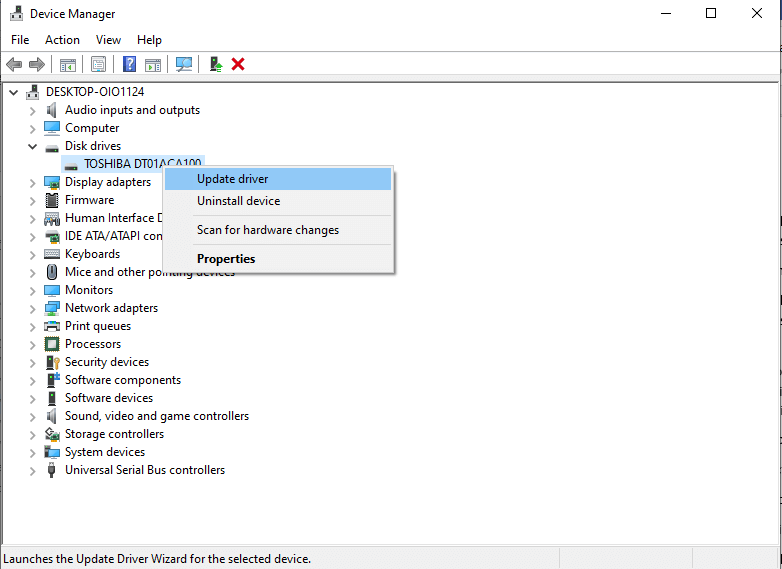
Select Device Manager by right-clicking the Start button at the screen's bottom.
Locate and expand the Disk drives section from the list.
-
Right-click on each disk drive listed there and select Update driver from the options.
-
Pick the option that says Search automatically for updated driver software.
-
Follow any prompts that pop up to install the updates if Windows finds them.

Way 4: Run SFC Scan to Fix 0xC1900101 Error
Corrupted system files can derail updates and bring up the 0xc1900101 error without warning. The System File Checker, or SFC, scans your computer for these damaged files and repairs them, restoring order so the update can proceed.
-
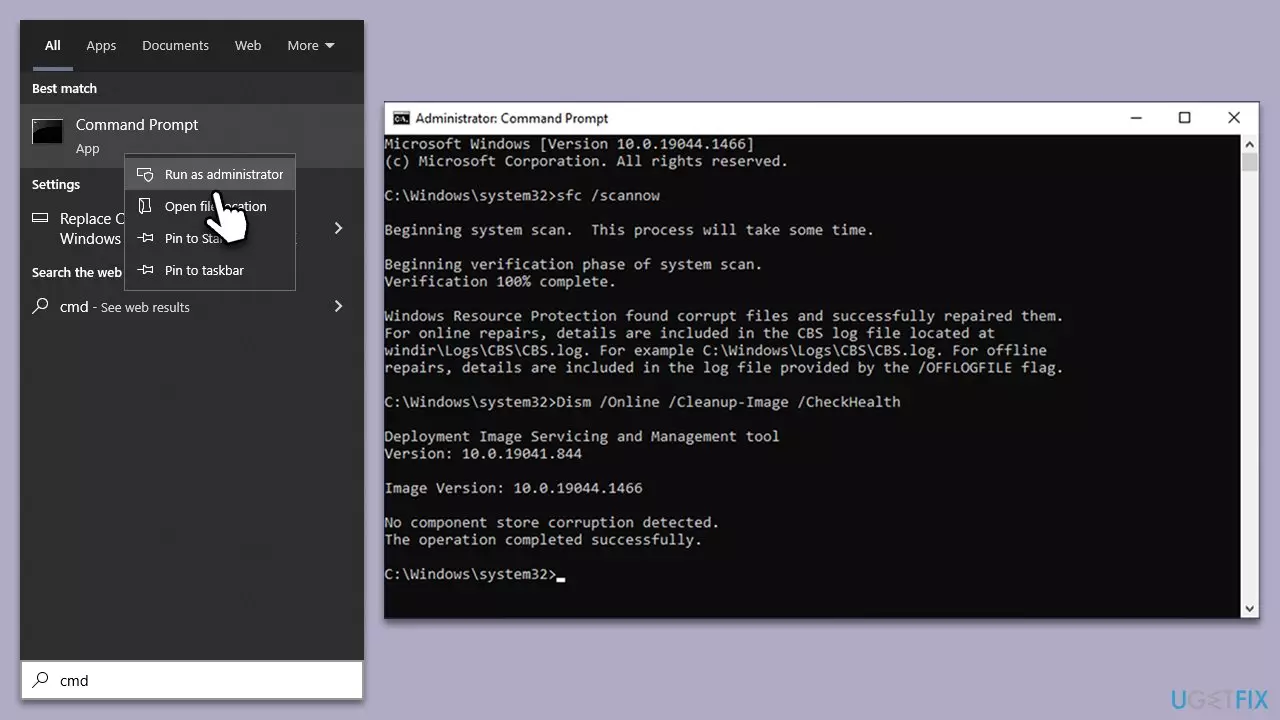
Press the Windows key and S key together, then type cmd into the search field.
-
Right-click on Command Prompt in the results and select Run as administrator to open it with full privileges.
-
Type sfc /scannow into the Command Prompt window and hit the Enter key to start the scan.
-
Sit tight while the tool checks your system files, which might take 10 to 20 minutes depending on your computer.
-
Watch for a message when it finishes—if it finds problems, it will fix them automatically.

Way 5: Check Your Storage Space
Windows 11 demands plenty of free space—64 GB at minimum—to install updates without hiccups. If your system drive falls short, the 0xc1900101 error can pop up as a result. Checking and managing your storage ensures the update has the room it needs.
-
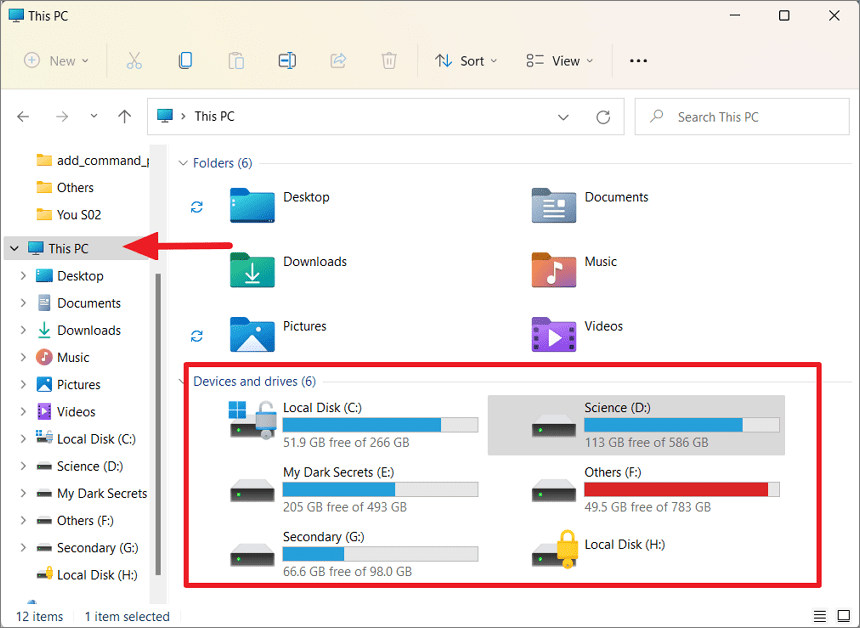
Press the Windows key and E key together to open File Explorer on your screen.
-
Click on This PC in the left sidebar to see your drives and their details.
-
Look at the system drive, typically C:, and note how much free space it shows under its name.

Extra Tip: Backup System Before Update
Before you dive into any major Windows update, backing up your system is a smart move to avoid losing data if something goes wrong. Cloning your OS disk or backup your system with a tool like 4DDiG Partition Manager creates an exact backup of your drive, giving you a safety net. This way, you can restore everything easily if the update fails or causes issues.
4DDiG Partition Manager is an all-in-one tool that simplifies disk management and backups. It offers a range of features to keep your system safe and optimized:
Features
- Migrates Windows OS to an SSD with one click, no reinstallation needed.
- Clones your entire hard drive to back up data or upgrade to a bigger drive without losing anything.
- Creates a WinPE bootable disk to clone or fix a computer that won’t start.
- Repairs, recovers, and restores partitions from your PC or other storage devices.
- Checks if your PC can upgrade to Windows 11 for free and bypasses requirements with one click.
Steps to backup your system with 4DDiG Partition Manager:
-
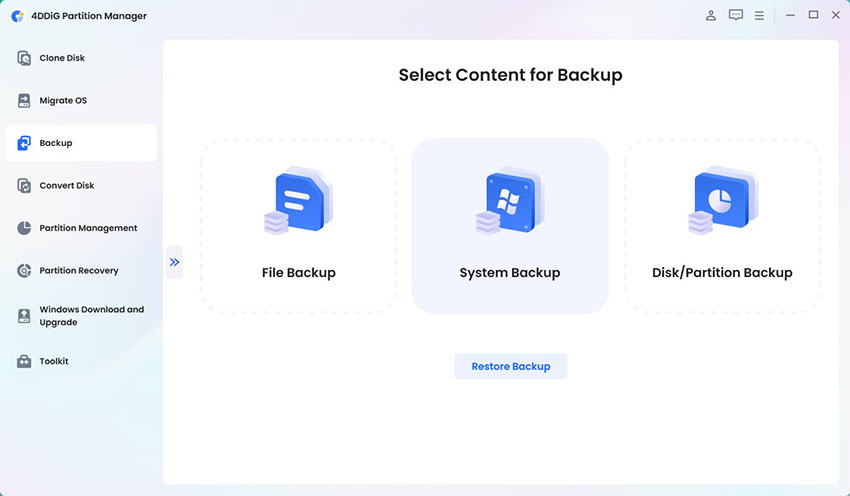
Connect your target SSD to your computer and open 4DDiG Partition Manager, then in Backup section select System Backup.

-
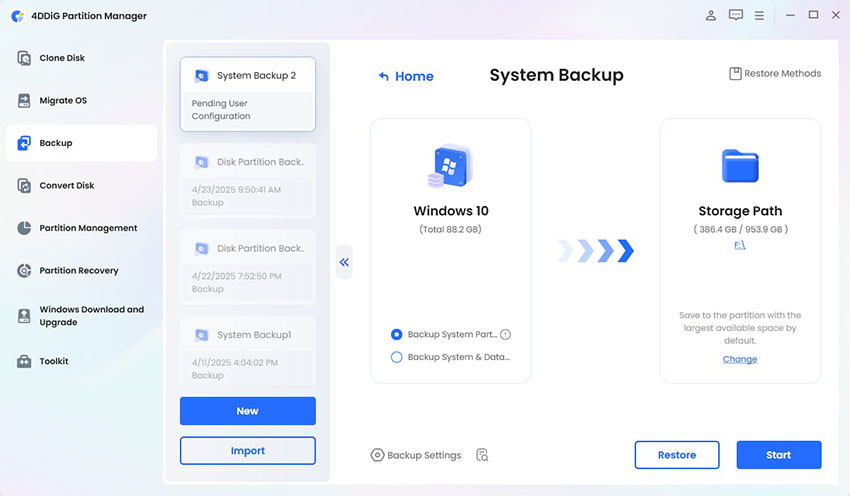
Choose to backup system partition or the whole data, and select a place to store the backup. Click Start.

-
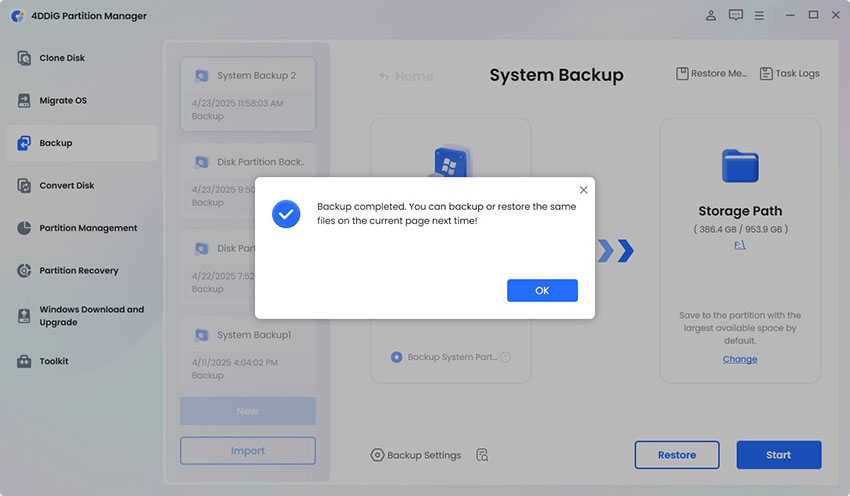
Once done, you have your system backuped. Click ok to go back to the software.

Conclusion
Dealing with the 0xc1900101 error doesn’t have to ruin your day or leave your Windows 11 system outdated. This article has armed you with five solid methods—running the Windows Update Troubleshooter, using Disk Cleanup, updating disk drivers, performing an SFC scan, and checking storage space—to knock out the error and get your update installed.
Each approach targets a common cause, from driver conflicts to cramped drives, giving you a clear path to success. On top of that, backing up your system with 4DDiG Partition Manager before you start adds an extra layer of protection, ensuring your data stays safe no matter what happens. Don’t let the 0xc1900101 error stop you—take these steps, keep your system current, and enjoy the security and features Windows 11 has to offer.
 ChatGPT
 Perplexity
 Google AI Mode
 Grok
Grok

