How to Screen Record on Mac? 4 Easy & Quick Ways
Learn how to screen record on MacBook effortlessly in this guide and overcome the common issue with recorded video not playing on Mac by utilizing 4DDiG File Repair.
Are you a student or a professional looking to learn how to screen record on MacBook for school, office work, or content creation? If yes, you’re in the right place. The screen recording feature on MacBook allows you to capture and record on-screen activities for sharing purposes.
In this quick guide, we’ll provide step-by-step instructions to record a Mac screen in four ways. But that’s not all! We’ll also share a bonus tip to help you overcome the common issue with recorded video not playing on Mac. So let’s get the full scoop below!
Way 1. Screen Record on Mac via Screenshot Toolbar
Utilizing the pre-installed screenshot toolbar on Mac is the easiest way to capture your MacBook screen if it runs on macOS 10.14 or later. This convenient tool allows you to screen record with internal audio as well as audio from your microphone. However, it does have certain limitations such as not saving the file in a format other than MOV, and lacking post-recording editing features.
Nonetheless, it remains a solid option for screen recording. Let's see how to screen record on mac with audio using the screenshot toolbar:
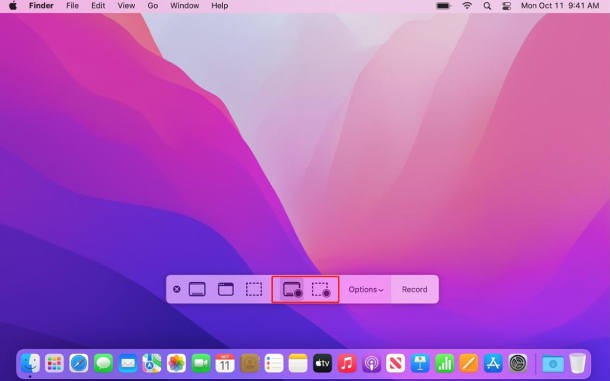
- Press "Command+Shift+5" to open the screenshot toolbar at the bottom of the screen.
-
To capture the entire screen, choose “Record Entire Screen.” If you prefer to record a specific area, select “Record Selected Portion” and choose the desired region to capture by dragging and re-sizing the frame of the screen area.

-
Before you start recording, click on the Options button on the toolbar. From there, choose “Built-in Microphone” to include your voice or audio while screen recording. Additionally, you can customize other settings such as the timer, storage location, and more.
-
Click the "Record" button to start the screen recording. When you're finished recording,click on the Stop icon at the top-right side of the menu bar or simply press “Command + Control + Esc” to end the recording.


The screen recording will be automatically saved as a .mov file in your specified location on your Mac.
Way 2. Record Screen on Mac with Audio Using QuickTime Player
If your MacBook runs on an older macOS version or the screenshot toolbar isn't functioning, you can rely on the Quick Time record screen with audio. QuickTime Player is a versatile application that not only allows you to play videos but also includes built-in screen recording capabilities. With QuickTime Player, you can easily record your screen along with audio, whether it's for creating tutorials or sharing presentations.
Here are the steps to use QuickTime to record screen on Mac:
-
Open QuickTime Player. In the menu bar, click on "File" and select "New Screen Recording" from the drop-down menu.
-
Choose Internal Microphone by clicking the arrow next to the Record button.
- To start recording the entire screen, simply click anywhere on the screen. Alternatively, you can drag to select a specific area to record, and then click "Start Recording" within that selected area.
-
Once you are done with recording, click the Stop button in the menu bar, or press “Command + Control + Escape” to end the recording. QuickTime will open the recorded video automatically.


Way 3. Record Screen on Mac via Chrome Extension
You can use a Chrome extension if you don't want to use Quick Time player or the screenshot toolbar to capture your Mac screen. "Awesome Screenshot & Screen Recorder" is a handy browser add-on that allows you to capture your Mac screen with internal and external audio. Additionally, it offers features like capturing web pages and recording videos using a camera.
This extension integrates with popular platforms such as Trello, Slack, Asana, and Jira, and provides easy sharing options through links or direct saving to your local disk. It supports up to 20 videos and 100 screenshots, with a maximum resolution of 4K. Here's how to screen record on Mac with audio using Awesome Screen Recorder:
- Open Chrome on your Mac, search for Awesome Screenshot & Screen Recorder in the Chrome Web Store, and click "Add to Chrome" to install the extension.
- Launch the extension by clicking the extension icon on the Chrome toolbar. Then select "Record."
- Select the "Desktop" option and adjust the microphone and system sound volume according to your preferences. Additionally, you can set the desired video quality for your screen recording.
-
Once you've done the setting, simply click the "Start Recording" button to initiate the screen recording on Mac.
- To end the recording, click "Stop" and download the recording locally in MP4 format. Or you can further share it through a link.

Way 4. Record Screen on Mac via Third-Party Screen Recorder
If you're looking for more advanced screen-capturing features on your Mac, consider using a third-party screen recorder like OBS Studio. It's particularly useful for professional live streams and footage recordings. What sets OBS Studio apart is its advanced video and audio features, multiple input recording options for both audio and video, and multiple output options.
It's free and open-source and is compatible with various platforms. However, it offers no video editing features and can be a bit complicated for beginners. But it's more than perfect for those seeking enhanced functionality in their screen recording endeavors.
- Go to the OBS website and download the software on your Mac.
-
Launch OBS Studio, click "+" under the "Sources" section, and choose "Display Capture" from the menu.
-
Provide a name for your recording and click OK to proceed.
-
Now choose your display and capture methods. If you have multiple displays connected, choose the one you want to record from the drop-down menu labeled "Display." If you don't want to display the cursor in the recording, uncheck the box next to "Show Cursor." Once you are done, click OK.
-
OBS will capture sound from your mic by default. In the "Mixer" tab, you can adjust the audio levels by dragging the sliders to ensure the desired audio input is captured correctly.
-
Once you have configured the settings, click on the "Start Recording" button at the bottom right of the interface. OBS Studio will begin recording your screen with audio.


To end the recording, simply click "Stop" in the OBS window and that's it!
FAQs related to MacBook Screen Recording
Q1: How long can a Mac record video?
It depends on factors like the storage space and processing power of your Mac and the recording software you use for screen capture. But in general, a Mac can record videos of any length if there is sufficient storage space for the file size.
Q2: Where do videos go when recorded on Mac?
The actual location may vary based on your Mac settings or the recording software you use. But typically, recorded videos on a Mac using built-in tools like screenshot utility or QuickTime Player are usually saved in the "Movies" folder on the local disk.
Q3: Why can't Mac screen record with audio?
Capturing internal audio in Mac requires accessing the system's audio output, which poses security risks. That's why the Mac's built-in tools lack native support for screen recording with audio. To overcome this limitation, users often turn to third-party screen recording software that can record screen with internal audio.
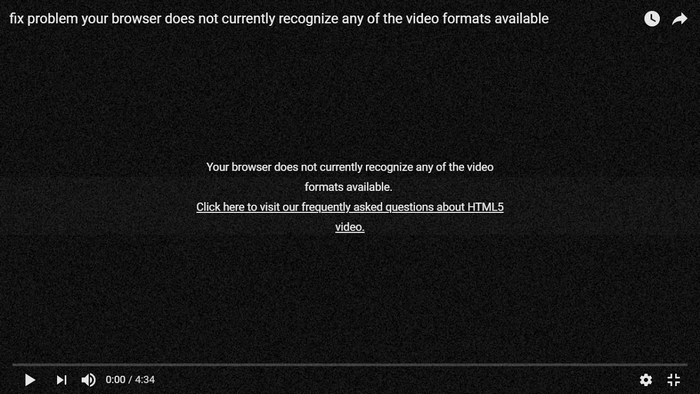
Bonus Tip: How to Fix Screen Recorded Video Not Playing on Mac?
There are times when you finish recording a video of your Mac screen, only to discover an issue with the screen-recorded video not playing on Mac. This can be incredibly perplexing and frustrating. However, there is a highly effective solution available: 4DDiG File Repair. This tool eliminates the need for inconvenient re-recording, especially for live streams or other content that cannot be replicated.
With 4DDiG File Repair, you can fix corrupted videos easily and quickly. Here’s what more it can do:
- Repair corrupted, broken, and damaged videos in various formats, including MOV, MP4, MKV, and more.
- Batch repair videos of multiple formats simultaneously.
- Compatible with all Mac-based storage devices, including SD cards, hard disks, and USB drives.
By following a few simple steps, you can potentially resolve the issue and get your screen-recorded video to play properly on your Mac.
![]() Secure Download
Secure Download
![]() Secure Download
Secure Download
-
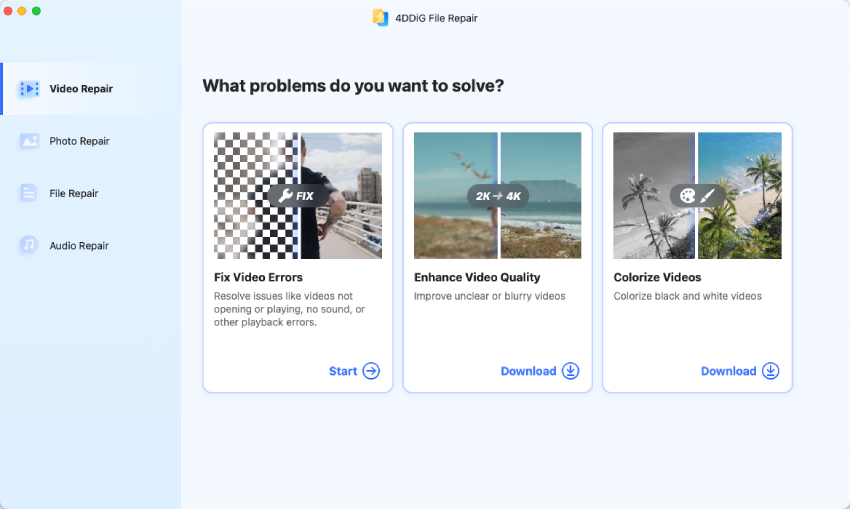
Download and launch 4DDiG File Repair on your MacBook. choose the "Fix Video Errors" option and click "Start," which will lead you to the repair interface.
-
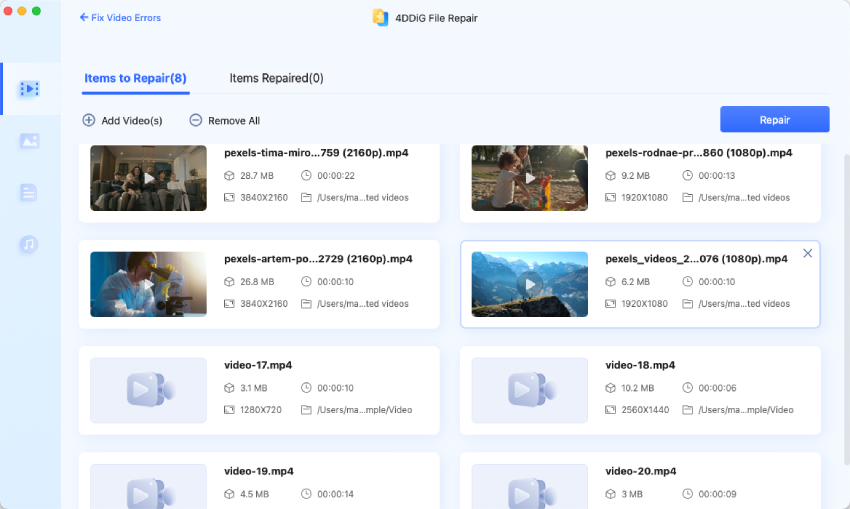
Upload the screen recorded videos that are not playing correctly on your Mac and click "Repair." 4DDiG File Repair will start repairing the corrupted recordings.
-
After the repair is complete, review the repaired videos by clicking "View Results."
-
If the videos now play correctly, select the ones you want to save and click "Export Selected" to store them on your MacBook.


The Bottom Line
When it comes to learning how to screen record on Mac, we've explored various options above, from using the screenshot toolbar to OBS studio for screen capture. However, if your recorded video is unplayable, there's a powerful solution: 4DDiG File Repair. It can repair corrupted videos and restore documents and audio files to their original format. So, next time you face any screen recording unplayable challenges on your Mac, consider 4DDiG as your go-to solution for reliable and efficient file repairs.