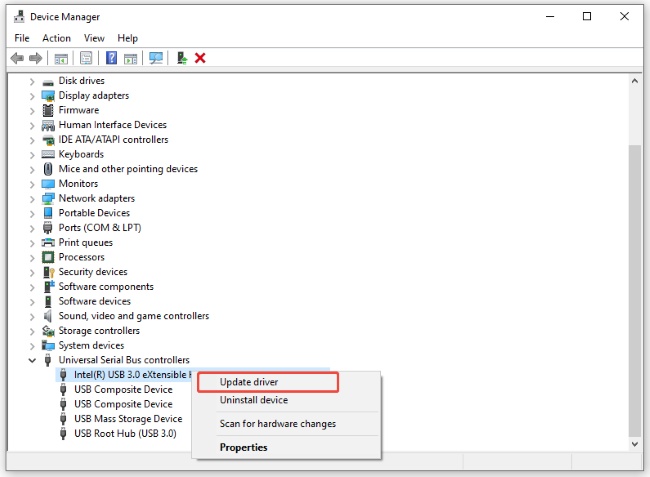
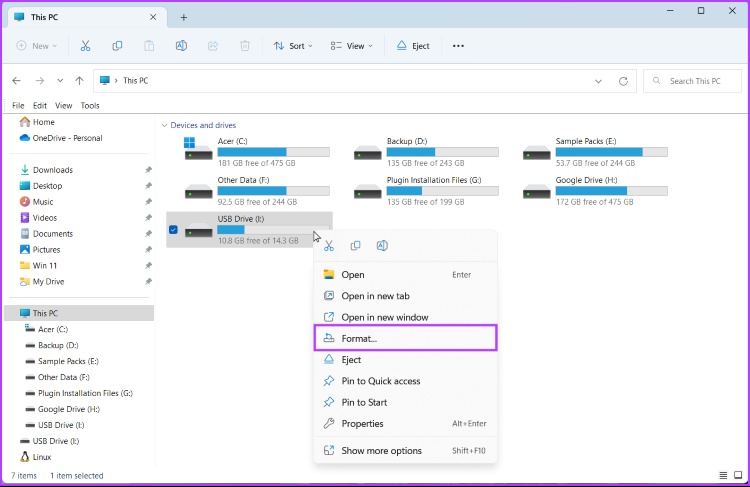
Step-by-Step Guide: How to Safely Eject a USB from Windows 10/11?

5 mins read

Updated on 2026-05-08 16:23:34 to USB Recovery

Many users simply pull out their USB drives without thinking twice, but that habit can lead to data corruption or even device damage. In such cases, if you don't know how to eject a USB from Windows properly, you're not alone. Whether you're using Windows 10 or Windows 11, safely removing your USB device is essential. Let’s discuss the safest methods and what to do if your USB refuses to eject.

Why You Should Properly Eject a USB from Windows?

Before learning how to eject a USB from Windows 11 or Windows 10, it’s important to understand why this step matters. Many users underestimate the risks of unplugging a USB drive directly.

Here are the key reasons you should always eject your USB safely:

  • Prevents data corruption by ensuring all read/write processes are completed before removal
  • Protects your files from becoming damaged or inaccessible
  • Avoids file system errors that can make your USB unreadable
  • Stops background processes that may still be using the USB drive
  • Extends the lifespan of your USB storage device
  • Ensures system stability by avoiding unexpected hardware interruptions

Even if your USB seems idle, Windows may still be transferring data in the background. That’s why properly ejecting is always the safest approach.

How to Safely Eject a USB from Windows 10/11?

There are several reliable methods to safely remove your USB device. Below are the most effective ways to follow when learning how to eject a USB drive from Windows 10 or Windows 11.

Method 1: Use the "Safely Remove Hardware" Icon

This is the most common and recommended method for safely removing USB drives. It ensures all processes are stopped before disconnection.

  • Locate the USB icon in the system tray (bottom-right corner of your screen).

  • Right-click on it and select "Eject DataTraveler 3.0".

    eject usb drive from the tray
  • Wait for the message "Safe to Remove Hardware" pop up, then you can physically unplug your USB drive safely.

    safe to remove hardware popup

This method is simple and works for most users trying to understand how to safely eject a USB from Windows 11.

Method 2: Eject USB from File Explorer

Another quick way to remove a USB from Windows 10/11 is through File Explorer, especially if you are already managing files on the USB.

  • Open "File Explorer" on your PC and locate your USB drive under the "This PC" section.

  • Right-click the USB drive and click "Eject" from the menu.

    eject usb from file explorer
  • Wait for confirmation before removing the device

Method 3: Eject USB via Taskbar Settings

Sometimes the USB eject icon may be hidden in the taskbar overflow area, making it less visible at first glance. Accessing it through taskbar settings ensures you can still safely remove your device without searching extensively. This method is useful for users who want better control over system tray icons.

  • Right-click the taskbar when your USB is connected to the PC and choose "Taskbar settings”.

  • Go to the "Personalization" window and click "Select which icons appear on the taskbar" in the settings.

    select which icons appear on the taskbar
  • Make sure that the option “Safely Remove Hardware and Eject Media” is enabled.

    safely remove hardware and eject media in taskbar
  • When this option is enabled,

This method ensures that you don’t miss the icon when it’s not directly visible.

Method 4: Use Disk Management

Disk Management is a built-in Windows utility that allows you to manage storage devices at a deeper system level. It provides an alternative way to safely remove USB drives when standard methods are not working. This method is particularly helpful when dealing with stubborn or unresponsive devices.

  • Press “Windows + X" and select "Disk Management," then locate your USB drive in the list.

    eject usb drive from disk management
  • Right-click the USB partition and select "Eject," then wait a few seconds before unplugging.

This method is useful for advanced users or when other methods fail.

What to Do If You Can't Eject a USB on Windows 10/11?

Sometimes, Windows prevents you from ejecting a USB drive. If you see errors or nothing happens, don’t forcefully unplug them. Instead, follow these fixes.

Fix 1: Close Programs Using the USB Drive

The issue occurs because some applications are still accessing files on the USB. Even background processes can prevent safe removal. Tips to fix:

  • Close all File Explorer Windows.
  • Check if any files stored on the USB are open.
  • Exit related applications (e.g., Word, Photos, Media Player).
  • If unsure, press "Ctrl + Shift + Esc" to open Task Manager and end processes that may be using the USB.

After closing everything, try ejecting the USB again.

Fix 2: Check "This device is currently in use" Error

This error appears when Windows detects active usage of the USB drive. It usually means a background process hasn’t finished.

In most cases, waiting a few minutes allows the system to complete pending tasks. If the problem continues, restart your computer and then attempt to eject the USB again. This often resolves temporary system locks.

Fix 3: Restart Windows Explorer

Windows Explorer controls file operations and device interactions, so any glitch in it can prevent USB ejection. Restarting Windows Explorer refreshes system processes and clears temporary issues affecting device management. This is a quick fix that often resolves the problem without restarting your entire computer.

  • Press "Ctrl + Shift + Esc" to open Task Manager and find “Windows Explorer” in the list.

  • Right-click it and select "Restart," then wait for the system to refresh and try ejecting the USB again afterwards.

    restart windows explorer in task manager

This method clears temporary system issues quickly.

Fix 4: Use "Process Explorer" to Find Locking Apps

If you still can’t eject your USB, a hidden process may be locking it. Microsoft’s Process Explorer can help identify it.

  • Download Process Explorer from Microsoft's official site.

  • Open the tool as admin by right-clicking it and choosing "Run as Admin," then press Ctrl + F and search for your USB drive name to identify which process is using the USB.

    use process explorer to find locking apps
  • End the process safely by right-clicking the handle and choosing the "Close Handle" option to release the file.

  • Try ejecting the USB again.

This method is powerful for advanced troubleshooting.

⚡ When USB Still Can't Be Ejected: Try a Data Recovery Tool

If your USB still cannot be safely ejected after these steps, there could be potential data risks due to software glitches or disk corruption. In such cases, it’s important to secure your files before taking further action.

4DDiG Windows USB Data Recovery can recover lost or inaccessible files from USB drives, even when they are not functioning properly. It works especially well if improper removal has already caused data issues. So, even when your USB is not readable by the OS, 4DDiG can help you recover all the important files from it.

FREE DOWNLOAD

Secure Download

FREE DOWNLOAD

Secure Download

  • Download and install 4DDiG on your PC. Connect the USB that is not readable on your PC and start the 4DDiG software. Now, in the "Hard Drive" section, click the USB to begin scanning it.

    launch 4ddig and enter interface
  • When the scanning is complete, you can choose different “Filters” to easily locate the files you want.

    click type to see all files 4ddig
  • Click on a recoverable file to get a quick preview and see its contents. If you are satisfied with the preview, click the "Recover" button. Other than this, there is no way to check the contents of an unreadable USB with such ease.

    preview and recover the files
  • Choose a safe location other than the USB to save these recovered files and click “Save Now”. Now, you have the files saved on your PC, which were once inaccessible in your unreadable USB drive.

    save the recoverable files

Alternative Ways to Safely Remove a USB Without Ejecting

If you want a more convenient way, there are alternative methods to safely remove USB devices without manual ejection every time.

Adjust USB Device Settings in Device Manager

Windows allows you to enable a "Quick removal" policy, which reduces the need to eject manually.

  • Press Windows + X and select "Device Manager," then expand "Disk drives."

  • Right-click your USB device and select "Properties."

    click properties of the usb drive
  • Go to the "Policies" tab and select "Quick removal," then click OK to save.

    select quick removal under removal policy

This setting allows safer direct removal but may slightly reduce performance.

When Is It Safe to Unplug Directly?

With "Quick removal" enabled, you can unplug the USB without ejecting, but only when no files are being transferred. Always make sure:

  • No files are open.
  • No copying or moving operations are running.
  • The USB activity light is not blinking.

Even with this feature, it’s still safer to eject manually when possible.

FAQs

Q1: Can I unplug a USB without ejecting it?

Yes, but only if no data is being transferred and Quick removal is enabled. Otherwise, unplugging directly can lead to data corruption or file loss.

Q2: What does device is in use mean?

This message means a program or background process is still accessing the USB drive. You need to close those processes before safely ejecting the device.

Q3: What is the shortcut key for ejecting a USB?

There is no universal shortcut key, but you can access File Explorer using Windows + E and eject the USB from there quickly.

Q4: Where is the eject button on a PC?

The eject option is usually found in the system tray as the Safely Remove Hardware icon or by right-clicking the USB drive in File Explorer.

Conclusion

Understanding how to eject a USB from Windows properly is essential for protecting your data and maintaining device health. Whether you use the system tray, File Explorer, or advanced tools, safely removing your USB ensures no background processes are interrupted.

If you encounter issues or suspect data loss, tools like 4DDiG USB Data Recovery can help recover your files quickly. Following these best practices will keep your USB devices and data safe every time.

FREE DOWNLOAD

Secure Download

FREE DOWNLOAD

Secure Download

William Bollson (senior editor)

William Bollson, the editor-in-chief of 4DDiG, devotes to providing the best solutions for Windows and Mac related issues, including data recovery, repair, error fixes.

(Click to rate this post)

You rated 4.5 ( participated)