Losing a file can be a very painful experience. It can be especially frustrating if the file is important and you don't have a backup. Losing a file can mean losing important work or even losing memories. The file may contain your important documents or your precious photos. It may also contain your university data or assignments that you have to deliver urgently. Whatever the case, it is always unpleasant when you accidentally delete or lose an important file. If you've accidentally deleted a file on your Mac and then realized you needed it, you know how frustrating it can be to recover it. Thankfully, there are a few ways to try and get your files back without using any software. In this article, we'll show you how to recover deleted files on mac without software. Keep reading to find out more!
- Part 1: Where Do Deleted Files Go on Mac?
-
Part 2: How to Recover Deleted Files on Mac Without or With Software?
- Solution 1: Recover Deleted Files from the Trash Bin Folder
- Solution 2: Restore Deleted Files via Undo Option
- Solution 3: Retrieve Deleted Files using Terminal
- Solution 4: Deleted Files Recovery form Time Machine
- Solution 5: Find Deleted Files Back with iCloud Drive
- Solution 6: Recover Deleted/Lost Files on Mac with Tenorshare 4DDiG (When Free Recovery Methods Doesn't Work)HOT
- Part 3: How to Protect Files on Your Mac?
- Frequently Asked Questions on Deleted Files Recovery on Mac
Part 1: Where Do Deleted Files Go on Mac?
Deleted files on your Mac don't disappear immediately. The file is now in the Trash, which will stay for 30 days until you empty it. As a result, deleted files sometimes reappear in the Trash when you open them. When you permanently delete a file on your Mac by bypassing the trash folder, it doesn't just disappear into thin air. It is still stored on your hard drive but is now marked as "inaccessible" and not visible in the Finder. The file's space on your hard drive is now considered "free" and can be overwritten by new data. With the right tools and methods, deleted files that have not been overwritten yet have a chance to be fully recovered. In the case of Mac users experiencing the heartbreaking loss of a priceless file, knowing the file deletion basics is quite important. It's time to recover deleted Mac files files with confidence!

Part 2: How to Recover Deleted Files on Mac Without or With Software?
There are many ways to recover deleted files on Mac. Some are more effective than others, and some require the use of third-party software. We will present some general methods for reference.
Solution 1: Recover Deleted Files from the Trash Bin Folder
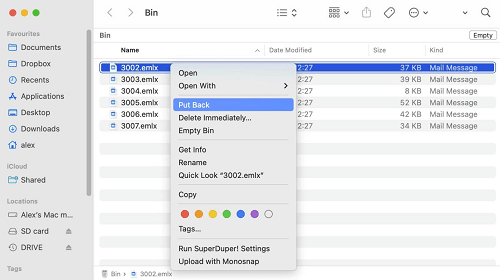
The first thing you should do when you realize a file is missing is check the Trash. Sometimes, we accidentally delete files and then empty the trash without realizing it. You might be thinking how to recover deleted files from Trash Mac without software. If the file is in the Trash, you can easily recover it by going into the trash folder and right-clicking on the file that you want to recover and selecting "Put Back" option.

Solution 2: Restore Deleted Files via Undo Option
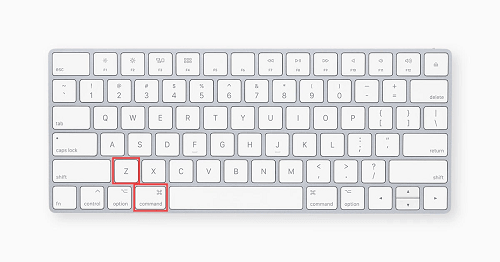
In macOS, the Command-Z keystroke combination can be used to retrieve a recently deleted file. Press Command-Z to undo your last action if you have just deleted a file by mistake. If you don't act quickly, the possibility of recovering the file on your Mac decreases with each subsequent action you take. The effort is worth trying, but refrain from getting frustrated if the file is not restored. The important thing to remember is that this method will not reverse the trash bin removal process. As soon as the Trash is empty, you will only have two options for recovering: using a backup or using third-party software.
Solution 3: Retrieve Deleted Files using Terminal
If you are still searching about how to recover permanently deleted files mac without software then this this solution may work for you. The purpose of this solution is essentially to provide access to files that reside in the Trash Bin in another way. After you have emptied the Trash, you can restore your data using the recovery methods that utilize your backups. You can streamline and simplify the following procedure by using the Put Back option within the Trash Bin.
Step 1: Launch the Terminal application on your Mac.
Step 2: Go to the Trash folder by entering the command cd .Trash and pressing Return.
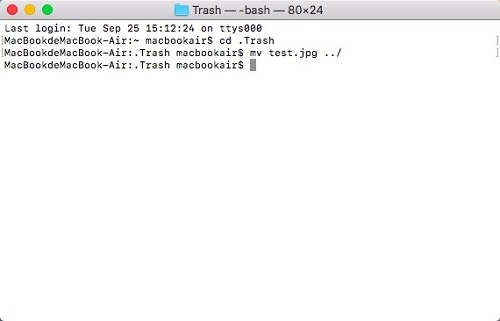
Step 3: You can recover files with this command by typing mv xxx.xxx ../, where xxx.xxx represents the full filename and extension.
Step 4: Press the Return key.
Step 5: Close Terminal by typing Quit.
Step 6: Verify the file has been successfully moved by opening the Finder window or browsing to your home folder.
Solution 4: Deleted Files Recovery form Time Machine
If you have deleted files permanently from trashbin also then you might be thinking how to recover emptied trash on mac without software. If you have a Time Machine backup, you can use it to get your lost data back. Time Machine is a handy backup feature that comes with every Mac. You can use it to create regular backups of your entire system, including apps, documents, music, photos, and videos. If you've accidentally deleted a file or folder, you can use Time Machine to restore it.
Here's how:
Step 1: Navigate to the Folder that contains the lost data and open it in a Finder window. The Finder in the Pictures folder can be opened if a file was deleted from it.
Step 2: In System Preferences, you can choose Time Machine or click on the clock icon on the menu bar.
Step 3: Browse the local snapshots and backups by using the arrows and timeline.
Step 4: You can restore one or more items by selecting them and clicking Restore.
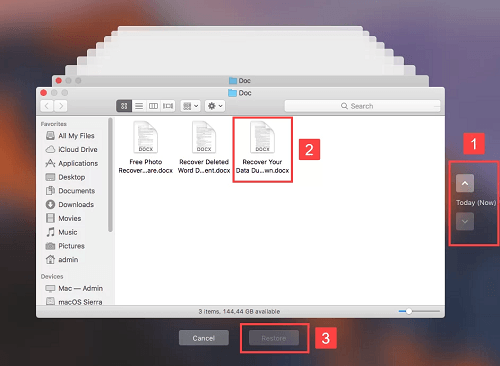
So this is how to recover permanently deleted files mac without software. The drawback of this method is that you can only use it if you have a Time Machine backup. If you don't, you'll have to use one of the other methods on this list.
Solution 5: Find Deleted Files Back with iCloud Drive
With your iCloud Drive, your Mac has direct access to Apple's cloud storage solution, iCloud. Items from specified folders, such as Documents and Desktop, can be automatically stored on the drive. iCloud Drive automatically backs up your files. Any device with an Internet connection can be used to recover them. You can recover deleted files from iCloud if you delete them.
Here is how to do it:
Step 1: Log in to iCloud.
Step 2: You can find the recently deleted files in iCloud Drive by clicking the Recently Deleted button at the bottom of the window.
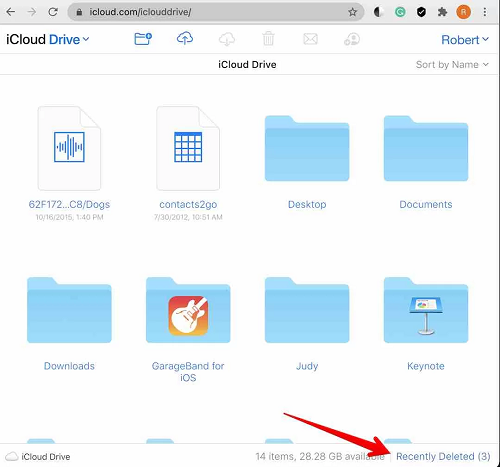
Step 3: The next step is to click Recover All or select the items you want to restore and click Recover..
By following these steps, you will be able to easily recover your files from iCloud drive. The only drawback of this method is that it only works for files that have been deleted within the last 30 days. Any files deleted before that will be permanently lost.
Solution 6: Recover Deleted/Lost Files on Mac with Tenorshare 4DDiG (When Free Recovery Methods Doesn’t Work)
As you can see, there are quite a few ways that you can try to recover your lost or deleted files on Mac. However, these methods may not always work as intended and you may not be able to get your files back. In such cases, the best option would be to use a professional data recovery tool like Tenorshare 4DDiG. This software has been designed specifically for data recovery and it comes with a wide range of features that make it the perfect choice for this task. Some of the most notable features of Tenorshare 4DDiG are mentioned below:
- It can recover files from any storage device including external hard drives, USB flash drives, SD cards, etc.
- It supports a wide range of file types including photos, videos, documents, music, etc.
- It comes with a simple and user-friendly interface that makes it very easy to use.
- It comes with a preview feature that lets you preview your files before recovering them.
- No need to turn off SIP.
- High security and fast scanning.
For PC
Secure Download
For MAC
Secure Download
To recover files using 4DDiG, follow the steps given below:
- Step 1: Select a Location
- Step 2: Scan the Location
- Step 3: Preview and Recover Files from the Local Disk
Once Tenorshare 4DDiG Windows Data Recovery is installed and launched, the home interface is shown below, including Data Recovery & Advanced Options. Select the location where your data was lost from a list of hard drives and then click Start. The upper-right corner of the window lets you choose the target file types prior to scanning.

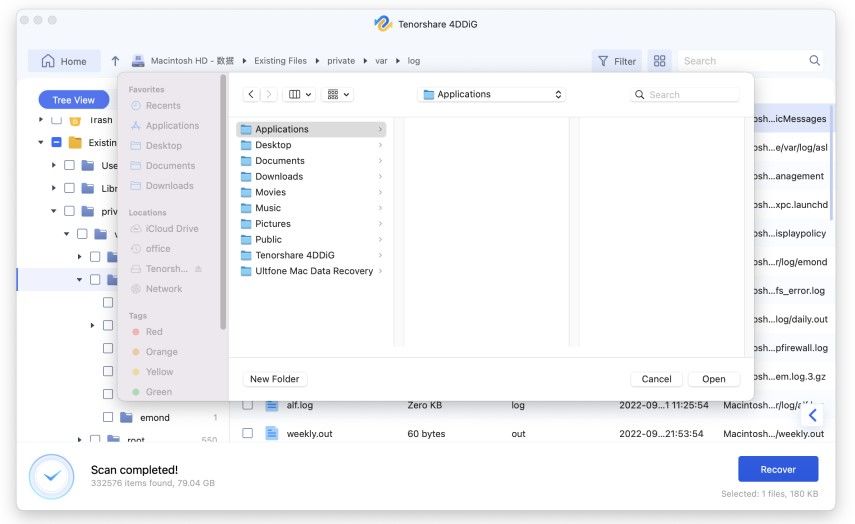
Once you have identified the files you want to recover, 4DDiG immediately searches the selected drive around for missing data, and you can stop or pause the search at any time. Under the Tree View, you can view categories such as Deleted Files, Existing Files, Lost Locations, RAW Files, and Tag Files. Using File View, you can also see file types such as Photos, Videos, Documents, Audio, Emails, etc. In addition, you can use the Filter option on the right side of the panel to narrow down your search.

You can preview and recover the target files once they have been discovered. Don't save to the same partition where you lost your data in the event of disk overwriting.
Part 3: How to Protect Files on Your Mac?
Now that you know how to recover lost or deleted files on Mac, it is also important to know how to protect your files from being lost or deleted in the first place. There are a few simple things that you can do to keep your files safe and secure. Some of these are mentioned below:
- Always Keep a Backup: One of the most important things that you can do to protect your files is to keep a backup. This way, even if your files are lost or deleted, you will still have a copy of them and you can easily recover them. There are a number of ways to back up your files and you can choose the one that best suits your needs.
- Use a File Recovery Tool: Another way to protect your files is to use a file recovery tool. This way, even if your files are lost or deleted, you will still be able to recover them. There are a number of file recovery tools available and you can choose the one that best suits your needs.
- Be Careful When Deleting Files: Another thing that you can do to protect your files is to be careful when deleting them. If you are not sure about a file, then don’t delete it. This way, you will avoid accidentally deleting important files.
By following these simple tips, you can easily protect your files and avoid losing them.
Frequently Asked Questions on Deleted Files Recovery on Mac
1. Is there anyway to recover permanently deleted files on Mac?
Yes, as long as the formatted SD card is not overwritten with new data.
2. How can I recover permanently deleted files from recycle bin without software?
To fix a corrupted micro SD card, Insert micro SD into a card reader.
There are a number of ways to recover lost or deleted files from the recycle bin. However, these methods may not always work as intended and you may not be able to get your files back.
3. How do I recover deleted Mac files?
There are a few different ways that you can go about recovering deleted Mac files, depending on the situation. We have listed few different methods in this article. Try them one by one to see which one works best for you. However, if you are a person who cares about data security and recovery speed, it is recommended to use the data recovery software Tenorshare 4DDiG, which is worthy of your complete trust.
Conclusion
Losing important files can be a very frustrating experience. However, if you know how to recover lost or deleted files on Mac, then you don’t have to worry about this anymore. There are a number of ways to recover lost or deleted files and you can choose the one that best suits your needs. If you are looking for a reliable and effective data recovery tool, then Tenorshare 4DDiG is definitely worth considering.
 ChatGPT
 Perplexity
 Google AI Mode
 Grok
Grok
