Are you ready to upgrade your system to macOS Sequoia/Sonoma beta but are afraid of losing data? If this is the case, you are not alone, as many people want to upgrade their system to macOS Sonoma Beta but don't know how to do it without losing their data. So in order to help you, here is a complete guide that will help you learn how to install macOS Sonoma beta without losing data.In this comprehensive guide, we will provide you with the necessary steps and precautions to ensure a seamless installation without any data loss. So let's get started.

Part 1: Preparations for macOS Sequoia/Sonoma Beta Download
So before getting straight on the steps to install or download macOS Sequoia/Sonoma beta, it's better to first prepare your system. Here are a few things that you should consider.
1. Check Compatibility:
Start by verifying if your Mac meets the system requirements for macOS Sequoia/Sonoma beta. Ensure this by visiting the official Apple website and see if your Mac is compatible to avoid any compatibility issues or performance issues post-installation.
2. Back Up Important Data:
Safeguarding your valuable data should be your top priority. Before proceeding with the upgrade, it is strongly recommended to back up your Mac using the built-in backup utility called Time Machine.
3. Ensure Enough Free Space on Your Mac's Hard Drive:
macOS Sonoma beta requires 26 to 44 GB of free space to install and run smoothly. Before initiating the installation, check your Mac's available storage and make sure you have enough free space to accommodate the new operating system.
By considering these preparatory steps, you can minimize the risk of data loss and ensure a successful installation of macOS Sonoma beta.
Part 2: How to Download and Install macOS Sequoia/Sonoma Beta on Mac?
If you have followed the above-given precautions, it's time to install macOS Sequoia/Sonoma beta on your Mac. Here are the steps that will help you.
Step 1. Register as an Apple Developer
In order to download the macOS 14 Sequoia/Sonoma beta, you must first become a registered Apple developer. For this, visit Apple's developer website and navigate to the Account page.
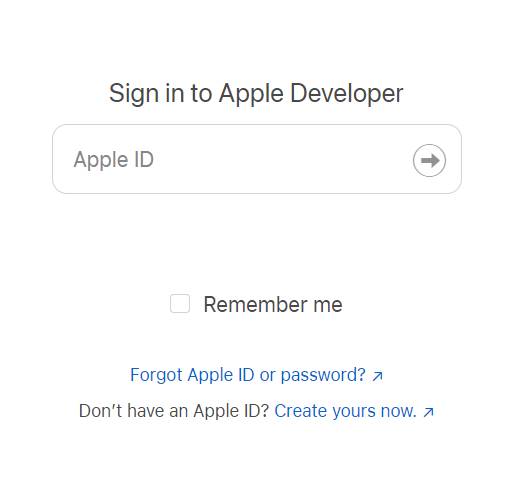
There, you can find detailed information about the annual cost of the Apple Developer Program, which is $99. Registering as a developer not only grants you access to the macOS Sequoia/Sonoma beta but also enables you to explore other beta releases and guidelines, as well as publish apps on the App Store.
Step 2. Open The System Setting App
Begin by opening the System Preferences app on your Mac. You can do this by searching for "System Preferences" in Spotlight or by clicking on the Applications folder in your Dock and selecting System Preferences from there.
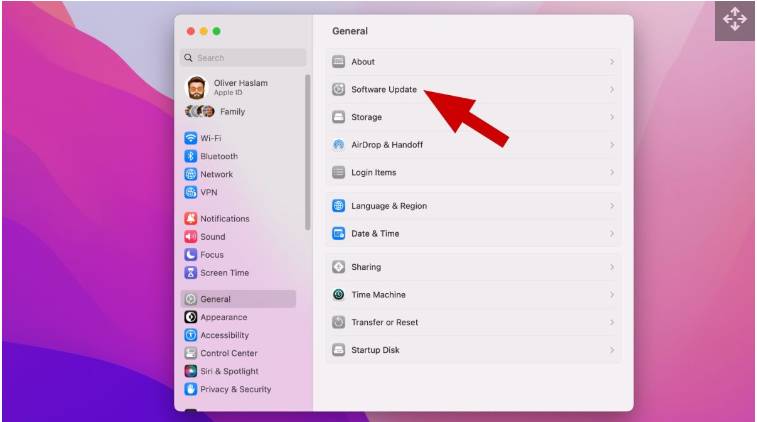
Step 3. Enable Beta Downloads
Within System Preferences, click on the General option, followed by Software Update. In the Software Update window, locate the "i" button next to the option for beta updates.
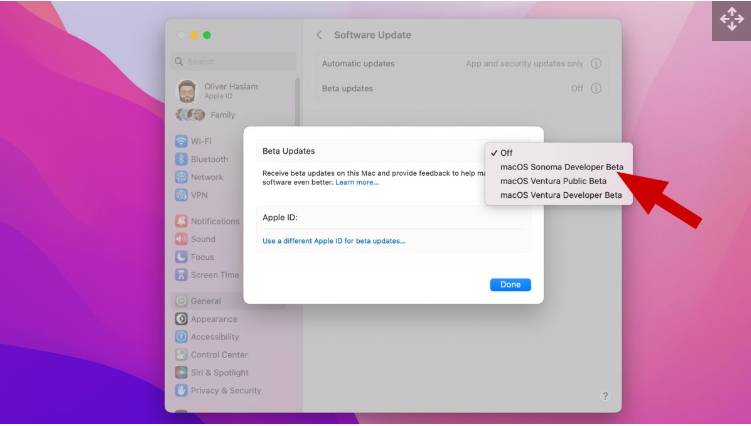
Click on it and select the macOS Sonoma developer beta from the dropdown menu. Save your selection by clicking the Done button, indicating your readiness to receive Apple's beta updates.
If you wish to return to the non-beta version of macOS, you can choose the Off option.
Step 4. Install macOS 14 Sonoma
Once you have enabled beta updates, return to the Software Update window. The macOS 14 Sonoma update will now be available for download.
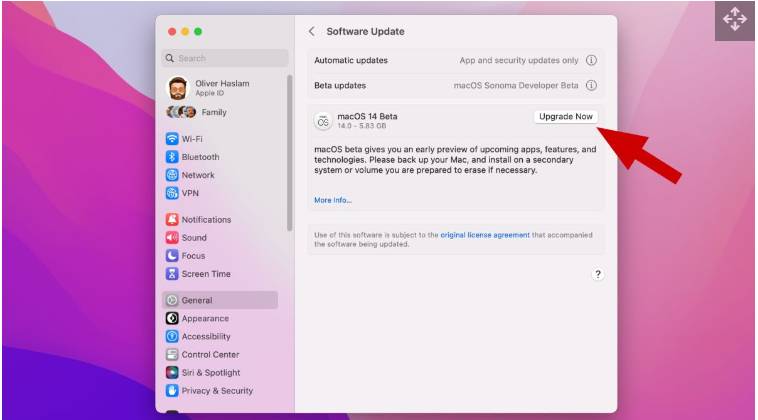
Click on the Upgrade Now button to initiate the installation of macOS 15 Sequoia. Your Mac will then proceed to download and install the update, which may require a restart to complete the process.
After the installation is finished, you will be ready to explore macOS 15 Sequoia's exciting new features.
Bonus Tip: How to Recover Lost Data after macOS Sequoia/Sonoma Update?
During the upgrade process, your data should remain intact. However, it's possible that some apps or software may not be compatible with macOS Sequoia/Sonoma, which could cause them to stop working or behave unexpectedly. So these unexpected issues could potentially lead to data loss. If you forget to back up your important data in advance, don't worry!
Our recommended solution is 4DDiG Mac Data Recovery, which is a versatile tool that recovers various types of lost data from different storage devices, providing comprehensive data recovery for documents, photos, videos, and more. Its user-friendly interface guides you through each step, while the preview function allows for selective file recovery, saving time and storage space.
Here's a step-by-step guide on how to use 4DDiG Mac Data Recovery to recover lost data:
First of all, download and install 4DDiG Mac Data Recovery from the official website and launch it. On the main interface, hover your cursor on the local disk where you have lost your data, and a Scan button will appear, click on it.
Free DownloadFor PCSecure Download
Free DownloadFor MACSecure Download

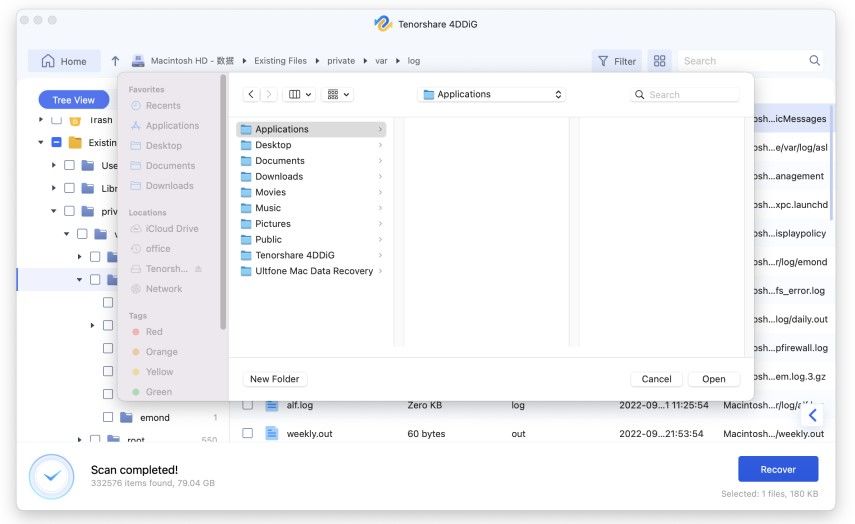
This will start scanning your drive for lost or deleted data. You can see the progress on the lower left corner of the screen. During this, you can check Tree View and File View tabs to see which files or data are being recovered.

Once the scanning is completed or you have found the specific lost file, you can choose the file and hit the Recover button. It is also recommended not to save the recovered file on the same local disk as it may cause permanent damage to your file.

FAQs about macOS Sequoia/Sonoma
1. What Macs will support Sequoia/Sonoma?
MacOS Sequoia/Sonoma is expected to support a range of Mac models. MacOS Sonoma supported devices are:
- iMac 2019 and later
- Mac Pro 2019 and later
- iMac Pro 2017
- Mac Studio 2022 and later
- MacBook Air 2018 and later
- Mac Mini 2018 and later
- MacBook Pro 2018 and later
2. What's new in macOS Sequoia/Sonoma?
Sequoia/Sonoma is expected to bring enhancements to the user interface, performance optimizations, privacy and security enhancements, updates to built-in apps, and potentially new system-level features.
3. Should I install the macOS Sequoia/Sonoma beta?
The decision to install the macOS Sequoia/Sonoma beta depends on your individual needs and preferences. It's important to note that beta versions of software, including macOS, are still in the testing phase and may contain bugs or compatibility issues with certain apps or hardware. If you rely heavily on your Mac for critical tasks or have specific software requirements, it may be advisable to wait for the stable release.
Conclusion
So that's how to install macOS Sequoia/Sonoma beta on your Mac. All you have to do is enroll in the Apple Developer program and download the macOS Sonoma beta for your Mac system. For this, carefully follow the steps given above and update your system to the latest macOS Sonoma beta. However, if you have lost any important files during the installation process, worry not. You can use 4DDiG Mac Data Recovery to get back all of your lost files within a few minutes.


 ChatGPT
 Perplexity
 Google AI Mode
 Grok
Grok
