How to Wipe a Drive from Lenovo BIOS | Step by Step
Lenovo BIOS has a good option that helps you wipe a drive completely if you cannot sell or dispose of your laptop or if you want a brand new system in their Lenovo laptop. The erasure of the data is also important because just deleting the files will not completely keep anyone from recovering the data. In this guide, we will show you, step by step how to wipe a drive from Lenovo BIOS to keep your data safe.
This article will explain how to securely wipe drive from BIOS Lenovo, how this could be necessary, and the procedure. We also will present other approaches for drive cleaning, such as bootable USBs and different software to format the drives and in detail how special ThinkPad Drive Erase Utility works.
Part 1: Preparing to Wipe Hard Drive from BIOS Lenovo
Preparation is required before you consider erasing Lenovo BIOS to avoid data loss and also to ensure that everything will run smoothly.
✅ Back Up Important Data in the Drive
Remember always to copy any file that you consider integral before formatting your drive. When this drive is erased, no other person can retrieve the information that was written on it. Thus, read this guide to learn more details: Best 4 Ways for Hard Disk Drive Backup.
✅ Ensure Power Supply and System Stability
Keep the laptop connected to a good socket so that it won’t develop some complications in the process of wiping the operating system from the computer since it will interrupt the process.
✅ Create a ThinkPad Drive Erase Utility Bootable USB
What is required to wipe a drive is a bootable USB with the ThinkPad Drive Erase Utility on the stick. Follow these simple steps to create one:
To do this, anyone can download the ThinkPad Drive Erase Utility by searching your ThinkPad Model from the official site.
Plug a USB drive (At least 8 GB capacity. And all data will be erased) to your Lenovo laptop.
To create a bootable USB you should use some kind of software like 4DDiG Partition Manager.
Open 4DDiG Partition Manager and go to “Toolkit” > “Create WinPE”.
Later, choose “ISO file” as the format to create the WinPE bootable USB and tap the bottom-right “Start” button.

Note:
Make sure the USB is blank or its data has been backed up.
Just a few minutes will be taken to finish the ThinkPad Drive Erase Utility bootable USB creation. Once done, tap “Finish”.

After this has been accomplished your USB drive will be ready to be used in the subsequent procedures. Also, if you are still confused of the process, please check more details from this specific guide: How to Create Windows 10 Bootable USB without Media Creation Tool.
Part 2: How To Wipe A Hard Drive From Bios Lenovo
⚠️ Level: Difficult
⌛ Duration: Depends on the size of drive
✌ Suitable for: Tech savvies
Now that you’re prepared, follow these steps to wipe your drive from Lenovo BIOS. Before that, please insert the created bootable USB stick to your ThinkPad.
If you fail to find the inserted USB flash drive on BIOS, please fix the error following this post: How to Fix Hard Drive Not Showing Up in Bios?
Restart Your Lenovo Laptop: Close your laptop and open it again.
Access Lenovo BIOS: Press F1 or F2 during startup to enter BIOS Setup Utility .
Navigate to the Security Menu: With the help of arrow keys go down to select “Security” option in the BIOS.
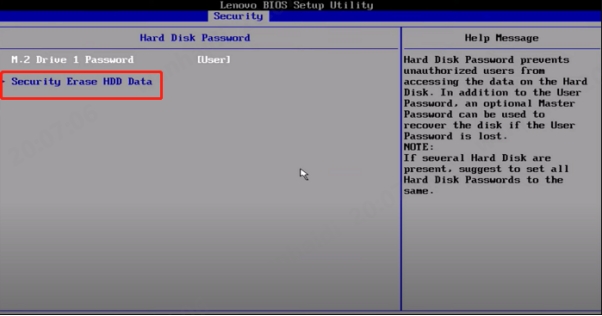
Choose “Security Erase HDD Data”: Under options go to the Security tab and over there select the “Security Erase HDD Data” option. This will initiate the process of wiping of hard drive data.
Enter the Password: If your system has a hard disk password, the user has to type it in the terminal window.
Confirm the Wipe: Select “Yes” to continue to wipe out all current settings. It is quite important to be sure that you copied or backed up all the data you need before proceeding.
Wait for the Process to Complete: The wipe process might even take some minutes depending on the size of the drive to be erased. Once done, you’ll be left with a blank drive that you can reuse or reinstall if you want to.

When using these steps, all data on the Lenovo BIOS will have been erased and any sensitive information deleted.
Part 3: An Easier Method to Wipe Drive from Lenovo Laptop
In fact, the above method comes with the risk of data loss and laptop crashing. Thus, if you don’t want to follow the method explained above to get into Lenovo BIOS out of concern for data risk, then 4DDiG Partition Manager could be a good alternative for you. Obviously, this tool does the same and it has some extra options for disk operations.
4DDiG Partition Manager is an efficient disk management software which supports delete any disk including SSDs and can be launched on any laptop including those of Lenovo while ensuring the security of the disks. It’s easier and less risky than the BIOS approach while offering additional options for working with partitions, cleaning up the system, and recovering it.
✨ Features of 4DDiG Partition Manager:
- Simple to erase data and wipe any kind of drive to its bare roots.
- Safely & easily to create a bootable WinPE disk for backup data from non-bootable omputers.
- Repair, recover, and restore disks and partitions from laptops and any storage device.
- Can create/delete/format/wipe/extend/shrink/split/merge/resize/move disk drive partitions
- Graphical user interface is easy to understand and navigate for both novices and professionals.
- Guarantees your data is well deleted and will not be obtained or retrieved in any ways.
- Migrate Windows OS to SSD and other drives without reinstallation.
✨ Steps to Wipe Drive from Lenovo Laptop Using 4DDiG Partition Manager
Walk through the following stepwise instructions to wipe a hard drive from Lenovo laptop without BIOS safely.
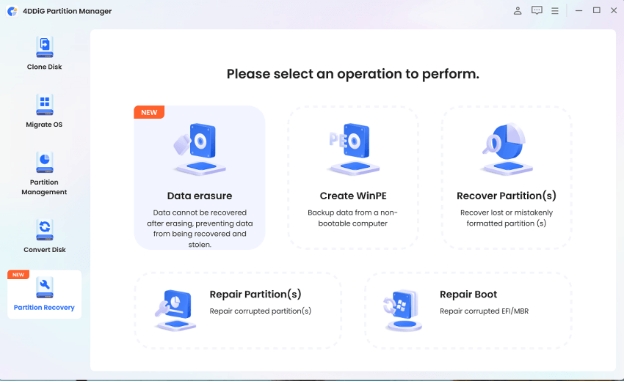
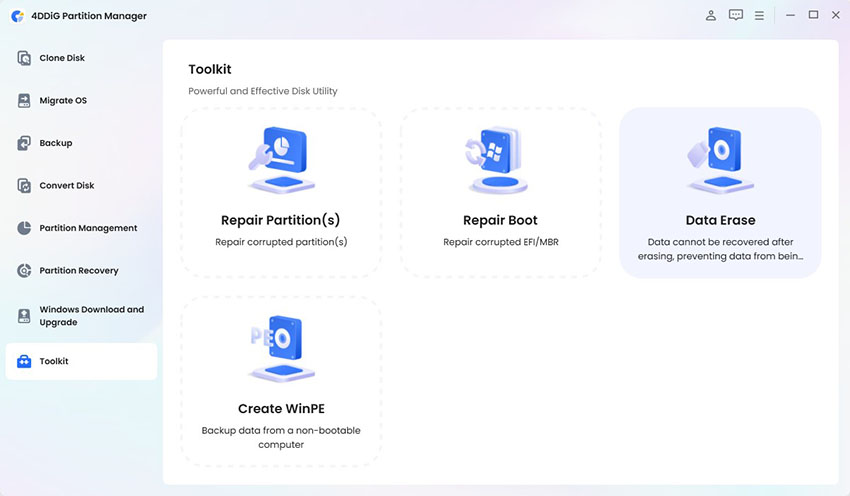
First of all, install the latest version of 4DDiG Partition Manager on your ThinkPad. Start it and select “Toolkit” > “Data erase”.
FREE DOWNLOADSecure Download

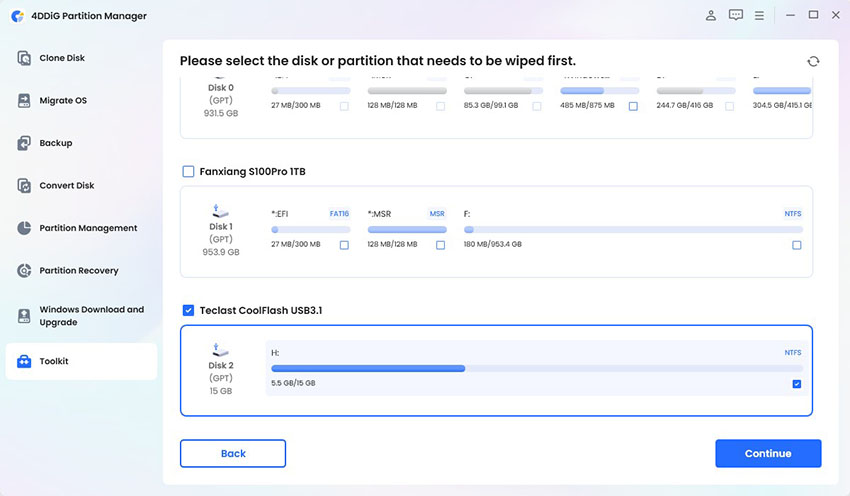
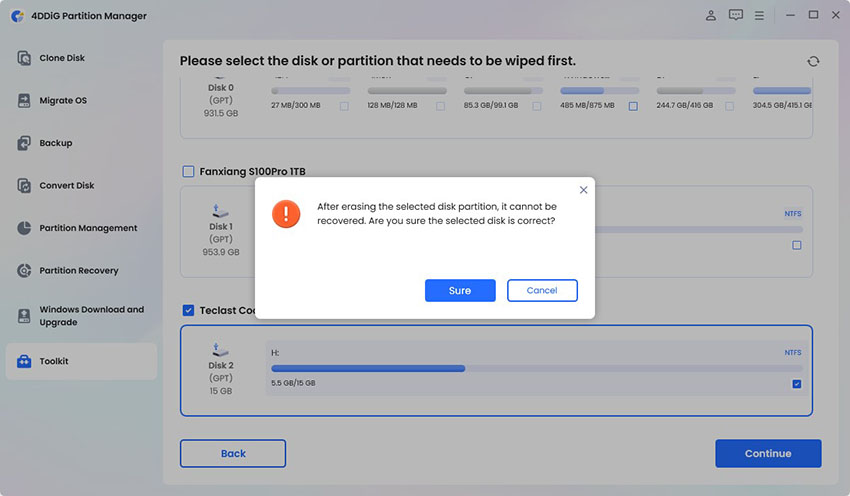
Choose the drive (SSD or HDD) that you would like to wipe from Lenovo.

You will be prompted that the data on the drive will be deleted. Tap “Sure” if you have backed up the drive data.

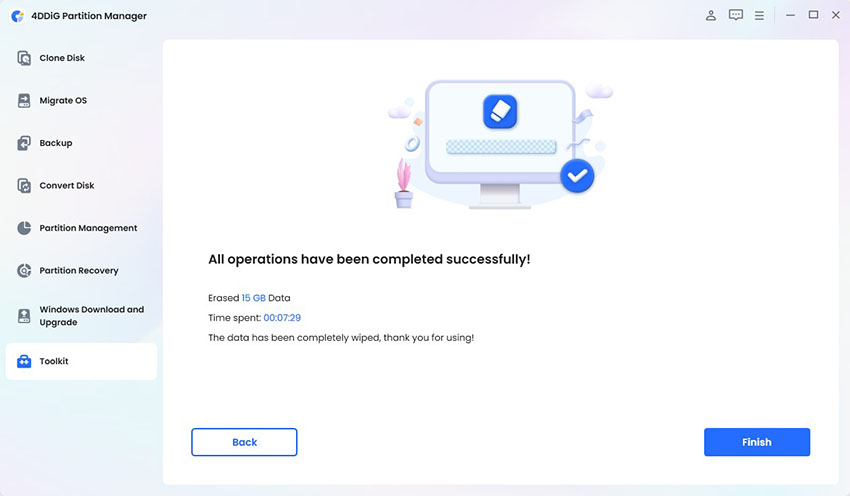
Once tapped, the software will kick off the drive wipe process on Lenovo and finish it in a short time. Once completed, click “Finish”.

4DDiG Partition Manager allows for comfortable and safe Lenovo laptop drive deletion without even entering BIOS .
Part 4: People Also Ask about Lenovo Wipe Hard Drive from BIOS
Q1: How to wipe a hard drive on a Lenovo, besides BIOS?
It is possible to clean the hard drive with help of third-party application such as 4DDiG Partition Manager, or via Windows settings. As mentioned earlier these methods are easier and more natural to use than BIOS.
Q2: How do I wipe my Lenovo laptop from the BIOS?
To delete your Lenovo laptop from the BIOS, press the relevant key during startup to enter BIOS; then, go to the Security section and choose the Security Erase HDD Data option and confirm this function.
Q3: How to format hard drive from BIOS Lenovo?
Formatting a hard drive from Lenovo BIOS ranges via getting within the BIOS settings, locate the hard disk and finally click on on the format or erase hard disk possibility. This can be done by going to Security Erase HDD Data.
Conclusion
You have known how to wipe a drive from Lenovo BIOS. However, it could be a little difficult for some of the users to deal with BIOS at times. As for the more effective and easy-to-use approach, 4DDiG Partition Manager possesses all the advantages of beginner-friendly software with additional useful functions such as managing partitions and convenient navigation.
Regardless of which method you decide to use, BIOS, third-party, and Windows settings, it is advised that you first backup your files.
Secure Download


 ChatGPT
 Perplexity
 Google AI Mode
 Grok
Grok

