How to Recover Data from Unallocated Hard Drive in 3 Ways?
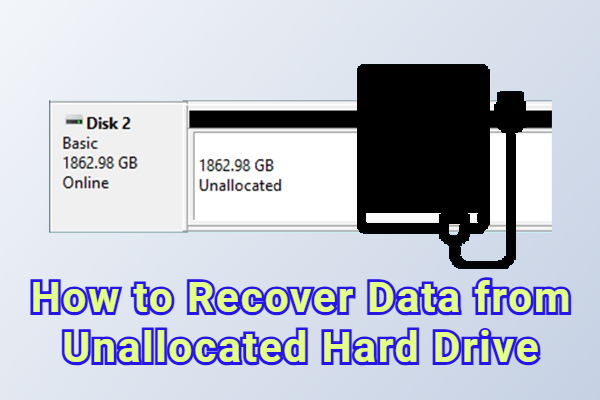
A hard drive that once worked perfectly can sometimes show up as unallocated in Disk Management, making all your files seem to have disappeared. When this occurs, you can still see the drive’s storage space, but not the data inside it.
Fortunately, in most situations, the data still exists on the unallocated space, it’s just temporarily inaccessible. In this guide, we’ll explain what an unallocated hard drive is and show you how to recover data from an unallocated hard drive safely and easily.
Overview of Unallocated Hard Drive
Before jumping into recovery methods, let’s take a moment to understand what an unallocated hard drive means and what causes it. Knowing this will make it easier to choose the right way to get your data back.
What Does an Unallocated Hard Drive Mean?
An unallocated hard drive means the storage space on the disk hasn’t been assigned to any partition. Partitions act like containers that organize and manage data on a drive.
Without a partition, the computer can detect the drive but can’t access or use the files inside. In other words, the data is still physically there, but the system doesn’t know where it belongs.
What Causes Unallocated Disk Space Issue?
Unallocated disk space is the part of your hard drive not assigned to any partition, so it can’t store files. It’s basically empty “raw” space without a drive letter or file system. This is normal on new drives or after reinstalling Windows, but if you didn’t do any of above, here're the possible reasons why your hard drive shows unallocated:
- Accidental Partition Deletion: You may delete a partition by mistake, making the space unallocated.
- Formatting Errors: Problems during formatting can leave the space unusable.
- File System Corruption: If the file system gets damaged, the computer can’t read the partition.
- Disk Management Changes: Shrinking, moving, or merging partitions incorrectly can create unallocated space.
- Virus or Malware Attacks: Some viruses or malware can damage partitions, causing the space to become unallocated.
How to Recover Data from an Unallocated Hard Drive?
Now that you understand what an unallocated hard drive is and why it happens, the next step is learning how to get your data back. Here, we’ll introduce three reliable methods to recover files from an unallocated hard drive.
Method 1: Recover Files from Unallocated Hard Drive Using Software
Files on unallocated hard drives can’t be opened or accessed like normal files. But if the data hasn’t been overwritten, it can still be recovered using the right tool. Not all recovery programs are reliable, so it’s important to pick a trusted one.
4DDiG Data Recovery is a great choice for recovering data from unallocated space. It’s easy to use and can quickly find both deleted and existing files. It also works with RAW or damaged partitions, making it a flexible solution for tricky drives.
If you suspect that your hard drive is damaged, you can create a disk image first and scan that instead. This keeps the original drive safe and reduces the risk of losing more data during recovery.
Secure
Download
Secure
Download
You can start by downloading and installing 4DDiG, then follow to see how to recover files from unallocated hard drive using this program:
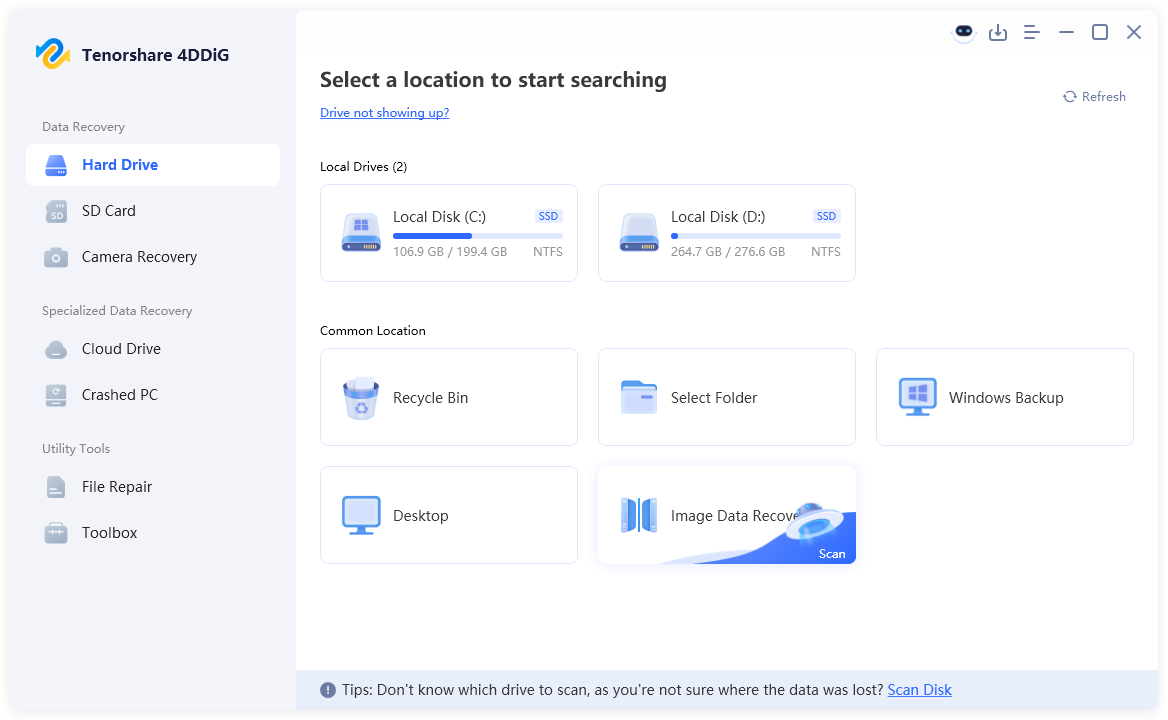
- Launch 4DDiG on your computer, then go to "Hard Drive" in the left panel of 4DDiG and choose "Disk Image" under "Common Location".

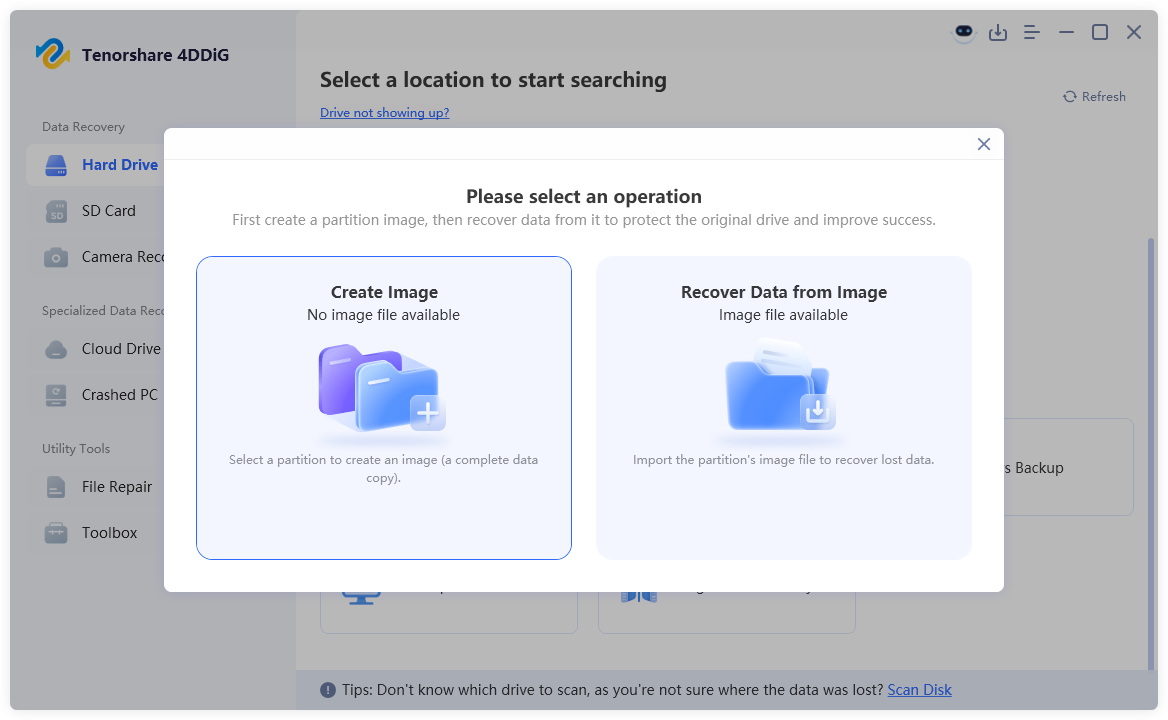
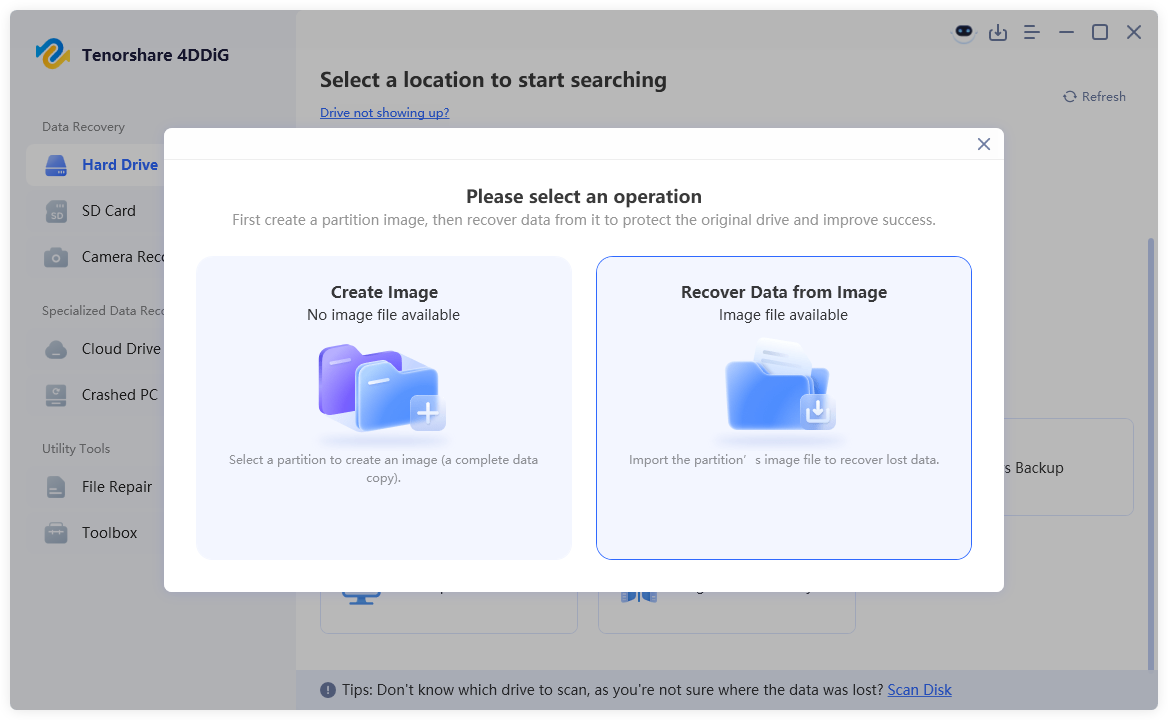
- You can choose to create a new disk image file with 4DDiG, or import one that you've created before.


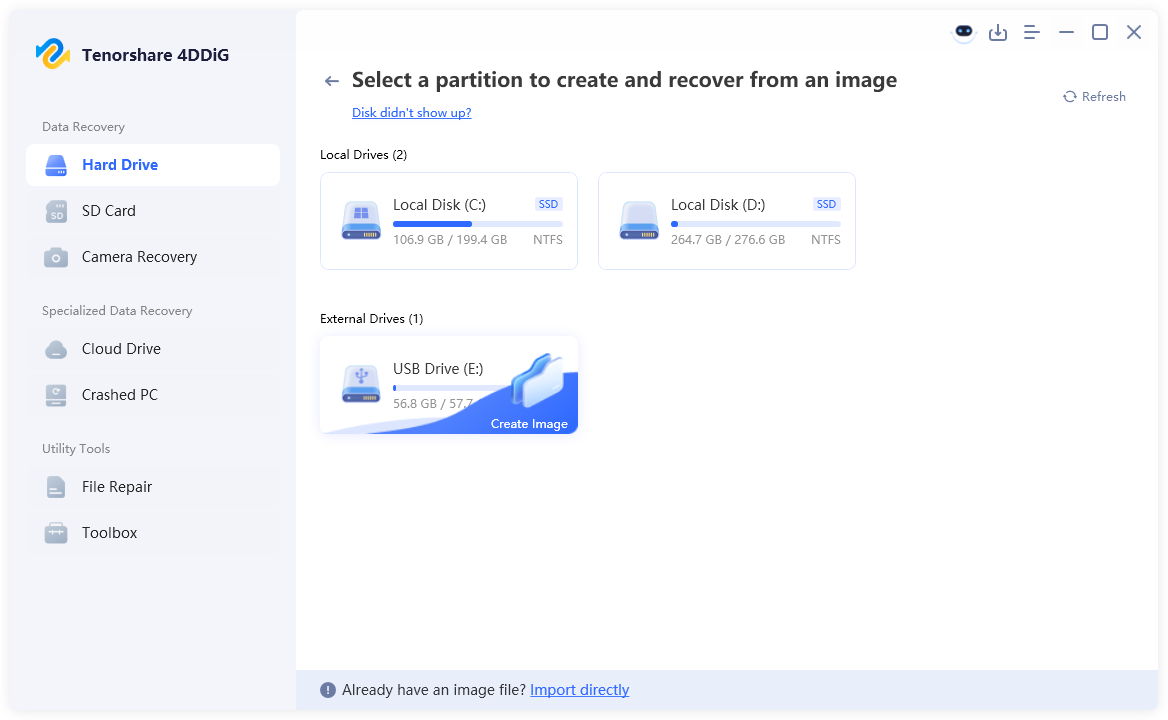
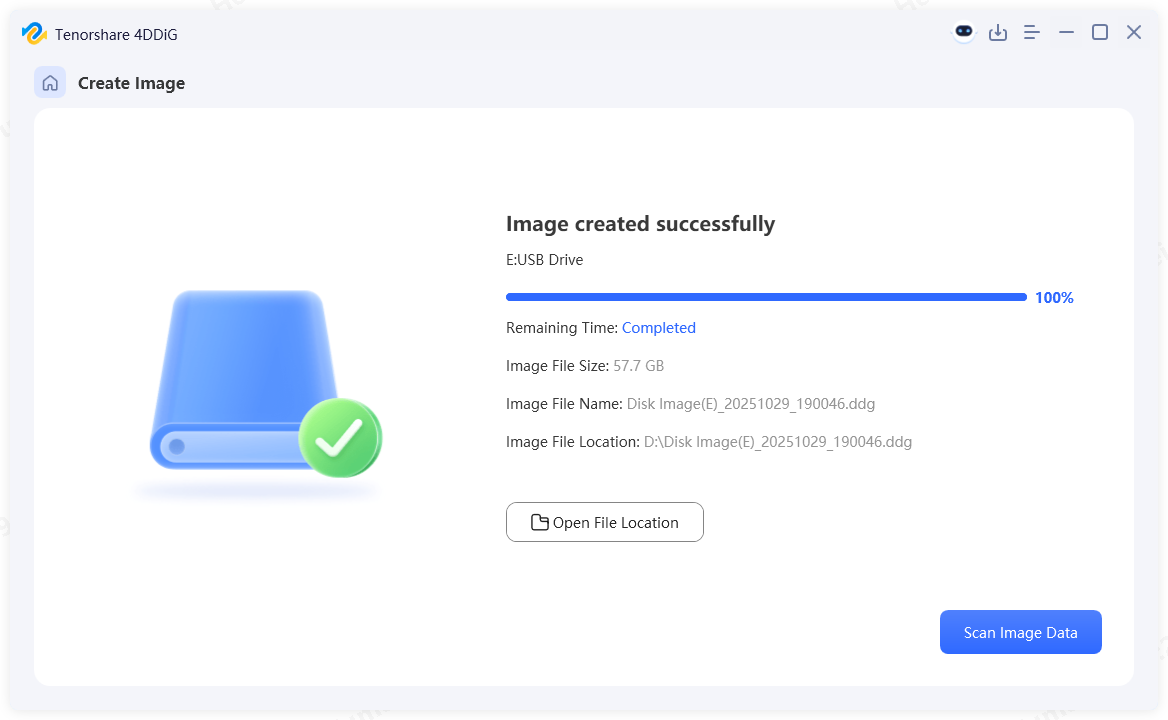
- Select a partition or disk to start creating the disk image. Once done, click the "Scan Image Data" to proceed.

- Return to the image recovery interface and tap on the 'Recover Data from Image' option. 4DDiG will then automatically import the corrupted partition's image to recover your files.

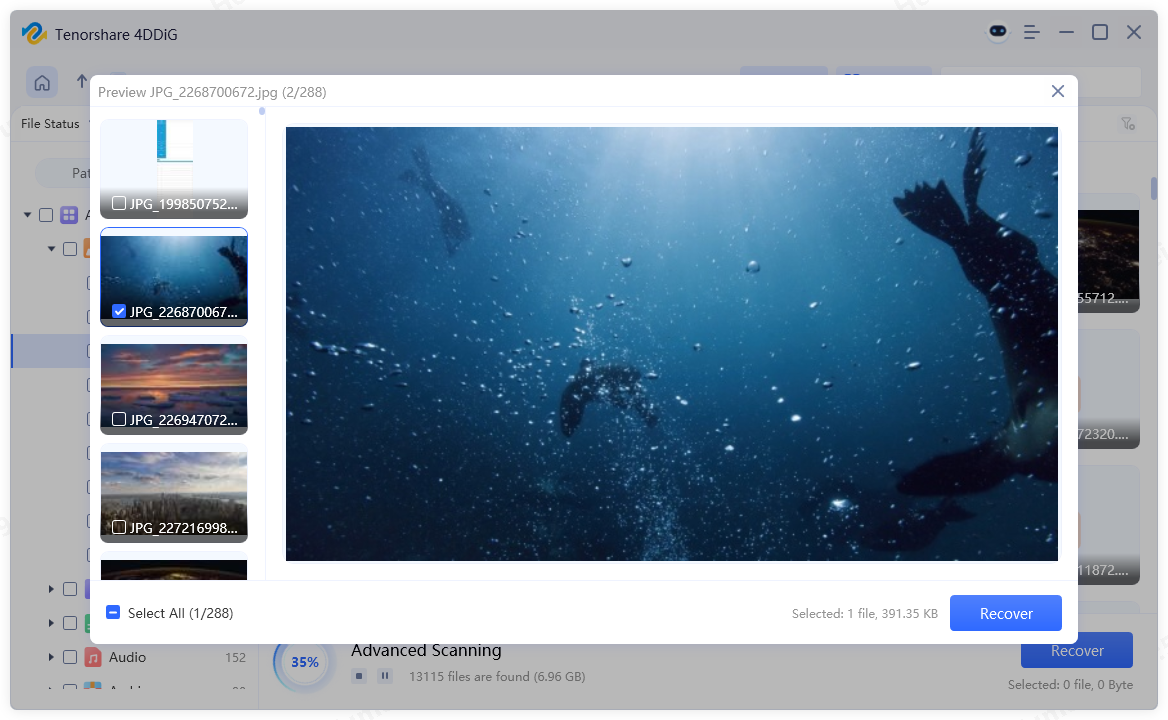
- Once the scan is complete, you can preview files before recovery. Then hit the "Recover" button for the program to finish the last step.

Method 2: Restore Data from Your Windows Backup
If you’ve enabled the Windows backup feature before the partition/hard drive became unallocated, you can easily restore copies of your files from the backup (called File History). This built-in feature can help you recover data lost due to an unallocated hard drive without using third-party tools.
Here's how to recover data from unallocated hard disk using File History:
- Connect the drive you previously used for your File History backups to your computer.
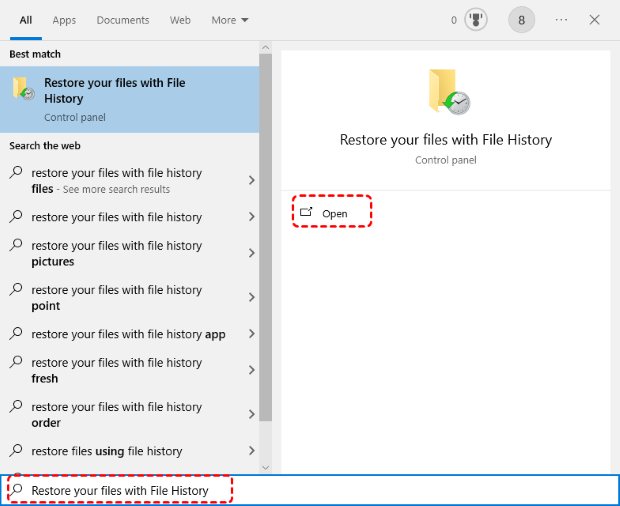
- Open Windows Search (press Windows + S) and type “File History” to launch it.

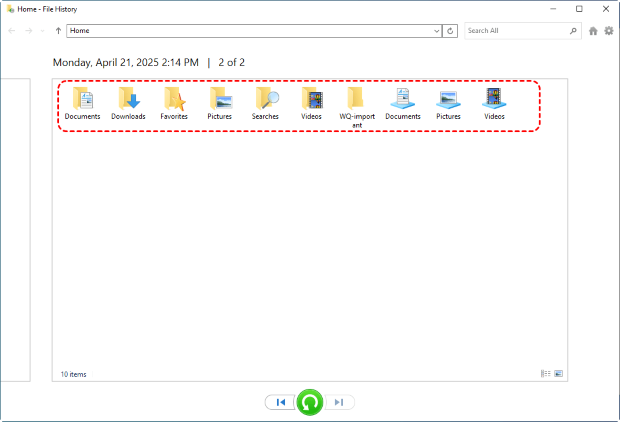
- Browse through the available backups, select the files you want to recover, and click the green “Recover” button.

- Wait for File History to restore your selected files, they’ll be saved to their original locations automatically.
Method 3: Contact Offline Data Recovery Service
While most drives/partitions become unallocated due to logical problems, such as accidental partition deletion or file system corruption, others stem from physical damage. In those cases, DIY methods won’t work, and it’s best to rely on a professional data recovery service to safely retrieve your files.
And this is how these data recovery service work:
- ☎️ Contact the data recovery service and explain your situation, including the type of drive and what data you need to recover.
- ✈️ Ship the drive securely or bring it directly to the service center.
- 🧐 The service provides an estimate of recoverable data and the cost for the recovery process. The evaluation is usually free or low-cost.
- 🔧 If you decide to authorize the recovery, technicians will repair it and extract data using specialized software and hardware tools.
- ✅ The recovered data is copied to a secure storage device and returned to you, along with the original drive.
How to Fix an Unallocated Hard Drive?
Once you’ve successfully recovered your data, the next step is to recover unallocated partition and make your hard drive usable again. An unallocated drive can’t store new data or run properly until it’s fixed. Fortunately, there are several ways to restore it to normal and get it ready for use again.
Option 1: Create a New Partition
The simplest way to fix an unallocated hard drive is by creating a new partition using Disk Management. This built-in Windows tool lets you allocate the unused space, assign it a drive letter, and make it ready for storing data again.
Here's how to fix an unallocated hard drive without losing data:
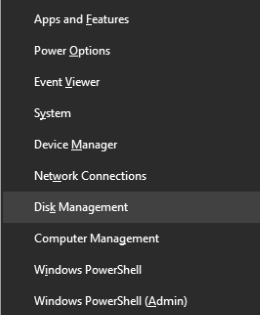
- Press Windows + X and select "Disk Management" from the menu.

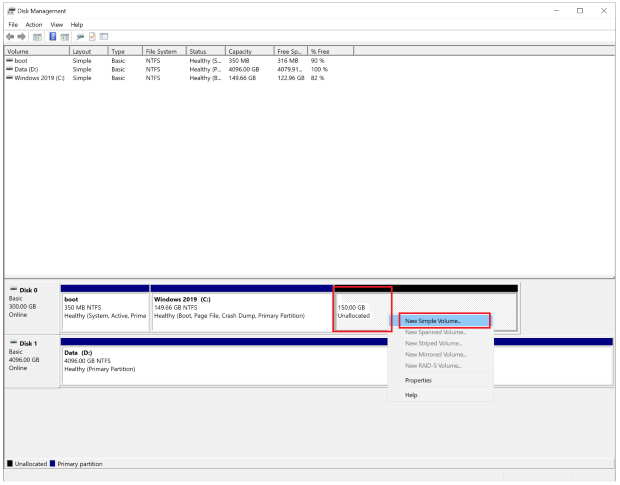
- In the Disk Management window, find the section labeled Unallocated, usually marked with a black bar.
- Right-click the unallocated space and choose "New Simple Volume".

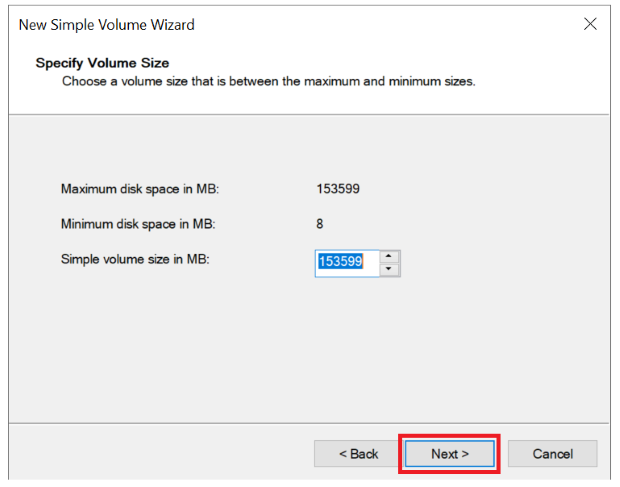
- Follow the New Simple Volume Wizard to set the volume size. You can use the default value to allocate all available space, then click "Next".

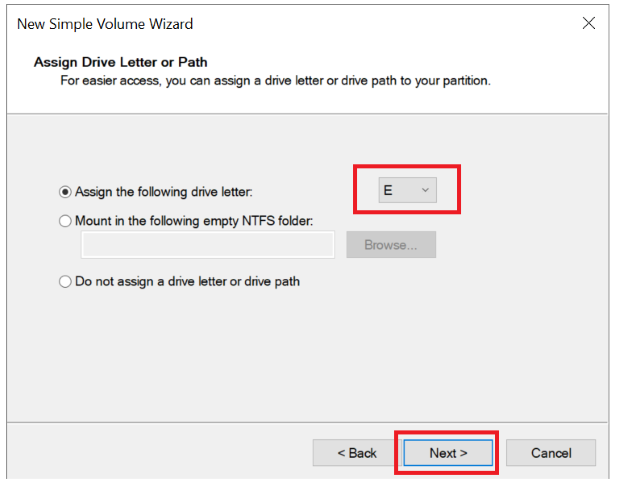
- Assign a drive letter to your drive and click "Next".

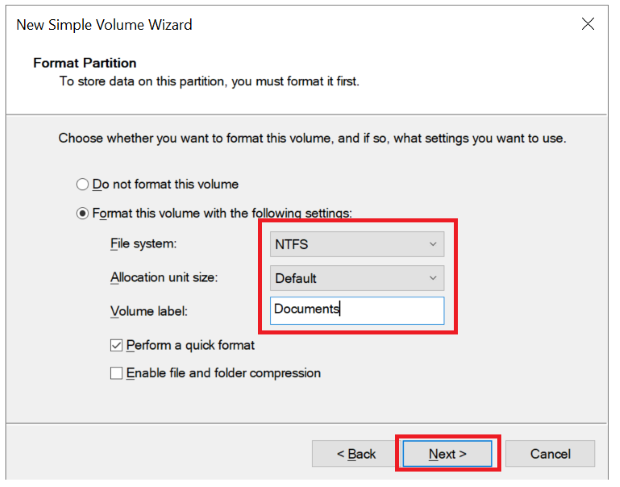
- Select a file system (NTFS or exFAT) and enter a Volume Label (name) for the partition (you can also leave them as default), then proceed again.

- Once completed, the new partition will appear in File Explorer and can now be used for storing data.
Option 2: Extend an Existing Partition
Sometimes your hard drive already has existing partitions, and the unallocated space is next to one of them. In this case, instead of creating a new partition, you can extend the existing partition to merge the unallocated space.
This method increases the storage of your current drive without affecting your existing files. Let's learn how to access unallocated space on hard drive by extending the partition.
- Press "Windows + X" and select "Disk Management" from the menu.
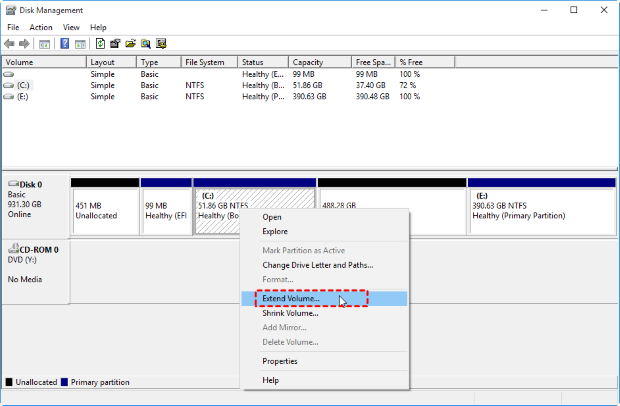
- Locate the partition you want to extend, right-click on it and select "Extend Volume" from the context menu.

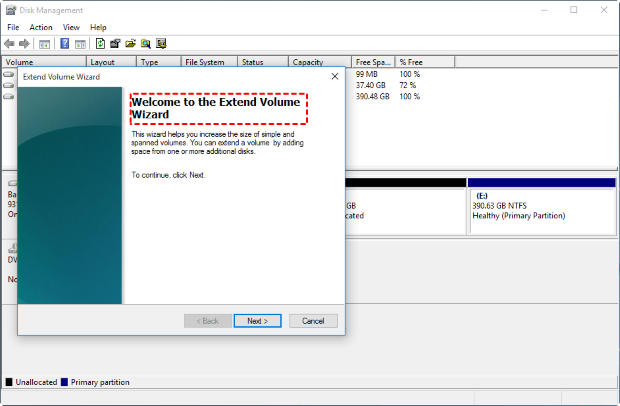
- The "Extend Volume Wizard" will open. Click "Next" to proceed.

- Specify the amount of unallocated space to add to the partition. By default, it selects all available unallocated space, then click "Next".
- Click "Finish" to complete the process. The partition will now include the previously unallocated space.
- Check "File Explorer" to ensure the partition size has increased and the drive is usable.
Option 3: Try Diskpart in Command Prompt
If the unallocated space isn’t recognized by Disk Management or you need more control over your partitions, you can use Diskpart in Command Prompt, which allows advanced users to manually create, delete, or modify partitions.
Here's the detailed steps on how to fix unallocated hard drive using CMD:
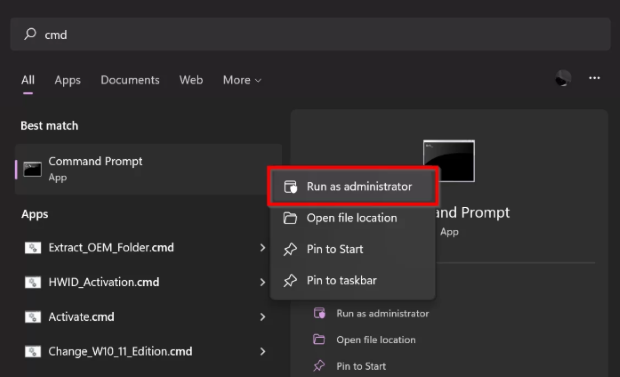
- Press "Windows + S", type "cmd", right-click "Command Prompt", and select "Run as administrator".

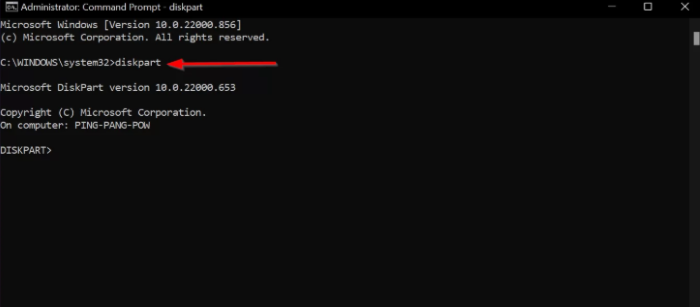
- In the Command Prompt window, type "diskpart" and press "Enter" to launch the Diskpart utility.

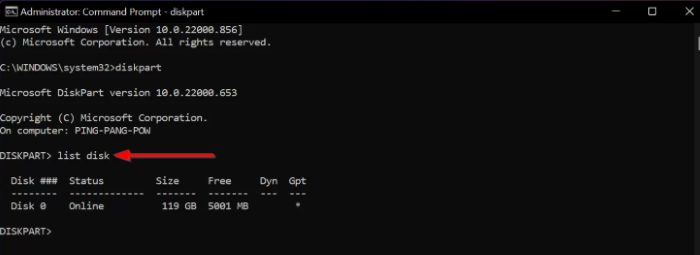
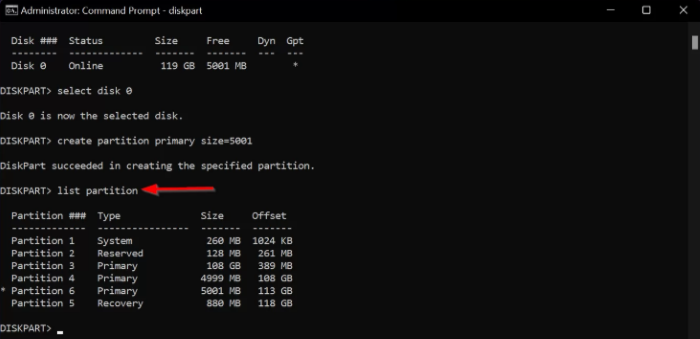
- Type "list disk" and press "Enter" to see all connected drives and the amount of unallocated space on your drive under the "Free" column.

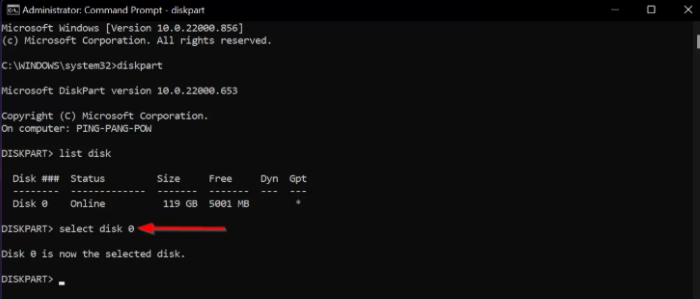
- Type "select disk X" (replace X with the number of the target disk) and press "Enter".

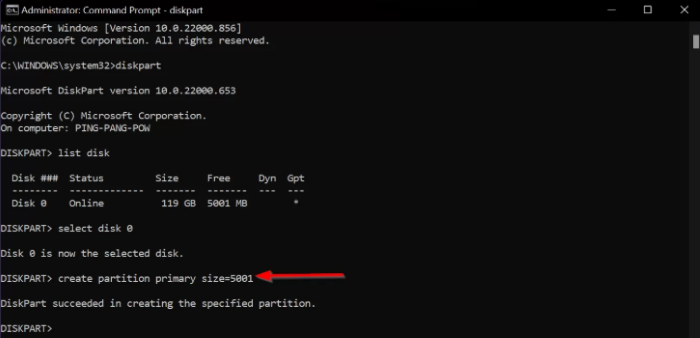
- Type "create partition primary=x"(replace x with the number listed under the "Free" column) and press "Enter" to create a new primary partition in the unallocated space.

- Now, type "list partition" and press the "Enter" key. On the next screen, type "select partition x" (Replace x the number of the newly created partition) and press "Enter".

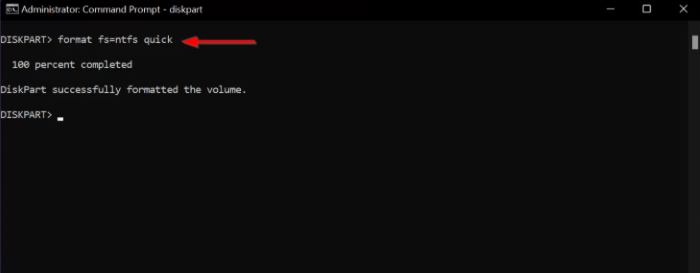
- Next, type "format fs=ntfs quick" and press "Enter" to quickly format the new partition with the NTFS file system.

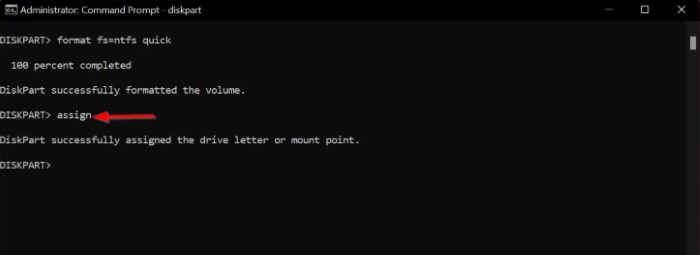
- Type "assign" and press "Enter" to assign a drive letter to the new partition.

- Type "exit" and press Enter to close Diskpart, then close Command Prompt. The new partition should now appear in File Explorer and be ready for use.
Option 4: Update or Reinstall Disk Drivers
Sometimes an unallocated hard drive issue occurs not because of the disk itself, but due to outdated or corrupted drivers. Updating or reinstalling your disk drivers can help Windows recognize the drive and restore normal functionality. Let's see how to get back unallocated disk space with ease.
Sometimes an unallocated hard drive issue occurs not because of the disk itself, but due to outdated or corrupted drivers. Updating or reinstalling your disk drivers can help Windows recognize the drive and restore normal functionality. Let's see how to get back unallocated disk space with ease.
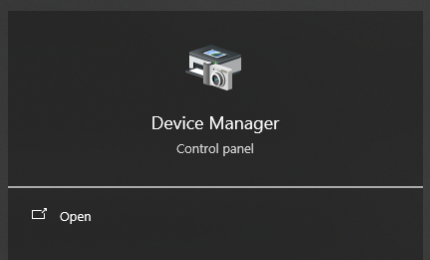
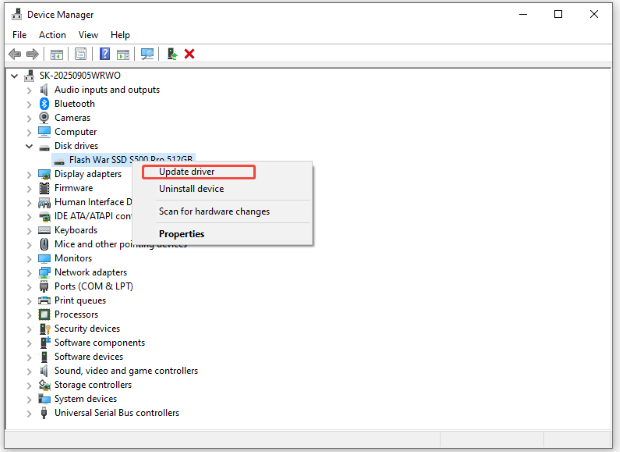
- Search "Device Manager" from the menu.

- Expand the "Disk drives" category to see all connected drives.
- Right-click the drive that appears unallocated or problematic and choose "Update driver".

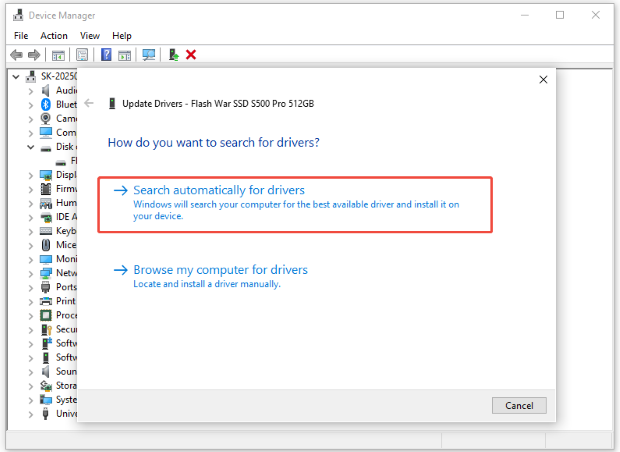
- Select "Search automatically for updated drivers" and follow the prompts. Windows will search for and install any available updates.

- If updating doesn’t work, right-click the drive again and select "Uninstall device".
- After uninstalling, restart your computer. Windows will automatically detect the drive and reinstall the drivers.
- Check Disk Management or File Explorer to see if the drive is now recognized and usable.
Challenges and Tips for Unallocated Hard Drive Recovery
Recovering data from an unallocated hard drive/partition can be tricky. Certain factors can reduce your chances of success, these include:
- Overwriting Data: Saving new files to the unallocated space can overwrite lost data, making recovery difficult or impossible.
- Type of Storage Drive: SSDs with TRIM enabled can automatically erase deleted data, making it hard for software to recover any data, while HDDs usually retain deleted data until overwritten.
- Long Time Since Data Loss: The longer the space remains unallocated, the higher the chance that lost files get partially overwritten.
- Physical Damage: If the drive has hardware issues, data recovery may fail or require professional help.
Knowing these challenges helps you understand why recovery can fail, and there are practical steps you can take to improve your chances of success.
- Stop Using the Drive Immediately: Avoid writing new data to the unallocated space to prevent overwriting lost files.
- Use Reliable Recovery Software: Choose trusted tools like 4DDiG for safe and effective recovery.
- Create a Disk Image: Make a backup of the unallocated drive before attempting recovery to avoid further data loss.
- Recover Partitions First (if possible): Restoring the lost partition can make file recovery easier and safer.
- Seek Professional Help for Damaged Drives: If the drive has physical issues, consider professional data recovery services.
Conclusion
This article has shown three ways to recover data from an unallocated hard drive, including using reliable software like Tenorshare 4DDiG, which can handle unallocated, RAW, or damaged partitions. Once your data is safely recovered, it’s also recommended to fix the unallocated hard drive so it becomes fully usable again.
Secure
Download
Secure
Download
 ChatGPT
 Perplexity
 Google AI Mode
 Grok
Grok


