How to Fix Windows Movie Maker Low Quality Export Video in 4 Ways
Windows Movie Maker has been a go-to and one of the best free video editing software for many Windows users, especially on Windows 10 and earlier. However, a common issue that arises is Windows Movie Maker low-quality export video. This typically occurs due to various factors, such as export settings, compression issues, or the limitations of the software itself.
However, the good news is that this issue can be easily fixed. This article will guide you through the reasons behind this issue and offer solutions to enhance your video quality. Whether you're a beginner or an experienced user, these tips will help you achieve crisp, high-definition results every time.

Part 1: What Causes Windows Movie Maker Low Quality Video After Export?
Before diving into solutions, it’s essential to understand why Windows Movie Maker might produce low-quality videos after export. Here are several factors that can affect video quality:
- Incorrect Export Settings: If you choose the wrong export settings, such as lower resolution or wrong format, the video quality will degrade.
- Compression Issues: Windows Movie Maker tends to compress videos significantly when exporting to certain file types (like WMV), leading to a loss in quality.
- Source Video Quality: If your source video is of low resolution or poor quality, the final output will also be subpar.
- Codec Errors: Sometimes, improper or missing codecs can cause video quality issues during the export process.
- WMV Format Limitation: Windows Movie Maker can only export videos in WMV format, which is designed for smaller file sizes. Unfortunately, this format sacrifices quality for file size efficiency.
- Software Constraints: Windows Movie Maker is quite basic compared to other video editing software, and it doesn't offer advanced options for video quality enhancement.
By understanding these causes, you can take the necessary steps to improve the quality of your videos during export.
Part 2: Best Way to Enhance Windows Movie Maker Video After Export to 4K
Even after exporting a low-quality video from Windows Movie Maker, there’s still hope! 4DDiG Video Enhancer is an excellent solution for improving the video quality to 4K and even 8K. This tool can enhance various video formats, including WMV, MP4, and more, significantly improving the resolution and clarity.
Whether you’re dealing with blurry or low-resolution footage, this software can bring your videos to life with stunning clarity. It also helps reduce noise, enhance colors, and sharpen images for a polished final product.
Secure Download
Secure Download
✨ Main Features of 4DDiG Video Enhancer
- Resolution Enhancement: Upscale your videos to 4K or 8K resolution, making them appear sharper and clearer.
- Noise Reduction: Use advanced algorithms to remove video noise, ensuring a cleaner and smoother image.
- Color Correction: Automatically enhance color saturation and vibrancy, providing more natural and vivid visuals.
- AI Sharpen Video: Use AI algorithms to sharpen videos, improving video clarity.
- 4 Awesome AI Models: Come with General Denoise, Face, Anime, and Colorize models.
- Multiple Video Formats Supported: Support a wide range of video formats: MP4, MKV, AVI, MOV, 3GP, and more.
- Batch Processing: Improve several videos at once, saving time and effort.
- Easy to Use: User-friendly interface that makes it accessible even for beginners.
- Anime Video Enhancer: Improve the quality of anime videos with 4K resolution.
✨ Detailed Steps to Enhance Your Video to 4K
Follow these simple steps to improve your Windows Movie Maker exports:
-
Open 4DDiG Video Enhancer
Launch the executable called 4DDiG File Repair after installation. In the software, go to the left sidebar and click on "AI Enhancer," then select "Video Enhancer."
-
Add Low-Quality Windows Movie Maker Videos
Tap "Add Videos" or drag the poor-quality Windows Movie Maker videos to upload them into the software window.
-
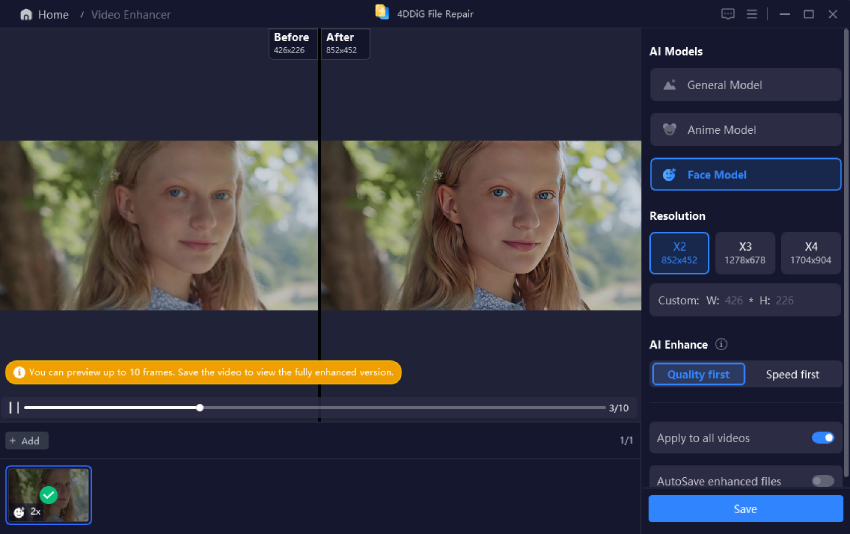
Select AI Model and Resolution for Enhancement
Select an AI model (General, Anime, Face, or Colorize Model) based on your video type. Set the output Resolution to 4X.- General Denoise: Best for any user across any scenarios. Overall enhance all types of videos and remove noise from them.
- Anime Model: Best for animation lovers. Can optimize anime-style or cartoon videos with higher resolution.
- Face Model: Best for facial enhancement. Can upscale the resolution and face details of close-up shots and portraits in the video.
-
Colorize Model: Can add realistic and natrual hue to the faded
old videos and
colorize black-and-white videos.

-
Enhance, Preview, and Save Windows Movie Maker Videos
Click "Enhance" to apply the AI model and start the enhancement process. Wait for the software to improve the quality of your video. Once the enhancement is complete, preview the first 10 frames to check the quality. If satisfied, click "Save" to store the 4K enhanced video on your computer.
4DDiG Video Enhancer is a powerful and intuitive solution for transforming your low-quality video exports into high-definition masterpieces. Whether for personal or professional use, it ensures your videos shine with clarity and detail.
Part 3: How to Fix Windows Movie Maker Low Quality Export Video [3 Common Fixes]
If you prefer to stick with Windows Movie Maker and avoid third-party software, there are a few common fixes you can try to improve the quality of your exported video. These methods are simple and don’t require any advanced video editing knowledge.
If you've been experiencing low-quality exports when using Windows Movie Maker, don't worry! There are a few simple steps you can take to improve the quality of your exported videos. Below are three common fixes that can help you achieve high-quality exports.
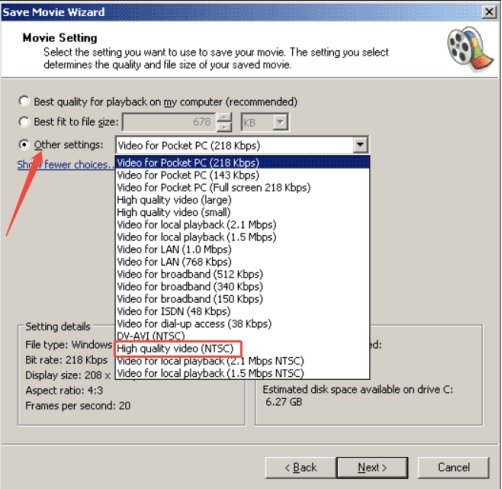
1. Adjust Export Settings to High Quality Video (NTSC)
One of the primary reasons for poor video quality after exporting from Windows Movie Maker is improper export settings. By default, Movie Maker might be set to export videos in a lower resolution or quality. Adjusting the export settings to a higher quality, such as NTSC (National Television System Committee), can significantly improve the outcome.
✌ What This Fix Does: This setting ensures that your video is exported at a higher resolution and frame rate, which is especially useful for videos intended for TV screens or high-definition monitors.
✍ Steps:
-
Open Windows Movie Maker 2 on Windows 11 or 10 and import your project.
-
After editing your video, click on the "Export" or “Save movie” button.
Find the “Save Movie Wizard” and click on it.
-
In the Save Movie Wizard window, check the “Other settings” option. From the draw-down list, select “High quality video (NTSC)”.
-
Upon selection, click Next to proceed and finish the exportation process with the adjusted settings.

2. Uncheck All File Preparation Options & Save Movie for High-Definition Display
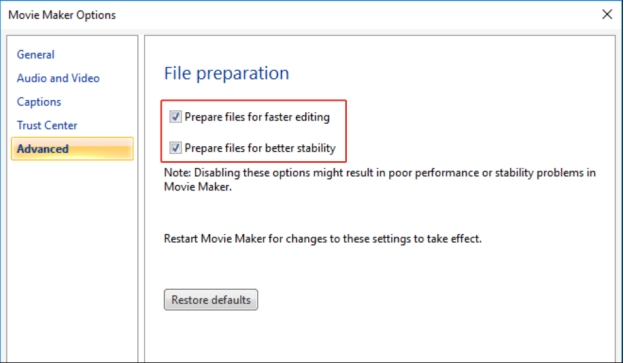
Sometimes, Windows Movie Maker's file preparation options can negatively affect the video quality. By unchecking these options, you can avoid unnecessary compression and ensure that your video retains its original quality.
✌ What This Fix Does: Unchecking file preparation options prevents Movie Maker from reducing the quality of the video during the export process, helping maintain the high-definition quality.
✍ Steps:
Open your project in Windows Movie Maker.
-
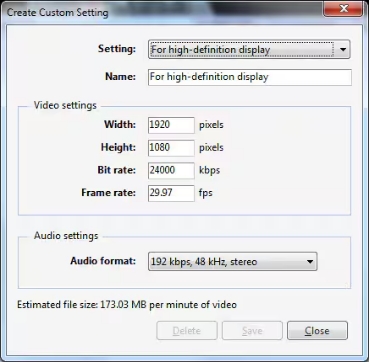
After finishing your editing, click on "Save movie" at the upper right and select “Create custom setting” from the drop-down menu.
-
In the pop-up Create Custom Setting dialog, choose "For high definition display" option from the “Setting” section. Then click “Save”.

-
Then go back to its home screen, click “File” > “Options” > “Advanced”.
-
From the right side, uncheck both “Prepare files for faster editing” and “Prepare files for better stability”. Once done, click “Restore defaults”.

3. Use High-Quality Source Video Files
The quality of the source video files you use in your project plays a crucial role in the final exported video quality. Using low-resolution or highly compressed video files can result in poor-quality exports, even if you adjust the export settings.
✌ What This Fix Does: Using high-quality, uncompressed video files ensures that the final export maintains the best possible quality without introducing artifacts or blurriness.
✍ Steps:
-
Before starting your project, use video files that are high-quality (HD or higher resolution).
-
Avoid using low-resolution files like 360p or 480p, as they will result in blurry and pixelated exports.
-
Import the high-quality video files into Windows Movie Maker.
Proceed with your project and make any necessary edits.
-
When you export, follow the steps from Method 1 or Method 2 to ensure a high-quality export.
By following these steps, you can significantly improve the quality of your exported videos in Windows Movie Maker. Whether you adjust the export settings, disable unnecessary file preparation options, or use higher-quality source files, these methods will help you achieve a sharper, more professional-looking video.
Part 4: People Also Ask about Windows Movie Maker Video Quality
Here are some frequently asked questions regarding video quality in Windows Movie Maker:
Q1: How to fix export error in Windows Movie Maker?
To fix export errors, ensure your software is updated and check that your export settings are correct. If the issue persists, try restarting the program or using a different video format.
Q2: Can you crop the video on Windows Movie Maker?
Yes, Windows Movie Maker allows you to crop videos by selecting the "Edit" tab and using the crop tool to adjust the video's frame.
Q3: How do I make a low-quality video in Windows Movie Maker?
To intentionally make a video low-quality, choose lower resolution settings during export or apply heavy compression to reduce the file size.
Q4: Will Windows Movie Maker decrease quality?
Yes, due to its limited export options and compression algorithms, Windows Movie Maker often reduces video quality during export, especially in formats like WMV.
Q5: Why is my movie maker video blurry?
Blurriness could be caused by low-quality source videos, incorrect export settings, or over-compression. Always use high-resolution clips and choose the correct export options.
Q6: Can Windows Movie Maker export MP4 videos?
No, Windows Movie Maker does not support exporting MP4 videos directly. It primarily exports in WMV, AVI, or other formats.
Conclusion
If you’re struggling with Windows Movie Maker low quality export video, this guide provides actionable solutions. From adjusting export settings to using high-quality source files, you can address the most common issues. For the best results, use 4DDiG Video Enhancer, which offers AI-powered tools to enhance video quality to 4K or 8K. Transform your low-quality exports into stunning visuals with ease.
Secure Download
Secure Download
💡 Summarize with AI:
You May Also Like
- Home >>
- Video Tips >>
- How to Fix Windows Movie Maker Low Quality Export Video in 4 Ways


 ChatGPT
 Perplexity
 Google AI Mode
 Grok
Grok


