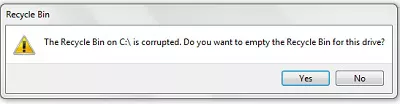
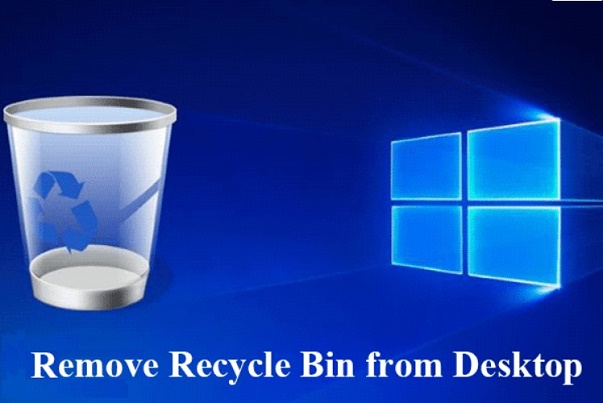
Mac Recycle Bin Not Emptying, How to Fix?

5 mins read

Updated on 2024-07-11 14:35:57 to Mac Recovery Solutions

Have you encountered the frustrating "Mac Recycle Bin not emptying" issue? Many Mac users face this problem, which can lead to a cluttered desktop and reduced storage space. When your Mac Recycle Bin refuses to empty, it can be a real headache. You might try emptying it repeatedly, only to find the files stubbornly remain. This issue can occur due to various reasons, such as locked files, corrupted file permissions, or even system glitches.

But don't worry! In this article, we'll explore the causes behind the "Mac Recycle Bin not emptying" problem and provide you with effective solutions. By the end of this guide, you'll have the knowledge and resources to tackle this problem head-on and keep your Mac running smoothly. So, let's get started on resolving your Mac Recycle Bin woes!

mac recycle bin not emptying

Part 1: Why Does My Mac Recycle Bin Not Emptying?

Understanding these potential causes is the first step in resolving the issue and getting your Mac Recycle Bin back to normal. So let's explore some of the common reasons why your Mac Recycle Bin might not be emptying:

  • Corrupted files: Sometimes, files in your Recycle Bin can become corrupted, preventing the bin from emptying properly.
  • Locked files: If a file is locked, your Mac won't be able to delete it, causing the Recycle Bin to remain full.
  • Running applications: When an application is still running and using a file that's in the Recycle Bin, it can't be deleted.
  • Insufficient permissions: If you don't have the necessary permissions to delete a file, it will remain in the Recycle Bin.
  • System glitches: Occasionally, system glitches or software bugs can cause the Recycle Bin to malfunction.

Part 2: How to Fix Mac Recycle Bin Not Emptying?

Now that we've explored the reasons behind your Mac Recycle Bin not emptying, it's time to take action. In the following section, we'll walk you through various methods to fix this issue, including a bonus tip on how to recover files from your Recycle Bin using a powerful tool.

Bonus Tip: How to Recover Files from Recycle Bin Mac?

You're trying to fix your Mac Recycle Bin that just won't empty, and in the process, you accidentally delete some critical files. Your heart sinks, and panic sets in. But wait, there's hope! 4DDiG Mac Data Recovery is here to save the day.

This user-friendly tool is designed to recover deleted files from recycle bin after empty, even if they've been deleted during a frustrating Recycle Bin issue. 4DDiG Mac Data Recovery works by deeply scanning your drive using advanced algorithms to locate and recover lost files. It offers both Quick and Deep Scan modes to ensure a thorough search, maximizing your chances of getting your files back.

Plus, with its handy file filter option, you can easily narrow down the search to specific file types, like documents or photos.

Supporting over 2000 file types and various devices, 4DDiG is a versatile and reliable solution for anyone facing data loss due to any kind of error.

FREE DOWNLOAD

Secure Download

FREE DOWNLOAD

Secure Download

Here are the simple steps to use this tool for recovering files from your Mac Recycle Bin:

  • Select the Recycle Bin location in the software and click "Scan" to start searching for lost files.

    select location
  • After scanning, browse and preview the results to locate the files you want to recover.

    scan data
  • Click "Recover" and choose a different location to save the restored files, ensuring a successful recovery. With its user-friendly interface and powerful scanning capabilities, 4DDiG Mac Data Recovery makes it simple for anyone to recover files from their Mac Recycle Bin.

    recover icloud data

Way 2: Restart Your Mac or Boot into Safe Mode

If you're unable to empty the Recycle Bin on your Mac because a file is being used by another application, restarting your Mac or booting into Safe Mode can help resolve the issue.

  • Quit the application that's preventing the file from being deleted. If you're unsure which app is causing the problem, close all running applications.
  • If quitting the application doesn't work, restart your Mac. Click on the Apple menu in the top-left corner of your screen and select "Restart."
  • After restarting, try emptying the Recycle Bin again. If the issue persists, it might be caused by a login item or startup item using the file.
  • To resolve this, start your Mac in Safe Mode. Shut down your Mac, then press and hold the Shift key while it starts up. Release the Shift key when you see the login screen.

    login screen
  • Once in Safe Mode, attempt to empty the Recycle Bin. If successful, restart your Mac normally to exit Safe Mode.

Way 3: Use Terminal to Force Empty the Recycle Bin

If you're comfortable using Terminal, you can employ it to forcefully delete files from the Recycle Bin. This method is particularly useful when other approaches have failed, as it bypasses any errors preventing the Recycle Bin from emptying.

However, exercise caution when using Terminal, as incorrect commands may lead to unintended consequences.

  • Open Spotlight by pressing CMD + Space. Type "Terminal" and hit Return to launch the Terminal application.

    launch the terminal application
  • In the Terminal window, type "sudo rm -R" (without quotes) followed by a space. This command will force delete the files from the Recycle Bin.

    sudo rm
  • Go to the Recycle Bin and select all the files you want to delete. Drag these files into the Terminal window, then press Return.

    terminal window
  • Terminal will prompt you to enter your Mac admin password. Type in your password and press Return to authorize the command. Note that when typing your password, no characters will appear on the screen, but the Terminal is still registering your input.
  • Once authorized, the command will execute, immediately deleting the files you dragged into the Terminal window.
Note:

If you accidentally delete the wrong files, you can use a reliable data recovery tool like 4DDiG to attempt to recover them.

Way 4: Unlock Files to Empty the Recycle Bin

If you're unable to empty the Recycle Bin on your Mac because some files are locked, you can easily unlock them and proceed with deletion. Here are the simple steps to unlock the files:

  • Open the Recycle Bin on your Mac by clicking its icon in the Dock.
  • Locate the locked file that's preventing the Recycle Bin from emptying. Right-click on the file and select "Get Info" from the context menu.
  • In the Info window, look for the "Locked" checkbox near the bottom of the General section. If the checkbox is marked, click on it to uncheck and unlock the file.

    locked
  • Close the Info window and return to the Recycle Bin. You should now be able to delete the previously locked file by right-clicking it and selecting "Delete Immediately," or by clicking the "Empty" button.
  • Repeat steps 2-4 for any other locked files in the Recycle Bin that are preventing it from being emptied.

Way 5: Use Disk Utility to Repair the Drive

Disk Utility is a built-in tool on macOS that can help you perform various disk-related tasks, including repairing drives to fix errors that may be preventing the Recycle Bin from emptying.

So If you're unsure why your Mac's Recycle Bin won't empty. You can use Disk Utility to repair the drive and may resolve the issue.

  • Restart your Mac and hold down the Command + R keys during startup to enter macOS Recovery.
  • When the macOS Utilities window appears, select "Disk Utility" and click "Continue."
  • In the Disk Utility window, select the drive that contains the files you want to delete from the sidebar on the left. This is typically your main startup disk, named "Macintosh HD" by default.
  • Click on the "First Aid" button in the top toolbar of the Disk Utility window. This will initiate a scan of the selected drive, checking for and attempting to repair any errors found.

    first aid
  • After the First Aid process is complete, close the Disk Utility window and click on the Apple menu in the top-left corner of the screen. Select "Restart" to exit macOS Recovery and boot your Mac normally.
  • Once your Mac has restarted, try emptying the Recycle Bin again. If Disk Utility successfully repaired any errors on the drive, you should now be able to delete the files without issue.

Part 3: Frequently Asked Questions

Q: How do you force empty the recycle bin on a Mac?

Ans: To force empty the Recycle Bin on a Mac, open Terminal, type "sudo rm -R" followed by a space, then drag the files from the Recycle Bin into the Terminal window and press Return.

Q: Why aren't deleted items in the Recycle Bin Mac?

Ans: If deleted items aren't appearing in your Mac's Recycle Bin, they may have been permanently deleted using the "Delete Immediately" option, or the application you used to delete them bypassed the Recycle Bin.

Q: How do I make my recycle bin automatically empty on Mac?

Ans: To set your Mac's Recycle Bin to automatically empty, go to Finder Preferences, click Advanced, then check the box next to "Remove items from the Trash after 30 days."

Conclusion

As you can see there are several effective solutions to resolve this problem. By following the methods outlined in this article, you can successfully empty your Recycle Bin and reclaim valuable storage space. If you accidentally delete important files in the process, remember that data recovery tools like 4DDiG Mac Data Recovery can help you get your lost data back. Don't let a stubborn Recycle Bin slow you down – take action and enjoy a clutter-free Mac today!

William Bollson (senior editor)

William Bollson, the editor-in-chief of 4DDiG, devotes to providing the best solutions for Windows and Mac related issues, including data recovery, repair, error fixes.

(Click to rate this post)

You rated 4.5 ( participated)