How to Fix HDMI Sound Not Working on TV from Laptop [Easy for Everyone]
HDMI is the norm for releasing high-quality audio and video from TVs to laptops. Unfortunately, in many users' cases, HDMI sound on TV just doesn't work, and this can disturb your entertainment or your presentations. The reason this happens and how to fix HDMI sound not working on TV is what we’ll explain in this guide, along with eight simple fixes that should be easy to perform.
Part 1. Understanding HDMI Audio
❓ What Is HDMI?
HDMI (High-Definition Multimedia Interface) is a technology that can make high-quality audio and video signals from one source to another via a single cable. It supports multi-channel audio formats, and therefore, it is a great vocative to connect your laptops, gaming consoles, and media players to your TV. HDMI offers convenience and the ability to deliver immersive sound, and that makes it vital for modern setups.
❓ Why Is HDMI No Volume on TV?
There are several reasons why sound may not work through HDMI:
- Laptop or TV incorrect audio settings.
- Incompatible audio formats.
- A bad or poor-quality HDMI cable.
- Lack of old audio drivers that are installed on your computer.
This will help you also come to know the reason for this issue and how to identify and solve it more efficiently.
Part 2. Quick Checks Before Troubleshooting HDMI No Sound on TV
Before you get after the solutions to solve this issue of your TV not giving any sound over the HDMI connection, it is important to do some quick checks. These checks require no technical experience and yet allow you to easily try out different configurations for the HDMI cable to track down the root cause at your end.
Below are 2 crucial quick checks that you must try before you work towards resolving the no sound on TV via HDMI issue.
1. Check Your HDMI Cable
It is very important what quality and in what conditions your HDMI cable is. Here are some checks that will help you troubleshoot your HDMI cable:
-
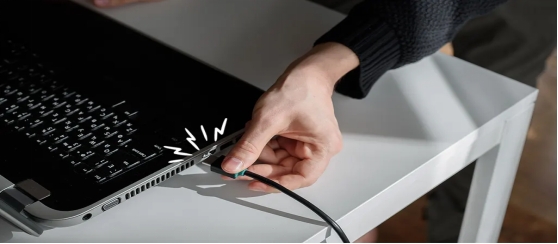
Make sure the cable is firmly seared to both the laptop and the TV.
-
Look down the cable for any obvious damage: frayed edge or bent connector.
-
If you can, take the cable and test it with another device to get rid of physical defects.
2. Test with Another Device
Before you assume your laptop or TV is at fault, run an HDMI cable from your TV to whichever other device (e.g. another laptop, gaming console, or Blu-ray player) you have and see if there’s some other device that is at fault. If it is fixed then the original device is working fine. If there is still HDMI sound not working on TV, start troubleshooting the TV or HDMI cable.
Doing these things will allow you to continually narrow down the root cause so you can start to solve for more advanced solutions.
Part 3. How to Fix HDMI Sound Not Working on TV [6 Fixes]
Now that you are coming to the solution to the problem, here are our top 6 solutions that you can try to fix the issue. These solutions include everything you can try from different compatibility settings to trying playback device configurations.
1. Adjust TV and Laptop Audio Settings
One of the most common reasons for HDMI sound failure is it's having wrong audio settings. It’s possible your laptop is not sending audio to the correct device, or that your TV isn’t set to take in audio from the HDMI port. Setting up these settings fixes everything for proper communication between your devices.
-
If there is a TV, look at its audio settings and set the correct HDMI input.
-
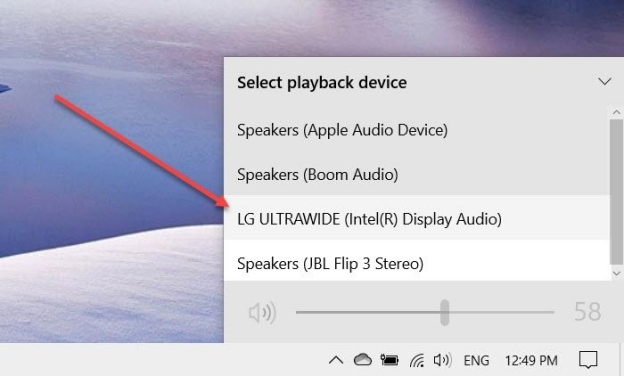
Click the “Volume Icon” in the taskbar on your laptop, click to bring up a list of devices, and choose your TV for audio output.
-
After you save the changes, you can test the sound.

2. Check Audio Format Compatibility
If your laptop is sending out the audio format, but your TV does not support it, you are going to experience audio compatibility issues. Advanced formats such as Dolby Atmos DTS are also prone to missing fonts because of how they’re constructed. Verify and tune up the audio format so that your TV processes the signal well.
-
Head to “Control Panel”, click on “Sounds”, and then simply right-click the “Volume” Icon in the taskbar.
Go to “Playback”, and select your TV, then “Properties”.
-
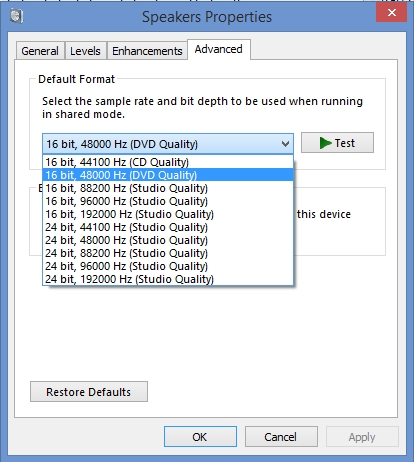
You need to go to the “Supported Formats” tab and ensure that your TV actually can support the selected format.
-
Change those settings if you need to use a compatible format instead.

3. Use 4DDiG Audio Repair Tool
If HDMI sound problems persist even after changing the configuration the problem may originate from corrupting of system files or audio data. The 4DDiG Audio Repair Tool is a reliable solution for those stubborn problems, repairing sound errors and restoring file integrity.
Secure Download
Secure Download
Features of 4DDiG Audio Repair:
- Batch repair corrupted audio files because of their sound errors.
- Fix issues with sound output on different devices and different platforms.
- Support MP3, AAC, M4A, FLAC, WAV, and more audio formats
- Work with multiple downloaded resources and recording devices
- Remove noise, pops, and more imperfections from audio
- Restores system audio and restores the quality of media files.
- High success rate and fast repair speed
How to Use 4DDiG Audio Repair
Below is the step-by-step guide on how you can use 4DDiG Audio Repair to repair WAV, MP3, and any other audio files.
-
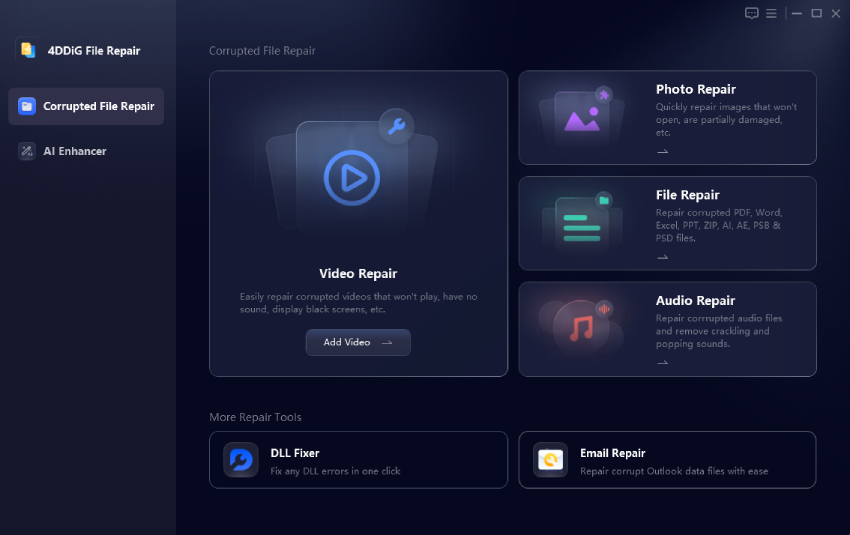
Select “Corrupted File Repair” and pick “Audio Repair” after opening 4DDiG File Repair.

-
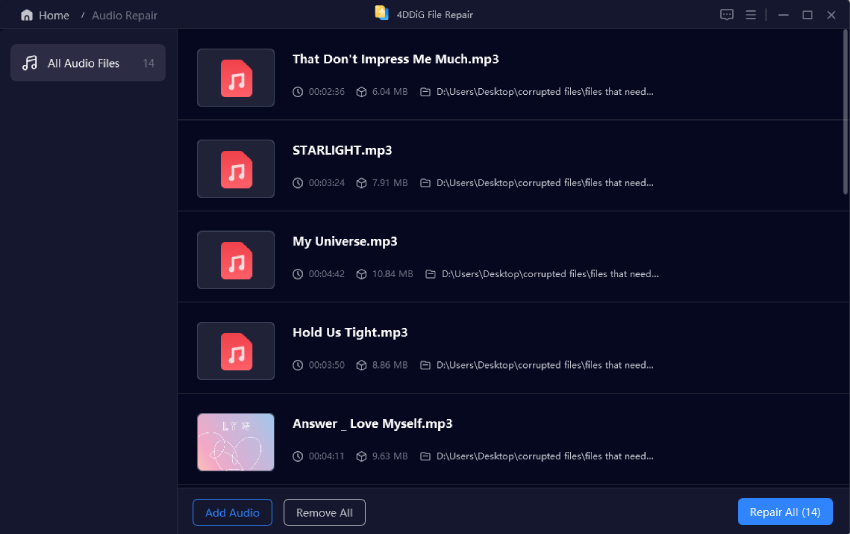
Click “Add Audio” and select your audio files that have no sound through HDMI on TV.

-
Click “Repair All” to begin repairing damaged audio files for playing them via HDMI on TV with sound.

-
Click “Save All” to save all the repaired audio files and try playing them on TV through HDMI again.

Also, you can use its online free version - 4DDiG Online Free Audio Repair to fix those audio files that are slightly damaged.
4. Select HDMI as Default Playback Device for TV
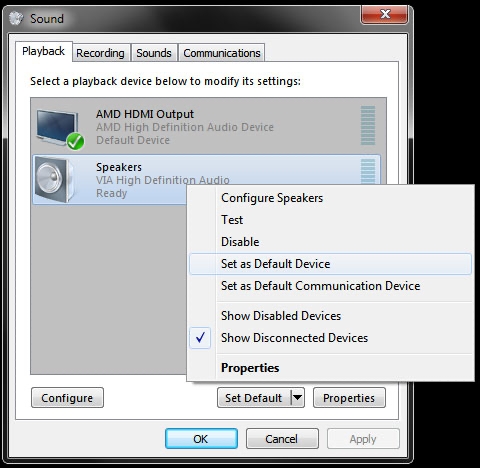
When you connect to a TV, windows do not always switch the audio output onto something like HDMI automatically. This means you are routing your sound to where you need it to go, manually by selecting HDMI as the default playback device.
-
Click the “Volume” icon in the taskbar and select “Sounds”. In the list that is under the "Playback” tab, you will find your TV or its HDMI device.
-
Just click Set Default to make it the default. Make the changes and run the audio by playing a media file.

5. Set the Laptop's Sound Output Device as Your TV
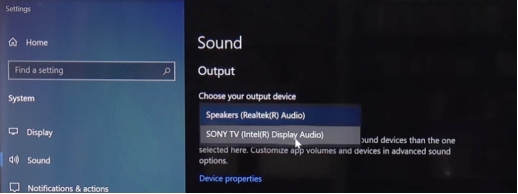
If they still aren't working after you've changed HDMI to be the 'default playback device', you'll need to manually set your laptop's audio output settings. This will allow you to steer clear of conflicts with another system.
Open “Settings” and go to “Sound”.
Now, choose your TV as the “Default output device”
-
Remember to restart your laptop before trying the audio again.

6. Disable the Laptop Speaker
It's when our internal speaker on the laptop conflicts with HDMI audio output because of that conflict we get no sound. If you disable the laptop speaker then system audio will only flow through HDMI.
-
Click on the "Volume” Icon on the taskbar and right-click to get “Sounds”.
-
On the “Playback” tab, you will find your laptop’s internal speaker.
-
Click “Disable” in the “Options” group of the right-click menu for the speaker.
Then the speaker will get a “Disabled” mark against it.
Part 4. People Also Ask about HDMI No Volume on TV
Q1: Does Sound go through HDMI?
HDMI carries both video and audio signals, although both cable and device involved must be compatible and properly configured.
Q2: Why does my TV have no Sound when I connect HDMI?
This may have happened as a result of a wrong setup, an incorrect audio format, or a broken HDMI cable.
Q3: Do some HDMI cables not support audio?
HDMI cables always come with audio capability, however, subpar quality or older versions may not be as good at transferring audio signals.
Conclusion
Solving HDMI sound issues on your TV can be quite simple. Following these quick checks and fixes, you can bring your audio back, and enjoy these seamless multimedia experiences. If you have stubborn HDMI sound not working on TV problems, 4DDiG Audio Repair will help you with advanced tools for diagnosing and fixing audio errors easily.
If you have the correct troubleshooting steps and tools as you have with you every time you forget to connect the HDMI, you will be able to get high-quality sound by way of your HDMI connection too.
Secure Download
Secure Download
💡 Summarize with AI:
You May Also Like
- Home >>
- Audio Repair Solutions >>
- How to Fix HDMI Sound Not Working on TV from Laptop [Easy for Everyone]


 ChatGPT
 Perplexity
 Google AI Mode
 Grok
Grok

