Audio Renderer Error. Please Restart Your Computer - What It Means & How to Fix?
Questions
“So I’m watching this YouTube video with headphones in, but when my headphones died, the video buffered and said 'Audio renderer error. Please restart your computer.' I’ve tried restarting my computer but it is still happening. The video is completely fine when I have my headphones connected, but when I disconnect the video does this, please help me.” - from Reddit
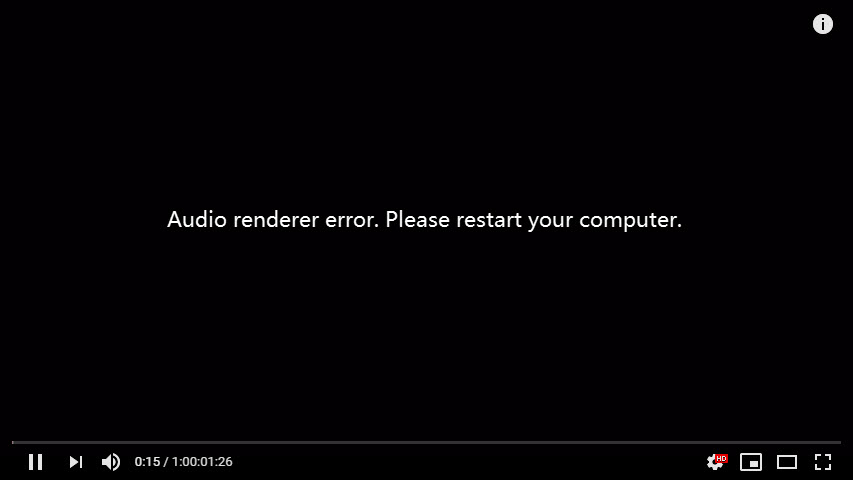
Many Windows users have reported encountering a bothersome audio renderer error, particularly when trying to play videos on platforms like YouTube, Adobe Premiere Pro, Voicemeeter, etc. And they’ve found that restarting the computer doesn't always do the trick.
If you're stuck with this error which disrupts your audio output and hinders video playback, fret not. In this article, we've compiled several effective ways that show you exactly how to fix the sound error. So without any further ado, let’s dive into the solutions.
Part 1. What Does Audio Renderer Error Mean?
What is audio rendering? Audio rendering refers to the process of converting audio data from its raw or edited state into a final, playable format. The process involves converting digital audio to analog signals that can be played through speakers, headphones, or other audio output devices.
Audio Renderer Error typically means a problem that occurs when a device or software tries to play audio but encounters an issue with the audio rendering process. When this process encounters errors, it can result in issues like distorted or no sound, audio dropouts, or crashes in audio-related applications.
✍ Common Scenarios of the Issue
- Chrome/Voicemeeter/Youtube audio renderer error
- Rendering required audio files stuck at 0
- Premiere Pro stuck at rendering required audio files
✍ What Causes Audio Renderer Error?
Understanding this reason behind the issue is essential to effectively addressing and preventing it. Below are several factors that can contribute to this error.
- Audio Driver Issues: Outdated or incompatible audio drivers can disrupt the audio rendering process.
- Software Conflicts: Conflicts between audio-related software, such as multiple applications trying to control audio output simultaneously, can lead to errors.
- Audio Settings: Any unfavourable changes to the audio settings internally can lead to the error.
- Corrupted Audio Files: If an audio file is corrupted or improperly encoded, attempts to render it may result in errors.
- Browser Issues: Since the error mostly occurs while browsing YouTube, browser-related issues such as accumulated cache and cookies, extensions or plugins, etc. can be the culprits of the error on YouTube.
Part 2. How to Fix Audio Renderer Error Windows 11/10 without Restarting
While the error message suggests a computer restart as the solution, it's not a foolproof solution, especially in cases where the error isn't merely a temporary glitch, as many users have discovered. In this section, we'll explore methods on how to fix audio renderer error without restarting computer.
- Fix 1: Restart Windows Audio Service
- Fix 2: Reconnect Your Audio Playback Devices
- Fix 3: Use Same Rate on Windows Sound System and ASIO Driver Settings
- Fix 4: Update/Rollback Audio Drivers
- Fix 5: Disable and Re-enable Audio Devices
- Fix 6: Run Audio Troubleshooter
Method 1. Restart Windows Audio Service
When troubleshooting audio-related issues, restarting the Windows Audio Service can provide a straightforward solution. The Windows Audio Service is responsible for managing audio devices and processes on your system. Over time, this service can encounter glitches that affect audio playback, leading to the rendering audio issue.
Here's how you can restart the Windows Audio Service:
- Press Win + R and enter "services.msc" into the command box to open the Service app.
- Go to the "Windows Audio" service and right-click on it
-
Click on the "Restart" option. This action will restart the service (15-20 seconds).

- Close the Service app and refresh your computer. Play the problematic audio file or YouTube video to check if the rendered error has been resolved.
Method 2. Reconnect Your Audio Playback Devices
A simple yet effective initial step to tackle the sound error is to re-establish the connection of your audio playback devices. Often, a loose or improperly connected cable can disrupt the audio rendering process, leading to the error. Therefore, check that all your headphones, speakers, or other audio devices are properly connected to your computer's audio ports.
If the error persists, it could stem from a momentary technical glitch caused by multiple audio playback devices connected to your computer. This confusion within the operating system triggers the "Audio renderer error. Please restart your computer" message. In this scenario, attempt the following:
- Disconnect all audio playback devices.
- Reconnect only the specific device intended for use.
☞ How to Fix No Audio Output Device Is Installed? 100% Work!
Method 3. Use Same Rate on Windows Sound System and ASIO Driver Settings
When the sample rates of the Windows Sound System and the ASIO driver do not match, it will cause errors in the transmission of audio data. This can interfere with the processing and playback of audio signals. To get rid of such a dilemma, please follow the steps below to match them with the same sample rate:
- From the system tray, find the Speaker icon and right-click on it. Choose "Sound" from the pull-up list.
- Click the "Playback" tab and on the playback device list, pick your speaker or output device and tap on "Properties" afterward.
- In the Speaker Properties dialog, switch to the "Advanced" section.
- Tap on the down-arrow icon next to the "Test" tab. Then the sample rate and bit depth options will display on the draw-down menu.
- Make sure the options shows 44100 or 48000.

Method 4. Update/Rollback Audio Drivers
Since outdated or incompatible drivers can significantly impact the audio rendering process, it’s crucial to ensure that your audio drivers are up-to-date and compatible with your system. But if the “Audio renderer error. Please restart your computer.” error emerges after a recent driver update, reverting to the previous driver version might be the solution.
Here’s how you can update or rollback your audio drivers:
➡️ Update Audio Drivers:
- Go to the Start menu and search for Device Manager and open it.
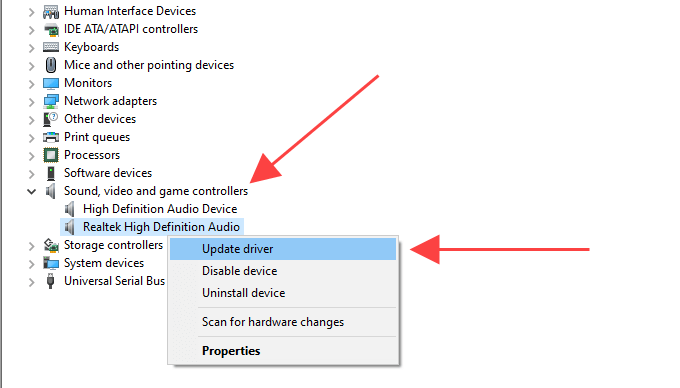
- Click on the Sound, video, and game controllers option to expand it.
-
Right-click on the default audio driver and click on the Update driver option.

-
Device Manager will search and update the driver to the latest version. Restart your computer and play the audio again.
➡️ Rollback Audio Drivers:
- Open Device Manager from the Start menu.
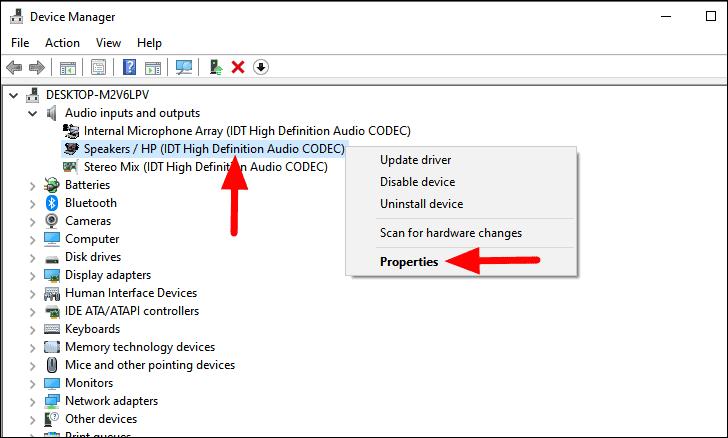
- Expand the Sound, video, and game controllers option.
-
Right-click on the audio driver and select the Properties option from the menu.

-
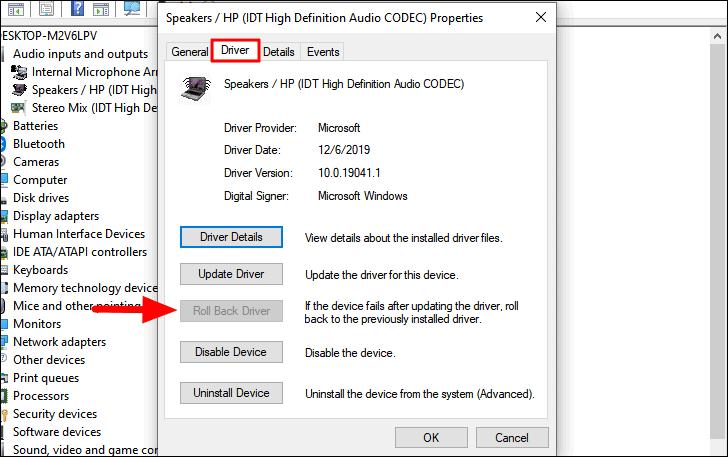
From the Properties window, go to the Driver tab. Click “Roll Back Driver” if this option is available (grayed out if no previous driver exists).

- Choose a reason for rolling back and then click “Yes.” Now restart your computer to apply the changes. Once restarted, play the audio or YouTube video again to see if the problem has been resolved.
Method 5. Disable and Re-enable Audio Devices
Audio devices can freeze at times due to temporary glitches in the system, potentially leading to the issue. A practical approach that has worked for many users involves temporarily disabling and then re-enabling audio devices. Doing this can help rectify the error and restore proper audio functionality. Here's how do I restart the audio device on my computer:
- Right-click on the Start icon and select the Device Manager from the menu.
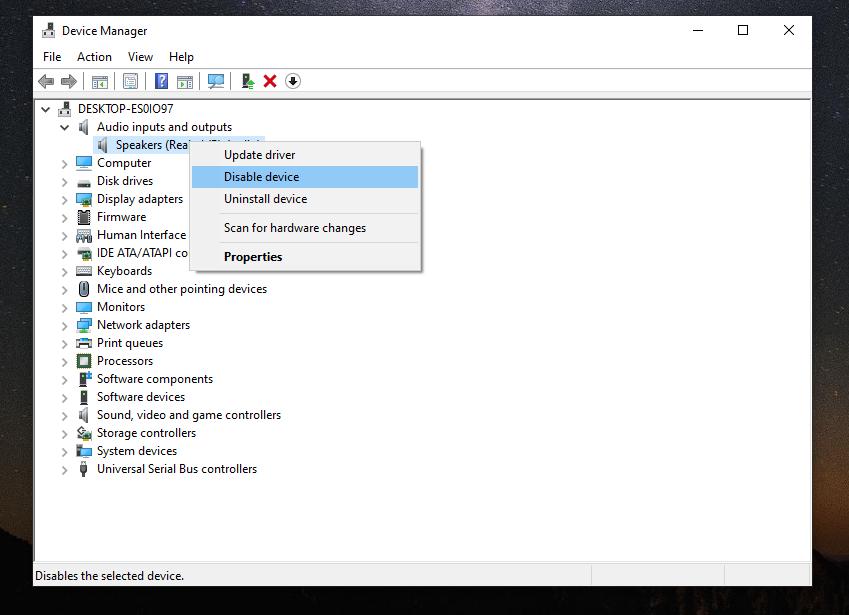
- On the Device Manager, expand the "Audio inputs and outputs" section.
-
Right-click on the devices and select the "Disable device" option.

-
Refresh your computer. Open the Device Manager again.
-
Right-click on the disabled audio devices and click on "Enable device" option now. Then test the audio playback to check if the issue has been resolved.
Method 6. Run Audio Troubleshooter
Windows 11 comes with a dedicated audio troubleshooter that can identify and automatically resolve issues related to audio playback. Here are the steps to run the audio troubleshooter in windows 11.
- From the Start menu, open the Settings app.
-
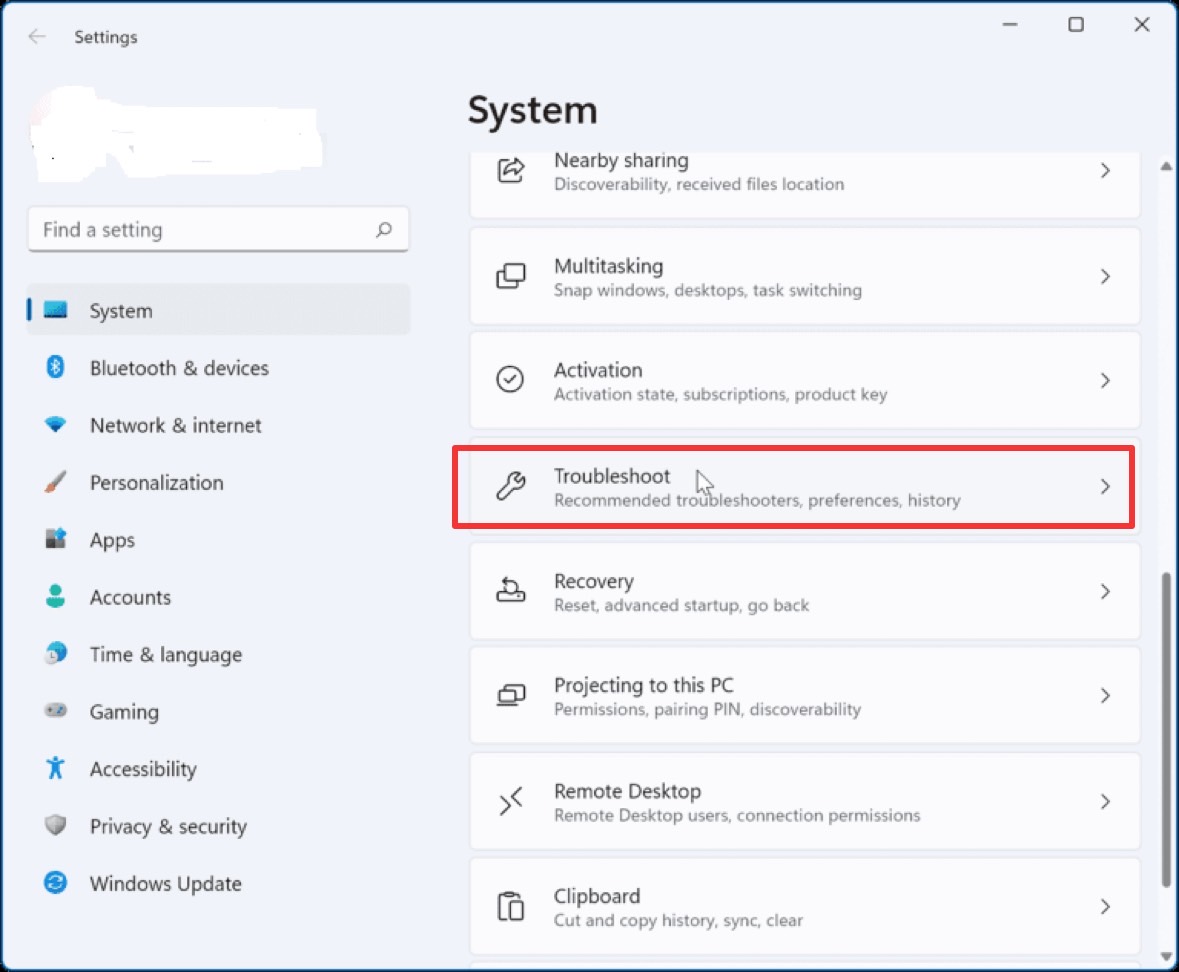
Go to System from the left panel. Go to "Troubleshoot" from the right panel.

- Select the "Other troubleshooters" option.
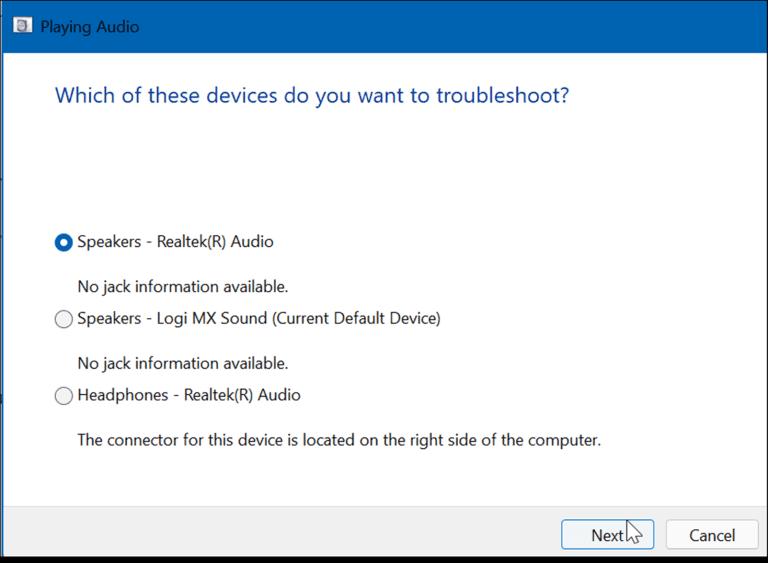
- Under Other troubleshooters, click the Run button next to "Playing Audio".
-
You need to select your audio device and follow the on-screen instructions for the
troubleshooter to diagnose the problem and fix it automatically.

☞ Sometimes, the audio renderer error may lead to audio-video desync issue. At that time, please check this guide to fix the desync error on different platforms or devices: How to Fix Audio and Video Out of Sync in 2025 (YouTube, Prime Video, Samsung TV, and More)
Part 3. How to Fix Audio Renderer Error Mac
If you are a Mac user, apart from some of the above methods, please take the following solutions a try.
Method 1. Restart Your Computer
According to many users' reports, it is feasible to troubleshoot the rendering audio error on Mac by restarting their desktop. Just tap on the top-left Apple logo and select "Restart" from the dropdown menu. A confirmation dialog will appear. Click "Restart" again to confirm.
Method 2. Roll Back to the Earlier Version of Mac
The audio rendering issue also usually occurs after updating to the macOS version, such as macOS Sonoma 14.6. Amid this, it is recommended to roll back to the last version. The process is a little bit complicated.
- On Terminal, enter the command: "
softwareupdate--list-full-installers" to search if there is any available software, such as macOS Sonoma 14.4.1. - Then run the command to install the Sonoma 14.4.1: "
. softwareupdate --fetch-full-installer --full-installer-version 14.4.1." - This way will not override the existing Sonoma 14.6 installation.
Also, you can contact the Apple Support to replace your motherboard. However, it is not free if your computer is not under warranty.
Part 4. Specific Case: How to Fix YouTube Audio Renderer Error
Method 1. Adjust Amplify Equalizer & Test PC Speaker Play Sound
Some users said that it is the third-party audio amplify equalizer that result in the The YouTube audio issue. Therefore, it is recommended to adjust the eqqualizer and then follow the instructions:
- Right-click on the bottom-right Speaker icon on your PC's screen and choose "Sound" from the dropdown.
- In the Sound window, click "Playback" and tap on "Properties".
- On the Speakers Properties windows, switch to the "Levels" section on the dialog. Drag the volume bar to the maximum value.

- Later, go to the "Advanced" tab and hit the "Test" button.
Method 2. Disable Adblocker
Besides, adblocker is also a culprit behind the sound issue. Most YouTube videos may comes with some ads before playback. Then the adblocker will block the content, including the audio. Therefore, you can disable the adblocker extension or whitelist YouTube.
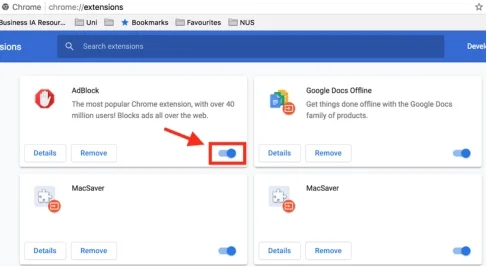
- Tap on the three-dot icon on Chrome and go to "Extensions" > "Manage Extensions".
- Then find the Adblocker extension and toggle off its button.

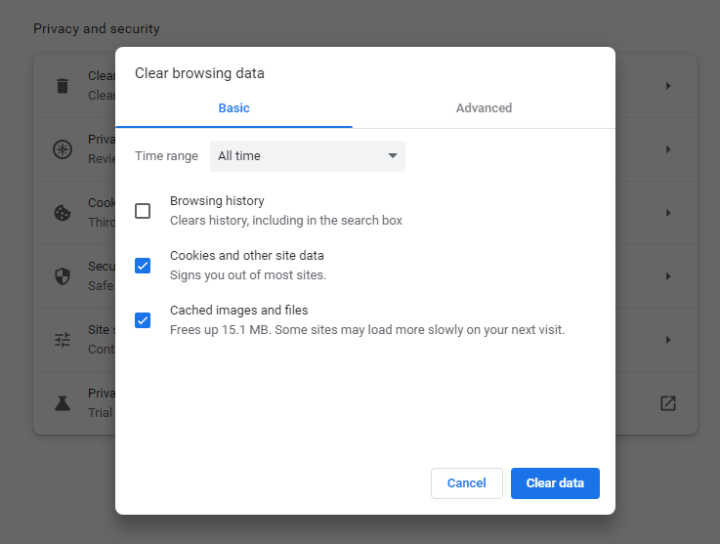
Method 3. Clear Cache & Cookies in Browser
When encountering the YouTube audio renderer error, it's worth considering issues related to your browser's cache and cookies. These stored data elements can sometimes become corrupted, leading to playback problems. Clearing them out can potentially resolve the error. Here's how clearing your browser's cache and cookies can potentially fix the sound problem.
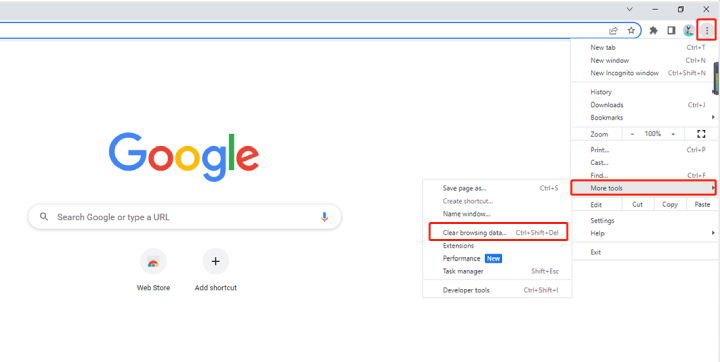
- Open Google Chrome. Click the three-dot icon at the top-right corner.
-
Go to "More Tools"> "Clear Browsing Data" option

- Select a time range and toggle on the cookies option and the cached option.
-
Click the Clear Data button. Once the cookies and cached files are cleared, reopen the browser and play the video on YouTube again.

Part 5. How to Fix Audio Renderer Error and Repair Unpayable Audio with Professional Utility
If the above methods are of no avail, it is considered that the audio itself is the culprit. What you need is to turn to specialized software like 4DDiG Audio Repair, which is professionally designed to fix audio files that are unrendered, corrupted, broken, etc. It can diagnose and rectify various audio anomalies (including the rendering audio error), offering a comprehensive approach to salvaging compromised audio recordings.
Outstanding Features of 4DDiG Audio Repair
- Professionally repair various audio files that are unrendered, unplayable, broken, corrupted, etc.
- Deal with multiple audio formats: repair MP3, M4A, FLAC, WAV, and more.
- Also support many video files: MP4, AVI, MOV, MKV, and others supported by YouTube and other platforms.
- With high success rates, no matter how severey corrupted the audio is.
- Can batch repair multiple audio files and video files at once, saving time.
- Friendly and quick to use for beginners.
How to Repair Unrendered or Unplayable Audio with 4DDiG Audio Repair
-
Install and fire up the 4DDiG Audio Repair (aka the 4DDiG File Repair executable) on your computer. Select the "Corrupted File Repair" option from the left menu and then tap on "Audio Repair".
FREE DOWNLOADSecure Download
FREE DOWNLOADSecure Download

-
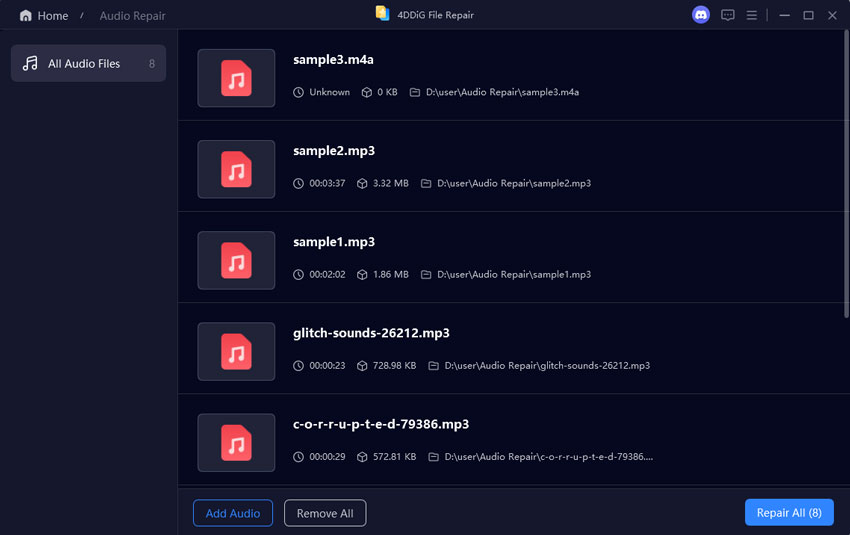
Import the corrupted files showing audio renderer error from your storage device by clicking on the "Add Audio" button. Alternatively, drag and drop those files to the 4DDiG software directly.

-
Once added, initiate the repairing process by clicking the "Repair All" button. 4DDiG File Repair will analyze the audio files, detect the issues and repair them effectively.

-
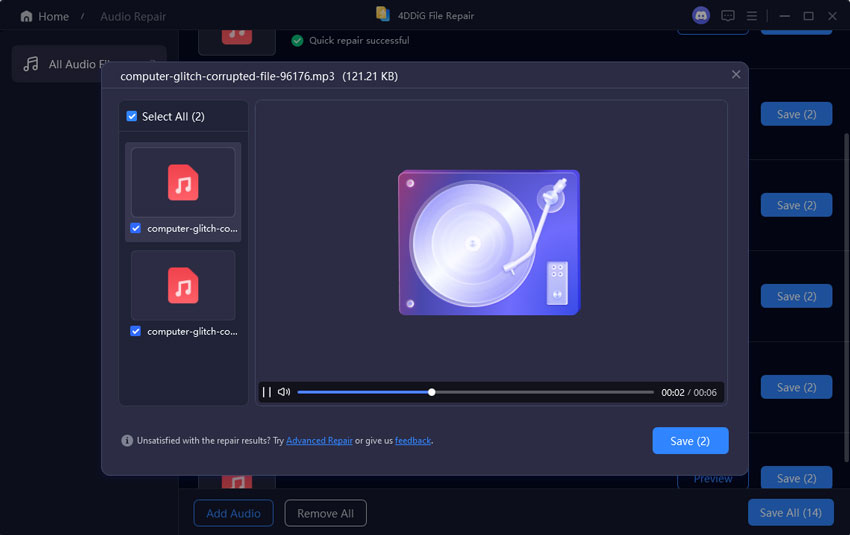
When finished, you will see the list of the repaired files. Click "Preview" to check the fixed result. Finally, hit "Save All" to export and store them at once.

Part 6. People Also Ask about Rendering Audio
Q1: What does an audio renderer do?
An audio renderer processes the digital audio signals and sends the processed audio signals to the output audio playback device. In other words, it's responsible for taking the digital audio information and turning it into sound that we can hear.
Q2: Why does restarting my computer not fix the Audio Renderer Error?
If the error is due to a temporary glitch in the system, restarting your computer can fix it. But if the issue is due to audio drivers, audio devices, or corrupted audio files, restarting won’t fix the error.
Q3: Why audio renderer error keeps happening?
If the issue keeps happening for the same audio file, the file could be damaged or corrupted. You can use 4DDiG File Repair to fix the file and play it without any issues. If you have multiple audio devices or outdated or faulty audio drivers, such audio issues can be persistent.
Q4: How do I fix the sound glitch on YouTube?
First, check the volume icon on Youtube is turned on. Second, ensure the YouTube website is unmuted.
Conclusion
The audio renderer error is a common challenge encountered by Windows users. When a mere computer restart proves insufficient for resolving this issue, it's advisable to explore solutions such as checking audio device connections, updating audio drivers, re-enabling audio devices, and clearing browser cache and cookies.
Additionally, if the error extends to offline media playback using the default player, the possibility of a corrupted audio file should be considered. In such cases, a reliable solution like 4DDiG Audio Repair is recommended for seamlessly recovering and playing compromised audio files.
Secure Download
Secure Download
💡 Summarize with AI:
You May Also Like
- Home >>
- Audio Repair Solutions >>
- Audio Renderer Error. Please Restart Your Computer - What It Means & How to Fix?





 ChatGPT
 Perplexity
 Google AI Mode
 Grok
Grok


