Taking screenshots is one of the most important and common built-in systems of a computer. It is also available on Mac. The different computer has different options to take a screenshot. Like another computer system, Mac also has a simple and easy technique to take a screenshot. Some people complain why is my screenshot not working on mac. Well, it can happen. Lots of people searching to know how to fix screenshot on mac not working. It appears that you've found your destination. In this post, we've discussed a few options for getting yourself out of this problem quickly and easily. So, why late? Let’s get the solution.
- Part 1: How to Screenshot on Mac?
-
Part 2: How to Fix Screenshot on Mac Not Working?
- Solution 1: Make sure your Mac's shortcuts are set up correctly
- Solution 2: Try restarting and updating the Mac
- Solution 3: Do an NVRAM reset
- Solution 4: Load in safe mode
- Solution 5: Check your Mac for malware
- Solution 6: Use native utilities
- Solution 7: Use grab to screenshot on Mac
- Solution 8: Use preview to Screenshot on Mac
- Solution 9: Check the keyboard settings
- Solution 10: Confirm the location of saving Mac screenshots
- Part 3: How to Recover Deleted or Lost Screenshots on Mac?HOT
- Part 4: How to Avoid Screenshots on Mac Not Working?
- Part 5: Screenshots on Mac Not Working FAQs
Part 1: How to Screenshot on Mac after macOS 15 Update?
Before learning why is screenshot on mac not working, you must first understand how to capture a screenshot on a Mac in order to repair the "screenshot on mac not working" problem. Because if you do not know the all systems to take a screenshot then you cannot be sure that the system of your computer is working or not.
Method 1: Take a screenshot of a window
Step 1: At the same moment, press "Command + Shift + 4" on your keyboard. To hover the cursor above the window, press the "Space" key on your keyboard as soon as you see crosshairs on your screen. Then, using either the trackpad or the mouse, make a selection. It is important to remember to keep the Space bar down while dragging.
Step 2: The Camera symbol is now visible, and the background of your window has been tinted grey. To capture a window, select it from the list if there are many open ones. Click the mouse button one last time to finish capturing a screenshot of what's in the window you just opened.
Step 3: A "Move to Trash" option will appear when you right-click on the application icon, but you may also drag the icon to the Trash using your mouse.
Method 2: Take a full-screen screenshot
Step 1: To begin you have to hold down the "Command + Shift + 3" keys simultaneously.
Step 2: When you hear the sound of the camera shutter, your screenshot will be saved to your computer's desktop.
Method 3: Screenshot a section of the display
Step 1: At the same moment, press the "Command + Shift + 4" keys on your keyboard. You will be able to snap a screenshot of a specified section of the screen if you use this shortcut.
Step 2: You will see a cross with some numbers after tapping the keys. So, use the cross to capture the area you desire.
Method 4: Take a screenshot of a dropdown menu
Step 1: After launching the menu, hold down the "Command + Shift + 4" keys and then drag the cross to where you want it to appear on the menu.
Step 2: To take a screenshot of a specific region, “release the mouse button” and then click the “Space key” on your computer keyboard. By hitting the menu button one more time, you may capture a screenshot.
These are the methods of taking screenshots on mac. If you follow all these methods but still cannot take screenshots then stay tuned to get the solutions.
Part 2: How to Fix Screenshot on Mac Not Working after macOS 15 Update?
As you are already here so we think that you are facing difficulties in taking screenshots on your Mac. Don’t worry, follow the solutions below to solve the screenshot on mac not working issue.
Solution 1: Make sure your Mac's shortcuts are set up correctly
A screenshot may be taken by pressing "Command+Shift+3" to take a screenshot of the entire screen, or "Command+Shift+4" to capture only part of the screen, as long as the screenshot shortcuts have not been activated. The keyboard shortcuts for taking screenshots are active by default. But if screenshot on mac not working then you can activate that again by following the steps below.
Step 1: First of all navigate to the "Apple" menu and then to "System Preferences."
Step 2: After that, select "Keyboard" and then "Shortcuts" from the drop-down menu.
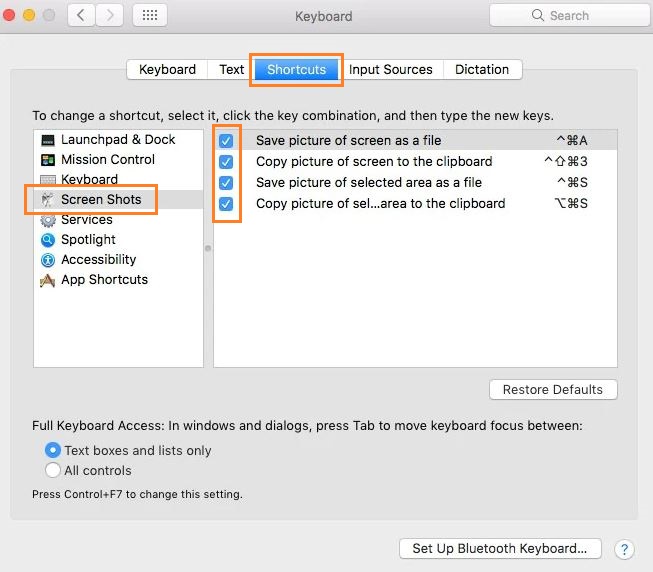
Step 3: Next you have to select "Screenshots" from the drop-down menu on the left side of the window.
Step 4: Finally, double-check that all of the choices are checked or active in this section.
Now try again to take a screenshot, if it still doesn’t work for screenshot on mac not working issue, then go for the next solution.
Solution 2: Try restarting and updating the Mac
This is the simplest way which sometimes works after applying the first solution. There are different types of systems to “Restart your Mac”.
Step 1: Restart your computer by pressing and holding the "Power" button. You may also restart by pressing "Control + Eject."
Step 2: Now go to the “Apple” menu and after that, you have to choose “Restart”.
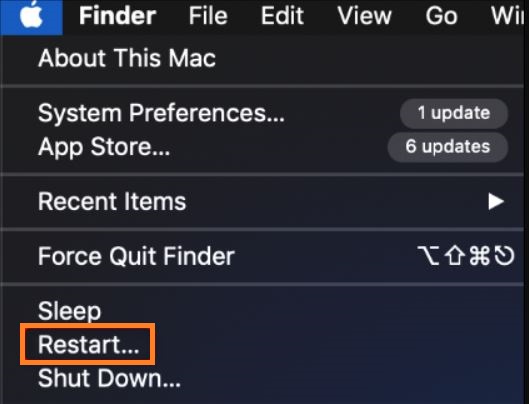
Step 3: Select "Restart" after pressing "Control + Command + Eject" or "Control + Command + Power."
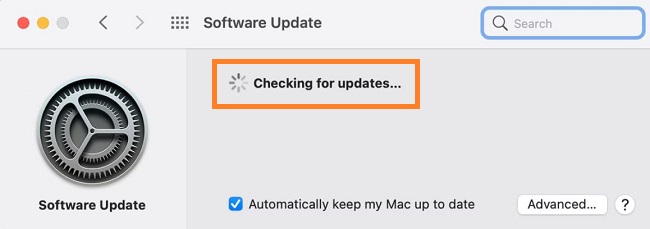
Step 4: To have your Mac automatically look for newer versions of software, go to System Preferences > Software Update.
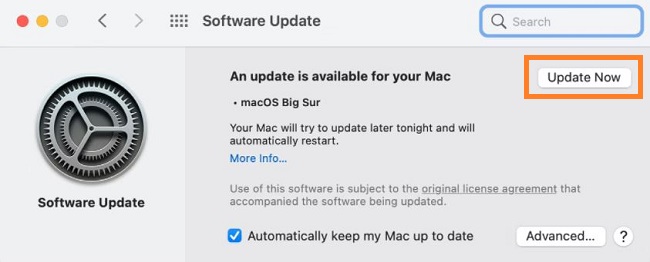
Step 5: Click the Update Now button if there's a new version.
Now, the screenshots not working on mac issue should be fixed.
Solution 3: Do an NVRAM reset
It's a form of computer memory called “NVRAM” that keeps track of things like the level of your sound, time zone, and screen resolution. Resetting the NVRAM is known to fix a variety of problems, including a problem with Mac screenshots not working. SO, let’s reset it.
Step 1: Press the power button on your Mac to shut it down and then restart it.
Step 2: Hold down “Command + Option + P + R” on your keyboard for around 20 seconds after you hear the starting sound.
We think this will solve your problem. If still not then go for the next solution.
Solution 4: Load in safe mode
Sometimes screenshots do not work because of some malware installed into your computer. To know surely you need to open your Mac in short mode.
Step 1: Wait a full 10 seconds after shutting down your Mac before starting it up again.
Step 2: Press and hold Shift immediately after the Mac has restarted. Once you see the login screen, release the key.
Step 3: Now, you can see “Safe Boot” on the top of the display after log in.

Step 4: Now try to take screenshots but still if do not work then try to remove malware from your computer. We think after that the screenshot option will start working.
Solution 5: Check your Mac for malware
If your laptop has been infected with malware, you may find that you are unable to capture screenshots on your Mac. If you have even the slightest suspicion that this is the case, it is imperative that you take action. In order to remove malware, uninstall programs, clean up and optimize your Mac, you may use “CleanMyMac X” to do so.
Using Setapp, you may search for "CleanMyMac X" in the app to discover and install this app. Then just open the app and click on run to find malware, then remove them and try to take a screenshot.
Solution 6: Use native utilities
You may have questions that what is native utilities. This is a built-in tool to take screenshots.
Step 1: Finder > Applications is where you'll find it. The Preview menu will be shown at the top of your screen.
Step 2: Click “Command + Shift + 5”, or go to utilities by selecting “Finder > Applications > Utilities”.
Step 3: Take a screenshot by clicking on the Screenshot icon. On your screen, you'll notice many options for customizing the display.
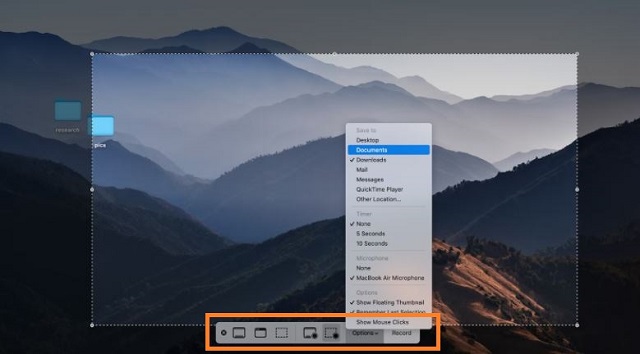
Step 4: To check and, if necessary, modify the default location of your screenshots, go to Options > Screenshot Location. To capture a screenshot, pick one of the screenshot symbols from the menu given below.
Now you should find the fix for why is screenshot not working on mac, if not,you can move to the next method.
Solution 7: Use Grab to Screenshot on Mac
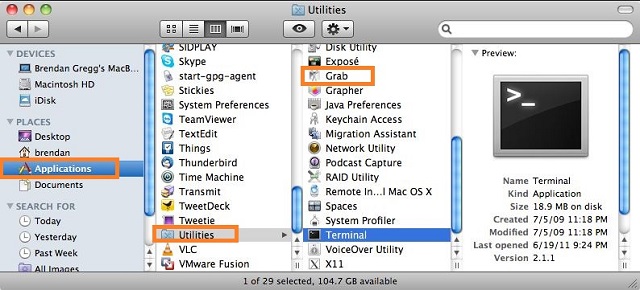
Grab is another solution for taking screenshots on Mac. “Grab” is a built-in option that is also called a native function. Using the “Grab” Apple Screenshot tool, follow the steps below to take a screenshot:
Step 1: Launch Applications and choose Utilities from the drop-down menu.
Step 2: The Capture button is located in the "Grab" Mac OS software. So, click on it to take screenshots.
Solution 8: Make sure your Mac's shortcuts are set up correctly
This is one of the easiest solutions to take screenshots on Mac. Let’s do this.
Step 1: Locate and launch the Preview application from the Dock.
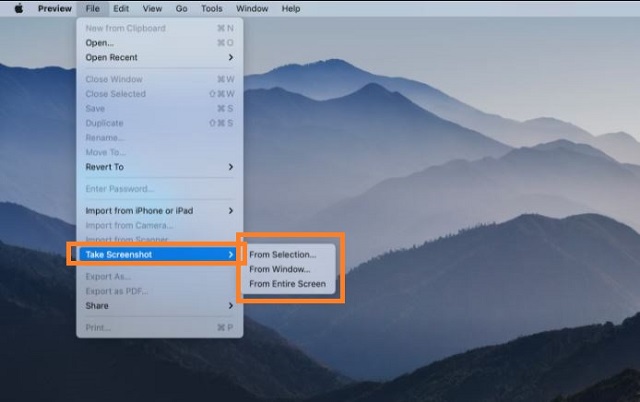
Step 2: Select Take Screenshot from the File menu after selecting “File > Take Screenshot”.
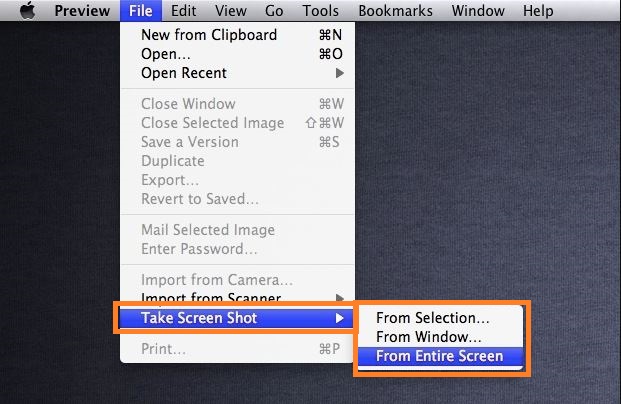
Step 3: You can see three types of options, select any of them to take screenshots.
Solution 9: Check the Keyboard Settings
Sometimes keyboard settings can be disabled, So we should double-check keyboard settings on mac.
Step 1: At first using your Dock Apple menu, select “Open System Preferences.”
Step 2: Then, You will find “Keyboard”, then turn towards “Shortcuts”.

Solution 10: Confirm the Location of Saving Mac Screenshots
You may know that when you take any screenshot on your Mac, by default it stays on the desktop. If you ever changed the location then you may not find the screenshot. So, let’s try to find the saving location on your mac.
Step 1: First of all launch the screenshot app from the “Option”.
Step 2: Now carefully notice the saving location and change it to desktop.

Part 3: How to Recover Deleted or Lost Screenshots on Mac?
While you fixing screenshot on mac not working issue, do you ever unfortunately delete any important screenshots on Mac? Sometimes it happens. Sometimes we delete screenshots by mistake and want to get that back. Here you can try Tenorshare 4DDiG Mac Data Recovery Software. Why 4DDiG? There are lots of application over the internet which works for recovering deleted screenshots on Mac. We recommend 4DDiG because its capability and success rate are higher than others.
- Support data recovery from Mac without need to disable SIP.
- Support recovery of more than 1000 file types such as photos, videos, documents and audio.
- Recover data from all Mac-based devices including USB flash drives/SD cards/external devices/digital camera, etc.
- Support recovering deleted or lost data from macOS Monterey, macOS BigSur 11.0, macOS 10.15, macOS 10.14 (macOS Mojave) and more.
- Simple, obvious and quick recovery steps.
Secure Download
Secure Download
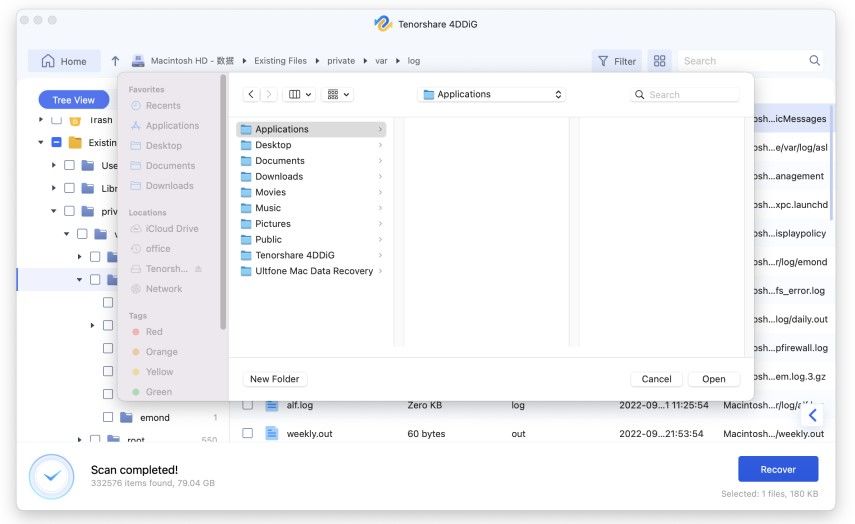
- Free download 4DDiG Mac software here and run it on your Mac, then select the drives from where you want to recover deleted screenshots and then click on “Scan”.
- This will start scanning your drive and you can preview files.
- After the scanning has been completed you can see a list of deleted files. You have to click on “Recover”. And now you need to wait for a while to get back your screenshots.


Part 4: How to Avoid Screenshots on Mac Not Working?
This is a very irritating problem for Mac users. Every day we need to take screenshots of any kind of important document. When you are going to take a screenshot of an important element and that time it is not working, just think how much irritating is it. To avoid this problem try to use your mac in a proper way. Most of the time malware creates the problem. That's why always use anti-virus software and try not to use or visit any unauthorized applications or software.
Part 5: Screenshots on Mac Not Working FAQs
1. How do I enable screenshots on my Mac?
Answer: There are several techniques to enable screenshots on Mac. One of the common commands is “Command + Shift + 4”.
2. Why is screenshot on mac not working?
Answer: There can be many reasons behind why is my screenshot on mac not working. One of the major reasons is your Mac may be affected by the virus.
Conclusion
Why can't I screenshot on my mac? Nowadays this is a common problem on the internet. That's why today we tried to introduce you to why is screenshot not working on mac and tried to provide you with some authentic solution to fix screenshot on mac not working, so that you can apply it when you have the problem. And unfortunately, if you lost any screenshots or other data, then you must use the most reliable Tenorshare 4DDiG Mac Data Recovery Software to recover that.
 ChatGPT
 Perplexity
 Google AI Mode
 Grok
Grok

