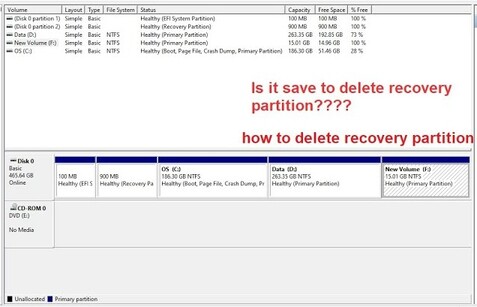
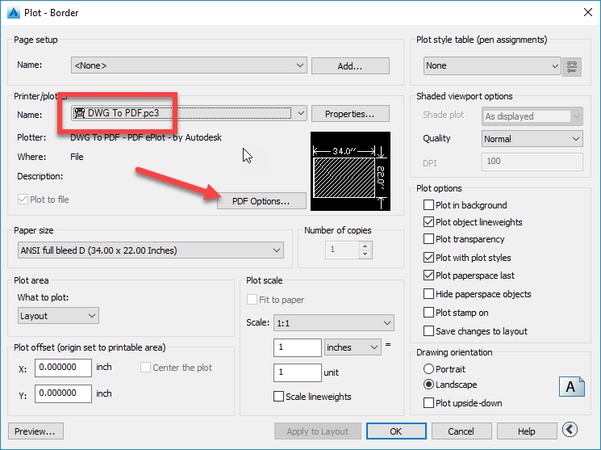
How to Recover Deleted Files Mac Free

5 mins read

Updated on 2024-09-06 10:45:48 to Mac Recovery Solutions

Losing important files by accidental deletion is really scary. Whether it's years of family photos, a work presentation you need, or a special video project - that awful feeling when something valuable is lost is so upsetting. It's so easy for deletions to happen by mistake - One misclick, a glitch in your computer, or even physical damage to the device can make your data disappear in a second. Luckily, there are now many powerful free tools that can deeply scan your Mac's drives and bring back those deleted files.

This guide will introduce you to some helpful tools and tricks that can help you to recover deleted files mac free. With these solutions, users can feel reassured, knowing their data can be recovered. Let's explore the best ways to recover your deleted files on Mac!

recover deleted files mac free

Part 1: Is It Possible to Recover Deleted Files Mac Free

Yes, you can recover deleted files on a Mac for free. Several methods are available to help you get your lost data back.

For example, if you accidentally delete a file, it might still be in the Trash folder. Simply open the Trash, find your file, and restore it with a click. If you have backups through Time Machine, you can easily recover files from different points in time.

For more complex situations, like when files are permanently deleted or the drive is damaged, free data recovery software can help.

These tools scan your Mac to find and restore deleted files. Using these solutions, you can recover your data without spending money. So, don't panic—there are ways to get your files back.

Part 2: How to Recover Deleted Files Free?

To recover deleted data on your Mac, we researched and found the best solutions for your problem. Among them, 4DDiG Free Data Recovery stands out as an excellent choice. This is a powerful tool designed specifically for Mac users facing data loss issues. Whether it's accidental deletion, a system crash, or formatting errors, 4DDiG has you covered. 4DDiG Free Data Recovery recovers data from HDDs, SSDs, USB drives, and SD cards, ensuring you can retrieve your lost files quickly. A unique feature of 4DDiG Free

  • Pros
  • Cons
    • Recovers files quickly and effectively.
    • Works with HDDs, SSDs, USBs, SD cards.
    • Effective for deletion, crashes, formatting.
    • Ensures data safety with encryption.
    • Requires a robust win system.

Here is how you can use 4DDiG Free Data Recovery for quickly get back your data:

FREE DOWNLOAD

Secure Download

FREE DOWNLOAD

Secure Download

  • Select a Location
    After installing 4DDiG Free Data Recovery, launch the software and choose the location where your files were lost, like your Mac hard drive or an external drive. Click "Scan" to begin searching for deleted files.

    ecovery
  • Scan and Preview
    The software will scan the selected location for lost files. This may take a few minutes. Once the scan is complete, you can preview the found files by clicking on specific file types to see more details.

    tree view
  • Recover Files
    After previewing, select the files you want to recover and click "Recover" to restore them to a safe location on your Mac.

    save recovered files

Part 3: How to Recover Deleted Files Mac Free in Other Ways?

While 4DDiG is a robust option for data recovery, there are other methods available that might suit different needs or situations. Here are some alternative ways to recover deleted files on your Mac for free.

Way 1: Mac Free Any Data Recovery

mac free any data recovery

Mac Free Any Data Recovery is a practical tool for recovering lost data on Mac. Developed by Amazing-Share, this software offers a straightforward interface with two primary options: quick scan and deep scan.

The quick scan is fast and effective for smaller files, while the deep scan thoroughly searches for more deeply buried files. This tool can recover data from various sources, including internal drives and external hardware like USB drives and SD cards.

One notable feature is its free trial mode, which provides 20 credits for recovering files. This allows users to test the software's capabilities before committing to a purchase.

However, while the interface is user-friendly, the lack of comprehensive help and support can leave users feeling a bit lost.

  • Pros
  • Cons
    • User-Friendly Interface
    • Fast Quick Scan
    • Effective Deep Scan
    • Supports External Devices
    • Lacks Help and Support
    • Limited Free Recoveries

Way 2: Use PhotoRec to Recover Deleted Files Mac Free

photorec

PhotoRec is a highly effective, free, and open-source data recovery software developed by CGSecurity, also known for TestDisk. Despite its last major update in 2019, PhotoRec remains a reliable option for recovering deleted files on Mac.

The software excels in recognizing a vast array of file types, including RAW photos and proprietary documents like AutoCAD's DWG files.

PhotoRec uses a signature scanner to locate and recover files from various storage devices, such as HDDs, SSDs, and USB drives, though it does not support mobile devices.

One of its drawbacks is its original interface, which operates like a terminal app and requires keyboard navigation. However, the QPhotoRec version offers a basic graphical user interface to make the process easier for less tech-savvy users.

  • Pros
  • Cons
    • Free and Open-Source
    • Recognizes Many File Types
    • Lightweight and Easy Install
    • Works on Multiple Storage Devices
    • No Major Updates
    • Basic Graphical Interface
    • Lacks Customer Support

Way 3: UFS Explorer to Recover Deleted Files Mac Free

ufs explorer

UFS Explorer is ideal for Mac users who need to recover deleted files from a variety of storage devices, including HDDs, SSDs, USB drives, and memory cards.

UFS Explorer supports a wide range of file systems, making it versatile and effective for different data loss scenarios.

One of the standout features of UFS Explorer is its ability to recover data from complex storage systems, such as RAID arrays. This makes it a great choice for more technically inclined users who require advanced recovery options.

Additionally, the software provides a preview of recoverable files, helping users to identify and restore the exact files they need.

While UFS Explorer offers a comprehensive set of features, it does require a bit of a learning curve due to its advanced capabilities.

  • Pros
  • Cons
    • Advanced Recovery Features
    • Supports Multiple File Systems
    • Recovers from RAID Arrays
    • File Preview Option
    • Learning Curve for Beginners

Way 4: Recover Deleted Files Mac Free from Trash Folder

If you accidentally deleted a file on your Mac, the Trash folder is your first stop for recovery. It’s a simple and quick method to get your files back.

Here's how to recover files from the local Trash:

  • Click the Trash icon on your dock to open the Trash folder.

    trash icon
  • Locate the file you want to recover.
  • Right-click the file and select "Put Back." The file will be restored to its original location.

    put back

To recover files from the Trash on an external drive:

  • Open Finder and navigate to your external drive’s home folder.
  • Press (CMD + Shift + >) to unhide the “.Trashes” folder.
  • Open the “.Trashes” folder, then open the “Trash” folder inside.

    trash
  • Locate the file you want to recover.
  • Right-click the file and select "Put Back." The file will be restored to its original location on the external drive.

    put back

Way 5: Recover Deleted Files Mac Free via Time Machine

Time Machine is Mac’s built-in backup tool that can help you recover deleted files if you have previously enabled it and created backups.

Here's how to recover files using Time Machine:

  • Open System Preferences and select "Time Machine."

    time machine
  • Check the box next to "Show Time Machine in menu bar" at the bottom of the window.

    show time
  • Open Finder and navigate to the folder that contains your deleted files.
  • Click the Time Machine icon in the menu bar and select "Enter Time Machine."

    enter time machine
  • Use the arrows on the right side of the Time Machine interface to browse through the timeline until you find the version of the folder that contains your files.
  • Select the files you want to recover and click "Restore." The files will be returned to their original location.

    restore

Part 3: FAQs about Recover Deleted Files Mac Free

Q: Is there free data recovery for Mac?

Ans: Yes, you can use 4DDiG Free Data Recovery to recover deleted files on Mac. The free version allows basic recovery, while the paid version offers more extensive recovery options.

Q: How do I recover permanently deleted folders on Mac?

Ans: Use Time Machine if you have backups. Alternatively, use data recovery software like 4DDiG to scan and recover deleted folders.

Q: How do I recover permanently deleted files from Mac terminal?

Ans: Open Terminal and use the `sudo rm -rf ~/.Trash/*` command to check for recoverable files. However, this method is complex and not always reliable.

Q4: How We Tested Data Recovery Software for Mac?

Ans: We tested each free data recovery tool on a real Mac, using various file formats. We restored the Mac to its original state before testing to ensure accurate comparisons.

Conclusion

Recovering deleted files on a Mac is entirely possible and accessible with free solutions in 2024. Tools like 4DDiG Free Data Recovery, along with other methods such as using the Trash folder and Time Machine, provide effective ways to restore lost data. These solutions ensure that you can retrieve your important files without hassle or expense. Try 4DDiG for a seamless recovery experience and safeguard your valuable data today.

William Bollson (senior editor)

William Bollson, the editor-in-chief of 4DDiG, devotes to providing the best solutions for Windows and Mac related issues, including data recovery, repair, error fixes.

(Click to rate this post)

You rated 4.5 ( participated)