How to Reset Mac without Losing Data
Have you ever faced a moment where your Mac, particularly if it's a MacBook Pro, just freezes up or acts out of the ordinary? The immediate concern is how to reset Mac without losing data? You're not alone in this! The silver lining here? You can indeed reset your Mac or MacBook Pro without saying goodbye to your precious files. This article will explore the steps to ensure your data remains untouched. Curious? Keep reading!
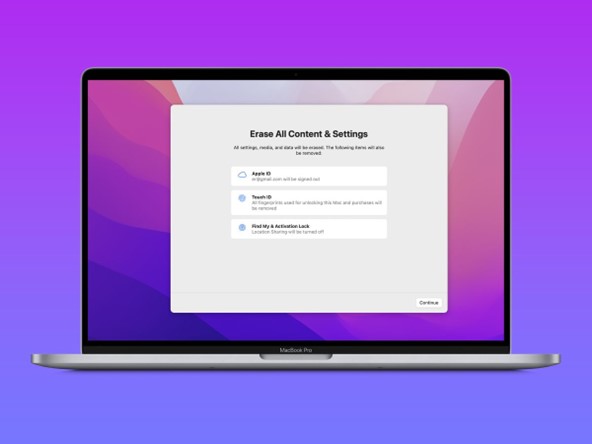
Part 1: Does Resetting Mac Delete Everything?
Resetting your MacBook will, indeed, erase everything on it. It's like giving your Mac a deep spring cleaning, where everything is taken out.
Now, imagine the frustration of unintentionally wiping away all those precious memories, work files, and, yes, your impressive collection of digital recipes (or was that just me?). It's enough to make anyone pull their hair out. That's why, before considering the big reset, always remember the golden rule: Back. It. Up.
Backing up your MacBook is like insuring your belongings before a big move. You hope you'll never need it, but you'll be grateful you have it if something goes wrong. So, if you're thinking about giving your MacBook a fresh start, pause, ensure you've secured all your files, and proceed with the reset.
While resetting can give your Mac a fresh lease on life, it's not without its risks. Tread with caution, backup regularly, and you'll ensure that all your data remains safe and sound.
Part 2: How to Reset Mac without Losing Data
Way 1: Backup Your Data before You Reset Mac without Losing Data
Backup Your Data: Before you even think about hitting that reset button, let's chat about backing up. Think of it as packing your essentials before heading off on an adventure. On a Mac, you have this fantastic built-in tool called Time Machine. It's essentially your Mac's personal time traveler (minus the DeLorean and flux capacitor).
Whether you're rocking a MacBook or a MacBook Pro, here's how to ensure your memories and files stay safe and sound:
- Connect an External Drive: First things first, hook up an external drive to your Mac. This will be your safe deposit box for all those digital treasures. Once connected, if a message pops up asking if you want to use the drive to back up with Time Machine, select the "Encrypt Backup Disk" checkbox (because privacy is golden) and click "Use as Backup Disk."
- Manual Setup: Missed the pop-up? No worries! Head to System Preferences, choose Time Machine, then click on "Select Backup Disk". A list of potential storage heroes will appear. Choose your external drive from the list and hit "Use Disk."
- Let the Magic Happen: With everything set, click "Backup Now" from the Time Machine menu. Sit back, maybe sip on a beverage of choice, and let your Mac do its thing.
Way 2: Use 4DDiG Mac Data Recovery to Recover All Lost Data
Whether it's an accidental delete or a system crash, losing data can feel like leaving your favorite book out in the rain. Enter 4DDiG Mac Data Recovery , your virtual umbrella for such rainy days. One of the standout reasons to turn to 4DDiG is its seamless compatibility; from the innovative T2 chip to the latest macOS Sequoia and the powerful M4, this tool has got your Mac covered. While it's a champion at data retrieval from Mac and Mac-related devices, what truly sets it apart is the simplicity of its operation. Imagine retrieving your cherished memories or essential documents in just three clicks, all without the need to fiddle with SIP. It's not just about recovering data; it's about recovering peace of mind efficiently and securely. So, why choose 4DDiG Mac Data Recovery? Because your data deserves a safety net that's robust and reliable. Cheers to fewer digital heartbreaks!
Secure
Download
Secure
Download
-
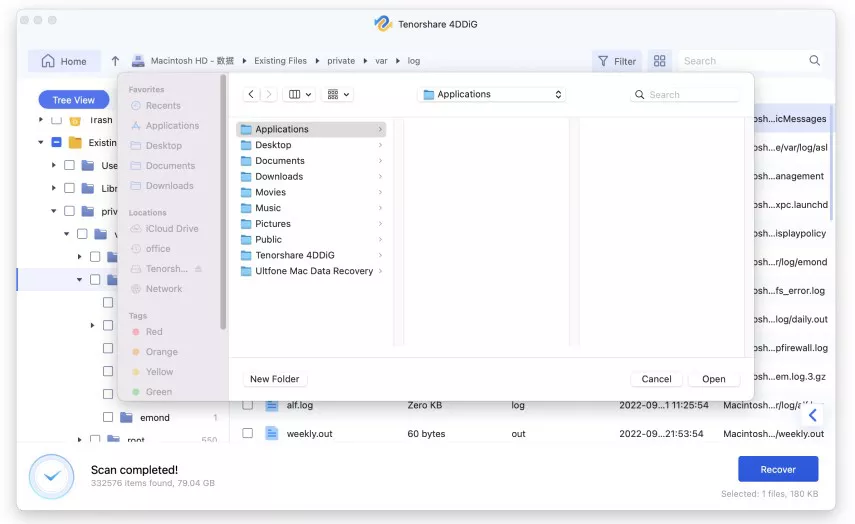
Launch 4DDiG Mac after you install it. Then select a location to start Mac data recovery. Just click “Scan” to start looking up all lost files.

-
Wait a few seconds. When the scanning result appear, you can click on specific file types to preview more details.

-
Click "Recover" and choose a path to save the found files. It's recommended to save the recovered files to a different partition from where you lost them. That can avoid to loss the data permanently.

Way 3: Resetting NVRAM: A Gentle Refresher for Your Mac
The Mac's NVRAM (Non-Volatile Random-Access Memory) is a bit like that secret stash of cookies you have - it holds onto some essential bits even when things are turned off. But every now and then, especially if your Mac's behaving a tad wonky, giving the NVRAM a little reset can be beneficial. When you reset it, you're essentially clearing out settings, and if you've tinkered with certain security features, they'll jump back to their default states.
So, how do you give NVRAM that gentle nudge?
- Power Down, Power Up: Begin by shutting down your MacBook Pro. Take a moment, maybe hum a tune, and then power it back up.
- Key Combination Time: As soon as you press that power button to turn it on, channel your inner pianist. You'll need to press the Option, Command, P, and R keys simultaneously. Hold onto this quartet for about 20 seconds. Think of it as a short meditation session for your fingers!
- Release and Restart: After those 20 seconds, release the keys, and your Mac will go about its business, hopefully with a bit more pep in its digital step.
Way 4: Use Disk Utility to Reset Mac without Losing Data
Disk Utility, the unsung hero of macOS, is your Swiss Army knife for managing storage on your Mac. While it can perform intricate operations, it also provides a means to freshen up your Mac without compromising your data.
Here's a simple breakdown:
- Accessing Disk Utility: To begin, you'll need to restart your MacBook. As it starts up, hold down the Command and R keys together. This will usher you into macOS Recovery. Here, you'll see the good old Disk Utility amongst a few options. Click on it to enter.
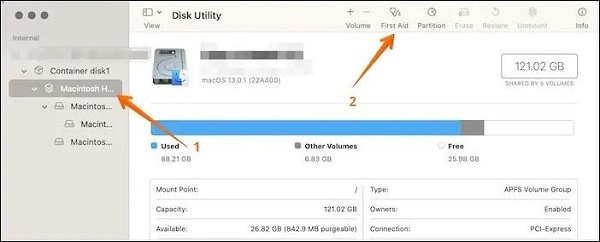
- Choosing the Right Drive: Once inside, you'll see a list of drives on the left. Your Mac's main drive is typically called "Macintosh HD." Select it.
- Opt for First Aid: In Disk Utility's toolbar, you'll spot a stethoscope-like icon named "First Aid." This is your Mac's way of giving its drive a health check. Click on it, and then click "Run." This process will check for any errors or issues and attempt to rectify them, all while keeping your files untouched.
-
A Gentle Reminder: While Disk Utility's First Aid is designed to preserve data, always ensure you have a recent backup before running any significant procedures. It's like wearing a helmet when biking; you hope you won't need it, but it's good to have!

Way 5: Restore Your Backup after You Reset Mac without Losing Data:
After resetting your trusty Mac, restoring all your cherished data is the final treasure. If you've diligently followed along, you've got a backup handy. Let's embark on the last leg of this journey to bring your data home.
- Reconnect with Your Backup: Connect that external hard drive (where your backup's snugly resting) to your iMac, Mac mini, MacBook Pro, Mac Pro, or MacBook Air. A grand reunion, if you will.
- Summon the Migration Assistant: This friendly tool will help transport your data back where it belongs. Navigate to Finder > Applications > Utilities and select Migration Assistant. Give it a moment, and then click "Continue."
- Choose Your Source: Within Migration Assistant, opt for "From a Mac, Time Machine Backup, or Startup Disk" and then hit "Continue." It's like telling the assistant where your treasure map leads.
- Spotting Your Time Machine Backup: On the next screen, when prompted, select your Time Machine backup and click "Continue." Your Mac's essentially saying, "Ah! So that's where I left my memories!"
- Selective Restoration: Now, you'll be presented with a list of data categories. Choose what you want to restore, be it your prized photos, essential documents, or funky tunes. Click "Continue" and watch the magic happen.
-
The Final Countdown: Sit back, perhaps hum a celebratory tune, as your Mac assimilates all the data. It's like watching memories flood back in real time.

Part 3: People Also Ask
Q 1: Can Data Be Recovered after a Factory Reset Mac?
Data recovery after a factory reset on a Mac is highly unlikely. Factory resets involve formatting the storage drive and reinstalling the operating system, effectively erasing all data. While specialized data recovery techniques may exist, they are not guaranteed to recover significant amounts of data. To safeguard your data, it's essential to back up important files before performing a factory reset.
Q 2: How to Erase a MacBook?
- Click on the Apple menu in the top-left corner of your screen.
- Select "System Preferences."
- In the System Preferences window, click on "General" in the sidebar.
- On the right side, you'll see an option called "Transfer or Reset." Click on it.
- Next, click on "Erase All Content and Settings."
This process will initiate the erasure of your MacBook and reset it to factory settings.
Q 3: How Do I Reset My MacBook to Factory Settings without Password?
Resetting a MacBook to factory settings without a password can be done, but it involves a process requiring Recovery Mode access. Here are the steps:
- Shut Down Your MacBook: Power it down if it's currently on.
- Boot into Recovery Mode: Turn on your MacBook and immediately press and hold the Command (⌘) + R keys until you see the Apple logo or a spinning globe. This will boot your MacBook into Recovery Mode.
- Access Disk Utility: Select "Disk Utility" from the menu in Recovery Mode and click "Continue."
- Erase the Hard Drive: In Disk Utility, choose your main hard drive (usually named "Macintosh HD") from the left sidebar. Then, click the "Erase" button at the top of the window. You can format it as APFS or Mac OS Extended (Journaled).
- Reinstall macOS: After erasing the hard drive, exit Disk Utility, and in the Recovery Mode menu, choose "Reinstall macOS" or "Reinstall OS X." Follow the on-screen instructions to reinstall the operating system.
- Set Up as New: Once the reinstallation is complete, you'll be guided through the initial setup process as if you were setting up a new MacBook.
Conclusion
In the digital age, where our lives are intricately woven into our MacBooks, knowing how to reset your device without losing data is a vital work. Through this article, we've explored various pathways, including 4DDiG Mac Data Recovery Take action today to master the art of "how to reset Mac without losing data," and embrace the peace of mind that comes with it. Your digital world awaits a cleaner slate!



 ChatGPT
 Perplexity
 Google AI Mode
 Grok
Grok


