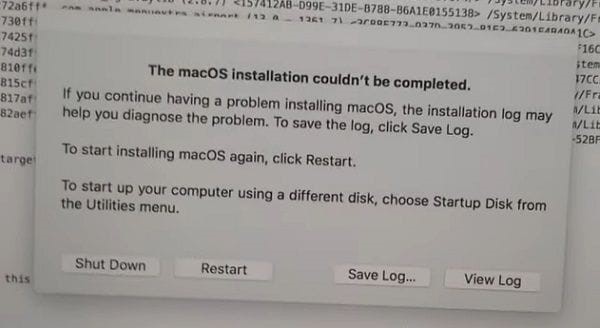
4 Ways to Reinstall macOS Sequoia without Losing Data

5 mins read

Updated on 2024-09-20 19:37:36 to Mac Problems

Sometimes, operating system problems force you to downgrade from the latest OS to the previous one, even on the best Macs from Apple. However, most users are hesitant to do so because of data loss. The reinstallation of macOS usually includes wiping up the data. Fortunately, there are ways you can actually reinstall macOS sequoia without losing any data on your Mac. This will also help resolve the bugs, glitches, or other severe underlying issues you might be facing in the OS. Let’s dive into how to reinstall macOS Sequoia without losing data, using simple steps.

reinstall macOS Sequoia

Part 1: Why Do You Reinstall macOS Sequoia?

Generally, it’s advisable to use the latest operating system on your Mac for the best user experience. However, sometimes the inclusion of bugs, glitches, or other persistent problems in the particular OS can force the users to roll back to the previous version of a stable OS. If you're already using the latest OS, the best way to deal with the OS problem is to reinstall it.

Another reason to reinstall the Mac Sequoia is the decrease in system performance and stability. Over time, the Mac may become slow, and perform subpar due to bugs, corrupted files, or accumulated cache files in the system. A fresh OS installation can help overcome these issues, and revive the system performance.

You may also consider reinstalling the macOS sequoia to remove malware, viruses, or security threats. Macs are known for their robust, secure OS, but they can also be vulnerable to malware and viruses which can compromise your computer's security. Reinstalling the OS will remove the unnecessary files from the system, and replace them with legitimate ones.

Part 2: Prepare to Reinstall macOS Sequoia without Losing Data?

When reinstalling macOS Sequoia, one of the users' biggest concerns is the personal data stored on the Mac. Whether it’s a system issue, file corruption, or accidental deletion, data loss can occur unexpectedly. This is where the 4DDiG Mac Data Recovery comes in handy.

FREE DOWNLOAD

Secure Download

FREE DOWNLOAD

Secure Download

As you prepare to reinstall the macOS Sequoia, 4DDiG Mac Data Recovery ensures you can recover any lost/deleted data with one-click process. The program is equipped with the smart algorithms, which makes even the toughest data recovery successful.

The best part is it offers a user-friendly and self-explanatory user interface, making it easier even for novice users to perform a data recovery process with one click. With 4DDiG, you can recover data from external/internal hard drives, SSDs , USB flash drives, and memory cards .

Let us show you how to recover lost/deleted data using 4DDiG with simple steps:

  • Install the 4DDiG Mac Data Recovery, and launch it on your Mac. Select the local disk from where you want to recover the data, and hit the Start button to initiate.

  • It’ll immediately start the scanning process and you can stop it at any moment if you identify the targeted files. You can also use the filter option to narrow down your search.

  • Once the scanning is completed, you can preview the files. To restore the files, select the files, and hit on the Recover button to move them to a secure location.


Part 3: How to Reinstall macOS Sequoia without Losing Data

Whether you’re facing OS system issues on your computer or are annoyed with the bugs, glitches, and app crashes, reinstalling macOS Sequoia is an effective way to resolve system issues without indulging in complex processes.

Reinstalling MacOS Sequoia is a straightforward process consisting of a few simple steps. Here's a step-by-step guide on how to reinstall macOS sequoia without losing any data.

  • Shut down your Mac
    To get started with the macOS reinstallation, first of all, shut down your Mac using a conventional method, by navigating to the Apple menu in the corner of the screen on your Mac, and then selecting the Shutdown button.

    If you can’t shut down your Mac from within the OS, you can try the other way to shut it down. Every Mac laptop has a power button that you can easily turn off. Press and hold down the Power button for 10 seconds until it turns off. Let go of the power button when it shuts down.

  • Start up from macOS Recovery
    Now, you need to enter the macOS into the recovery mode on your Mac. Depending on what type of Mac with Apple Silicon you’re using, follow the appropriate steps. If you’re not sure which one you’re currently using, you can try both steps to enter the macOS recovery mode.

    start up from

    For Mac with Apple Silicon:

    • Press and hold down the Power button on your Mac.
    • Keep holding the PowerOptionsOptions button until you see the on the screen. Release the power button when you see the .
    • Select the Options, then click the Continue button.
    • Now select the user, and password if asked,

    For other Mac:

    If you’re using a Mac with an Intel-based chip, here are the steps to start up from macOS recovery:

    • Press the power button quickly, and release it to turn on the Mac.

    • Right after turning on your Mac, press the combination of the Command + R on your Mac.

    • Keep holding the keys until you see the cursor on the screen.

  • Reinstall macOS from Recovery
    Once you’ve entered the recovery mode on your Mac, you’ll see the 4 different options on the screen. Follow the steps below to reinstall macOS Sequoia without disc:

    • Select the Reinstall macOS sequoia option - second on the list.

    • Follow the onscreen instructions to reinstall the macOS.

    • Once the reinstallation is complete, your Mac will show a setup assistant.

      reinstall it
  • If installation from Recovery is unsuccessful
    If the reinstallation process from recovery becomes unsuccessful due to disk errors, or OS issues, you can try the following solutions to fix it:

    • Repair the startup disk using the Disk Utility. You can launch the Disk Utility from within the OS. If the OS isn’t starting up you can also use the Disk Utility from the Recovery.
    • If repairing the startup disk doesn't help fix the issues. Try erasing the startup disk using the Disk Utility. This will cause the data loss but will resolve the issues.
    • Install the software updates or use other ways, such as a bootable installer, and Safari to directly download the macOS firmware package, then install it on your Mac.

Part 4: FAQ

Q 1: How to Create a macOS Sequoia Installation USB?

  • Download the macOS Sequoia installer from AppStore.
  • Insert the USB of minimum 16GB storage, and format it as Mac OS Extended.
  • Use the Terminal to create a macOS 15 bootable installer.

Q 2: How to Clean Install macOS Sequoia on your Mac

Installing macOS sequoia on your Mac can be done in a few simple steps. Shut Down your Mac, start up your Mac in the Recovery mode, and select Reinstall macOS Sequoia. Follow the onscreen instructions to complete the installation process.

Q 3: How to fix Reinstall macOS sequoia not working?

If the reinstallation of macOS Sequoia fails due to the unknown errors, you can use the other ways to install the OS such as via bootable USB or directly download the firmware package from Safari, and install it. Try repairing the start-up disk to fix the reinstallation errors.

Final Words

Reinstalling the macOS Sequoia can resolve many system issues, errors, bugs, or glitches effectively. It's effective in resolving system issues on MacOS. This article explains how to reinstall macOS Sequoia without losing data, and you can use 4DDiG Mac Data Recovery in case of data loss. If the reinstallation of macOS Sequoia becomes unsuccessful, try to reinstall macOS Sequoia without internet via a bootable USB.

FREE DOWNLOAD

Secure Download

FREE DOWNLOAD

Secure Download

William Bollson (senior editor)

William Bollson, the editor-in-chief of 4DDiG, devotes to providing the best solutions for Windows and Mac related issues, including data recovery, repair, error fixes.

(Click to rate this post)

You rated 4.5 ( participated)