Working on your PC, doing one of the most basic activities like copy-pasting a file or a folder, you are suddenly struck with error 0x800701b1. Even when you are working on an advanced Operating System such as Windows 10 or 11, you could still get affected by this error. it can happen regardless of the action taking place within the internal drive or involving an external drive. Also, the size of the file/folder does not matter either. In this article, we will help you to get past this error by showing you 14 ways of fixing it.
- What Should you Do before Fixing 0x800701b1 Error?HOT
-
How to Fix 0x800701b1 Error on Windows 11/10?
- Fix 1: Connect the Affected Drive with a Different USB Port
- Fix 2: Use Disk Management to Rescan the Disks
- Fix 3: Reinstall your Device Drivers
- Fix 4: Upgrade PC's PSU
- Fix 5: Check your Drive's Security Settings
- Fix 6: Make Sure the Latest Windwos Driver is Compatible with your USB Drive
- Fix 7: Run CHKDSKto Scan your USB Drive
- Fix 8: Make a New Local User Account to Access any Data
- Fix 9: Run Antivirus Software to Scan for Malware
- Fix 10: Change Hard Drive Format
- Fix 11: Turn OFF Drive's Read-Only Mode
- Fix 12: Create a New NTFS Format Partition on your Hard Drive
- Fix 13: Remove the other Peripherals
- Fix 14: Avoid File Transfer in Huge Chunks
Part 1: Overview of 0x800701b1 Error Code
What is Error Code 0x800701b1?
Error 0x800701b1 is a Windows error found in Windows 10 and 11 that may appear during copy/pasting of files and folders. This error commonly happens when some DLL files get unregistered from the system though there are other reasons behind this as well. The error message comes with the following message, “A device which does not exist was specified” which means that the required drive is not accessible. The computer will show this error when it tries but fails to transfer any data to the designated drive, either due to the fact that it is unrecognizable to your computer or simply not working properly. Sometimes the error may occur when you are trying to install Windows on a hard drive connected via USB.
Causes of 0x800701b1 Error Code
In addition to the couple examples mentioned above, there are other reasons why error code 0x800701B1 may show up.
- Files or folder ownership changed and you can't get access to it
- Transfer over 4 GB files/folders to FAT32 disk
- Write-protected or read-only mode is open
- Computer virus cause target disk or encrypts files
- Many unnecessary peripherals connected with your PC
- Connect external drive to USB 2.0 port instead of USB 3.0 port
- Use a generic driver for the external drive connected to their PCs
- Don't have enough free space available
- System restrictions
Part 2: What Should you Do before Fixing 0x800701b1 Error?
It is a good practice to always keep a backup of your data since it is highly possible that when you face errors such as 0x800701b1, you may lose your data due to the fact that the operation is never properly completed and the data gets corrupted midway. In case you do not keep an updated backup of your data and you lose it during such an error or while trying to fix it, there is a relatively easy way to get it back using Tenorshare 4DDiG data recovery software. Using this software, you can get your data back in 3 easy steps.
Here are some key features of Tenorshare 4DDiG:
- Support lost/corrupted data recovery from windows error
- Supports data recovery from Windows, Mac, SD card, USB, and so on
- Supports data recovery from accidental deletion, virus attack, system crack, windows error, formatted hard drive, and so on
- Support over 2000+ different file types recovery, including documents, videos, photos, and so on
Follow below guide to recover lost data due to Windows Error 0x800701b1:
Secure Download
Secure Download
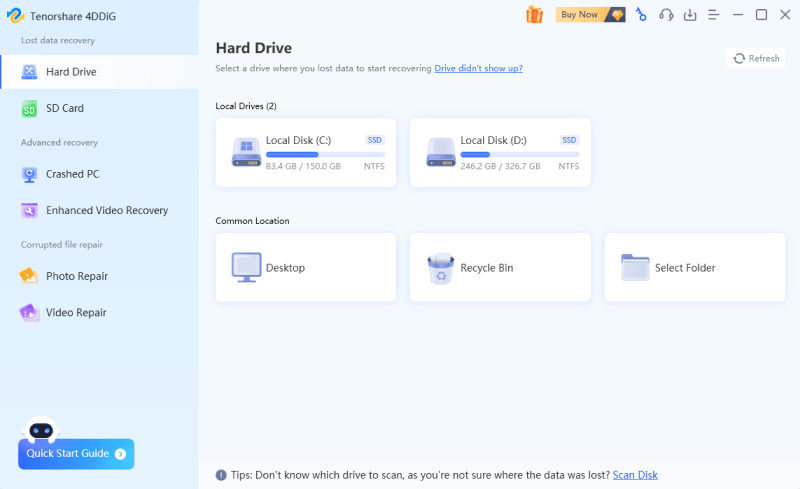
- Run 4DDiG on your Windows and then you will find multiple options including Data Recovery. Simply click on the affected drive to process the scanning. Alternatively, you can select a particular file type to scan in the upper right corner.
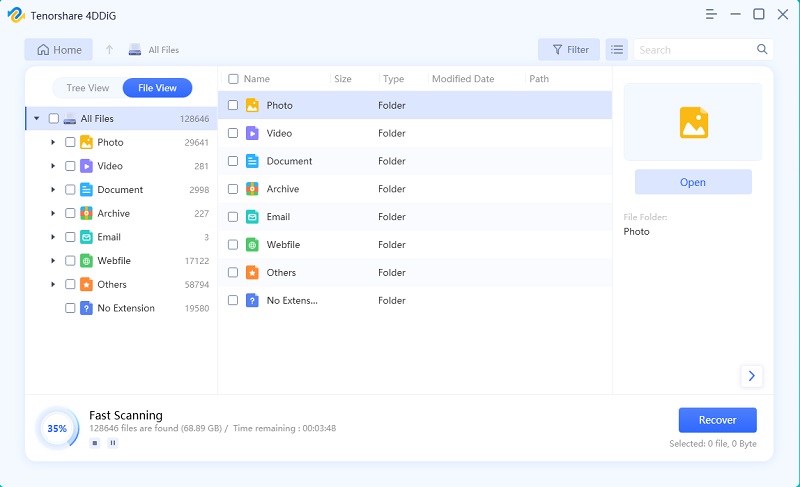
- 4DDiG will start looking for the lost files instantaneously in the drive that you have selected earlier. You can stop looking for the file anytime, in case you have already found it or just need to take a break, and resume later if you have to.
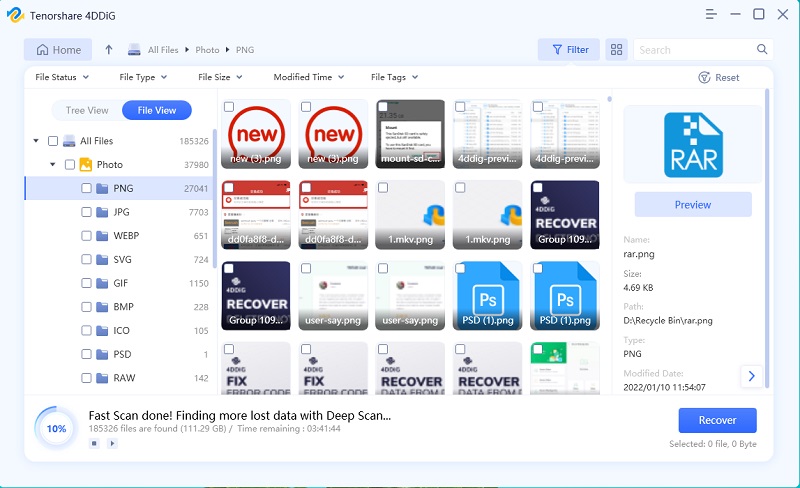
- The next thing for you to do is to identify your desired files and check if they are okay by previewing them. if all good, put them in a different location to avoid the possibility of losing them again due to disk overwriting and data loss of the affected drive.
Part 3: How to Fix 0x800701b1 Error on Windows 11/10?
We will show you 14 ways to try and fix the issue caused by Error 0x800701b1. However, even before you apply them, there are a few things you should try first. You should start with copying a different type of file to your selected destination. If the file gets copied, it could mean that the primary file is already corrupted. however, if you are unable to copy to the destination, it would mean that likely a software issue is the culprit behind the error. You can restart your PC to see if the problem goes away, in case you are facing this error for the first time. If still no luck, pause real-time protection of your security system/antivirus and try again. Still the error persisting? Try the fixes below:
For PC
Secure Download
For MAC
Secure Download
Fix 1: Connect the Affected Drive with a Different USB Port
One of the simplest but effective fixes against the Error 0x800701b1 is to use a different USB port to connect the device you are facing the error with. You could simply try to connect to the more recent USB 3.0 port instead of the old version which only delivers USB 2.0 connectivity. It will help ensure the drive gets enough juice from the port or the ability to transfer files at max speed available.
Fix 2: Use Disk Management to Rescan the Disks
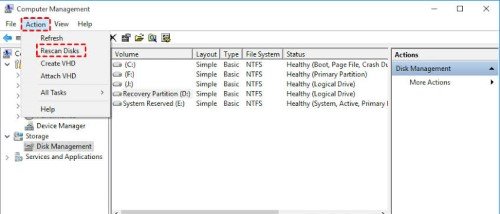
Another fix to the Error 0x800701b1 you can try is to do a Rescan using Windows Disk Management. The method is very simple, open Disk Management by typing Disk Management on search, select it. Once opened, click on Action menu and click on Rescan disks. Restart your PC. If the error continues, redo the procedure.
Fix 3: Reinstall your Device Drivers
You could try to reinstall the driver of the device you are facing problem with. This is a common phenomenon with external devices that lack compatible drivers. To resolve this:
Step 1: Go to Device Manager by typing it in Windows Search (Alternatively, type “devmgmt.msc” in the dialoge box that appears by pressing the windows key and R together and hit the enter.
Step 2: Click on Disc Drive to expand it, select the device causing the error and uninstall it. Press “Scan for Hardware Changes” which will allow Windows to reinstall it with a generic driver.
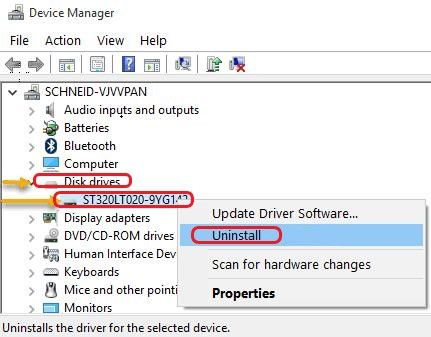
If required, restart your PC and check if the error still persists. If fixed, you can keep the driver that windows installed for your device or you can simply install the appropriate driver for your device. If still not fixed, read the next solution.
Fix 4: Upgrade PC's PSU
Diagnose your Power Supply Unit. Confirm that it is capable of delivering a sufficient amount of power your system requires, particularly in case of a desktop PC. If you have detachable components drawing power and are not necessary to run your system, disconnect them. If that stops your system from giving Error 0x800701b1, it means that your PSU is not powerful enough to provide power to all your components or simply, is faulty. Changing/upgrading the PSU is the only solution.
Fix 5: Check your Drive's Security Settings
If you are unable to access the drive because of security restrictions, the USB flash drive will display an error saying "device does not exist." Follow the instructions below to change ownership by changing the Security Settings.
Step 1: Open File Explorer, then click on This PC on the left, select Properties by right-clicking on the targeted drive where you will find the Security tab.
Step 2: Press Advanced tab, followed by Change in front of Owner.
Step 3: Press Advanced in the left corner followed by Find Now.
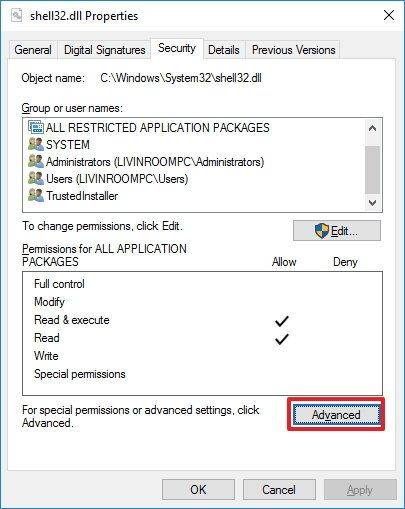
Step 4: In Advanced Security Settings, you will see Change, press it. Once you see your username, press it twice.
Step 5: Now look for Replace All Child Object Permission Entries with Inheritable Permission Entries from This Object, click the checkbox beside it to select it and hit apply.
Now that the permissions have changed, the error 0x800701b1 may not show anymore once you connected the affected drive again.
Fix 6: Make Sure the Latest Windwos Driver is Compatible with your USB Drive
Driver incompatibility is a common cause for showing error 0x800701b1 when an external flash drive is connected. To rectify this, go to Device Manager by following the steps mentioned previously.
Step 1: Select the USB drive under Universal Serial Bus Controller, click Properties, followed by Driver tab. Please write the version of the driver somewhere before you press Update Driver.
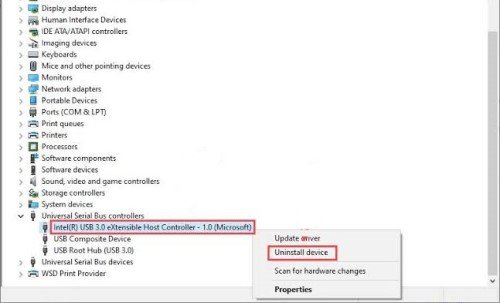
Step 2: Since you will be selecting drivers other than the one you noted, click on Browse My Computer for Drivers, followed by Let Me Pick from a List of Available Drivers on My Computer.
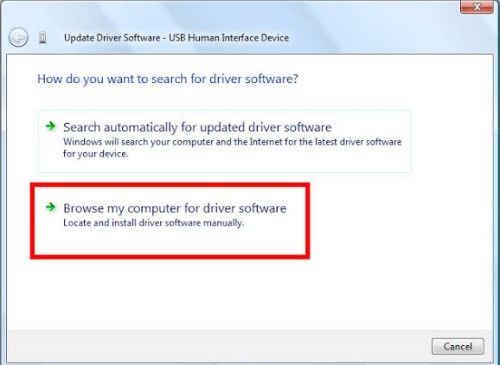
Step 3: After pressing next, press on any driver other than the one noted and again press Next which will ensure the selected driver is installed. Hopefully that will resolve the error. But if not, repeat the same procedure but select a different driver each time.
Fix 7: Run CHKDSKto Scan your USB Drive
You may need to perform a CHKDSK Scan of your USB Drive if it has logical file system error. In such instances, the 0x800701b1 error code will show. In case the error still shows after you have performed the scan, remove the USB drive and turn off your computer. Again turn it on with no other non-necessary peripherals to see if the drive works. If not, check the drive on a different system. If the drive continues to show the same error, its time to get it checked for hardware issues or use specific software to resolve such issue.
Fix 8: Make a New Local User Account to Access any Data
Consider making a new local user account in case your computer is not allowing you to see certain data due to permission errors which is not so uncommon in Windows 10/11 systems.
Step 1: To make a new local account, simply open Microsoft Management Console by typing mmc in search. you should provide your administrative password of your current account when asked.
Step 2: Click on Local User and Groups followed by User-Action-New User. Respond to the queries required to open a new account, then press Create.
Then login to your new account to check whether the error 0x800701b1 is resolved.
Fix 9: Run Antivirus Software to Scan for Malware
It is always a good practice to keep your computer’s security software updated and let it scan your system regularly to avoid attacks from viruses, malwares, rootkits and so on. A good antivirus software can help prevent such threats from harming your system. However, it is important that you use reliable software to protect your system. Always install from a trusted, highly ranked provider who updates their software regularly. If your antivirus software shows any issue within your system, you can always remove it or send it to quarantine.
Fix 10: Change Hard Drive Format
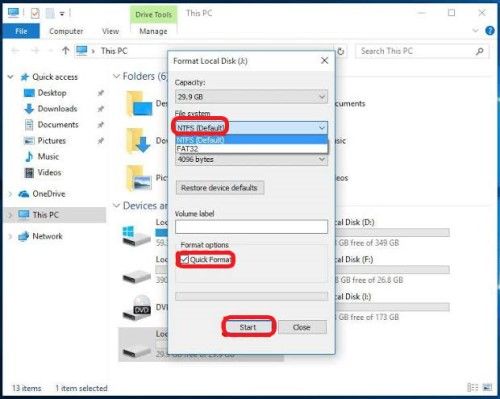
Changing the format of the drive in question may resolve the error 0x800701b1, particularly NTFS formatting, which is a reliable and a newer file format and allows files of bigger size to be transfered. However, be cautioned that formatting a drive will erase everything inside it permanently.
Step 1: You can change the file system of a drive by right clicking it in the File Explorer and select Format.
Step 2: Select NTFS and press start. Once finished, press Close and restart your system. Now you should be able to copy paste your file to that drive.
Fix 11: Turn OFF Drive's Read-Only Mode
If you are trying to copy-paste to a folder or drive that is Read-only, you will not be able to do so and as a result, the error 0x800701b1 may show. Read-only files/folders/drives only allow you to read or see the content, not make any changes to them. If the destination you are trying to modify is read-only, you can simply change it.
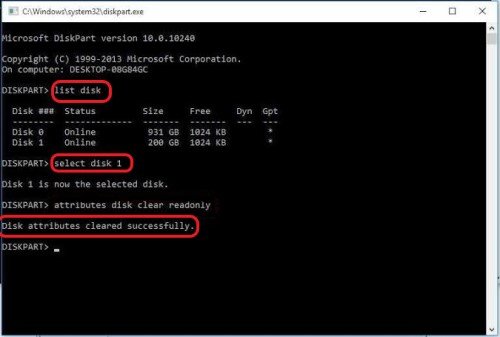
Step 1: To do so, first you need to open Run and type CMD and click ctrl, shift and enter together. You can open Run simply by typing it in windows Search or by clicking windows key and R together.
Step 2: You need to approve the User Account Control by pressing Yes to ensure that you have the necessary administrative rights to perform the intended tasks.
Step 3: Once in Command Prompt, please put the following commands respectively and press enter each time you do so: diskpart - list disk - select disk 1 (1 is the drive letter that you want to change the status of) - attributes disk clear readonly - this should ensure the required changes are made but first you will need to restart your system for the changes to apply.
Fix 12: Create a New NTFS Format Partition on your Hard Drive
Sometimes, you try all the fixes you can find and none may work. Well, desperate times require desperate measures!. In such instances, you may consider creating a new NTFS Partition on your hard drive. Do not forget to backup your files and folder to a different location since partitioning your drive means all of its contents will be fully deleted.
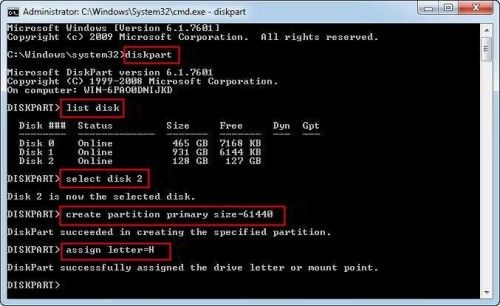
Step 1: Creating a new NTFS partition is relatively simple. you can simply repeat the steps described in the immediate previous fix (FIX 11) up until “ Select Volume X” (X indicating the destination drive).
Step 2: After that, you just need to put a few additional commands which are as follows: - clean - create partition primary - Do not forget to press enter after each command.
Step 3: Now you will need to select disk 0 followed by entering a few more commands which are: - list disk - Select partition 1 - Active - As always, press enter after each command.
Step 4: The system will show you the available disks on your system once you have put the “list disk” command. Use the list to identify the number of your destination drive and put that number instead of ‘1’ in the “Select Partition” command.
Step 5: You will then enter the following command “format fs=ntfs label=Y”, without the commas. You may put any letter other than Y as the label, if you want to.
Step 6: Just allocate a drive letter to the new partition, which could be any letter of your choice as long as no other drive in your system is currently using it. just type and enter the following command : assign letter=L ( Instead of L, it can be any letter of your choice). Close Command Prompt before restarting your system.
Fix 13: Remove the other Peripherals
The Error 0x800701b1 may show in case when your system is unable to provide enough power to the drive in question. To check if that is the case, you should remove all other devices from your system and check and try again. Same goes for laptops, If this fixes the issue, it indicates that your system is underpowered or you have too many peripherals connected to your system.
Fix 14: Avoid File Transfer in Huge Chunks
If you are only experiencing the 0x800701b1 error code when trying to copy paste files that are very large, say 10 gigabytes or larger, then maybe you should reconsider. Such large files can be difficult for some systems to handle, especially if the system does not have a decent configuration. Try to perform the task in a smaller size, particularly when you know the storage device you are using has been in use for a long time.
Conclusion
Error codes such as 0x800701b1, always appear as a surprise, when a user is least expecting it. When that happens, it generates great concerns among the users as this may cause them to lose valuable data that they may not have a backup of. Losing important data is always a great hassle for anyone. If you are someone who does not backup their data frequently and religiously, then you should consider getting an effective file recovery software such as Tenorshare 4DDiG data recovery software, which can effectively recover the lost data and help you avoid the great hassle while you fix your system.
 ChatGPT
 Perplexity
 Google AI Mode
 Grok
Grok
