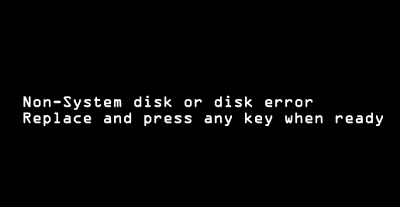
Non System Disk or Disk Error is the error this post is about. It wouldn't be inaccurate to classify this mistake as one of the most terrifying. The issue usually happens while working on the system and conducting routine tasks such as copying data, relocating files, installing applications, or executing specific programs. It happens just before the system boots up. As a result, the error occurs as soon as you power on the machine. When you receive this error, the first thing that comes to mind is your data. We understand how important your data is to you. We have compiled a list of all viable solutions to this problem.
| Workable Solutions | Step-by-step Troubleshooting |
|---|---|
| Prepare: Recover Data from Unbootable Computer with 4DDiG Tool | |
| Fix 1. Remove All Non-system Disk | |
| Fix 2. Check on your HDD's IDE or SATA Cable | |
| Fix 3. Set the Right Boot Priority in BIOS/UEFI | |
| Fix 4. Remove and Reinstall the Hard Drive | |
| Fix 5: Perform Startup Repair | |
| Fix 6: Run CHKDSK | |
| Fix 7: Repair MBR | |
| Fix 8: Set System Partition Active | |
| Fix 9: Replace Hard Drive |
Part 1: What does Non System Disk or Disk Error Mean?
Non-System Disk or Disk Error is a typical "black screen" error message that displays when the computer cannot boot correctly. It happens when the BIOS cannot locate a disc with a bootable operating system (OS) and is generally caused by a problem with the boot order.Here are some causes about non system disk or disk error
- Installed any infected application
- An attack on the system by a virus or malware
- Corrupted Windows system files are a possibility
- Your hard drive has bad sectors
- There is a loose connection between the system hardware and the software
- The boot order is incorrect
Part 2: How to Fix Non-system Disk or Disk Error?
There isn't much we can do because non system disk or disk error doesn't occur while we are in the OS. However, as noted by users, there are several methods for resolving this problem. The methods on how to fix non system disk error are listed below.
Prepare: Recover Data from Unbootable Computer with 4DDiG Data Recovery Tool
When you encounter non system disk or disk error, there is something wrong with the boot files on the hard disk drive. To recover data from a non-bootable computer, we strongly suggest you use Tenorshare 4DDiG to access crashed computer and retrieve data. Here are some major features of this tool; also, you can follow the video or steps below to figure out how to get back data before fixing this issue.
- Access and recover data from unbootable computer.
- Recover any deleted or lost files from Windows/USB flash drives/SD cards/external hard drives/digital camera, etc.
- Support various loss scenarios like deletion, formatting, RAW drive, corrupt, damaged, etc.
- Support 2000+ data types such as photos, videos, audio, documents and more.
- Fast scan with 100% security.
To recover unbootable laptop with 4DDiG, prepare yourself with the following stuffs before data recovery from crash computer: another working computer, a blank USB drive of more than 1.5G or CD/DVD.
Secure Download
Secure Download
- Connect USB drive and Select
- Create a Bootable Drive
- Boot Crashed Computer and Recover Data
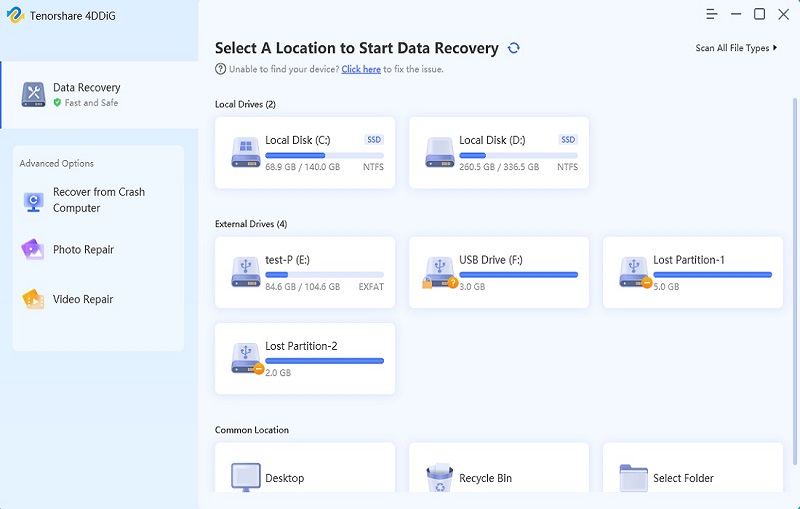
Start the 4DDiG software on your computer and connect your USB flash drive. To proceed, select Recover from Crash Computer from the home interface and then click on Start.
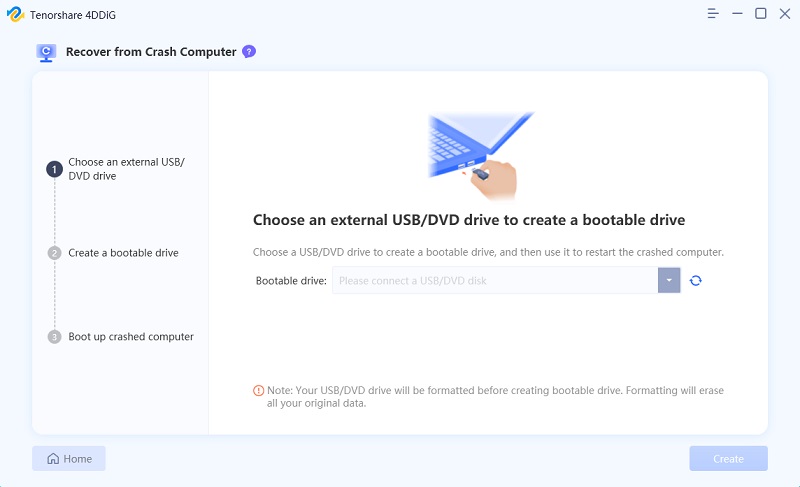
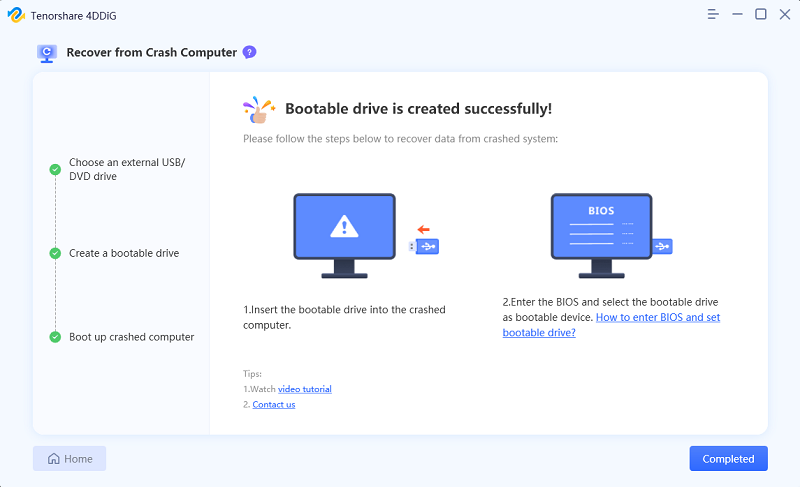
Choose an external USB/DVD drive to create a bootable drive then click on Create. After a while, the bootable drive will be successfully created, and you will be able to access your crashed computer to begin data recovery.
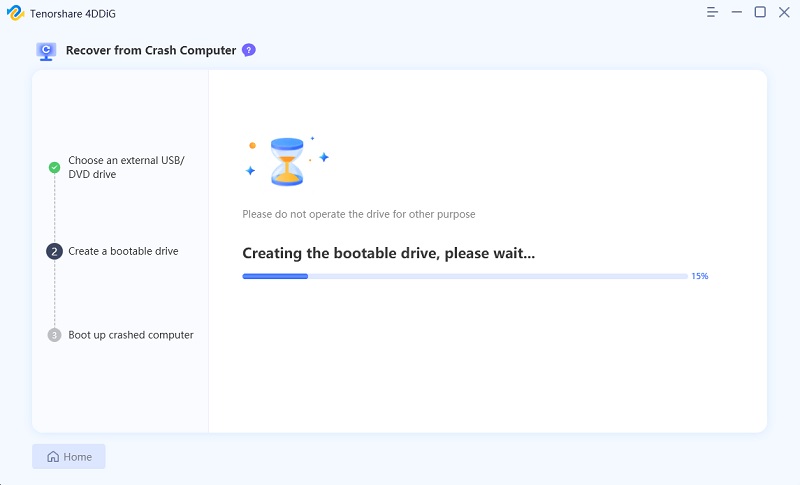
Insert the USB flash drive or CD/DVD drive into the crashed computer then restart your device. Afterwards, you would see the computer brand logo on the screen, then press the corresponding key until you get into your device's BIOS settings.After you enter the BIOS, switch to the boot tab using the arrow keys and select boot device. Then your crashed system will start loading files and please wait patiently for the configuration. Now 4DDiG will be launched automatically and you can select a location to start recovering data.
Secure Download
Secure Download
Fix 1. Remove All Non-System Disk
The machine might be reading a non-operating system disc on the CD/DVD optical drive since the boot order can be modified. Remove any non-system disk or disk error and reboot the machine using the methods below.
Step 1: It would help if you disconnected any USB or 1394 (Firewire) devices connected to the computer.
Step 2: Remove any discs from the CD and DVD drives.
Step 3: Press and hold the Power button for 15 seconds to switch off the computer.
Step 4: Now turn on the computer by pressing and holding the Power button.
Fix 2. Check on your HDD's IDE or SATA Cable
If you've recently changed or repaired your hard drive, the hard drive is likely loosely connected. If you haven't changed or repaired the hard drive, it's also a good idea to double-check that it's attached properly. Also, there might be dust between the ports, so clean them well before reconnecting the hard drive.
Fix 3. Set the Right Boot Priority in BIOS/UEFI
If you've recently installed Windows, the boot sequence is likely to have been messed up. A booting device has a boot order, such as a thumb drive or a system. If the system hard disc isn't set to first, the error will show. Fix the problem by following the steps.
Step 1: Turn off your computer.
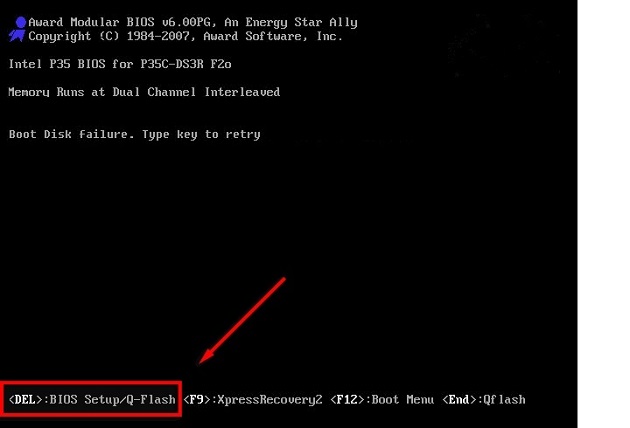
Step 2: Please turn it on again, and as soon as it turns on, hit the BIOS hotkey again.
Step 3: Go to the BOOT/BOOT Configuration or equivalent tab once you've gotten into the BIOS.
Step 4: Set the Boot order here, and ensure your internal hard drive is at the top of the priority list.
Fix 4. Remove and Reinstall the Hard Drive
A poor connection between the hard disc and the computer might occur if the machine is dropped or jolted. You might need to uninstall/reinstall the hard disc. It is how you repair computer non system disk or disk error:
Step 1: Turn off the electricity.
Step 2: If it's a laptop, remove the battery.
Step 3: Remove the system disc from the computer.
Step 4: The system disc should be reinstalled.
Step 5: If it's a laptop, replace the battery.
Step 6:Turn the computer on.
Fix 5: Perform Startup Repair
In most circumstances, non-system disk or disk error how to fix Start up Repair can assist you in fixing a non-system disc or a disc issue. First, unplug any external devices that are attached to the computer. After that, insert a Windows installation CD. Finally, troubleshoot the problem by following the procedures below:
Step 1: Set the PC to boot from the installation DVD in BIOS.
Step 2: Wait for Windows to load the necessary files. Select the language, time and currency format, or input method. Then click "Next" when you see the Windows Setup screen (for Windows 10, it's "Windows Setup"; for Windows 7, it's "Install Windows").
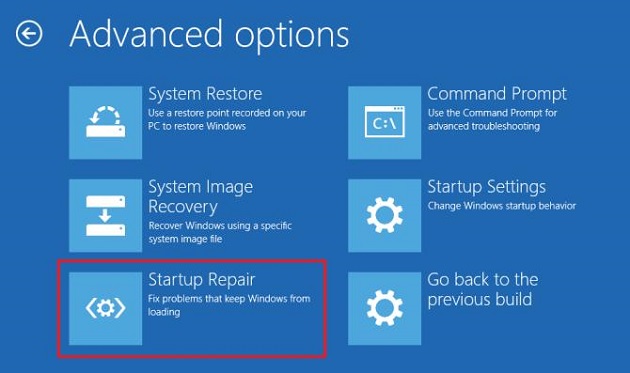
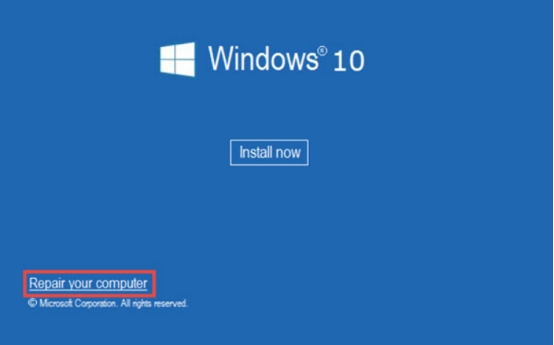
Step 3: Select Repair Your Computer from the drop-down menu.
Step 4: Select Troubleshoot –> Advanced options –> Start-up Repair –> for Windows 10 users. After selecting a target operating system, Windows will begin assessing your system. Windows will attempt to resolve an issue automatically or propose a remedy if an issue is discovered. To resolve the "non-System disc or disc problem," follow the prompts.
Step 5: To restart your computer, click Finish after you've completed these instructions.
Fix 6: Run CHKDSK
CHKDSK (Check Disk) is a Windows diagnostics tool that examines the integrity of hard drive partitions and can assist you in resolving a variety of problems that may result in the Non-System Disk or Disk Error.
Step 1: Follow the instructions above, but instead of Startup Repair, choose Command Prompt.
Step 2: Press Enter after typing the following command.
chkdsk C: /f
Step 3: This phase might take a long time. If the tool discovers any problems, it will try to fix them. If you don't, you'll get the message. The file system was examined by Windows and confirmed to be error-free.
Fix 7: Repair MBR
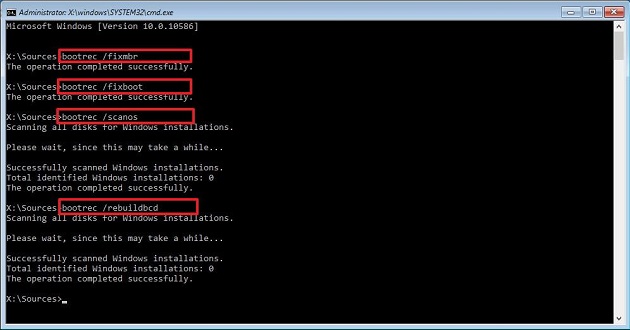
Follow these procedures to resolve MBR issues on a Windows 10 computer:
Step 1: The bootable disc should be used to start the computer.
Step 2: In the Windows 10 Setup, click the Next button.
Step 3: In the lower-left corner, click the Repair your computer icon.
Step 4: Select Troubleshoot>Advanced options>Command Prompt from the Troubleshoot menu.
Step 5: When you need to fix Master Boot Record corruption issues or clear the code from the MBR, use the FixMbr option. This command will not replace the hard drive's existing partition table.
Bootrec /fixMbr
Step 6: Press Enter and close the Command Prompt at the end.
Fix 8: Set System Partition Active
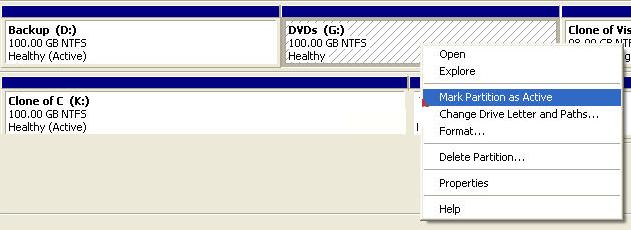
This problem can also be solved by making the system partition active. The steps are as follows:
Step 1: Right-click on Computer or This PC on your desktop and select Manage.
Step 2: Disk Management may be found in the left-hand menu, as illustrated above.
Step 3: Mark Partition as Active by right-clicking on the primary partition you wish to make active.
Fix 9: Replace Hard Drive
To replace a hard drive, back up any data you wish to save, remove the old hard drive, install the new hard disc, and restore the data you backed up. Here's some more information on the three phases that must be completed:
Step 1: The most crucial step in this procedure is to back up the data you wish to save!
Step 2: Ensure your computer is powered off before disconnecting and physically removing the hard disc.
Step 3: Installing the new hard drive is as simple as reversing the procedures you used to remove the old one! Secure the new drive in the exact location as the old one, then reconnect the power and data lines.
Disk Error FAQs
1. How do I uninstall a non-system drive?
Eject any non-system discs from the USB drive, floppy drive or the CD-ROM drive.
2. How do I fix my HP hard drive error?
- Your HP laptop's startup priority order can be changed.
- In the BIOS settings, update the BIOS and reset the BIOS configuration.
- Make sure your laptop and hard drive are both securely connected.
- Try doing a hard restart on your HP laptop.
3. How do you fix invalid system disk replace the disk and then press any key?
- Ensure that your Boot Disk is configured as your first bootable device in your BIOS settings.
- On the Boot partition, run Chkdsk.
- See if repairing the Master Boot Record with the Bootrec.exe utility helps.
Summary
So, when your computer reports a "non-System disc or disc error," the bottom line is that you can attempt the procedures mentioned above one at a time to resolve the error message. We pray you never have to use the last option. If none of the preceding repairs worked and you're still unable to boot your PC, the next step is to use Tenorshare 4DDiG to recover as much data as possible.
Secure Download
Secure Download
 ChatGPT
 Perplexity
 Google AI Mode
 Grok
Grok
