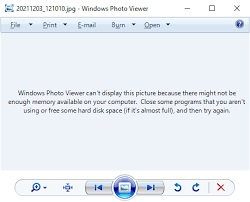
How to Fix Windows Photo Viewer Can't Display This Picture, Not Enough Memory?I Started getting this error when trying to open photos copied from my Galaxy A71 - "Windows photo viewer can't display this picture because there might not be enough memory". How to fix it? Any thoughts?
If this is the first time you're encountering the issue of being unable to open photos using both "Windows Photo Viewer" and "Photos," specifically receiving the notice that "Windows photo viewer can't display this picture, not enough memory," there's no need to worry. You've come to the right place for a solution. In response to your query, here are 11 different solutions that can help fix the problem effectively.
- Part 1: Why Does Windows Photo Viewer Not Enough Memory Error Happen?
-
Part 2: How to Fix Windows Photo Viewer Can't Display This Picture, Not Enough Memory?
- Fix 1: Use Photo Viewer Alternatives
- Fix 2: Convert to a Supportable Format
- Fix 3: Repair Corrupted Photos with 4DDiG Photo RepairHOT
- Fix 4: Reset Color Management
- Fix 5: Update Windows Photo Viewer
- Fix 6: Reset Photos App
- Fix 7: Uninstall and Reinstall Android/iOS Backup Suite
- Fix 8: Remove Encryption from the File
- Fix 9: Run Windows Store Apps Troubleshooter
- Fix 10: Perform a System File Checker Scan
- Fix 11: Disable Inheritance
- Windows Photo Viewer FAQs:
Part 1: Why does Windows Photo Viewer Not Enough Memory Error Happen?
The error message "Windows Photo Viewer can't display this picture, not enough memory" typically occurs when the system does not have sufficient resources to open and display the image file. But there are other factors can contribute to this error:
- System file corruption
- Unsupported photo format
- Corrupted or damaged image file
- High-resolution or large-sized image file
- Outdated Photo Viewer
By considering these potential causes, you can troubleshoot and address the "Windows Photo Viewer can't display this picture" error more effectively.
Part 2: How to Fix Windows Photo Viewer Can't Display This Picture, Not Enough Memory?
Regardless of the causes behind the error, it is reassuring to know that they can all be fixed, and you can do it yourself. Follow the methods outlined below to address the “windows photo viewer can't display this picture” issue effectively:
Video Tutuorial:Fix Windows Photo Viewer Can't Display This Picture
Secure Download
Secure Download
Fix 1: Use Photo Viewer Alternatives
When Windows Photo Viewer struggles to display a image file, using an alternative to Windows Photo Viewer can be an effective solution. The default Windows Photo Viewer may sometimes encounter limitations or compatibility issues with certain image formats or file sizes. By utilizing another photo viewer, you can overcome these limitations and successfully view your images.
Some recommended alternatives include IrfanView, XnView, FastStone Image Viewer, and Adobe Photoshop Express. These programs offer a user-friendly interface, support for various file formats, and efficient memory usage, ensuring smooth and reliable image viewing. Simply install one of these alternative photo viewers, open your images with it, and enjoy hassle-free viewing without encountering the memory error.
Fix 2: Convert to a Supportable Format
Converting the image to a supportable format can resolve the "Windows Photo Viewer Can't Display This Picture" error by ensuring compatibility with the default viewer. Sometimes, the image file may be in a format that Windows Photo Viewer cannot handle, causing the error to occur. In this case, try converting the image format to the one that is supported by Windows Photo Viewer like JPEG, PNG, GIF, TIFF, BMP, DIB, or WDP. Here's what you can do:
- Open File Explorer and locate the image you want to convert.
- Right-click the image and choose "Open with" > "Paint" from the menu. The image will open in the Paint app, and you can find the file size at the bottom of the screen.
Click "File" and select "Save as" > "PNG picture" or "JPEG picture" from the menu.
![convert image to jpeg or png on Windows]()
- A new dialog box will appear, allowing you to choose a folder, rename the file, and select the "Save as type." Navigate to a folder that you will remember later, and ensure that "PNG" or "JPEG" is chosen as the "Save as type."
By converting the image to a compatible format, you can ensure smooth viewing without encountering any compatibility issues in Windows Photo Viewer.
Fix 3: Repair Corrupted Photos with 4DDiG Photo Repair
When an image is corrupted, it may cause the viewer to encounter the Windows Photo Vewer not enough memory errors and fail to display the picture. In this case, resolving any issues or damage within the image file with a reliable tool like 4DDiG Photo Repair that is designed to repair and restore corrupted photos can be an ideal option.
Key features of 4DDiG Photo Repair include:
- Repairs various types of image corruption, including pixelation, blurry images, file format errors, and more.
- Supports batch repair in various formats.
- Up to 3,000 pictures can be repaired at one time.
- You can preview the repaired photos before saving them, ensuring the successful repair of your images.
- Fast repair with 100% secure.
To repair corrupted photos using 4DDiG Photo Repair, follow these steps:
Launch the software after it has been downloaded. Choose the 'Photos repair' tab and select Fix Photo Errors to proceed.
Free DownloadFor PCSecure Download
Free DownloadFor MACSecure Download
![fix corrupt photo using 4ddig file repair-1]()
Start the repair process by adding the broken/corrupted photos onto the screen and then tap on the 'Start Repair' option to start repairing the damaged photos.
![fix corrupt photo using 4ddig file repair-2]()
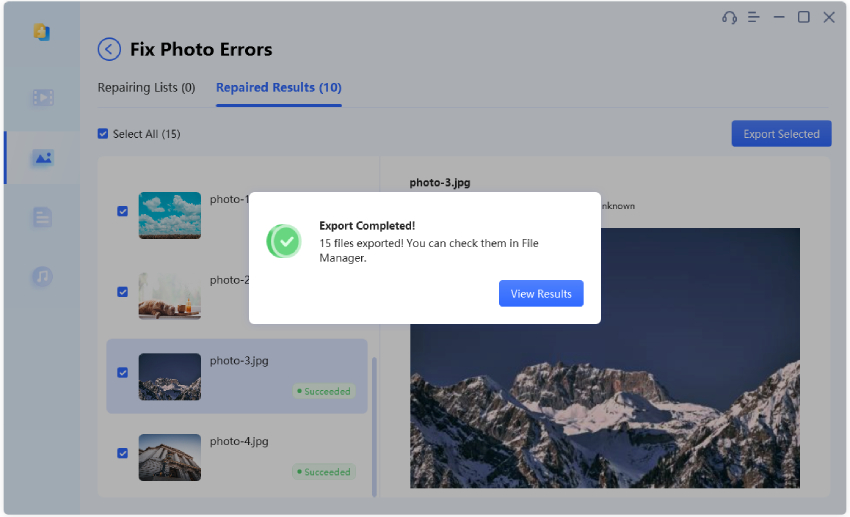
After the repair process is complete, you can view all the repaired photos. If you are satisfied with the results, you can click Export All to save them on the preferred location.
![fix corrupt photo using 4ddig file repair-2]()
By using 4DDiG Photo Repair, you can effectively repair corrupted photos and overcome the "Windows Photo Viewer Can't Display This Picture" error, allowing you to view your images without any memory-related issues.
Fix 4: Reset Color Management
Color management settings can help resolve issues related to color profiles and mismatched color spaces, allowing the Windows Photo Viewer to properly display the image. To use color management, follow these steps:
Step 1: Type "Color management" into the search bar, and open it when it gets listed.
Step 2: Navigate to the Devices tab and choose each ICC profile. Then, click on the Remove button to delete all profiles listed on that page (note: If you do not see any profile here, then there is nothing to do for now).
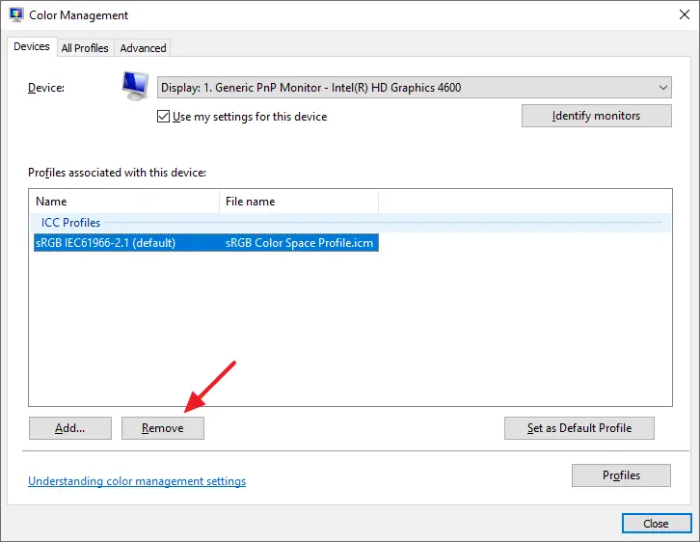
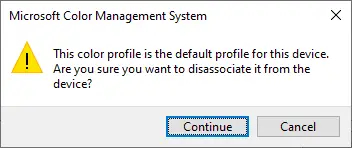
Step 3: When the message "This color profile is the default profile for this device. Are you sure you want to disassociate it from the device?" appears, click on Continue.
Step 4: Now, switch to Advanced tab, from the Device profile dropdown list box, select "Agfa: Swop Standard." This step is crucial as it ensures proper functionality.

Step 5: Finally, click OK to save the change.
Now, re-open the picture with Windows Photo Viewer to see if this method helps.
Fix 5: Update Windows Photo Viewer
Outdated versions of the Windows Photo Viewer may have compatibility issues and lack optimizations for memory management. By updating the software, you ensure that it is equipped with the latest bug fixes, performance enhancements, and memory utilization improvements, which can help overcome the Windows photo viewer not enough memory issue when opening photos. To upgrade your Windows Photo Viewer on Windows 10, follow these steps:
Step 1: Go to Start > Settings > Update & Security > Windows Update.
Step 2: Click on the "Check for updates" button. Windows will now search for any available updates for your system.
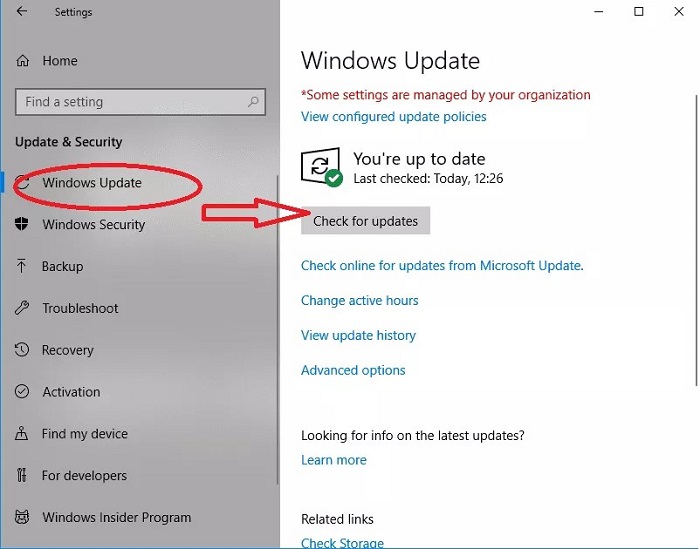
Step 3: If there are updates available, they will be listed. Click on the "Install" button to download and install the updates. Windows will begin the update process, which may take some time depending on the size and number of updates.
Step 4: Once the updates are installed, restart your computer if prompted to complete the installation process.
Fix 6: Reset Photos App
Sometimes the photo viewer not enough memory problem may be solved simply by resetting the 'Photos' app. Resetting the app will restore it to its default state, eliminating any problematic configurations and potentially resolving the memory issue. Let's guide you through the reset procedure step by step.
Step 1: Open the Settings application by pressing the Windows + I keys simultaneously.
Step 2: Look for and choose the 'Apps' selections.
Step 3: Navigate to the "Apps & Features" tab. Then scroll through the list and locate the Photos app in the right panel.
Step 4: Click on the three dots, then click on Advanced options.
Step 5: Click on Reset, which will delete all of the app's data.
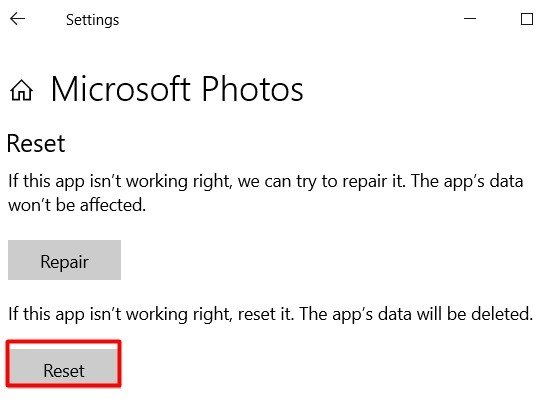
After resetting the Photos app, it should revert to its original configuration. You can then try opening pictures with Windows Photo Viewer to see if the "Windows Photo Viewer can't display this picture, not enough memory" error gets resolved.
Fix 7: Uninstall and Reinstall Android/iOS Backup Suite
If you have recently updated your phone backup software on your PC, it may be causing compatibility issues with Windows Photo Viewer, resulting in the inability to open photographs. This occurs when the default picture viewer on your Android/iOS phone is incompatible with the photo viewer on your PC. To address this issue, try removing the Android phone backup application from your PC and then attempt to view the photographs. Follow these steps to delete the smartphone backup software:
Step 1: Press Windows+R keys at the same time.
Step 2: In the dialogue box, type 'cpl' and hit Enter.
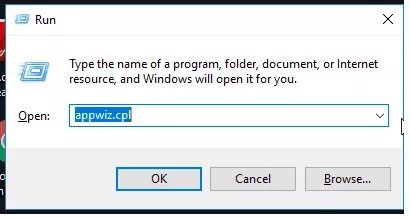
Step 3: Find your phone's linked software by name (Nokia, Samsung, Huawei HiSuit, etc.) in the Programs and Features box, select it, and click Uninstall.
Step 4: Check to see whether Windows Photo Viewer can open your photographs now. Later, you may reinstall the phone suite.
Once the smartphone backup software is removed, try opening the photographs again with Windows Photo Viewer. This should help resolve any compatibility conflicts and allow for smooth photo viewing.
Fix 8: Remove Encryption from the File
Are you attempting to open smartphone photos using Windows Photo Viewer? Smartphones often offer encryption options for images and other media files. However, this encryption can prevent Windows Photo Viewer from accessing the image files, resulting in the "Windows Photo Viewer can't open this picture" issue. To resolve this, you need to disable encryption for the image files. Follow these steps to turn off encryption for photographs:
Step 1: Right-click on the image to enlarge it. Choose Properties.
Step 2: Select Advanced from the General menu.
Step 3: In the Advanced Attributes window, deselect the "Encrypt contents to secure data" option.
Step 4: Select OK to save the changes.
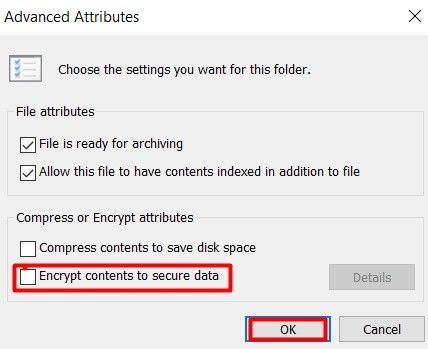
Once the encryption is removed, try opening the file with Windows Photo Viewer to see if the memory-related error is resolved.
Fix 9: Run Windows Store Apps Troubleshooter
If the "Windows photo viewer can’t display picture" issue persists, try running the Windows Store Apps troubleshooter. This troubleshooter is designed to identify and fix problems related to Windows Store apps, which includes the Photo Viewer. By running the troubleshooter, you can potentially identify and resolve any underlying issues that are causing the memory-related error. Here are the steps you can follow:
Step 1: Press the Windows and I keys to open Settings. Scroll down and select 'Update & Security" from the drop-down menu.
Step 2: From the left sidebar, choose the 'Troubleshoot option.
Step 3: Take a look at the right-hand sidebar. Click on the 'Additional troubleshooters' link to gain access after scrolling down.
Step 4: Scroll down to the 'Windows Store Apps,' click on it then hit the Run the troubleshooter button.
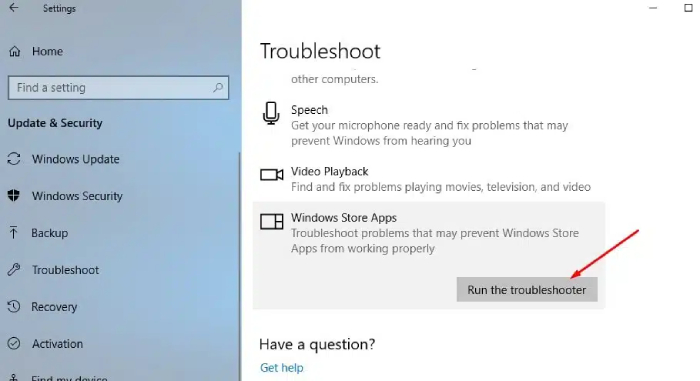
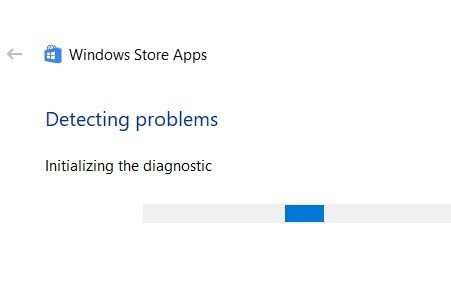
Step 5: Wait a bit for the procedure to finish. You will receive the findings and suggestions for improvement at the end of the procedure. Whatever you do, you must follow the instructions on the screen.
Fix 10: Perform a System File Checker Scan
A frequent and handy repair for any system fault is to run the SFC scan command. The SFC scan is a built-in Windows tool that scans and repairs corrupted or missing system files, which can affect the functioning of various applications, including the Photo Viewer. By running the SFC scan, you can identify and fix any system file issues that may be causing the memory-related error. The procedure to perform a system file checker scan is outlined below.
Step 1: Press the Windows key on your keyboard and type "Command Prompt." There will be a drop-down menu, select the option "Run as administrator."
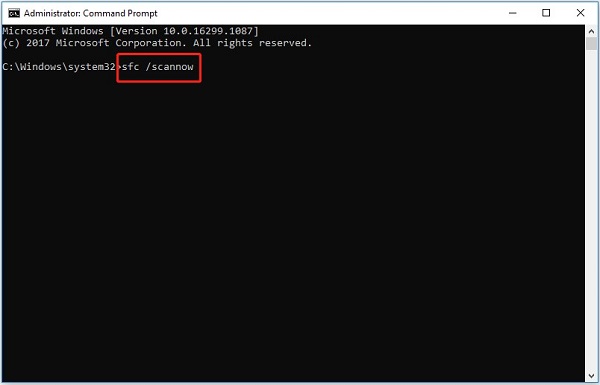
Step 2: In the Command Prompt window, type "sfc /scannow" and press Enter. The scan will start and may take some time to complete.
Step 3: If an error is found, the executing command will scan the system and automatically rectify it. Once finished, restart your computer.
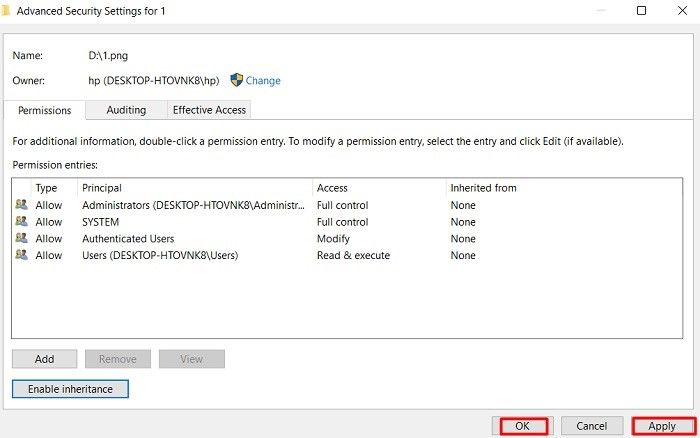
Fix 11: Disable Inheritance
Disabling inheritance should be considered as a last resort when encountering the "Windows Photo Viewer can't display this picture, not enough memory" issue. This method is rarely used but can be attempted if the previous fixes have failed to resolve the problem. Please proceed with caution and follow the outlined procedure below:
Step 1: Right-click on the file or folder that contains the picture you're unable to open and choose 'Properties' from the drop-down menu.
Step 2: Hit the 'Security' tab when the Window appears. Then select 'Advanced' from the drop-down menu.
Step 3: Then, at the bottom of the newly formed interface, click on the "Disable inheritance" button.
Step 4: When prompted, choose "Convert inherited permissions into explicit permissions on this object" and hit Apply to save the change. That's it! Click OK to close the dialog.
Windows Photo Viewer FAQs:
1. Why does my computer keep saying not enough memory?
The error message "not enough memory" occurs when the computer's available RAM is insufficient to handle the tasks and programs running, which can be caused by low physical RAM, memory leaks, running too many applications, or malware infections.
2. Which image file formats are supported by Windows Photo Viewer?
Windows Photo Viewer supports various common image file formats, including JPEG, PNG, BMP, GIF, and TIFF. However, it may not support some less common or proprietary formats without the necessary codecs.
3. Can I reinstall Windows Photo Viewer to fix the "Can't display this picture" error?
Reinstalling Windows Photo Viewer itself may not resolve the issue. However, you can try resetting the app by following the steps mentioned above or performing a system restore to a point when the Photo Viewer was working correctly.
Summary
Encountering the "Windows Photo Viewer can't open this picture not enough memory" can be frustrating. However, there are steps you can take to resolve the issue. You can try converting the file format or using alternative photo viewers. It's also important to keep your program and Windows updated regularly. If these solutions don't work, the picture itself may be corrupt. In such cases, utilizing specialized software like 4DDiG Photo Repair can be highly beneficial. It can effectively repair and recover damaged photos caused by memory issues, allowing you to view and enjoy your memories once again.


 ChatGPT
 Perplexity
 Google AI Mode
 Grok
Grok

