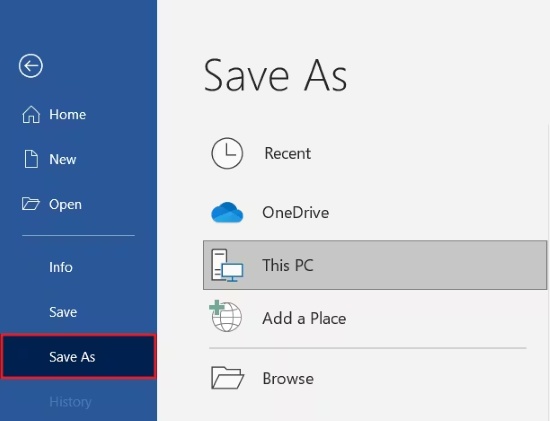
Unsaved Word Document Recovery Mac: 4 Easy Ways

5 mins read

Updated on 2024-06-24 16:46:47 to Office Recovery

Microsoft Word is a go-to tool for Mac users to create or open documents. Despite being a powerful tool, Microsoft Word is also vulnerable to data loss scenarios. One such common situation users face is losing Word documents by closing the file before saving. This is a terrible situation no user wants to face. However, it is a fixable issue.

There are multiple ways to perform unsaved Word document recovery Mac. You can use any reliable document recovery software or built-in recovery methods. In this guide, we have shortlisted four proven ways to recover unsaved Word document on Mac. So, let's get started!

unsaved word document recovery mac

Part 1: Why Didn't My Word Document Save on Mac?

Other than unintentionally clicking the "Don't Save" button while closing the file, there could be multiple other reasons behind why Word didn't save the document on Mac. Some of the likely ones are as follows:

  • AutoRecover feature is disabled
  • Interference from third-party add-ons or plug-ins
  • Virus or malware attack
  • Sudden power failure
  • Out-of-date Microsoft Word or macOS version

All the above reasons can be the cause behind why the Word document didn't save on Mac. No matter the root cause, you still have a strong chance to perform successful Word unsaved document recovery on Mac. Head to the next part to learn more.

Part 2: How to Recover Unsaved Word Document Mac?

Out of all the different ways to recover unsaved Word document on Mac, below are the four best and easiest ways to recover the Word document quickly:

1. Recover Unsaved Word Document Mac from Document Recovery Software

The highly recommended approach to recover unsaved/lost Word documents on Mac is by using document recovery software, such as 4DDiG Data Recovery.

4DDiG Mac Data Recovery is a powerful data recovery software that can conduct deep scans of Mac storage to recover lost/unsaved Word documents. No matter if you have lost a Word document due to an accidental mistake, disk damage, virus attack, or power outage, 4DDiG Data Recovery can recover the document intelligently and effortlessly.

The key features of 4DDiG Data Recovery are as follows:

  • Click-based interface to recover lost or unsaved Word documents from Mac and all Mac-based devices.
  • Recover documents lost due to accidental mistake, power outage, system crash, virus attack, or other scenarios.
  • Ultra-fast deep scan and 100% secure document recovery with a high success rate.
  • Preview-based, selective document recovery.
  • Recover other data types, including photos, contacts, videos, notes, etc.

In short, 4DDiG Data Recovery shines as a modernized and advanced tool to perform Word Mac unsaved document recovery.

FREE DOWNLOAD

Secure Download

FREE DOWNLOAD

Secure Download

Follow the below steps to get unsaved Word document recovery Mac with 4DDiG Data Recovery:

  • Download 4DDiG Data Recovery on your Mac. Install and launch it and select the location from where you want to scan and recover the Word document. Once done, click "Scan" to begin scanning.

    select and scan the drive
  • After scanning, preview and select the Word document(s) to recover.

    preview recoverable documents
  • Click "Recover" and specify the location to save the files on your Mac.

    save the recovered documents back to your mac

That's it! So, a simple and click-based approach of 4DDiG Data Recovery lets you quickly recover unsaved Word document on Mac without any hassle.

FREE DOWNLOAD

Secure Download

FREE DOWNLOAD

Secure Download

2. Recover Unsaved Word Document Mac from AutoRecovery

AutoRecovery is a built-in feature in Microsoft Word for Mac that saves the document automatically after every 10 minutes. It is enabled by default and keeps saving your documents autonomously. So, even if you have closed the Word document without saving it, your Mac has saved the document using AutoRecovery.

Here's how to perform Microsoft Word unsaved document recovery on Mac with AutoRecovery:

  • Launch Finder on your Mac.
  • Select the entire computer and then search for "AutoRecovery" from the search bar.
  • After the scanning, you will see a list of files with the "autorecovery" name. The one you are looking for should be named "AutoRecovery save of [Word file name]".

    search for autorecovery files
  • Double-click the file you want to recover. It will open in Microsoft Word.
  • Click File > Save as to save the document in your desired location on Mac.

    save the recovered document back to your mac

This way, you can use AutoRecovery to recover unsaved Word document Mac.

3. Recover Unsaved Word Document Mac from Temporary Folder

There is also a possibility that the Mac's temporary folder may have your unsaved Word file. Follow the below steps to learn how to undo unsaved word from the temporary folder:

  • Open Terminal.
  • Type "open $TMPDIR" and hit Enter. It will direct you to the TMP folder.
  • Open the "TemporaryItems" subfolder.
  • Locate and open the lost Word file using Microsoft Word.
  • Click File > Save as to save the document in your desired location on Mac.

    find and open the temporary folder to recover unsaved documents

This way, you can explore the Mac temporary folder and recover your lost Word document.

4. Recover Unsaved Word Document Mac from Version History

The last method to perform Word document unsaved recovery on Mac is by exploring version history. If you have made an initial save of the lost document, you can now browse the version history to restore the most recent version.

Here's how to recover unsaved Word document Mac from version history:

  • Open the Word document version accessible to you.
  • Click File > Browse Version History.

    browse version history from the document
  • Select the previous version you want to recover and tap "Restore".

    restore the selected version history of the document

This way, you can leverage version history to get back unsaved Word documents on Mac.

Final Word

Browsing the web for "unsaved Word document recovery Mac" is a common query Mac users make frequently. Just as it's a common issue, it's also a fixable one. That's what we have discussed in this guide with the four best methods.

Out of all of them, we highly recommend that you use the 4DDiG Mac Data Recovery tool. The main reasons are that 4DDiD Data Recovery offers deep scanning, preview-based recovery, and secure recovery of unsaved/lost documents. So, install 4DDiG Data Recovery and save time in recovering unsaved Word documents on Mac without any hassle.

FAQs about Unsaved Word Document Recovery Mac

Q1: Where is the Autorecovery folder for Word?

AutoRecovery folder is a hidden folder in Mac, so you cannot easily navigate to it. To access the AutoRecovery folder for Word, open Finder and click "Go" from the top menu bar. Select "Go to Folder" and type "~/Library/Containers/com.microsoft.Word/Data/Library/Preferences/AutoRecovery/". Once done, you will be taken to the AutoRecovery folder.

Q2: How do I find temp files on Mac?

The temporary files on Mac are stored in a specific folder. To access them, open Finder and click Go > Go to Folder. Type "~/Library/Caches/". From there, you can access all the temporary files.

Q3: How do I unfreeze a Word document without losing work?

If your Word document is frozen, wait for a few minutes, as the Mac may complete its tasks and unfreeze the document. If the problem remains, you should force quit Word. For that, click Cmd+Option+ESC, select Microsoft Word, and click "Force Quit". However, it may lead to loss of work.

William Bollson (senior editor)

William Bollson, the editor-in-chief of 4DDiG, devotes to providing the best solutions for Windows and Mac related issues, including data recovery, repair, error fixes.

(Click to rate this post)

You rated 4.5 ( participated)