How to Fix Mac Permission Denied
Have you ever tried to open a file on your Mac, only to be greeted by the dreaded "permission denied" error? This common alert pops up in Mac OS X, the Unix-based operating system for Apple computers.
Built on top of the Unix foundation, OS X enables you to access system services and files through the command line Terminal interface. But when your access gets blocked, error notifications like “permission denied” appear.
Essentially, it’s the system’s way of telling you “off-limits!”. Annoying as it may be, don’t worry - with the right troubleshooting, you can regain access. In this article, we’ll walk through five straightforward ways to tackle that denied permission alert including checking permissions and using Terminal commands.
With some simple fixes, you'll soon be back to seamlessly opening files and going about your tasks. Ready to solve the puzzle and clear the error? Let’s get started!

Part 1: What Is Mac Permission Denied?
The "permission denied" error on your Mac simply means you've tried accessing a file or making a system change that you don't have authorization for. As the name suggests, it's a permissions issue.
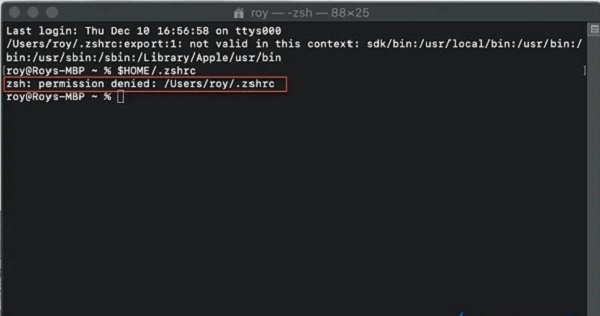
You may see the main "permission denied" message or variations like "zsh: permission denied" in Terminal. Other examples include getting blocked when opening files/apps, writing to external disks, or using certain features like the camera.
While the exact wording differs, the core meaning is the same: "off limits!". What triggers it?
Top culprits include lack of admin privileges, encrypted files/disks, and apps specifically restricted in System Preferences. You may also encounter permission errors after making account changes or misconfiguration ownership parameters.
Part 2: Restore Inaccessible Files on Mac via 4DDiG Mac Data Recovery
Struggling to access your important files due to the “permission denied” error on Mac? Don’t panic. Powerful data recovery software like 4DDiG Mac Data Recovery enables you to swiftly restore inaccessible or vanished data from Mac internal drives, external hard drives, USB sticks, memory cards, etc.
We recommend 4DDiG because it combines ease of use with high recovery success rates. The intuitive yet advanced interface allows both beginners and professionals to locate and rescue lost or blocked files in just 3 simple steps - pick a drive, scan for files, and recover data.
Optimized for Mac systems, 4DDiG supports all file formats and models. It can even recover data from crashed, corrupt or unbootable devices. Plus with rigorous data protection and round-the-clock technical support, it never compromises security and reliability.
Key Features:
- Recognizes 1000+ types of files
- Scans drives & makes file recovery easy
- Repairs damaged photos & videos
- Supports latest Mac models and hardware
- Free lifetime upgrades
Rather than helplessly accepting data loss, turn to a robust tool like 4DDiG to swiftly bypass permission problems and restore access on Mac.
Secure
Download
Secure
Download
-
Download and install 4DDiG on your Mac. Launch the program and choose the locked drive or device you want to scan for lost data. It supports Mac internal hard drives, external HDDs/SSDs, USB flash drives, SD cards, digital cameras, drones and more.

-
With your storage device selected, hit the “Scan” button for 4DDiG to deeply analyze it, hunting for working copies of inaccessible or deleted files. This process can take a few minutes to over an hour depending on drive capacity. Preview found data if required.

-
Finally, tick files and folders you wish to recover - all supported formats can be rescued. Click “Recover” and direct the restored data to another secure storage location, avoiding the original drive.

Fix External Hard Drive Read Only on Mac without Losing Data
Part 3: How to Fix Mac Permission Denied?
Now we'll walk you through five super-simple fixes to tackle that frustrating issue head-on. From basic tweaks to a bit more advanced stuff, we've got everything you need to get your Mac running smoothly again.
Ready to take charge? Let's jump right into each fix and get your Mac back on track!
Way 1: Gain Permission for Files by Reaching the Info Window
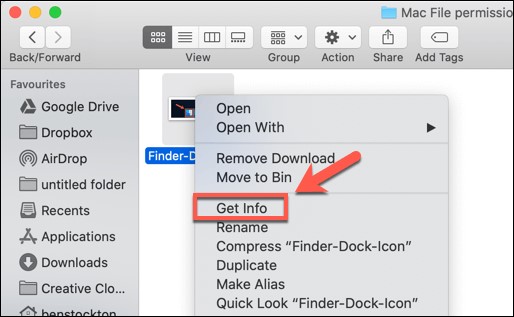
Having issues accessing your files due to permission problems? You can potentially resolve this by adjusting file/folder authorizations yourself via the Get Info window. Follow the below steps:
- Launch Get Info for the inaccessible file/folder showing the blocked access error.
-
Click the lock icon in Get Info to enable permission changes. Enter admin password if prompted.

- Under Sharing & Permissions, expand the section and tweak the access controls. Allow increased rights for your user account, like enabling Read & Write.
- Close Get Info to save changes after setting appropriate access levels to avoid blocked access going forward.
Way 2: Check if You Have File Access Permissions
Unsure if you already have adequate permissions for blocked files? You can easily check your existing access level as follows:
- Open the Terminal utility under Applications > Utilities in your Mac.
- Type the command “ls -l” in Terminal but don’t hit enter yet.
- Select the inaccessible file/folder showing the permission error and drag it into the Terminal window under the ls -l command line.
- Now hit the enter key. Terminal will analyze and display the specific permissions you currently have for that item.
- Examine if your access rights are restrictive here and cause the blocking. Revisit the first fix to modify permissions if needed.
Following the above steps makes it easy to verify your current file/folder access permissions via Terminal. Tweak them if permissions appear limiting and likely cause blocked access.
Way 3: Change the Folder Ownership if Mac Permission Denied
Don’t have adequate permissions and get blocked when accessing folders? You can resolve this by assigning ownership to your admin user account with Terminal commands:
- Open the Terminal app in your Mac and enter the chown command:
chown -R $USER:$USER /path/to/folder - In the command, replace /path/to/folder with the actual path to the protected folder that needs ownership change.
- Hit enter and authorize with admin credentials if prompted. Terminal will now change ownership to grant your user account full access.
- Test opening the folder again. The permission error should no longer bother you after the ownership change via Terminal.
The chown command swiftly alters folder ownership in your favor. Do note that while handling Terminal, cautiously double-check command syntax before executing to prevent unintended system changes.
Way 4: Run Sudo Commands when Mac Permission Denied
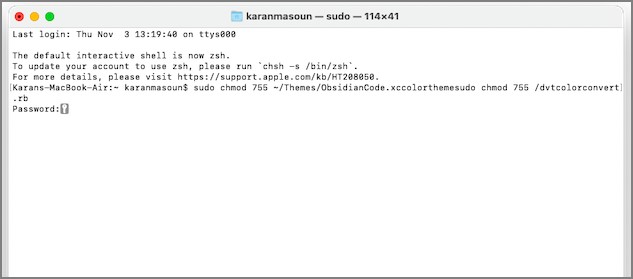
Getting blocked when executing Terminal commands on your Mac? Add the “sudo” prefix to temporarily run them with admin rights:
-
When facing permission errors executing Terminal commands, reopen the app and add “sudo” before the problematic command.
For example, if chmod coding.py shows permission denial, use:
sudo chmod coding.py
- Hit enter to run. Terminal will now prompt for the admin password. Provide credentials to authorize privileged execution.
- Once granted temp admin rights with sudo, the command should run successfully without permissions blocking access.
-
Just be careful when handling sudo - it broadly elevates privileges so cautiously verify command syntax first.

The handy sudo prefix allows easy one-time admin rights to accomplish tasks otherwise blocked for your user account, avoiding tedious permission issues.
Way 5: Give Permission to Third-Party Apps
Did installing new software trigger permission errors? Manually authorize the app as follows:
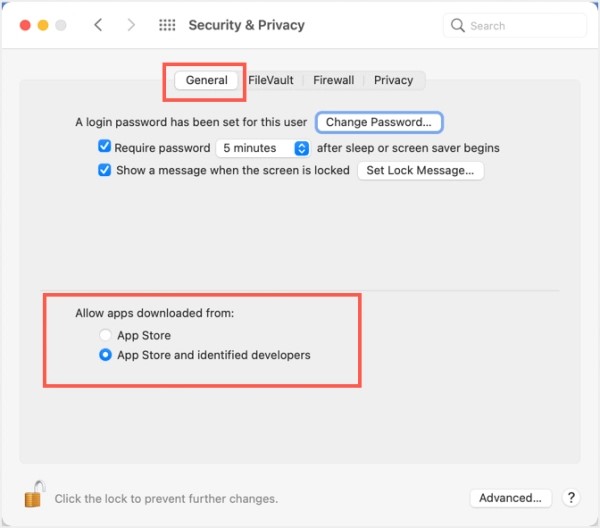
- Go to System Preferences > Security & Privacy > Privacy tab. Select the app permission category being denied.
-
At the bottom, click the lock icon to make changes. When prompted, enter admin name and password.

- Under Allow apps to access [permission name], check both boxes - one to allow apps from App Store, the other for identified developers.
- Close System Preferences to save the updated authorizations. Apps should now have sufficient access without annoying permission blocks.
- Reopen the problematic app that needed permissions. The alerts should cease with manual authorization completed for that app category.
Permissions begin restrictively for newly installed software. But granite admin access via System Preferences easily lifts these limits app-wise when you face blocked features and functions.
Part 4: Frequently Asked Questions
Q: How do I fix permissions denied on Mac?
Ans: To fix "permission denied" on Mac, first check your access levels in Terminal or System Preferences. Next, adjust file permissions in Get Info to grant yourself increased rights. Enter admin credentials when prompted. You can also run privileged commands with sudo prefix in Terminal to bypass blocks.
Q: How do I fix my Mac when it says I don't have permission?
Ans: When Mac says you lack permissions, reopen the locked item/app and use the Get Info window to alter its sharing & permissions. Enable your user Read & Write access. Verify that your account has admin rights to change authorizations system-wide as needed.
Q: Why does my Mac keep saying access denied?
Ans: Frequent "access denied" errors on Mac may be due to restrictive default permissions on newly installed apps, or encrypted system files locking out users without admin rights. Launch System Preferences and check/adjust app access settings under Security & Privacy as needed. Also enter admin password when changing authorizations.
Conclusion
Like many Mac users, you may occasionally face frustration when trying to access files only to be met with the common “permission denied” error. This alert serves as an access block, keeping you from seamlessly opening items or using certain features. In this article, we explored top reasons for this permissions issue & five straightforward troubleshooting methods to resolve the issue. Still struggling after trying the tips? Powerful utility software like 4DDiG Mac Data Recovery can retrieve inaccessible data by essentially bypassing system blocks. With the right tools and techniques, you can troubleshoot the issue and regain seamless access on Mac.


 ChatGPT
 Perplexity
 Google AI Mode
 Grok
Grok


