Erase Assistant Is Not Supported on this Mac: How to Fix It?
Discover solutions for the Erase Assistant is not supported on this Mac error and download 4DDiG Mac Data Recovery to recover any lost data if you accidentally erase all content and settings on your MacBook.
Users occasionally encounter unexpected hurdles in the ever-changing landscape of technology, and one such issue is the error message “Erase Assistant is not supported on this Mac.” This notification can be perplexing, especially for users attempting critical tasks such as erasing their Mac's storage. Understanding and resolving this issue requires a closer examination of the complexities of Mac systems.
This article will explain the Erase Assistant is not supported on this Mac error by providing users with in-depth information about the possible causes of this message. Whether you are a professional Mac user or new to the Apple ecosystem, this helpful guide will fix the Erase Assistant not showing up issue and empower you to manage your Mac's storage efficiently.

Part 1: Why Is Erase Assistant Not Supported on My Mac?
The “Erase Assistant is not supported on this Mac" message typically appears when attempting to use Erase Assistant, a feature within the macOS operating system designed to facilitate the erasure and reinstallation of the system. Several reasons could contribute to this error:
- Incompatible macOS Version: Erase Assistant may not be supported on older macOS versions or specific builds. Ensure that your Mac is running a compatible version of the operating system.
- Insufficient Disk Space: If your Mac's storage is critically low, Erase Assistant may be restricted from performing its tasks. Ensure you have sufficient free space on your hard drive before attempting the erasure.
- Hardware Limitations: Certain Mac models might have hardware limitations that restrict the use of Erase Assistant. Verify if your Mac meets the system requirements for this feature.
- Third-Party Software Conflicts: Installed third-party software or utilities might conflict with Erase Assistant. Disable or uninstall any non-essential applications that could interfere with the process.
- Corrupted System Files: Erase Assistant may not function correctly if crucial system files are corrupted. Running disk utility tools or reinstalling the macOS might help address this issue.
- Security Settings: Security settings on your Mac, such as FileVault encryption, might impact the ability to use Erase Assistant. Adjusting these settings or disabling encryption temporarily could resolve the problem.
- Unsupported Mac Model: Newer versions of Erase Assistant may not be compatible with older Mac models. You must confirm that your Mac is within the supported range for Erase Assistant functionality.
- System Integrity Protection (SIP): Certain system modifications protected by SIP can interfere with Erase Assistant. You must ensure that your Mac's System Integrity Protection is not overly restrictive.
Part 2: How to Fix 'Erase Assistant Is Not Supported on this Mac' Error?
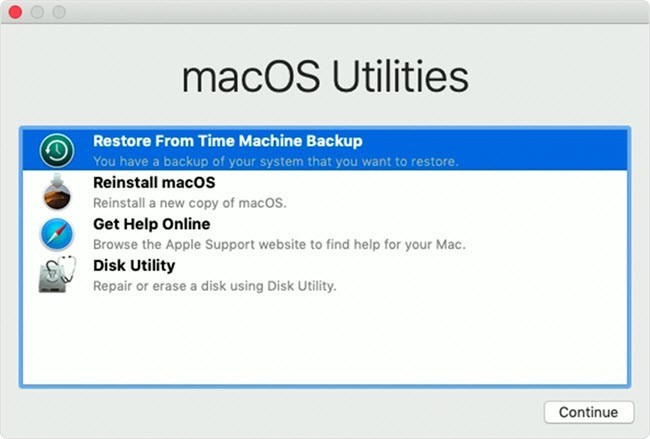
If you want to fix Erase Assistant is not supported on this Mac, you can do this by erasing your Mac in Recovery Mode. You will never use this tool to factory reset your MacBook Pro if you have an outdated macOS version or own an incompatible device. In such situations, the best way to wipe your Mac is to use macOS Recovery. The steps are as follows:
For Apple Silicon Macs:
-
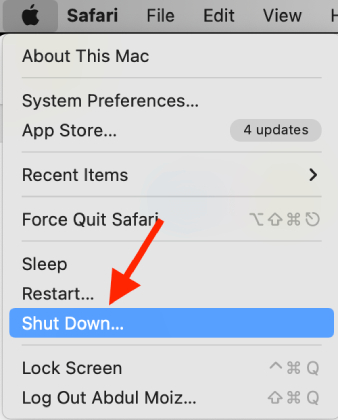
Turn off your Mac to enter macOS Recovery mode. You can do it by clicking the Apple logo in the menu bar, which is located in the upper left corner of your Mac. Now, you should select "Shut Down."

- Wait a few minutes to shut down Mac completely. The screen will be black after it has been turned off.
-
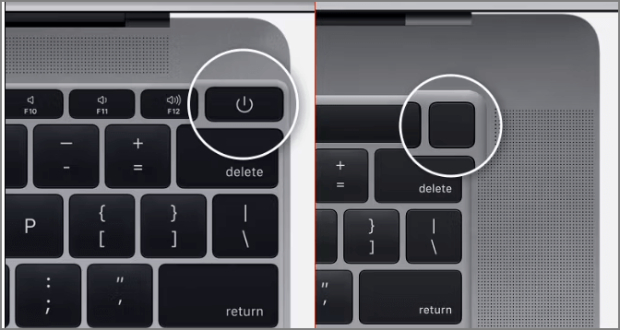
Press and hold the power button on Apple Silicon Macs to enter macOS Recovery. After that, you will see the error Erase Assistant is not supported on this Mac will be fixed.

For Intel Based Mac:
- Hold your keyboard's Command + R key to bring up the startup options screen.
- In the startup options window, select "Options," then click the "Continue" button.
- Select the volume you want to use on the next screen. If so, choose one to retrieve and press "Next."
- Select the administrator account and press the "Next" button.
- You will be prompted to enter the account's password on the following screen.
- After entering the password, click the "Continue" button.
-
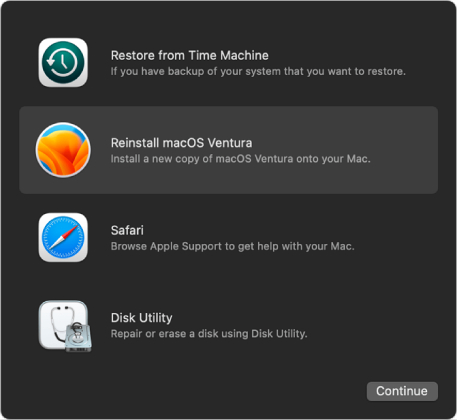
Now, macOS Recovery on your Mac has launched. This will fix your error.

Part 3: What to Do If You Can't Find Erase All Content and Settings Mac?
It might be for various reasons if you cannot locate the 'Erase All Content and Settings' option on your Mac.
Suppose you go into System Preferences and the "Erase All Content and Settings" option is missing. In that case, your Mac is either running an older version of macOS than Monterey or needs to be equipped with the necessary chip.
You only need to update your Mac to macOS Monterey or later. You can't perform the factory reset on your Mac with Erase Assistant and need to do it with macOS recovery.
In addition, you're probably not using Erase Assistant correctly if your Mac does support it, but you can't find the "Erase All Content and Settings" option on macOS Ventura. Now follow the below guide to find this:
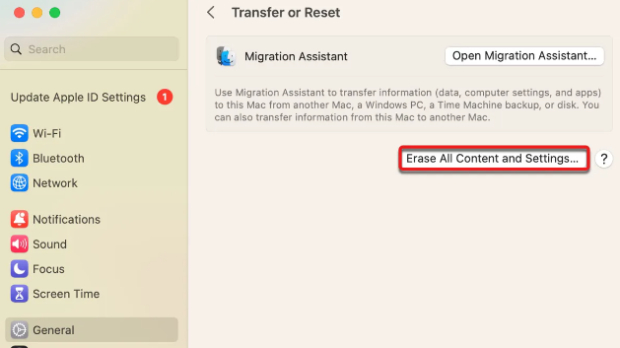
For macOS Ventura:
Navigate to the Apple menu > System Settings > General > Transfer or Reset.
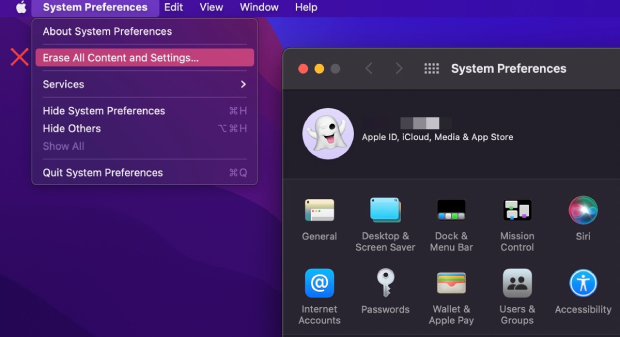
For macOS Monterey:
You can find "Erase All Content and Settings" on macOS Monterey under the Apple menu > System Preferences.
Bonus Tip: How to Recover Data After You Erase All Content and Settings on MacBook?
If you accidentally erase all content and settings on your MacBook, especially if you don't have a backup, it can be a challenging experience. Fortunately, you can recover your data with the help of data recovery software like 4DDiG Mac Data Recovery.
Here are the key features of 4DDiG Mac Data Recovery:
- User-Friendly Interface: 4DDiG Mac Data Recovery has an innovative and user-friendly interface, making it accessible for beginner and experienced users.
- Versatile File Recovery: This powerful software supports the recovery of various file types, including documents, photos, videos, audio files, and more.
- Multiple Recovery Modes: 4DDiG Mac Data Recovery offers multiple recovery modes for data loss scenarios. Whether you accidentally deleted files, formatted your hard drive, or lost data due to system crashes, you can choose the appropriate mode for a higher chance of successful recovery.
- Preview Before Recovery: The software allows you to preview recoverable files before initiating the recovery process.
- Deep Scan Technology: 4DDiG employs advanced deep scan technology, ensuring a thorough search for lost or deleted files.
- macOS Compatibility: 4DDiG is designed to work seamlessly with various macOS versions, ensuring compatibility with your MacBook's operating system.
Follow the below steps that can help how to use 4DDiG Mac Data Recovery to recover data from hard drives:
-
After installation, launch 4DDiG-Mac and choose a location, such as your local drives, to begin Mac data recovery. When you move your mouse pointer over your chosen location, the word "Scan" will appear in the lower right corner of the icon. Click Scan to begin searching for any lost files.
FREE DOWNLOADSecure Download
FREE DOWNLOADSecure Download

-
Scanning for deleted files takes some time. Once the scanning result has been generated, you can preview more details by clicking on particular file types.

-
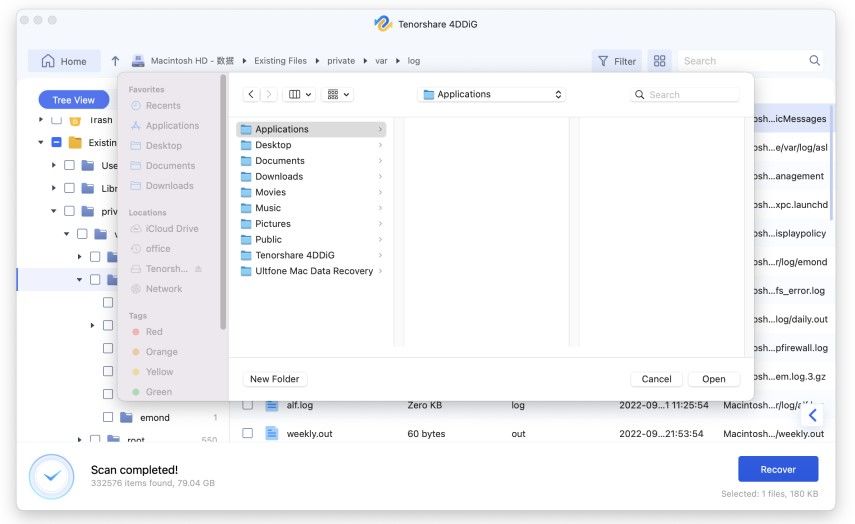
To save the found files, click the "Recover" button and choose a location. It is advised to store the recovered files on a different partition than the lost ones. As a result, you may face permanent data loss.

Conclusion
We've examined the possible reasons behind the "Erase Assistant is not supported on this Mac" issue and offered a comprehensive solution. Understanding the nuances of Mac systems, checking compatibility, and addressing issues such as insufficient disk space or third-party software conflicts are essential steps toward resolving this error.
We also discussed what to do on a MacBook if the "Erase all content and settings" option is not readily available. As a bonus tip, we provided 4DDiG Mac Data Recovery as a reliable option for restoring data after you erase all content and settings. Thanks to its intuitive interface, 4DDiG allows users to recover lost data safely and effectively. Just give it a try!
💡 Summarize with AI:
You May Also Like
- Home >>
- Mac Problems >>
- Erase Assistant Is Not Supported on this Mac: How to Fix It?


 ChatGPT
 Perplexity
 Google AI Mode
 Grok
Grok

