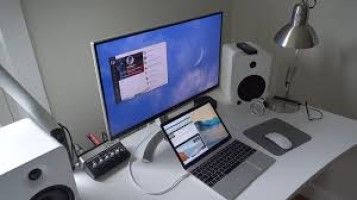
Not being able to get rid of the “MacBook pro external monitor not working” problem becomes a pain, as external monitors are very useful when it comes to extending our desktop display, and creating a broader and more visual space for applications. Whenever there’s an “external monitor for MacBook pro not working” issue, the user tends to miss out on the vast benefits of having an external monitor, which makes it even harder to deal with. These benefits include an immersive gaming experience, splitting screens as an artist or video editor, multitasking, and even running multiple applications at the same time. In this article, you will find the best and most efficient troubleshooting methods to deal with Mac external display not working issues, as well as a bonus tip on how to recover lost, corrupt, or damaged data from a MacBook computer.
-
Part 1: How to Fix External Monitor Not Working on MacBook Pro?
- Fix 1: Restart Computer
- Fix 2: Check the External Monitor Connection
- Fix 3: Check Your Cables Connection
- Fix 4: Try the Outlet Power
- Fix 5: Make Sure your macOS Already Update to Newly Version
- Fix 6: Take A Quick Power Nap
- Fix 7: Remove All Chained Adapters
- Fix 8: Check Mac Displays
- Fix 9: Check External Monitor Compatibility
- Fix 10: Use Alternative Monitor to Test
- Fix 11: Check the Third-party Graphics Card
- Fix 12: Check Mac Detect Displays Feature
- Fix 13: Reset NVRAM
- Fix 14: Reset macOS SMC
- Fix 15: Check Mac's Technical Specifications
- Fix 16: Change Mac Color Profile
- Bonus Tip: How to Recover Lost/Deleted/Damaged/Corrupted Data from Mac & Mac Devices?HOT
- FAQs:
Part 1: How to Fix External Monitor Not Working on MacBook Pro?
Although pairing external monitors with MacBook Pro computers comes with a lot of benefits, they don’t always synchronize perfectly. In some cases, a user may experience difficulties with detecting the external monitor especially after rebooting his or her Mac computer. In this section, you will find a handful of fixes you can initiate when your Macbook pro external monitor not working. And as usual, we will begin with the easiest fix and then advance to the more sophisticated ones.
Fix 1: Restart Computer
If after confirming all your cables are securely and correctly connected and your Mac still won’t detect your external monitor, restarting your computer should be your next option. As easy as restarting a computer may seem, it is the oldest troubleshooting method in the book and is quite effective at resolving problems related to external monitor detection. Do not unplug the cable of your external monitor before restarting your computer. Instead, only click on the Apple logo and then click on “Restart”.
Fix 2: Check the External Monitor Connection
If restarting your computer does not resolve the problem, then you should check the connection of your external monitor. Disconnect your monitor’s adapter for at least ten seconds and then reconnect it. If the problem persists then you can disconnect your adapter, turn off your Mac, plug in your adapter, and then turn on your Mac computer. They’ve been reports of positive results by users who turned on/off the external monitor while removing the cable and plugging it back in. To do so, unplug your monitor’s cable, turn it off, plug in the cable, and then turn on the external monitor. For those who own a MacBook, MacBook Pro, and MacBook, you can try closing your Mac’s lid while disconnecting the monitor. Connect the external monitor to your Mac, click on “Restart” after clicking on your “Apple” logo from the menu bar, and then close your Mac’s lid immediately. If the problem persists then you can move on to the next fix.
Fix 3: Check Your Cables Connection
Because a slightly loose cable connection can cause a computer not to recognize an attached display, check to see that your cable is securely connected even though it looks like it is. It is always worth detaching your adapter and cable and then firmly putting them back in whenever there’s a problem with an external display.
Fix 4: Try the Outlet Power
In a situation where your Mac computer completely relies on its internal battery for power, chances are the power left in the internal battery may not be enough to transmit pixels to your external monitor. If this is the case, then try plugging your computer into a power outlet and then see if it gives your Mac the juice it needs.
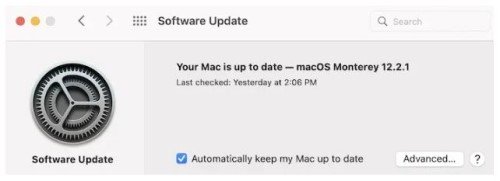
Fix 5: Make Sure your macOS is Already Updated to the New Version
If you haven’t updated your macOS to the current version, then you could be experiencing a problem that has already been addressed and fixed in the latest update. Check to see that your current macOS version is up to date. If it isn’t, then you’ll have to update it.
Fix 6: Take a Quick Power Nap
This is almost the same as turning off your Mac computer and then turning it back on. Taking a quick power nap may be able to facilitate the connection between your Mac and the external monitor.
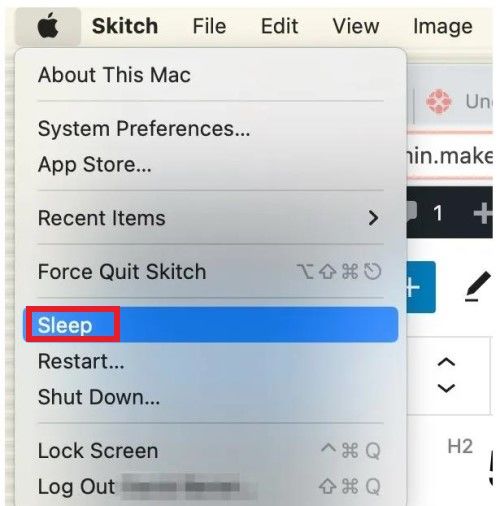
Step 1: Navigate to your Mac’s menu bar and then click on the Apple icon.
Step 2: Proceed by clicking on “Sleep” and then wait for a few minutes.
Step 3: Next, interact with your Mac computer to make it come on by pressing any key on the keyboard, touching the trackpad, or moving the mouse.
Fix 7: Remove All Chained Adapters
Chaining multiple adapters together isn’t the best way to get your Mac computer to act nicely, especially with an incompatible external display. Having a chain of adapters such as an HDM to DVI chained to a DVI to Mini DisplayPort adapter may do more harm than good. Instead, you’d want a simpler and more efficient setup that involves a single and compatible adapter.
Fix 8: Check Mac Displays
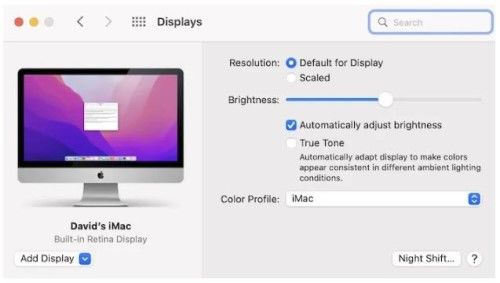
Your Mac display settings can also cause the “Mac external display not working” issue. Make sure your Mac’s contrast & resolution settings are not interfering with the functionality of your external monitor. You can check your Mac’s display settings by following these steps:
Step 1: Navigate to and click on the Apple logo from the menu bar.
Step 2: Click on “System Preferences” and then “Displays”. Here is where you can look for any extreme or unusual settings that may hinder the functionality of your external monitor. You can also experiment to see what works by playing with the sliders inside this settings menu.
Also, make use of the Ctrl + F2 shortcut keys to make sure the brightness of your external monitor isn’t at its lowest.
Fix 9: Check External Monitor Compatibility
Although there are a handful of external monitors out there in the market, not all of them are compatible with Mac computers. This is why it is of utmost importance to check the compatibility of an external monitor before purchasing it. The same goes for what’s meant to be “Compatible cables”. Verifying what port your Mac computer has will help you choose an external monitor with the same type of port as your computer. You can do this by navigating to and clicking on the Apple icon from the menu bar, clicking on “About This Mac” and then “System Report”.
Fix 10: Use an Alternative Monitor to Test
It would be a total waste of time to try adjusting your Mac’s settings to fix a temperamental, buggy, or outright damaged external monitor. If you can afford a second external display system, go for it, or if you already have a spare, try connecting it to your computer and see if it works. If it does, then this means the other was beyond fixing.
Fix 11: Check the Third-party Graphics Card
If you are the type of user who makes use of a third-party graphics card, make sure it is properly inserted and fully balanced in the PCI (Peripheral Component Interconnect) slot. Also, make sure the necessary drivers are installed and are all up to date. Check to see that you are making use of the current or latest operating system as the latest macOS versions sometimes do have driver updates.
Fix 12: Check Mac Detect Displays Feature
The Mac Detect Displays feature can be used to force a connection between your Mac computer and the external monitor when the macOS does not automatically recognize the monitor. You can make use of this feature by following the steps below.
Step 1: Navigate to and click on the Apple logo from the menu bar.
Step 2: Click on “System Preference” and then “Displays”.
Step 3: On your keyboard, press and hold on to the “Option” key to display the “Detect Displays” button.
Step 4: Choose “Detect Displays” to check if the external display is compatible with your system.
Fix 13: Reset NVRAM
The NVRAM (non-volatile random-access memory) stores the settings your macOS may need to access quickly, and some display-related settings are among them. A range of technical issues may arise if these settings are altered or corrupted, and as such setting your NVRAM to factory reset may get rid of external monitor display problems. It would be in your best interest to know that resetting your NVRAM will reset your Mac’s settings & preferences, and as such, it may require reapplying them after resetting the NVRAM. You can reset the NVRAM following the steps below:
Step 1: Turn off your Mac computer. Turn on your Mac computer and then immediately press and hold the following keys on your keyboard; “Option + Command + P + R”. Hold these keys and only release them when your Mac computer restarts.
Step 2: For users with M1 Mac computers, during startup, your computer automatically checks if a reset is required. This is because they do not have shortcut keys to reset the NVRAM. To enforce this check, turn off your computer, and then after a few seconds, turn it back on.
Fix 14: Reset macOS SMC
The SMC (System Management Controller) is responsible for controlling the majority of the physical components of your computer. Resetting your macOS SMC can potentially resolve some display-related problems. However, M1 Mac users can skip this fix as Apple Silicon Mac computers do not have the System Management Controller (SMC). You can rest your Mac’s SMC by following the steps below.
Step 1: Completely turn off your Mac computer
Step 2: Plug in your Power adapter and then press and hold the power button together with these keys on your keyboard; “Control + Shift + Option”. Hold these keys for at least 10 seconds and release all of them at once. For MacBook users with a T2 chip, also press and hold the “Shift” key in addition to the other keys.
Step 3: Restart your Mac computer as normal.
This fix is quite effective and should solve the issue of your external monitor not working for MacBook pro. But if it isn’t, then you should move on to the next fix.
Fix 15: Check Mac's Technical Specifications
Your Mac specification plays an important role when it comes to transmitting your display to an external monitor. Check your Mac’s technical specifications to see that your graphics card is compatible and powerful enough to transmit pixels to your external monitor. If you make use of a 4K external monitor, then there’s a tendency that you may experience compatibility issues with your graphic card. However, the majority of Mac computers produced after 2013 can support the 4K resolution.
Fix 16: Change Mac Color Profile
Let’s assume at this point you’ve been able to get your external monitor up and running, but you’ve noticed the display colors on your monitor are far different from the display on your Mac’s screen. Some external monitors come with buttons to help tweak a display color profile, but others don’t. Fortunately, the macOS Display Calibrator Assistant is there to assist users with monitors that do not have buttons to tweak the display color profile. You can access the macOS Display Calibrator by following the steps below.
Step 1: Click on the Apple logo from the menu bar and navigate to “System Preferences” and then click on “Displays”.
Step 2: At the bottom-right corner of your screen, you will find The “Color Profile”. Choose “Calibrate…” to open the calibrator assistant.
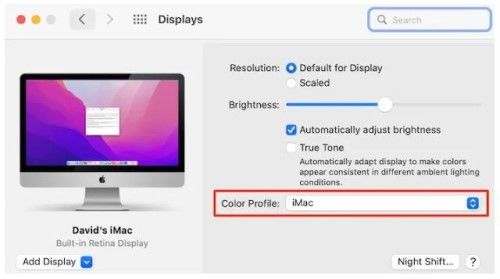
Step 3: Calibrate your display by following the on-screen instructions. On the other hand, you can try out other color profiles to identify which one best suits your external display. Explore new color profiles by navigating to “Displays” and then clicking on “Color”.
Bonus Tip: How to Recover Lost/Deleted/Damaged/Corrupted Data from Mac & Mac Devices?
The best, easiest, and fastest way to recover lost, deleted, damaged, or corrupted data from Mac and other Mac devices is with the use of third-party software. Although other methods that involve in-built recovery solutions are quite effective, third-party software is the easiest to utilize as the best of them can recover lost data in just three steps. The recommended software for a data recovery process on Mac is 4DDiG Mac Data Recovery software. This software is capable of:
- Completely recover lost data from Mac computers and other Mac devices including cameras, SD cards, USB flash drives, and others.
- It also supports a variety of macOS versions such as M1 Max, M1 Pro, M1, Ventura, and T2 chips.
- It has a high success rate and is high capable of recovering lost data on Mac.
- It is easy to use as it requires only three clicks to completely recover your lost data even without disabling SIP.
- It has a fast scanning process.
Below are the using steps to follow to recover lost data on Mac with the Tenorshare 4DDiG Mac data recovery software.
For PC
Secure Download
For MAC
Secure Download
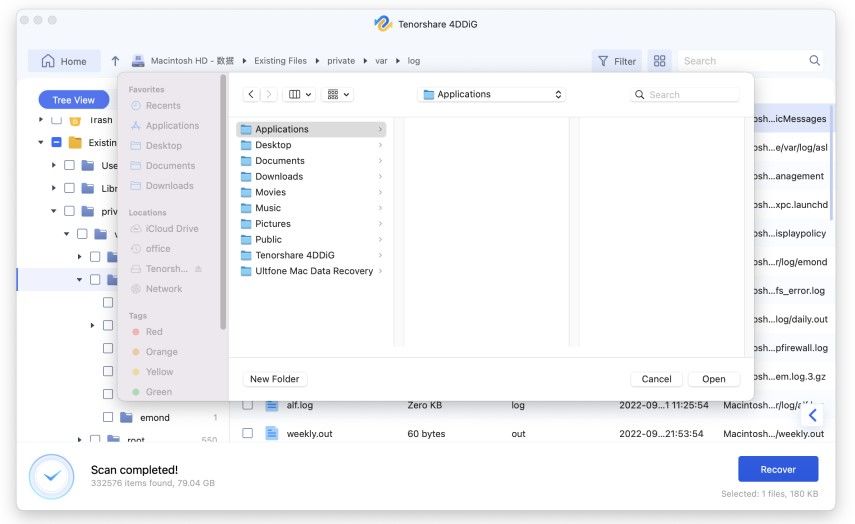
- After downloading and installing the Tenorshare 4DDiG Mac data recovery software, launch it and then select the external devices where stored the lost data – it could be your local storage in your Mac computer or any other plugged-in Mac devices like USB flash drive, SD card, etc. Move your mouse cursor to the desired location and then click on the “Scan” icon that pops up.
- After clicking on the “Scan” icon, the software automatically scans the selected location for lost, damaged, or corrupted files. Once the scan result is presented to you, preview more details by clicking on the file types.
- Save the scanned result to a secured location by clicking on the “Recover” button, and then select a secure location to store the recovered files. It is of utmost importance that you do not save the recovered files to the same location where you once lost them as this may lead to permanent data loss.


FAQs:
How Do I Get My MacBook Pro to Recognize An External Monitor?
First, turn on your MacBook and then navigate to and click on the Apple icon from the menu bar. From the dropdown menu, click on “System Preference” and then “Displays”. Next, click on the “Detect Displays” button. Some users may have to press the “Option” key to be able to view the “Detect Displays” button. Doing this can prevent the “external monitor MacBook pro not working” problem from occurring.
Why Won't My Second Monitor Work with My MacBook Pro?
This could be a result of a few known issues; it could be because of a poor connection, your Mac’s display settings, or compatibility issues.
How Do I Reset My External Monitor Mac?
You can reset your external monitor from your Mac’s Display Settings. Navigate to and click on “System Preference” from the Apple menu and then click on “Displays” to find your Mac’s display settings. You can also reset the resolution settings by selecting “Default for display”. Effect these settings by restarting your Mac computer normally.
Conclusion
Is your Mac external monitor not working? The above-mentioned troubleshooting methods are guaranteed to resolve this problem and also create a more comfortable and productive computing environment. At this point, the external monitor not working on MacBook pro should be a thing of the past. Reminder: For Mac users who may have in one way or the other, experienced data loss either due to corruption, accidental deletion, malware attack, or any other scenarios, the best and most efficient way to retrieve your lost data is with the use of third-party software. And the recommended software for the job is 4DDiG Mac Data Recovery Software.
 ChatGPT
 Perplexity
 Google AI Mode
 Grok
Grok

