Which file format do you use when you send out forms or non-editable documents? Of course, PDFs. But if somehow the website or the platform doesn't accept PDFs other than image format, especially when you are using a Mac, What will you do then? Well, this article will guide you on how to convert PDF to JPG on Mac.
Part 1: How to Convert PDF to JPG on Mac without Losing Quality?
Now, sometimes there is always a concern about losing the quality of the files. In fact, some platforms do work, but the files loses a lot of quality when converting PDF to JPG on Mac. So here you can use the following ways to save your file from losing quality while converting PDF to JPG on Mac.
Fix 1: Use Preview to Convert PDFs to JPG on Mac
You can use the preview option to convert PDFs to JPGs on Mac by following the following steps.
Step 1: Open the folder that comprises the PDF file. Afterwords Right-click on the folder and a bunch of options will appear, just click on the preview button.
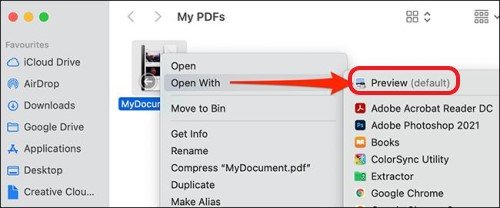
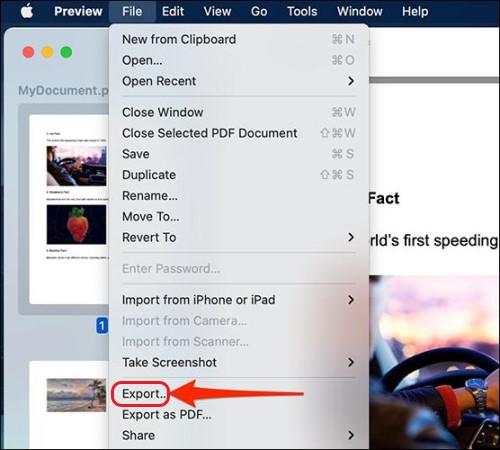
Step 2: After click on the preview option and select the PDF file you want to convert to JPG. Then on the top menu bar, click on File and then click on Export.
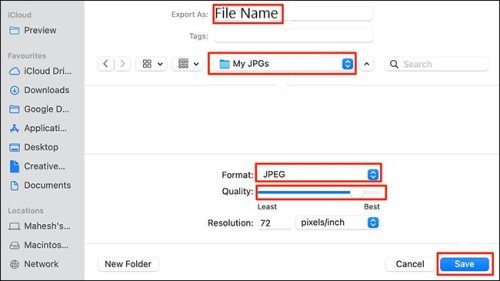
Step 3: You will see an export window. Then select "Export As" and afterward type the name of the converted JPG file. Then select a new folder or any other where you want to save the converted file.
Fix 2: Use Automator Quick Actions
Sometimes, when you need to convert more than one PDF file to JPG, the Preview method might take a lot of time. This is where the Automator quick action can convert all pages from your PDF to JPG. Follow the steps to convert JPG to PDF on a Mac or otherwise.
Step 1: Open Automator on your Mac by pressing Command + Spacebar, then type "Automator" in the search, and then it will appear by clicking on it.
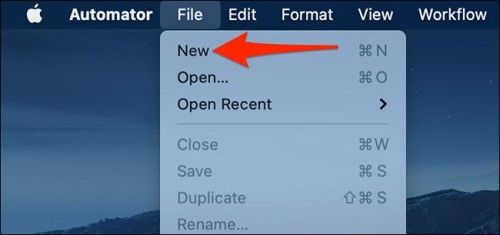
Step 2: On the top menu, click on File and select a new file in it. Then mark quick action and then click on "Choose".
Step 3: A quick action editing screen will appear. At the top, click on "Workflow Receives Current." Drop down the menu and click on "PDF Files".
Step 4: In the top left corner, click on "Action." Then click on the "Text Fields" and type in "Render PDF Pages as Images."
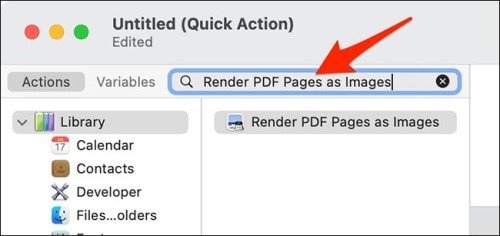
Step 4: Drop the rendered PDF pages as images in the workflow section on the right. They chose a JPEG image. Click on resolution if you want to change the resolution and even the compression level if needed.
Step 5: Now click on the BOX next to Variables and type "Move Finder Items". Then drag the movie finder items to "render PDF pages as images".
Step 6: Now to save, click on "File" and select "Save". command+S on the keyboard for a shortcut. This is how to convert PDF to JPG on a Mac using an Automator.
Fix 3: Use Free Online Tools
You can convert PDF to JPG on Mac using free online tools. There are many useful tools that you can use. But some of the tools contain malware, so be cautious, especially if you're using a Mac. Just remember to check some review of the third-party software before you choose to use it.
Fix 4: Use Adobe Acrobat
Adobe Acrobat is included in almost every MacOS.You can use these to convert PDF to JPG on Mac.
Step 1: Right-click on the file and open it with the Adobe Acrobat Reader. Choose the JPEG format by clicking on the file on the menu and then JPEG or JPEG2000.
Step 2: After choosing the output format, then clicking on Export, the process will be completed.
Fix 5: Use the Shortcuts App
You can convert PDF to JPG on a Mac with shortcuts app. Like you can make use of Siri shortcut building to convert pdf to jpg.
Step 1: Run the shortcut app on Mac, then move to the plus button.
Step 2: Looking for "Make Image" on the app and then click on Make Image from PDF page. Or you can choose the button with blue PNG image word and change it to JPEG or change it to ask each time.
Step 3: Now double click on the blue PDF word button and set it into shortcut input.
Step 4: In the top-right search box, type Save File and add double click to add this action to the shortcut.
Step 5: Check Use as Quick Action from the settings icon at the top right. Finder and other services can also be checked below that.
Step 6: After that, create a shortcut and give it a name. The icon can also be customized.
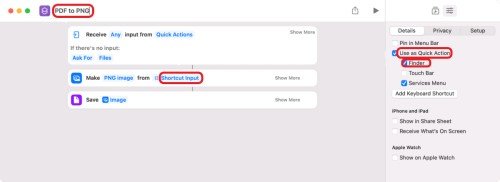
Step 7: Now save the shortcut and close this mission windows. and you have successfully built the shortcut for converting any pdf files to jpg files.
Step 8: Go to Finder, right click on the pdf files, then go to Quick Actions > Shortcut name. Wait for the process done, then choose the location to store the converted jpg files.
This is how you can convert pdf files to jpg files on mac with shortcut app.
Fix 6: Use Converted Tools
There are many tools through which you can convert a pdf to an image on a mac. These tools are very easy to use. You can download these from the play store. They are completely truthful programs. Yes, there are some mediocre programs as well. But your MacOS will block these before even opening them.
Fix 7: Take Screenshot to Convert PDF to JPG
If you don't want to use any tool or follow anyway to convert PDF to JPG on Mac, then simply take screenshots. Screenshots use the.jpg file format. On your Mac, you can take a screenshot using Command+shift+4. Moreover, if the area is not covered in the screenshot, you can increase it by Command + (Plus) + or Minus (-).
Bonus Tip: How to Recover Corrupted/Damaged JPG & PDF Files?
The majority of macOS users don't know they can recover data on macOS. If you have some damaged or corrupted JPG or PDF files on your Mac, you can recover those in full quality. No matter whether you delete the files or get corrupted/damaged, they are still on the hard drive until another file is saved. The best way to do that is to use Tenorshare 4DDiG. Which make data recovery like a piece of cake for everyone.
- Support data recovery from M1-equipped and T2-secured Macs
- Support data recovery from over 1000+ different file types, including photos, documents, music, and so on
- Support data recovery from many scenarios, including accidental deletion, formatting, corruption, virus assault, and so on
- Suporte data recovery from various storage devices, including USB flash drives, hard drives, SD cards, digital cameras, and so on
Secure Download
Secure Download
Steps to recover deleted/corrupted/damaged PDF and JPG files with Tenorshare 4DDiG:
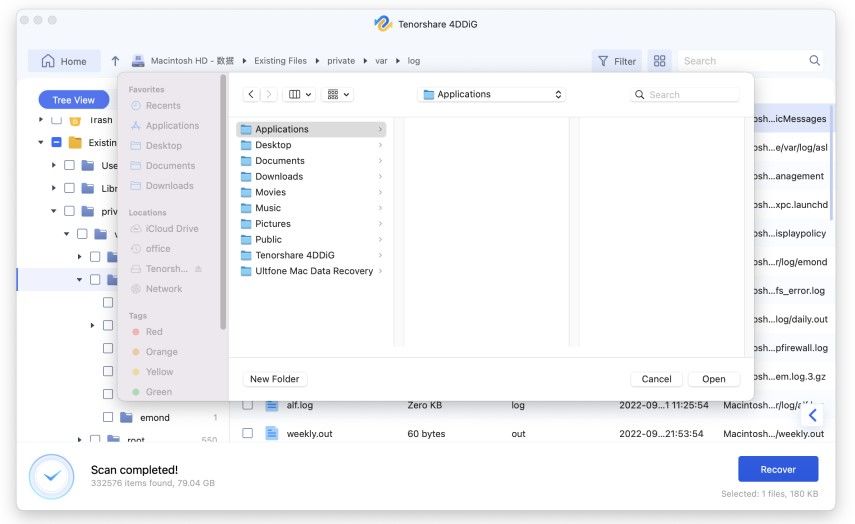
- Download Tenorshare 4DDiG from their official website. Open the software, then choose the location where your corrputed/damaged pdf or jpg used to stored.
- It will take time to scan. Afterwards you will be shown the scanned out pdf/jpg files, simply choose to preview and check if this is what you are looking for, then click on Recover.
- Now select the file and go on to save it in a secure location. This is how it is done to recover damaged or corrupted PDF and JPG files with Tenorshare 4DDiG.


Video tutorial on how to Recover Permanently Deleted Photos on Mac
Useful Tool Recommendation: Tenorshare AI - PDF Tool
Tenorshare AI - PDF Tool is an online tool that can chat with any PDF. It is one of the best AI tool to summarize PDF that can quickly extract, locate, and summarize information from PDFs. In addition, you can pose inquiries about the entire PDF document, and you will obtain both crucial information and comprehensible answers from this powerful tool.

Key Features of this powerful AI tool:
- Easily find specific information within PDF files.
- Gain valuable insights using AI-powered text analysis.
- Enhance comprehension with AI-powered summarization.
- Users can obtain accurate answers to their queries from PDF documents.
Conclusion
Now you can successfully convert PDF to JPG on Mac. But keep in mind that data loss will happen everywhere, even during the process of transferring files. Suppose you want to recover damaged data like JPG or PDF. In that case, you can simply go to Tenorshare 4DDiG which not only supports data recovery from damaged files but also accidental deletion or formatted.
In addition, if you need an AI tool to help you quickly summarize important information of PDF documents, we also provide a reliable AI PDF Reader-Tenorshare AI - PDF Tool. Just give it a try today!
Related Guide You May Also Like: How to Convert HWP to PDF in 4 Ways
 ChatGPT
 Perplexity
 Google AI Mode
 Grok
Grok
