How to Create Multiple Partitions on USB Drive?
Looking to learn how to create multiple partitions on USB drive? You've found the right guide. Partitioning your USB drive can significantly enhance your data organization and storage management. By dividing your USB drive into multiple sections, you can keep your files separate from work documents, or even use different file systems on the same drive. This guide will show you how to do it step-by-step, making the process straightforward to follow. Knowing how to create multiple partitions on a USB drive will help you make the most out of your USB storage, ensuring your data is well-organized and easily accessible.
Let's dive in and get started on optimizing your USB drive!
Part 1: Can a USB Have Multiple Partitions?
Yes, a USB can have multiple partitions. This capability allows you to organize data more efficiently by separating different types of files. For instance, you can have one partition for work documents and another for personal files. Multiple partitions also enable you to use different file systems on the same USB drive, enhancing compatibility with various devices. Knowing how to create multiple partitions on a USB drive can improve your data management and make your USB drive more versatile and functional. It's a simple yet effective way to optimize your storage space.
Part 2: How to Create Multiple Partitions on USB Drive?
Method 1. Create Multiple Partitions on USB Drive with Professional Partition Manager
One of the best tools for creating multiple partitions on a USB drive is the 4DDiG Partition Manager. This professional partition manager is highly recommended for its user-friendly interface and powerful features. With 4DDiG Partition Manager, you can easily create multiple partitions, ensuring efficient data organization and improved storage management.
Features
- Create multiple partitions on a USB drive effortlessly
- Resize, merge, split, and delete partitions as needed
- Support for various file systems, including NTFS, FAT32, and exFAT
- Clone entire disks or specific partitions for backup and migration
- Perform system migration without data loss
- Recover lost or deleted partitions with ease
- Check and optimize disk health and performance
If there's unallocated space on your USB drive, you can create a new partition by adjusting its size, file system format, and drive letter. If there's no unallocated space, you can create some by shrinking an existing partition.
How To Use 4DDiG Partition Manager To Create Multiple Partitions on USB?
-
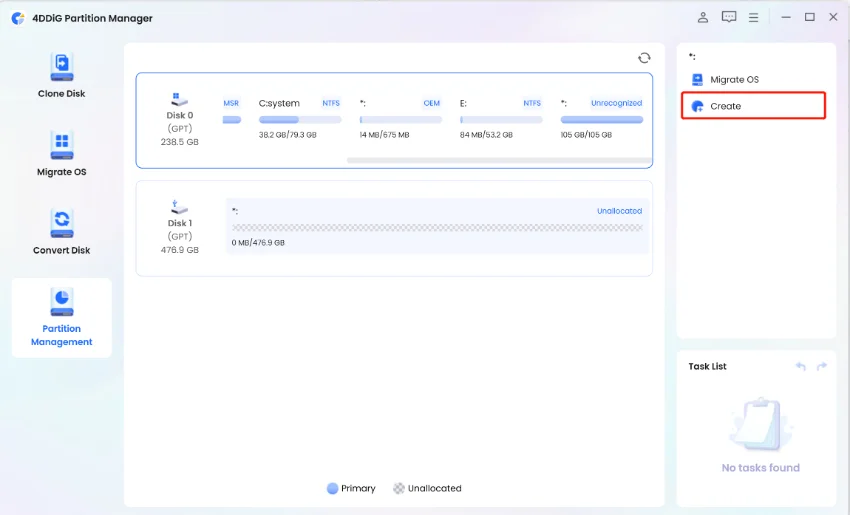
Download and launch 4DDiG Partition Manager. Go to "Partition Management" in the left navigation bar. Right-click on the unallocated partition where you want to create a new partition and select "Create". If there is no unallocated space, this option will be unavailable.
FREE DOWNLOADSecure Download

-
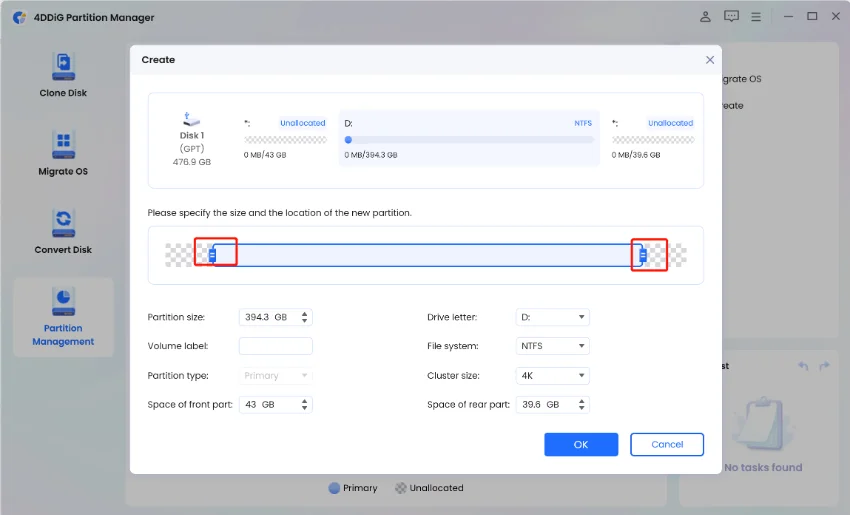
In the popup window, set the parameters for the new partition, including the size, drive letter, volume label, and file system (NTFS, exFAT, FAT16, or FAT32). Click "OK" to queue the operation. You can adjust the size by dragging the partition handle or entering the volume size manually in GB.

-
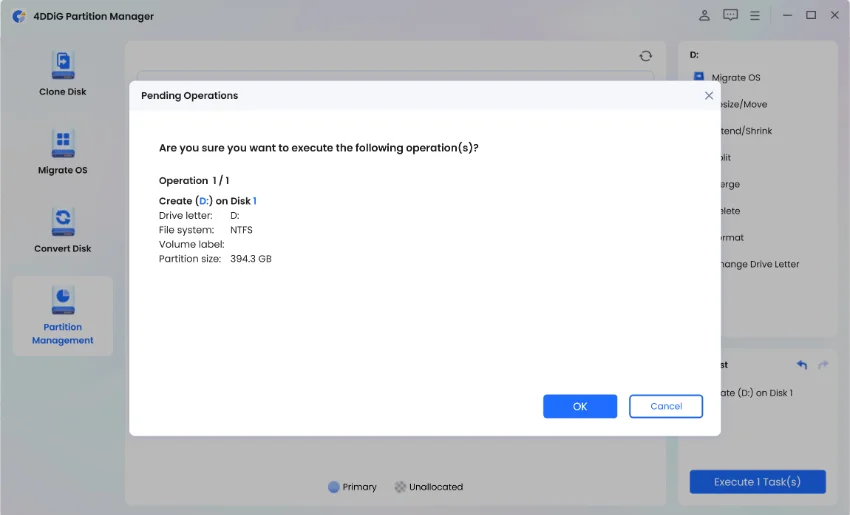
Preview the new partition's size and position in the main interface. If everything looks correct, click "Execute 1 Task(s)" and confirm by clicking "OK".

-
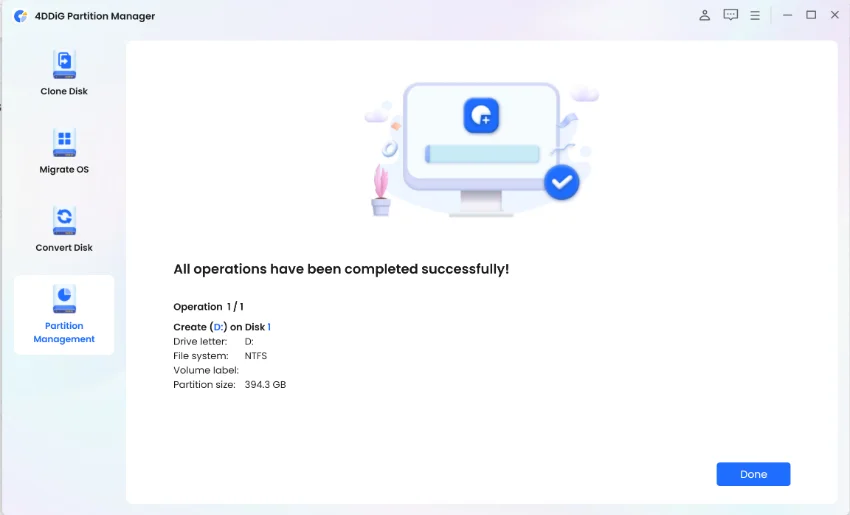
Wait for the partition creation process to complete. The program will format the new partition automatically. Do not close the program until the process finishes. Once done, click "Done" to finalize the creation of the new partition.

Method 2. Create Multiple Partitions on USB Drive via Disk Management
- On your desktop, right-click "This PC" and select "Manage" from the popup menu.
- In the left-hand list, double-click "Storage" and then select "Disk Management".
-
Find your disk, right-click on the unallocated space, and choose "New Simple Volume".

-
Click "Next", then set the size of the new volume in MB (e.g., if the maximum disk space is 29590, set the volume size to 10000 MB). Click "Next" to continue.

-
Assign a drive letter and click "Next".

-
Choose the file system and volume label, then click "Next" to review the settings.

-
Click "Finish" to complete the process. To create additional partitions, repeat these steps for the remaining unallocated space.

Method 3. Create Multiple Partitions on USB Drive via Diskpart (Quite Complicated)
- Open Command Prompt as an administrator. Type "diskpart" and press Enter to launch Diskpart.
- Type "list disk" to display all connected drives. Identify your USB drive and type "select disk X" (replace X with the correct disk number).
- Clean the selected disk by typing "clean". This will remove all existing data and partitions.
- To create the first partition, type "create partition primary size=10000" (replace 10000 with your desired size in MB).
- Verify the creation of the new partition by typing "list partition".
- Select the new partition by typing "select partition 1". Then, format it with "format fs=fat32 label='Partition1'".
- To create another partition, repeat Step 4 with the remaining space size, typing "create partition primary size=XXXX" (replace XXXX with the new partition size).
-
Again, verify the new partition by typing "list partition". Select the new partition with "select partition X" (replace X with the partition number) and format it using "format fs=ntfs label='Partition2'".

-
Continue the process to create additional partitions as needed. To view all created partitions, type "list partition".

That's it! You've successfully used Diskpart to create multiple partitions on your USB drive.
Final Words
Understanding how to create multiple partitions on USB drive can significantly improve your data organization and storage efficiency. There are various methods available to accomplish this. 4DDiG Partition Manager is particularly noteworthy for its ease of use and robust features, making it a popular choice. Alternatively, you can utilize the built-in Disk Management tool or the Diskpart command-line utility. Knowing how to create multiple partitions on a USB drive allows you to maximize your USB storage, ensuring your data is well-organized and accessible.
Secure Download
