How to Fix Flashing Folder with Question Mark?
Many people have reported the folder with question mark Mac issue on different Apple forums. If your Mac doesn't start the way it should be and shows a flashing folder with question mark , we have you covered. Here, we will illustrate the potential causes of this issue and present some possible solutions. So read on and get back into you Mac with ease.
Part 1: Overview of Flashing Folder with Question Mark
Whenever you open a Mac, rather than booting up to the macOS operating system, your Mac starts up to a flashing folder with question mark. You may hear a chime before you see the Macbook pro folder with question mark if you are using a pre-2015 Mac. The blinking folder with question mark Mac issues could happen across the Apple Mac items, including MacBook, MacBook Pro, Air, Mini, as they are altogether dealing with a similar OS - macOS.
The flashing folder with question mark Mac is an indication that your Mac fails to detect its startup disk or the startup disk doesn't contain a working Mac operating system. In this manner, your Mac can't load the macOS from the hard drive to the memory to open the operating system. Simply the reasons why the Mac flashing folder with question mark pops up upon startup include:
-
Hardware issue - your startup hard disk or logic board is broken.
-
Software issue - The startup disk will not contain a WORKING duplicate of macOS.

Part 2: How to Recover Lost File after Fixing Question Mark Folder Mac?
After attempting the above solutions to solve the flashing question mark folder Mac error, you might end you formatting your disk, which may cause data loss. At the point when you face loss of data on a Macintosh HD, you need an expert recovery tool to get your data back. In this manner, Tenorshare 4DDiG Mac data Recovery software can help you get your data back. Tenorshare 4DDiG Mac Data Recovery is an expert yet straightforward program that can restore any sort of data from your Mac hard drive or disks. It can recover pictures, videos, folders, and any document type. Download Tenorshare 4DDiG and follow the steps below to get your data back:
- Recover Data from empty trash , local & external disks, lost partitions, Bit locker Encrypted devices, crashed Macs, etc.
- Wide range of file support. 4DDiG data recovery supports the recovery of more than 2000 file types.
- Boasts of a modern algorithm that takes data recovery to the next level.
- Faster with a greater success rate than other apps available in the market.
Trustpilot Rating 4.3
100% Secure
-
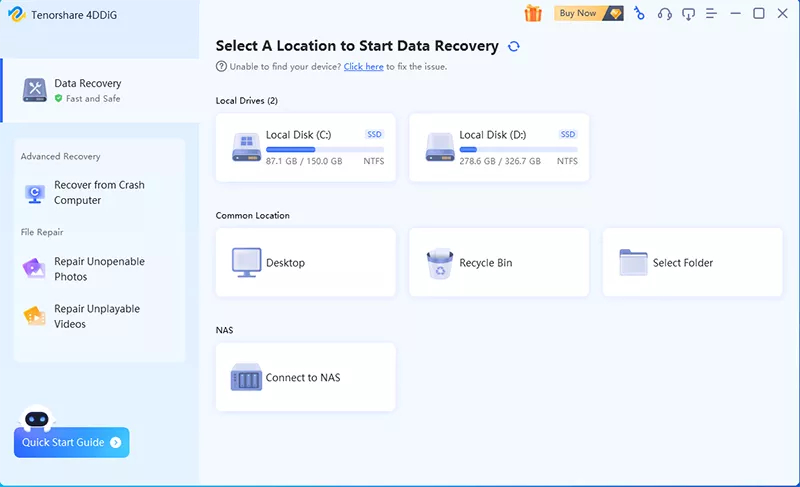
Select a Location
Install and open the Tenorshare 4DDiG Mac Data Recovery Software and select an area like your hard drive to recover data on your Mac. Then, at that point, click the "Scan" button to look for every lost file.
Note - If you use macOS Sierra or higher you'll need to follow these steps before proceeding.
-
Scan and Preview
The scanning process will take some time to filter all erased documents. After the result is produced, you can tap on explicit file types to get more detail.
![4ddig mac scan files]()
-
Recover Mac Files
Click the "Recover" button and select an area to save the files you found. It's not a good thought to download the restored files back to the disk where you lost them. That might lead to data overwriting.
![4ddig mac recover files]()
Part 3: How Do I Fix Flashing Folder with Question Mark on Mac?
Here are some fixes you can try if you're presented with a blinking question mark folder upon booting up your Mac.
Fix 1: Repair the Startup Disk with Disk Utility
Disk errors can lead to unexpected behavior when using your Mac like showing you a flashing folder icon with a question mark, prevent your Mac from starting up normally. In this case, you can restart your Mac and then run First Aid in Disk Utility to find and repair disk errors and get your Mac working again. Here's how you can repair the startup disk with Disk Ultility.
-
As your screen is stuck on the mac folder with question mark, press and hold the power button.
-
Press and hold Command + R when your Mac is restarting. That should send you to Recovery mode.
-
There, select Disk Utility in the spring-up window on your screen.
-
In the next window, select your startup disk and run First Aid to check whether the software can find and fix the Macbook pro flashing folder question mark startup.
Assuming Disk Utility doesn't fix the Macbook pro flashing folder error, there are a couple of things you can do. You can attempt to reformat your startup disk, reinstall Mac OS, or use Time Machine. Using Time Machine will return your Mac to a formerly recorded state, which implies, you will lose files on your system.
Fix 2: Reset NVRAM to Fix Question Mark Folder Mac
NVRAM is Short for non-volatile random-access memory which is a memory that saves its stored data regardless if the power is on or off. Resetting the NVRAM will reset information that deals with start-up disks and effectively fix your issue where a blinking question mark icon appears briefly before your Mac starts up.
To reset NVRAM, follow the steps below:
-
Turn off your Mac. If you can't close it down in the ordinary way, hold down the power button on your Mac for a couple of seconds until it closes down.
-
Press your Mac’s power button, then immediately press and hold Command, Option, P, and R keys on your keyboard.
-
Keep holding the keys until the Mac restarts, and you will see the Apple logo appearing twice.
-
Release the four keys, and this will reset the NVRAM.
This method will probably help you get rid of the flashing folder with question mark Macbook Air.
Fix 3: Check Startup System Preferences
If your Mac PC is not booting from the correct startup disk, it won't boot effectively, so if you want to ensure that your favored startup disk is chosen, follow the steps below:
Boot your Mac into Safe Mode and sign in to your Apple account.
Go to System Preferences from the Apple menu on top and then click Startup Disk.
Click the lock in the bottom left corner to make changes.
Then From the list of disks, click the symbol of the one you need to use as the startup disk for your Mac.
Restart your device.
Following these steps, the Macbook flashing folder with question mark issue should be resolved, and your Mac ought to have the option to boot ordinarily. If you still see the question mark folder, Mac, on startup, there might be an issue with the hardware.
Fix 4: Reselect the Startup Disk in Recovery Mode
After selecting the right startup disk, go to recovery mode using the following method:
Depending on the type of processor in your Mac, there are different ways to enter this mode.
Select your user account and enter your password to proceed. Then, you'll be welcome to the macOS Recovery mode, pick Disk Utility on the window, and then Continue.
In the Disk Utility window, go to "Show All Devices" from the View menu.
If your ideal startup disk shows up here, select it and run the First Aid option. First Aid Recovery will take a look at the chosen volume for errors and attempt to fix the Macbook pro flashing folder with question mark.
Fix 5: Format Startup Disk & Reinstall Mac OS
If Disk Utility can't resolve the flashing folder with question mark command R not working issue, you could have to format it and reinstall Mac OS. That will delete all information on it, so make a backup of your Mac data.
-
To begin the formatting, load your Mac in Recovery mode and open Disk Utility.
-
Select Mac HD and tap Erase.
-
In the spring-up window, you'll see a choice to change the disk name and format.
-
Click Erase Volume Group (or Erase).That will eliminate all data from your hard drive.
Presently, to involve this disk as a startup disk for your Mac, reinstall macOS on it. To do that, open your utility window in Recovery mode and click Reinstall macOS Big Sur. Try not to close the top of your Mac or let it sleep while the process is underway.
Fix 6: Contact Apple Support
If nothing fixes the blinking question mark folder Mac issue, contact Apple's support. There are a few unique ways of reaching Apple's client care group. You can call them by phone, talk with them on the web, reach them with the Apple Support app, or send them a message on Twitter. To visit the Apple user support group and get your question mark folder Mac issue resolved, go to getsupport.apple.com.
Video Tutorial on How to Fix Flashing Folder with Question Mark on Mac 2026
Trustpilot Rating 4.3
100% Secure
Summary
Whenever your system starts a flashing folder with question mark Mac, you can attempt the fixes referenced in this article to take care of your issue. Moreover, in case of data loss due to formatting, download Tenorshare 4DDiG right away to get your data back.
💡 Summarize with AI:
 ChatGPT
 Perplexity
 Google AI Mode
 Grok
Grok

Tenorshare 4DDiG
Recover data quickly regardless of if you are using macOS 15, 14, 13
- Control alt delete mac
- How to restore mac to previous date
- How to reset mac without losing data
- How to recover unsaved word document mac without autorecovery
- iCloud email recovery
- Restore messages from icloud
- How to recover tabs on mac
- Open office mac
- Free data recovery software mac
- Recover Emptied Trash Mac Free
- Undelete from Trash Mac
- Recover Emptied Trash on Mac without Software
- Mac free any data recovery
- How to recover permanently deleted photos from icloud
- Retrieve contacts from icloud
- Best Mac Cleaning Software
- Recover Deleted Files Mac Free