[Solved] How to Fix com.apple.DiskManagement.disenter error 0?
Learn how to fix the com.apple.DiskManagement.disenter error 0 on your Mac with these troubleshooting steps, and recover your lost files with 4DDiG Mac Data Recovery easily and quickly.
One common error macOS users may encounter when managing their disk partitions is com.apple.DiskManagement.disenter error 0. This can be a very annoying error that keeps users from doing necessary operations on their hard drives, like formatting, resizing, or partitioning. Thankfully, there are a few ways to fix this issue and resume your disk management responsibilities.
This article will explain six effective solutions for the com.apple.DiskManagement.disenter error 0, giving you complete control over your Mac's disk management functions. These solutions will provide you with the actions you need to take to fix this error and maintain the functionality of your system. So, keep reading!
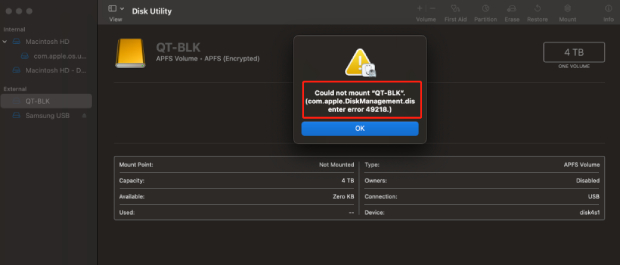
Part 1: What Is com.apple.DiskManagement.disenter error 0?
A macOS-specific error message called "com.apple.DiskManagement.disenter error 0" indicates a disc management or storage device issue. When trying to perform different disk-related operations, like formatting, resizing, or partitioning a hard drive, this error may appear. The error message's "disenter" section implies a problem with the Disk Management subsystem in macOS. So, it’s important to resolve this error to make sure that disk management functions work properly.
Part 2: How to Fix com.apple.DiskManagement.disenter error 0?
Simple Troubleshooting
Here are the simple troubleshooting methods to fix com apple diskmanagement disenter error 0 external drive error.
1. Restart Your Mac
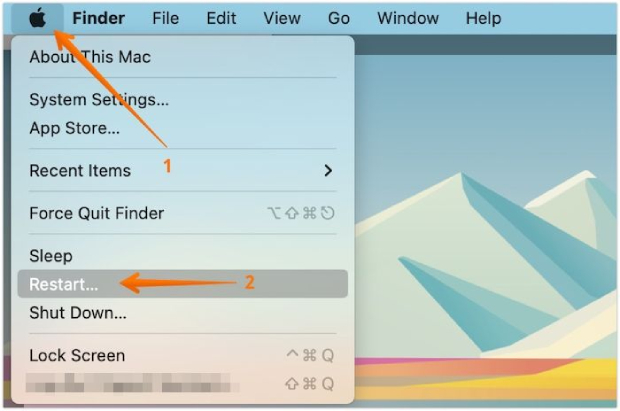
Sometimes, the com.apple.DiskManagement.disenter error 0 can be caused by temporary glitches or conflicts in the system. A simple and often effective first step is to restart your Mac. Follow the below steps:
- In the upper left corner of your screen, click the Apple icon.
-
Choose "Restart" from the drop-down menu.

- Wait for your Mac to shut down, then power it back on.
Try completing the disk management task that was causing the error after your Mac has restarted to see if the problem has been fixed. Go to the following troubleshooting method if the error still persists.
2. Check the Compatibility of the Drive's File System on the Mac
The com.apple.DiskManagement.disenter error 0 can also occur when the file system on the drive you're trying to manage is not fully compatible with macOS. Follow the below guide that can help to check compatibility:
- Find out the File System: Find out which file system is installed on the drive. File systems that are frequently used are HFS+, APFS, FAT32, and exFAT. Usually, the drive's properties or the Disk Utility app have this information.
- Ensure Compatibility: Ensure the drive's file system is fully compatible with the macOS version. For example, the APFS file system might not be fully supported by an older version of macOS. In such circumstances, you should format the drive with a different file system that works better with your operating system.
Advanced Troubleshooting:
Here are the advanced troubleshooting methods for com apple diskmanagement disenter error 0 fix in detail:
1. Check for Connectivity Issues
Sometimes, the com.apple.DiskManagement.disenter error 0 can be related to connectivity problems with your storage devices. Follow the below steps to fix this issue:
- Inspect Cables and Connections: Ensure that all cables and connections between your Mac and the external storage device are secure and not damaged. Disconnect and reconnect the cables to eliminate any loose connections.
- Try a Different Port or Cable: If you suspect a faulty cable or port, switch to a different USB, Thunderbolt, or other available port on your Mac. You can also try a different cable if you have a spare one.
- Test with Another Mac: If you can access another Mac, connect the problematic storage device. If the error persists on the second Mac, the issue may be with the device itself. If it works on the second Mac, the problem could be specific to your original Mac.
- Check Power Source: For external drives that require their power source, make sure they are adequately powered and connected. An insufficient power supply can cause errors during disk management.
2. Run First Aid in Disk Utility to Check the Disk
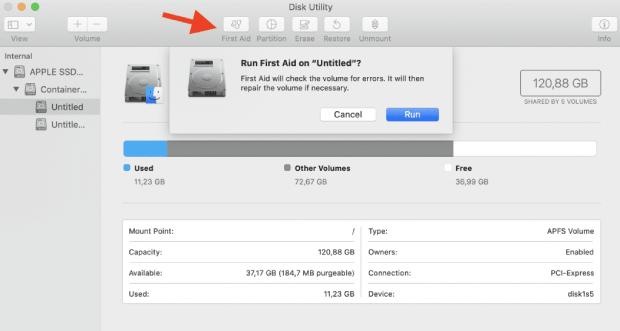
Disk Utility is a valuable tool for diagnosing and repairing disk-related issues on macOS. Running First Aid can help identify and fix errors on your disk that may be causing the com.apple.DiskManagement.disenter error 0. Here's how to do it:
- Open Disk Utility, which can be found in the Applications folder's Utilities folder or by using Spotlight Search.
- From the list on the left, select an unmounted drive.
-
Select First Aid, and then click on Run.

- If Disk Utility detects and repairs errors, try your disk management tasks to see if the problem has been resolved.
3. Mount the Disk in Terminal
If you're still encountering the com.apple.DiskManagement.disenter error 0, and Disk Utility hasn't fixed the issue; you can attempt to mount the disk using Terminal manually. Using the Terminal application, you can manage your Mac and make different system adjustments via the command line. With the help of this powerful tool, you can execute commands with administrative privileges and access any macOS settings. Follow the below steps:
- Launch Terminal from the Applications > Utilities folder.
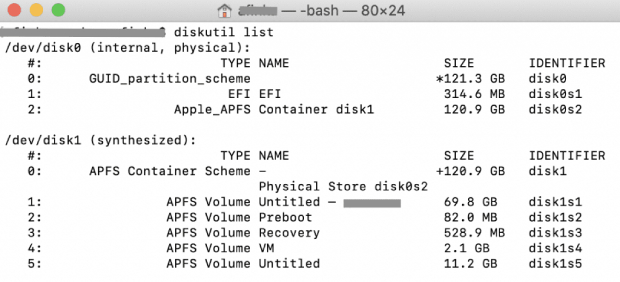
- In Terminal, use the diskutil list command to list all available disks and volumes. You'll see a list of disks, including their identifiers.
-
Type diskutil mount /dev/disk1s2 and press Return.

Ensure to enter the drive name for the unmountable disk in place of disk1s2. By using the first command, you can find its name in the Identifier column.
4. Reformat the Unmountable Disk (Last Option)
If you've tried the previous troubleshooting methods and can still not resolve the com.apple.DiskManagement.disenter error 0, reformatting the unmountable disk may be your last solution. Please be aware that reformatting will erase all data on the disk, so make sure you've backed up any important information before proceeding. Follow the steps to reformat the disk:
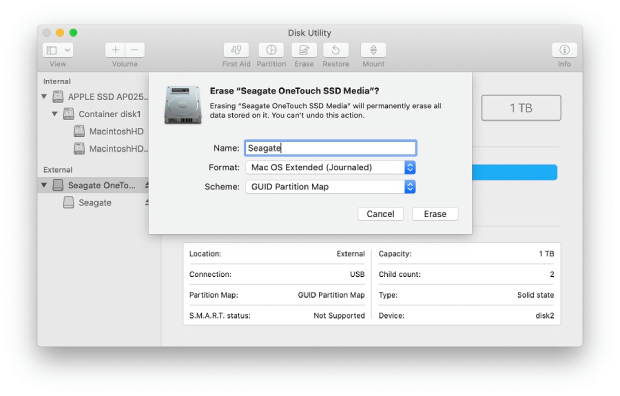
- You need to open Disk Utility.
- Select the unmountable drive from the left sidebar.
- After that, you must click "Erase" on the top toolbar.
- Select a name and choose a file system for the drive.
-
Finally, click Erase.

You should only proceed with this method if you've exhausted all other options and are confident that your data is backed up or not critical. If reformatting doesn't resolve the error or if it occurs again in the future, it may be indicative of a hardware issue, and professional assistance may be necessary.
Bonus Tip: How to Recover Lost Data from the Formatted Hard Drive on Mac?
Reformatting is a commonly used solution for resolving various disk issues as it effectively wipes the drive clean and restores it to its default state. However, it will cause data loss if you don’t create a backup before. Fortunately, we have provided a reliable solution for you - 4DDiG Mac Data Recovery!
4DDiG Mac Data Recovery is robust and user-friendly software designed specifically for Mac users to recover lost or deleted data from various storage devices, including formatted hard drives. Here are some key features of 4DDiG Mac Data Recovery:
- Comprehensive File Recovery: 4DDiG Mac Data Recovery can recover many file types, including documents, photos, videos, audio files, and more. It supports recovery from storage devices like internal and external hard drives, SSDs, USB drives, memory cards, and your Mac's system drive.
- Flexible Scanning Modes: It offers two scanning modes: Quick Scan and Deep Scan. Quick Scan is faster and suitable for recently deleted files, while Deep Scan is more thorough and is ideal for recovering data from formatted or corrupted drives.
- Preview Before Recovery: Before proceeding with the recovery, 4DDiG Mac Data Recovery allows you to preview the recoverable files. This feature enables you to recover specific files, saving time and disk space selectively.
- User-Friendly Interface: This tool provides an intuitive and user-friendly interface that makes it easy for both novice and advanced users to perform data recovery tasks without any technical expertise.
- Safe and Secure: 4DDiG Mac Data Recovery ensures data integrity and security during the recovery process. It doesn't overwrite or modify your original data, reducing the risk of data corruption.
Follow the below steps to use 4DDiG Mac Data Recovery to recover data from hard drives:
-
After installation, launch 4DDiG-Mac and choose a location, such as your local drives, to begin Mac data recovery. To start searching for all lost files, place your mouse over the desired location. The word "Scan" will appear as an icon in the lower right corner of the icon; click Scan.
FREE DOWNLOADSecure Download
FREE DOWNLOADSecure Download

-
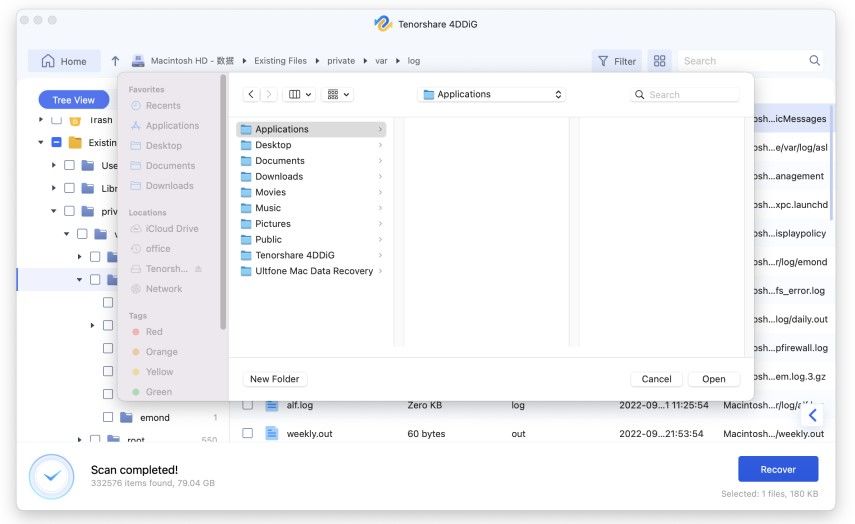
It takes time to scan deleted files. Once the scanning is completed, you can preview more details by clicking on particular file types.

-
To save the found files, click the "Recover" button and choose a location. Saving the recovered files to the partition where you initially lost them is not advised. Permanent data loss could result from this.

Conclusion
In conclusion, the com.apple.DiskManagement.disenter error 0 can be a frustrating issue on macOS. However, with the troubleshooting steps in this guide, you have a comprehensive set of solutions to address this error. Starting with simple steps like restarting your Mac and checking for file system compatibility, you can often resolve the issue quickly.
If those methods don't work, we have discussed more advanced troubleshooting methods, such as checking for connectivity issues, running First Aid in Disk Utility, reformatting the unmountable disk, or manually mounting the disk using Terminal. These methods help you diagnose and resolve the com.apple.DiskManagement.disenter error 0, potentially avoiding the need for reformatting.
Additionally, the bonus tip on using 4DDiG Mac Data Recovery provides a reliable solution for recovering lost data from a formatted hard drive on your Mac. This software offers various features to facilitate efficient and secure data recovery.
💡 Summarize with AI:
You May Also Like
- Home >>
- Mac Problems >>
- [Solved] How to Fix com.apple.DiskManagement.disenter error 0?


 ChatGPT
 Perplexity
 Google AI Mode
 Grok
Grok

