How to Recover Pictures from Hard Drive on Windows
Have you ever experienced the heart-wrenching moment of losing your precious photos? It's a feeling no one wants to go through. Photos are more than just digital files; they are cherished memories that capture life's most valuable moments. But what happens when your hard drive crashes or you accidentally delete them? Don't panic! Losing photos doesn't mean they're gone forever. Whether due to system crashes, accidental deletion, or other reasons, there are ways to recover your lost photos from a hard drive. In this article, we'll explore four effective methods to retrieve your pictures on Windows. We'll also discuss the common causes of photo loss and how to prevent it. By the end, you'll have the knowledge and tools to get your memories back. So, keep reading and learn how to recover your photos from a hard drive!

Part 1: What Causes Pictures Loss from Hard Drive?
Now, we'll explore the common culprits behind picture loss, so you can better understand and protect your precious memories.
Here are the main reasons your photos might disappear from your hard drive:
- Accidental deletion: It's all too easy to unintentionally delete files, especially when you're in a rush or not paying close attention.
- Hard drive corruption: Over time, your hard drive can develop bad sectors or experience file system corruption, making your photos inaccessible.
- Malware and virus attacks: Malicious software can wreak havoc on your system, corrupting or deleting your files, including your pictures.
- Physical damage: Dropping your hard drive or exposing it to extreme temperatures can cause physical damage, leading to data loss.
By understanding these common causes of picture loss, you can take proactive steps to safeguard your memories and minimize the risk of losing them forever.
Part 2: How to Recover Pictures from Hard Drive on Windows?
Now that you understand the potential risks to your photos, let's explore the solutions. We'll discuss four effective methods to recover your lost pictures from your hard drive on Windows. Whether due to accidental deletion, corruption, or other causes, these techniques can help you get your memories back.
Way 1: Recover Pictures from Hard Drive via 4DDiG Data Recovery
When it comes to recovering your precious pictures from a hard drive on Windows, 4DDiG Windows Data Recovery is a fantastic tool that can come to your rescue. This powerful software is designed to help you recover deleted photos quickly and easily, making it an essential tool for anyone who values their digital memories. One of the biggest advantages of 4DDiG Data Recovery is its user-friendly interface.
Another great feature of 4DDiG Data Recovery is its advanced scanning technology. It can deeply scan your hard drive to locate and recover lost or deleted pictures, even if they were deleted long ago. This means that even if you thought your photos were gone forever, 4DDiG Data Recovery may still be able to bring them back.
Additionally, 4DDiG Data Recovery supports a wide range of file types, including various image formats such as JPEG, PNG, GIF, and more. It can also recover pictures from different types of storage devices, including internal and external hard drives, USB drives, SD cards, and more. Here are the key features of 4DDiG Data Recovery:
- Recovers 1000+ file types, including pictures, videos, documents, and more.
- Supports data recovery from various storage devices, such as hard drives, USB drives, SD cards, etc.
- Offers a preview function to help you select the files you want to recover.
- Provides a user-friendly interface that makes the recovery process simple and straightforward.
Here is how you can use 4DDiG Data Recovery to recover your pictures from your hard drive:
![]() Secure
Download
Secure
Download
![]() Secure
Download
Secure
Download
-
Select the Location:
Start by downloading and installing 4DDiG Data Recovery on your Windows computer. Launch the software and choose the hard drive where you lost your pictures. Click "Start" to begin the scanning process.
-
Scan and Preview:
4DDiG Data Recovery will quickly scan your selected hard drive for any lost or deleted pictures. You can pause or stop the scan at any time if you spot the photos you're looking for. Once the scan is complete, you can preview the recoverable pictures to ensure they're the ones you need.
-
Recover Your Pictures:
After confirming the pictures you want to recover, select them and click the "Recover" button. Choose a safe location on your computer to save the recovered photos. It's recommended to save them to a different drive to avoid overwriting the original data. And that's it! With just three easy steps, you can recover your precious pictures from your hard drive using 4DDiG Data Recovery.
How to Recover Deleted Photo from Canon Camera [Easy & Simple]
Way 2: Check the Recycle Bin to Recover Pictures from Hard Drive
The Recycle Bin is like a safety net for your deleted files, holding onto them before they're gone forever. It's always the first place you should look when you're trying to recover lost pictures.
- Locate the Recycle Bin icon on your desktop and double-click it to open.
- Once inside, browse through the contents to see if you can find the photos you're missing.
-
If you spot the pictures you need, simply right-click on them and select "Restore." This will send them back to their original location on your hard drive.
- If you're trying to recover photos from an external hard drive, the process is slightly different. First, open File Explorer and navigate to your external drive.
- Click on the "View" tab at the top of the window and make sure the "Hidden items" box is checked. This will reveal any hidden folders, including the Recycle Bin.
- Look for the Recycle Bin folder on your external drive. If you find your deleted photos inside, you can restore them just like you would on your main computer.
Remember, the Recycle Bin is a temporary storage space for deleted files. If you've recently emptied it, your photos might be gone for good. So, always check the Recycle Bin first, but don't wait too long to recover your precious memories!
Way 3: Recover Pictures from Hard Drive Backup
Windows has a built-in backup feature called File History that automatically saves copies of your files, including your pictures. To use this feature, you need to have an external hard drive or storage device connected to your computer.
- Connect the external hard drive or storage device that contains your backup files to your computer.
-
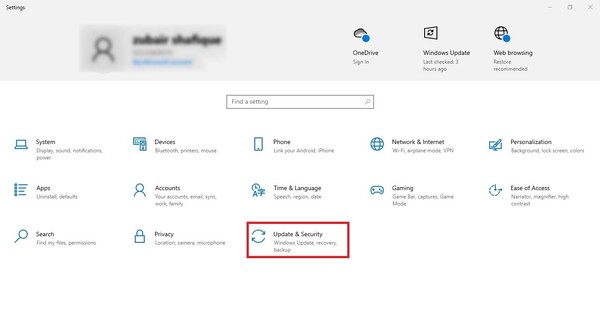
Open the Start menu and type "Control Panel" into the search bar. Click on "Control Panel" when it appears in the results.
-
In the Control Panel, locate the search bar and type "File History." Click on "Restore personal files" when it appears in the results.
-
File History will display a list of available backups. Browse through the backups to find the one that contains the photos you want to recover.
-
Once you've found the backup with your missing pictures, click on the "Restore" button to recover them. File History will restore the selected photos to their original location on your hard drive.
If you've been regularly backing up your photos using File History or another backup method, recovering your lost pictures should be a simple process. This is why it's so important to create backups of your precious memories.
Way 4: Recover Pictures from Hard Drive via Restore Previous Versions
Windows has a built-in feature called "Restore previous versions" that allows you to recover lost or deleted photos from your hard drive. This feature is available in Windows 7, 8, and 10.
- Open File Explorer and navigate to the folder where your deleted photos were originally located.
-
Right-click on the folder and select "Restore previous versions" from the context menu.
- A list of available previous versions of the folder will be displayed, along with the date and time they were created. Select the version that contains your lost photos.
- Click "Restore" to recover the selected version of the folder. If you want to save the previous version in a different location, click "Open" and then copy the desired photos to a safe location on your hard drive.
Remember, the "Restore previous versions" feature only works if System Restore was enabled before the photos were deleted. To turn it on, search for "Create a restore point," go to "System Protection," and select "Turn on system protection." Enable System Restore and create restore points regularly for better chances of recovery.
Part 3: FAQs about Hard Drive Photo Recovery
Q: How do I recover permanently deleted photos from my computer?
Ans: To recover permanently deleted photos, use data recovery software like 4DDiG Data Recovery. This tool can scan your hard drive and retrieve lost or deleted pictures, even if they're no longer in the Recycle Bin.
Q: How do I get pictures off my old computer?
Ans: To transfer pictures from your old computer, connect an external storage device like a USB drive or an external hard drive. Copy the photos from your old computer to the external device, then plug it into your new computer and transfer the files.
Q: How do I get data off my old hard drive?
Ans: To retrieve data from an old hard drive, connect it to your current computer using a USB to SATA/IDE adapter. Once connected, you can browse the hard drive's contents and copy the desired files to your new computer.
Final Thoughts
Losing cherished photos can be a devastating experience that many users face. However, this article has discussed four simple methods to recover your lost pictures from a hard drive on Windows. While these techniques can be helpful, if you're dealing with permanent photo loss, it's best to use a reliable third-party tool like 4DDiG Windows Data Recovery. Don't let precious memories slip away – try 4DDiG today and get your photos back!