How to Do Duplicate File Search on Windows 11 Pro via Command Line
Windows 11 Pro offers powerful file management tools, including the option for a Duplicate File Search on Windows 11 Pro Command Line. Duplicate files can fill up storage and slow down your system so it’s important to find and remove them. Using the command line to find duplicate files offers an efficient, software-free method to streamline your system.
This article will explore the steps to find and manage duplicate files using CMD and PowerShell and introduce a safer alternative for quick results.
Part 1: Why Do Duplicate File Search on Windows 11 Pro via Command Line?
When you have duplicate files on your Windows 11 Pro system, the command line is a highly effective, free way to find and remove unwanted duplicates. Here are the reasons to choose command line over third-party software:
- No Software Installation Required: Windows 11 Pro has built-in command line tools, so no need to download and install extra software. Saves time and storage space.
- Customizable and Fast: The command line gives you more flexibility to run custom commands as per your file management needs. For advanced users this gives more control over how duplicates are identified and handled.
- No Distractions or Bloatware: Command line tools are lightweight and free from unnecessary features or ads that come with third-party software.
- Automation: With the right scripts, you can automate the process of finding and removing duplicate files and keep your system clean with minimal manual intervention.
- Power and Flexibility: For more complex tasks command line tools like CMD and PowerShell have scripting capabilities that can do tasks beyond simple file search like batch deletion or organizing files into directories.
➤ Command Line Tools in Windows 11
Windows 11 Pro has several built-in command line tools for file management including searching for and removing duplicate files. Here are the main tools:
⭕ Command Prompt (CMD):
Command Prompt (CMD) is the default command-line interface in Windows. It’s simple and widely used for basic file tasks like moving, deleting or renaming files. While CMD can’t find duplicates as easily as other tools, it can help by listing files and filtering results based on names or sizes using dir and findstr.
CMD Commands:
- dir: Lists files and directories.
- findstr: Locate specific text within files or search results.
⭕ PowerShell:
PowerShell is more advanced than CMD. It can do more complex tasks like searching for duplicates based on file content, not just names or sizes. PowerShell can calculate file hashes (unique identifiers) to identify exact duplicates so it’s a reliable tool for this task.
PowerShell Commands:
- Get-ChildItem: Lists files and directories.
- Group-Object: Groups items by size or hash value.
- Remove-Item: Deletes files or folders.
⭕ Windows Subsystem for Linux (WSL):
WSL allows you to run a Linux distribution alongside your Windows 11 installation. While it’s primarily used by developers, it gives you additional tools and capabilities if you are comfortable with Linux commands. For advanced users, WSL can be used with Linux-based tools (like fdupes or rdfind) to search and delete duplicate files in a more streamlined way.
These tools are all part of Windows 11 Pro, and each has its own way of managing duplicate files. Whether you choose the simplicity of CMD or the power of PowerShell, the command line has options for you.
Part 2: How to Find Duplicate Files in Windows 11 Pro Using Command Line
Windows 11 Pro has command-line tools like Command Prompt (CMD) and PowerShell to search and manage duplicate files. This guide will show you step-by-step how to find and remove duplicates using both CMD and PowerShell. Using these methods, you can manage duplicate files on Windows 11 Pro.
1. Use CMD to Find and Remove Duplicates
Using CMD to find duplicates is time-consuming. This method is good for finding specific file types like images, audio and documents with clear and exact file extensions.
1️⃣ Find Duplicate Files
CMD is a simple way to find duplicates based on extensions. It’s good for specific file types like images, audio or documents.
-
Open Command Prompt as an Administrator: Press Start, type
cmd, and select "Run as administrator". -
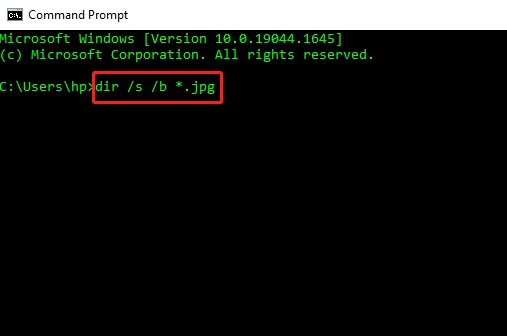
Search for duplicate files: Use the command:
dir /s /b .extension. Replace.extensionwith the file type you’re searching for. For example, to locate duplicate:.jpg files: dir /s /b .jpg
-
Press Enter to initiate the scan. CMD will identify duplicate files and generate a list displaying the detected duplicates.
2️⃣ Delete Duplicate Files
-
Open File Explorer and go to the folder containing the duplicate files.
-
Copy the folder path by right-clicking on it and select “Copy as path”.

-
Open Command Prompt and use the following command:
del /s /f .duplicate. Replace.duplicatewith the file extension to delete duplicates automatically. -
To delete entire duplicate folders, use
rmdir /s /q FolderName.
Be careful when using del or rmdir commands, as deleted files cannot be recovered easily.
2. Use PowerShell to find and remove duplicates
PowerShell is a more advanced tool that finds duplicates based on file hashes. This method detects files with the same content regardless of name.
1️⃣ Find Duplicate Files
Open PowerShell as Administrator:
-
Right-click on the Start menu and choose "Windows PowerShell (Admin)."
-
Find Duplicates by Hash: Use the Get-FileHash cmdlet to calculate file hashes:
Get-FileHash -Path "C:\Path\To\File" -Algorithm SHA256.Note:
If no algorithm is specified, the system will default to SHA256 which is good for file integrity especially for downloaded files. Using Get-FileHash with Get-ChildItem will do a quick file check.

-
Find Duplicate by Length and Hash: To find duplicates, files must be of the same size so focusing on files of the same size will speed up the process. Simply modify the file path based on the Get-FileHash result. To scan an entire directory, type command below. This command groups files by size and compares their hashes to find duplicates.
$srcDir = "C:\Path\To\Directory" Get-ChildItem -Path $srcDir -File -Recurse | Group -Property Length ` | where { $_.Count -gt 1 } | select -ExpandProperty Group | Get-FileHash ` | Group -Property Hash | where { $_.count -gt 1 }| foreach { $_.Group | select Path, Hash } 
2️⃣ Delete Duplicate Files
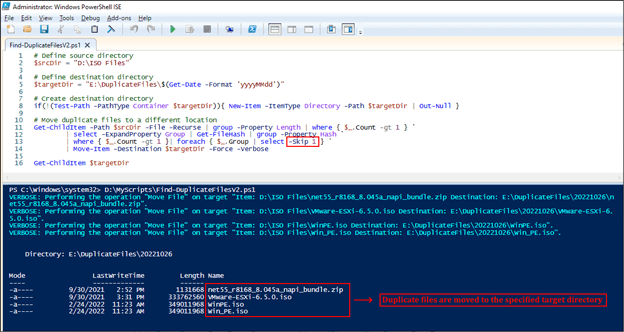
Once duplicates are found using PowerShell, don’t delete them immediately, especially when working with important files. Instead, move them to a different directory, preferably on a different drive with enough free space. You can do this by piping the output of the previous command to Move-Item. After finding duplicates, you can remove them in several ways:
☞ Move duplicates to a different folder for review:
This will keep one instance of each duplicate in the original location and move others to the target directory.
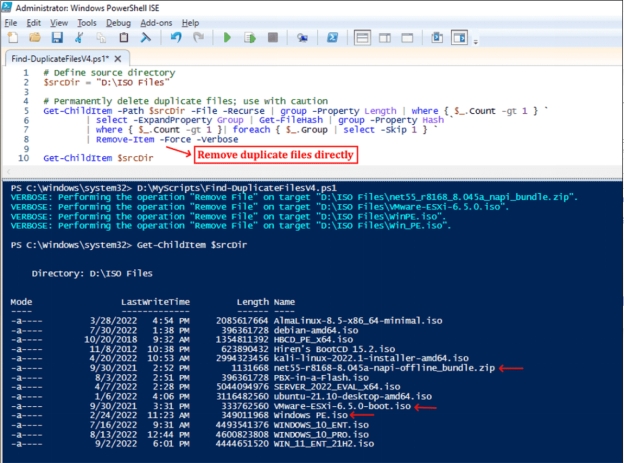
☞ Permanently delete duplicate files:
Deleting files is irreversible. Move duplicates to a separate folder for review before deleting.
Key Notes: CMD is good for basic tasks and specific file types. PowerShell has more advanced functionality including checksum based comparison for more accurate results. Use these tools with caution to avoid data loss. Always backup important files before running delete commands.
Part 3: Safer & Easier Way to Find and Delete Duplicate Files
Keeping your device clean is essential for storage and performance. Duplicate files consume valuable storage space and reduce system performance. For an easy and efficient solution, 4DDiG Duplicate File Deleter is highly recommended.
It’s a powerful tool for scanning duplicate files on Windows and Mac devices. Its user-friendly interface and advanced algorithm ensure accurate results and protect your important data.
Secure
Download
Secure
Download
✨ 4DDiG Duplicate File Deleter Features
- Fast Scanning: Advanced algorithms detect duplicates in seconds.
- Cross-Platform: Works on Windows and Mac.
- Supports All File Types: Photos, videos, documents and more.
- Smart Filters: Customize search by file type, size or more.
- Preview and Control: Review detected duplicates before deleting.
- Secure Deletion: Deletes only selected files.
✨ How to Use 4DDiG Duplicate File Deleter
Follow these steps to find and delete duplicates:
-
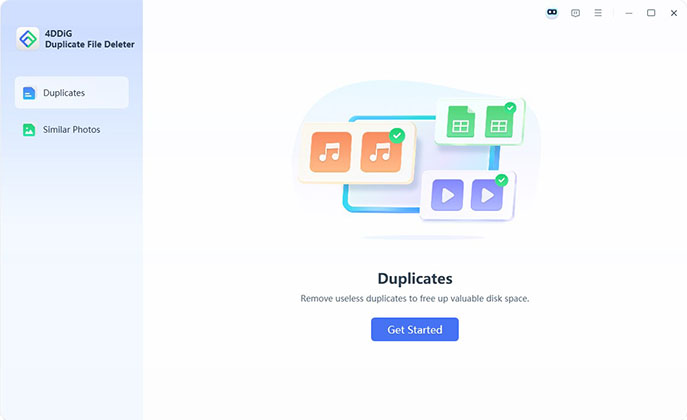
Get the 4DDiG Duplicate File Deleter on your computer and launch the program. On the home screen, head to “Duplicates” > “Get Started”.

-
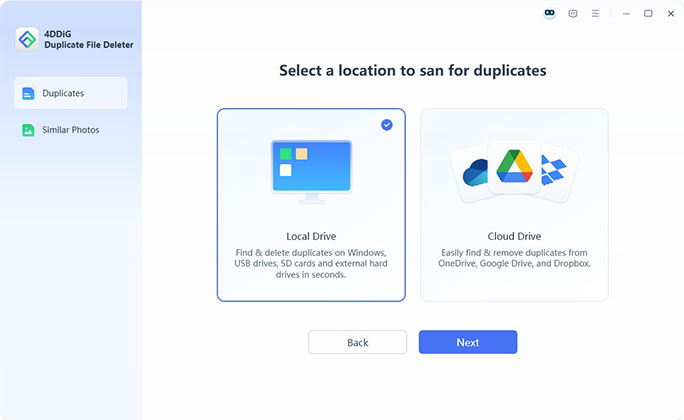
Select a “Local Drive” and choose “Next” to proceed.

Note:
To find a solution to search for and delete duplicate files from Google Drive, please check: How to Find and Remove Duplicates in Google Drive
-
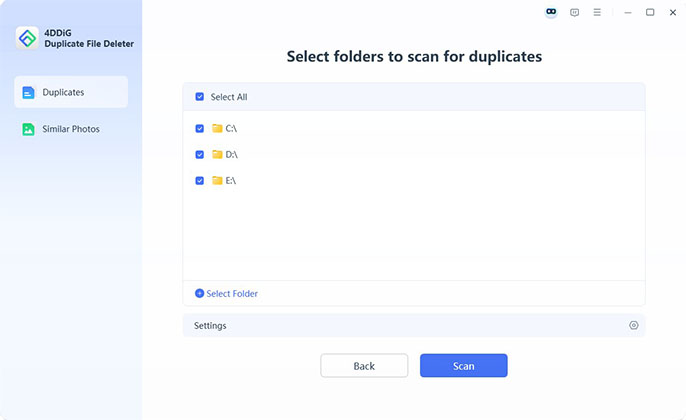
Select the folders which you want to find and remove duplicate files from.

-
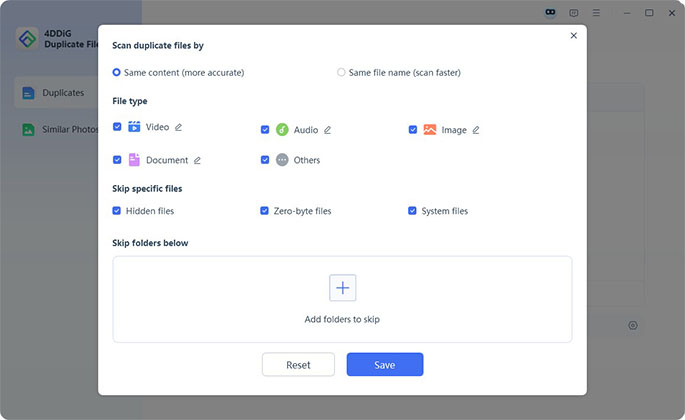
By tapping the bog icon lower, you can personalize the scanning items, such as file types, specific folders you want to skip, etc. Once done, click “Save” and then “Scan” to start.

-
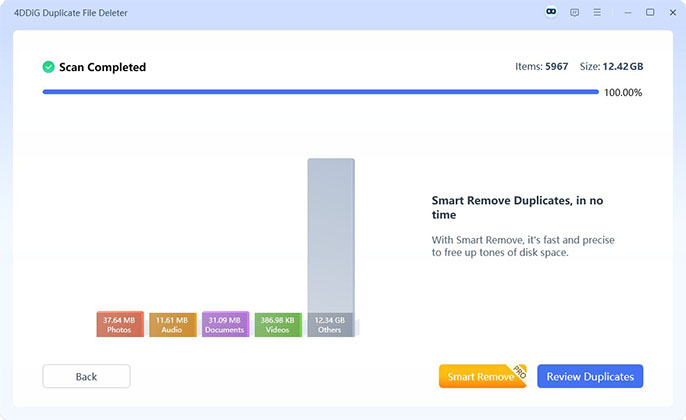
When the scanning is completed, you can click “Review Diplicates” to check specific duplicate items and remove them manually. Or, hit the “Smart Remove” button to delete them at once automatically and safely.

With 4DDiG Duplicate File Deleter, decluttering your device is safer and easier. By freeing up space, you can optimize your device in just a few clicks.
Best Free Windows 11 Find Duplicate Files App for Music 2025 [Top 7 ]
Part 4: Tips for Managing Duplicate Files
Preventing duplicate files is easier than cleaning them up. Here are some best practices:
- File Organization: Create a file naming convention to avoid duplicates.
- Cloud Storage: Store important files in the cloud so you have backups, and it’s easier to manage local duplicates.
- Perform Routine Maintenance: Schedule regular duplicate searches using tools like CMD, PowerShell, or 4DDiG.
- Avoid Overlapping Backups: Make sure your backup software doesn’t create duplicate copies of the same files.
- Use Automation: Set up regular scans with 4DDiG Duplicate File Deleter to automatically find and delete duplicates.
- Avoid Downloading Redundant Files: Be careful when downloading files from the internet, it’s easy to end up with multiple copies.
Conclusion
Finding and deleting duplicates is necessary to keep your system clean and efficient. While the duplicate file search on the Windows 11 Pro command line is a powerful solution, it’s time-consuming and complex for some users. Tools like 4DDiG Duplicate File Deleter make it easy with advanced features and are user-friendly. Whether you prefer manual or automated management, managing duplicates is good for your system performance and storage.
Ready to simplify your file management? Try the above methods today for a hassle-free experience!
Secure
Download
Secure
Download
💡 Summarize with AI:
You May Also Like
- Home >>
- Remove Duplicates >>
- How to Do Duplicate File Search on Windows 11 Pro via Command Line


 ChatGPT
 Perplexity
 Google AI Mode
 Grok
Grok

