People often search for "Why is my camera memory card full but no pictures?" when they cannot add new files to the card. It sure can baffle anyone because the card has no data, yet it still shows the message that it is full. Well, it's not sorcery. This is what happens if the SD card is full. So, what causes this issue, and how can you fix it easily? Continue reading to find out everything.
- Part 1: Why Does My SD Card Say Full when Empty?
- Part 2: Show Hidden Files on SD Card when SD Card Full but No Files
- Part 3: Directly Access the Default Path to Fix SD Card Full but No Files
- Part 4: Restore SD Card to Full Capacity via CMD if SD Card Full but No Files
- Part 5: Recover Deleted Files to Solve SD Card Full But No Files on ItHOT
- Part 6: Correctly Format the SD Card
Part 1: Why Does My SD Card Say Full when Empty?
People get confused when they get the notification/pop-up that the sd card is full, but in reality, it has no files. This can make anyone wonder why this is happening. There can be different reasons behind the “SD card full but no files” problem.
- There might be some hidden files in the SD card which have taken up all the space.
- If you have recently formatted the card, chances are you did not do it right.
- The SD card is damaged.
An SD card usually gets damaged when you spill any liquid or not or drop it on the ground. Furthermore, putting pressure/weight on it can also cause it to malfunction. So, if any mishaps have happened to it or the device it was in, it means the card is not okay. You should still try your look and follow these steps to get the issue fixed.
Part 2: Show Hidden Files on SD Card when SD Card Full but No Files
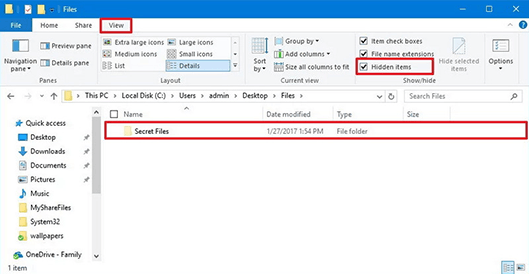
As mentioned above, the hidden files on the SD card can take up all the space, and you will have no room to add new ones. So, you should check for those hidden files and delete them if they are not important. Follow these steps:
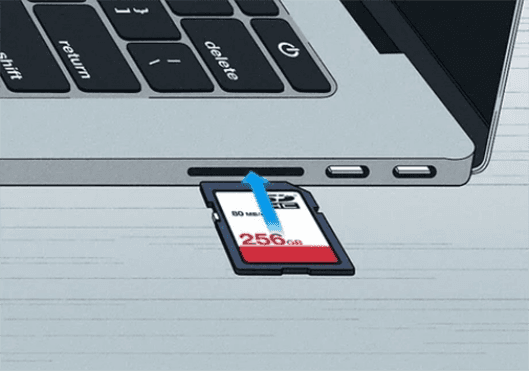
- First, connect the SD card to your PC and open the folder.
- Click on the "View" folder from the bar.
- Go to the “Show/Hide” section and tick the “Hidden” items.
- Go to the SD card folder, and all the hidden files will be there (if there are any).
You can also do the same thing via the command prompt. It is a bit of a complicated process, but it works every time if you do it right.
- Connect the SD card to a PC.
- Press the “Windows icon” and “R” together on your keyboard.
- Type “CMD” and hit enter to initiate the process.
- Type "attrib -h -r -s /s /d n:\*.*". Note that the "n" should be your SD card's drive letter. Check out what it is before you input it. If it is “g,” then replace the “n” with the “g.”
- Open the SD card folder, and all the hidden files will become visible.
People generally do step 4 wrong whenever they follow this method. Therefore, we suggest you do that step carefully. If you then see all hidden files and they are not important, simply delete them to free up some space.
Part 3: Directly Access the Default Path to Fix SD Card Full but No Files
Another easy way to fix the problem is to Access SD card files directly in the DCIM folder. It is not a difficult process if you follow the steps correctly. Here's how to access the SD card files using the default path:
- Begin the process by connecting the SD card to a PC and opening Windows Explorer on it.
- Navigate to the tools and folder options.
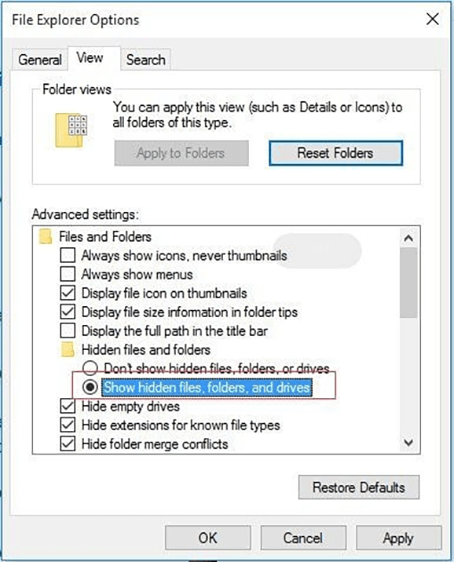
- Go to the “View” tab and then click on the “Show hidden files, folders, and drive” option.
- Click “OK,” and the files will be visible. To confirm, go to the SD card folder and check.
This method works most of the time, and most people prefer to do this over any other. But if it doesn’t work in your case, follow the next one.
Part 4: Restore SD Card to Full Capacity via CMD if SD Card Full but No Files
When the Nikon camera new SD card says full even after you have formatted it recently, it means it is facing issues. Fortunately, the “SD card still full after deleting” is a problem that you can fix using the CMD method.
- Start the process by connecting the SD card to a PC and pressing the “Windows icon” & “R” together on the keyboard.
- Type “CMD” and press enter or click “OK” to initiate the command.
- Type “fchkdsk” there and then input the letter of the SD card folder.
- After the SD card letter, type & /f. Press enter.
- Lastly, restart your PC.

Hopefully, the problem will now be fixed, and you can now access all the hidden SD card storage files.
The problem with fixing SD card problems is that the important files can get deleted during the process, which people just can’t afford to lose. There are higher chances that you may also end up losing some important pictures too. Don’t worry; you can retrieve all of them in no time, and it’s now time to know how.
Part 5: Recover Deleted Files to Solve SD Card Full But No Files on It
Files get deleted during the fixing of the SD card, but luckily, you can get them back using top-quality data recovery software. But the problem is- most tools are either not efficient or really expensive. Fortunately, you can now download the Tenorshare 4DDiG Data Recovery Tool. It is high-quality software that offers the best user experience. It can get back all the deleted files in a few minutes only (no matter what the file formats are). This software can retrieve more than 1000+ types of files easily. To your surprise, it can also restore those files that were lost in a system crash or virus attack.
That is why more and more people are downloading 4DDiG every day and recovering all the files back to their system/device. You can also use it to export the files to other folders before you do any of the fixing solutions discussed above. This will help you avoid data loss. The good news is- This software is available for both Windows and Mac. So, download it on your PC straight away and get back all the files.
Secure Download
Secure Download
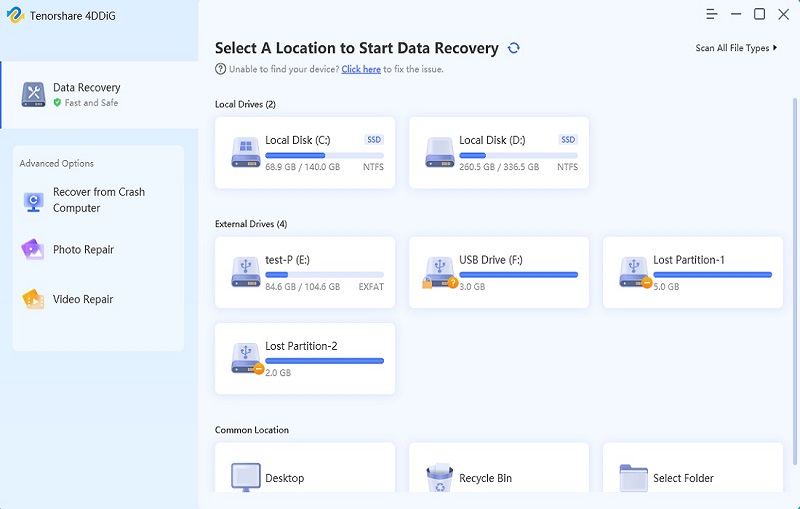
- Launch the Tenorshare 4DDiG data recovery software after downloading and installing it from their official web page. Next, click on “Data Recovery. You will be asked to select the location from which you wish to start the recovery process. Select the local disk with the inaccessible files and then click on “Start” to proceed. To target a certain file type, navigate to the upper-right corner of your screen before starting the scan process.
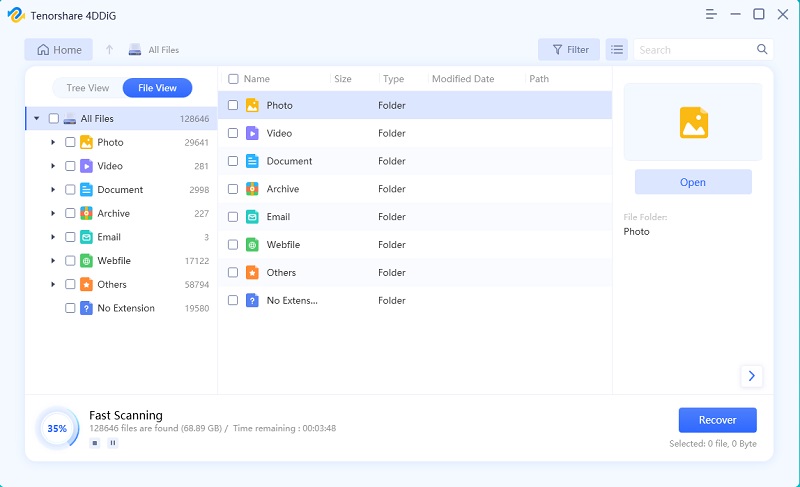
- At this point, the software automatically scans and repairs the files in the location you selected. A user can either stop or pause the scan process at any time if he or she has already identified the inaccessible files. Once the scan is complete, its result will come in categories such as Tag Files, RAW Files, Lost Location, Existing Files, and Deleted Files, and can be seen under the “Tree View”. To search for a specific file type, switch to File View. You can also narrow down your search by using the filter option seen on the right side of the panel.
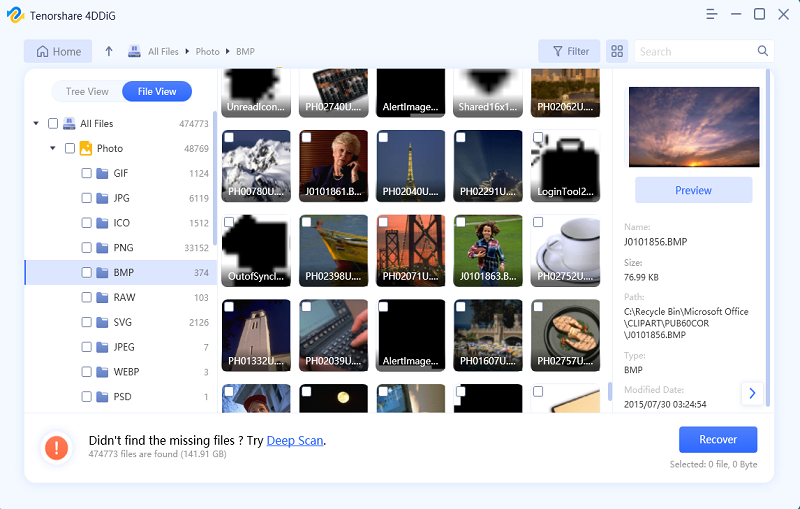
- The next step is to save your restored files to a safe location after previewing the scan result. It is important to avoid saving them to the same location where they had accessibility problems.
Part 6: Correctly Format the SD Card
It is super important you know how to correctly format the SD card if you don’t want to face the problem again. Here are the simple steps to do this:
- Connect the SD card to a PC.
- Go to Windows File Explorer.
- Look for your SD card and right-click on it. Then, out of the different options, choose "Format."
- Choose NTFS and then click on "OK."
When you do this, the SD card will be formatted after some time. You can then re-check it by opening its folder. So, in future, if you ever want to format your card, this is the right way to do it.
Conclusion
All-inclusive, if you face the “SD card was full but had no data on” problem, then you should immediately fix it, or else you won't be able to add more files to it. For this, we discuss a few methods, and all of them work. However, the chances of data loss are more. Therefore, you should have Tenorshare 4DDiG Data Recovery software on your PC (just in case). It has the quickest scanning speed, and you can even preview the files before you restore them. This will help you in deciding which ones you want back or which ones should stay deleted. So, download 4DDiG Data Recovery Software and make everything easy!
 ChatGPT
 Perplexity
 Google AI Mode
 Grok
Grok
