How to Fix LogiLDA.dll Error on Windows 11/10?
Learn how to fix the LogiLDA.dll error hassle-free with our easy-to-follow guide. Get your Logitech devices back on track in no time with 4DDiG DLL Fixer.
Is there an error popping on your Windows 11/10 system that says there was a problem starting C Windows System32 LogiLDA dll? Well, this is more common than you think and we have the fix for it! The LogiLDA.dll error message generally pops up while your system is turning on, just after your system turns on, the system awakens after being in sleep mode, or right after a system reboot. It can also occurs when launching a program or process that relies on the Logitech Download Assistant (LogiLDA.dll).
If you are getting the LogiLDA.dll error on your system and are looking for a way out, you have come to the right place. We have plenty of workable ways in which the LogiLDA.dll error can be fixed within no time.
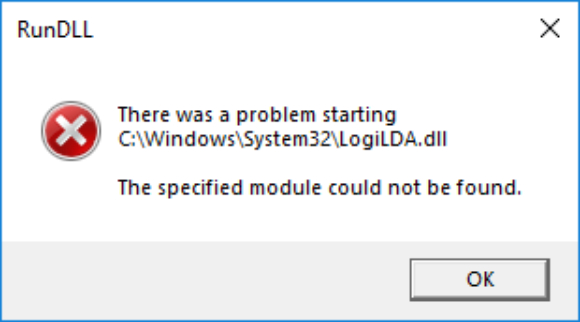
Part 1: What Is LogiLDA DLL?
When we talk about Windows DLL file, LogiLDA.dll can be categorized as a component of LDA or Logitech Download Assistant. This .dll file is typically located in the Windows\System32 folder on the C: drive. It serves as a software component for managing Logitech device updates. When your system starts up, a check is run by the Logitech Download Assistant to check for new Logitech updates. LogiLDA.dll plays a crucial role as it directly impacts the functionality of various hardware components such as mice, keyboards, and video cameras. These devices rely on Logitech software, and by extension, LogiLDA.dll, for proper operation.
Part 2: What Causes the LogiLDA.dll Error?
Before moving on to the fixes for the LogiLDA.dll error, it is important to learn about the reasons behind such an error. Here are a few probable scenarios that may lead to the LogiLDA.dll error message coming on your screen.
- The LogiLDA.dll error is generally caused when the dll cannot be found. This error message appears even when the dll has not been installed properly or is absent in the application.
- Many times, when a new Windows update is installed, a search for this file is triggered as soon as the system starts up and the software looks for it in the wrong place.
- The file being corrupted may also be one of the reasons behind the LogiLDA.dll error.
Part 3: How to Fix LogiLDA.dll Error on Windows 11/10?
Once you are aware of the reasons behind the LogiLDA.dll error, you may want to know how to fix C Windows System32 LogiLDA dll error. Here are a few workable ways to resolve such an issue with ease.
Way 1: Use a DLL Fixer to Restore LogiLDA.dll File Automatically
If you want a highly effective tool that has been designed specifically to deal with every DLL-related issue you can think of, you must try out 4DDiG DLL Fixer. DLL issues can lead to severe malfunctions in your Windows system. This is why you must attend to it at the earliest to continue using your Windows system effectively. Whether it is DLL corrupt errors, DLL missing errors, DirectX issues, or runtime errors, 4DDiG DLL Fixer is the answer to all your system problems related to DLL.
Features of 4DDiG DLL Fixer
- Quick and thorough scans for DLL error detection.
- One-click fix for damaged, corrupted, and missing DLL files.
- Restore missing DirectX files and runtime libraries.
- Repair application startup issues.
- 99% success rate.
- Excellent professional support.
- Huge DLL database.
Step to fix the LogiLDA.dll error using 4DDiG DLL Fixer
If you are getting the error that LogiLDA dll could not be found whenever you turn on your Windows system, you can use 4DDiG DLL Fixer to resolve this problem in the following way.
-
Download and open the 4DDiG DLL Fixer program on your Windows system.
FREE DOWNLOADSecure Download
-
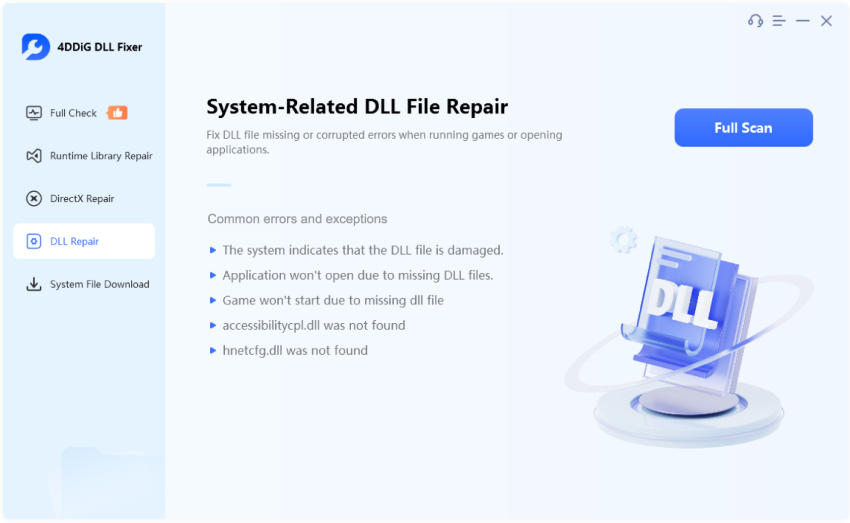
From the options on the left side, click on ‘DLL Repair’ and then on ‘Full Scan’.

-
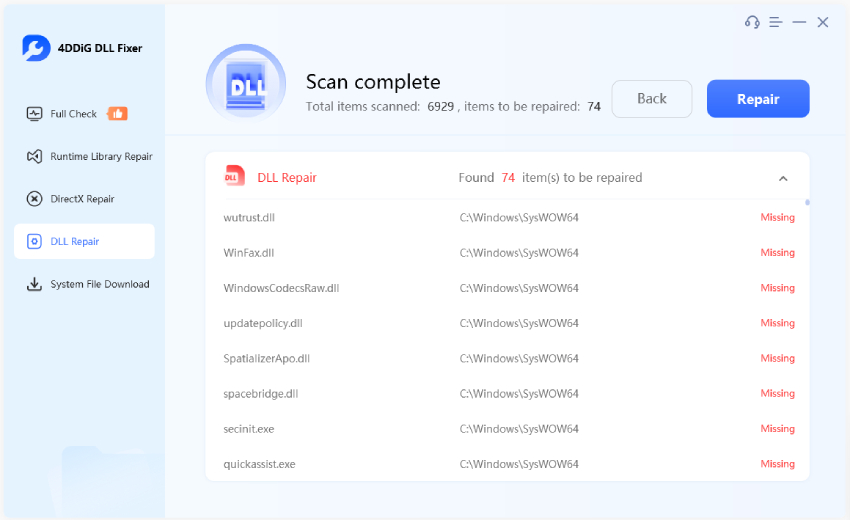
Once the scan is done, you will get a list of corrupt dll files after which you can click on ‘Repair’.

-
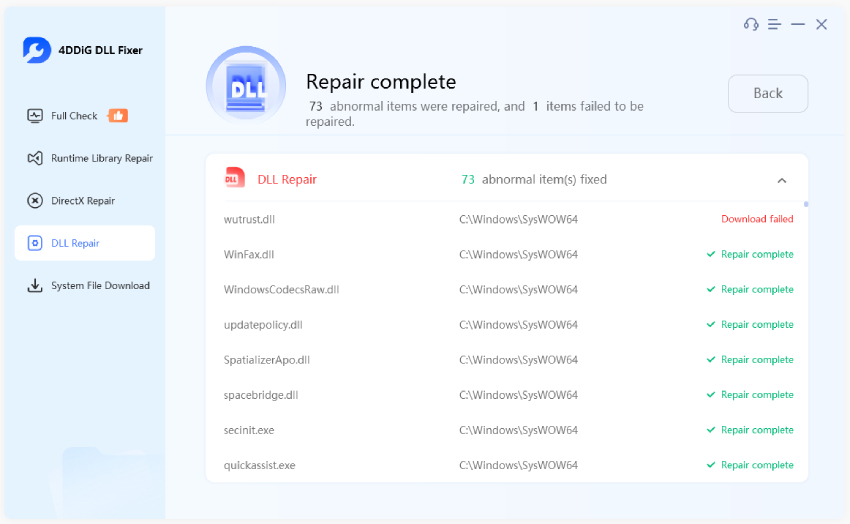
Once the repair process is done, all the corrupted dll files will be repaired and displayed on the screen.

This should solve the problem of the LogiLDA.dll error on your Windows system.
Way 2: Download and Install LogiLDA.dll File Manually
The LogiLDA dll error issue can be resolved by restoring the file from a trusted source. You can use the steps given below to download and install the LogiLDA.dll file manually.
- Go to DLL-files.com for LogiLDA dll download.
-
Key in ‘LogiLDA.dll’ in the search box and click on ‘Search for DLL file’.

-
Click on ‘logilda.dll’ and select a version to download base on your Windows operationg system version.

-
Copy the downloaded LogiLDA.dll and paste it into the directory of your System (C: \Windows\System32, and for a 64 bit in C:\Windows\SysWOW64\).

- Reboot your computer and check whether the issue of LogiLDA.dll error has been resolved or not.
Way 3: Reinstall Logitech Drivers
Are you still getting the error message that there was a problem starting LogiLDA dll? You can try to reinstall the Logitech drivers in the following way to resolve this.
- Press Windows + R keys to open “Run” dialog box.
-
Enter “devmgmt.msc” and click “OK” to open device manager.

- Double click on ‘Mice and other pointing devices’.
-
Right click on the ‘Logitech HID mouse’ option and click on ‘Uninstall device’.

After this, restart your computer and the default Logitech device driver will get reinstalled on your system. If it is not installed, visit the Logitech support site to download and install it maunally.
Way 4: Disable Logitech Download Assistant From Startup
If the above fixes do not work and you still are wondering how to get rid of LogiLDA.dll error, you can try to disable Logitech Download Assistant from Startup in the following way.
- Press the keys ‘Ctrl’, ‘Alt’, and ‘Del’ together and select ‘Task Manager’.
- Click on ‘Startup’ and right click on ‘Logitech Download Assistant’ from the list displayed.
-
After this, you can click on ‘Disable.’

Check whether this has helped in resolving the problem of LogiLDA.dll error.
Way 5: Delete Logitech Download Assistant Key from Registry Editor
If the LogiLDA.dll error appears even after disabling Logitech Download Assistant from Startup, you can try to delete Logitech Download Assistant Key from the Registry Editor in the following way.
- Press the ‘Windows logo’ key and ‘R’ key together to launch Run dialog.
-
To open the Registry Editor, key in ‘regedit’ and hit ‘Enter.’

-
Click ‘Yes’ if prompted and then locate ‘Logitech Download Assistant’ key by following the below path.
HKEY_LOCAL_MACHINE\Software\Microsoft\Windows\CurrentVersion\Run
-
Once located, right click on it, and select ‘Delete.’

After this, restart your PC and the LogiLDA.dll error message should stop appearing on your system.
Way 6: Uninstall the Logitech SetPoint Software
The error message “there was a problem starting LogiLDA dll” may also be caused by the Logitech SetPoint software. To check if this is the root cause, you can try to uninstall the Logitech SetPoint software and check whether the problem persists.
- Click the Start menu, type “Control Panel” in the search bar and then select Control Panel.
-
Click on ‘Uninstall a program’ under ‘Programs’.

-
Right click on the 'Logitech SetPoint (ver)' and select 'Uninstall.'

Once done, restart your PC and if the LogiLDA error does not appear, then you will know that the Logitech SetPoint software was the culprit.
Part 3: FAQs about LogiLDA.dll Error
Q1. Where is LogiLDA dll located?
A1. The LogiLDA dll file is located in the C: drive, in the System32 folder, in Windows.
Q2. How do I fix System32 LogiLDA dll error?
A2. There are many ways to fix the System 32 LogiLDA dll error, like by restarting your system, installing the latest Windows update, reinstalling the mouse drivers, disabling LogiLDA on startup, and reinstalling the Logitech program, among several other fixes.
Q3. Where should you put LogiLDA.dll in Windows 10?
A3. You need not put the LogiLDA.dll file anywhere in Windows 10. It is already automatically installed on your Windows system whenever you connect to any Logitech device.
Final Thoughts
It is highly recommended that you keep the driver for your Logitech devices updated to avoid being faced with issues like the LogiLDA.dll error. Whenever you get the LogiLDA.dll error on your system, you can easily resolve it using any of the methods mentioned above. However, the best and the quickest way to resolve this would be to use the 4DDiG DLL Fixer.


 ChatGPT
 Perplexity
 Google AI Mode
 Grok
Grok

