Have you ever accidentally deleted or lost your photos in your memories after the macOS Sequoia/Sonoma Update? Or if you have and you don't know how to recover lost photos after the macOS Sonoma Update. This is the right place to get the answers to these questions. The macOS Sonoma Update is certainly a big thing for macOS users. In fact, it is a free update and enables tons of features for Mac users. As is well known, when a new update comes alone, it comes with a lot of dilemmas as well. Most Mac users have already experienced the issue of photos disappearing after updating Sonoma. If somehow you are the victim of such an issue after updating macOS Sonoma, then there is something you can do. Today we have brought some of the best solutions for how to recover lost pictures after the macOS Sonoma Update. We have mentioned several ways, so you will have a better opportunity to recover your photos in their full pixels.
Part 1: What Causes Picture Missing After Sequoia/Sonoma Upgrade?
There are many, many reasons and causes of pictures missing after upgrading to Sequoia/Sonoma. Some of the keen users of Sonoma have reported some common reasons like:
- There may be a glitch in the update that comes from the OS itself. The same glitch causes the photos to be accidentally deleted or removed.
- Another reason is that if the photos are stored in a different location after the update, then they are moved to a completely new app.
If you have faced the same problem as before, before looking for anything else, check whether they have moved your photos to a new device or not. If you can't find the photos, then make sure you have recovered your photos after updating to macOS Sequoia/Sonoma.
Part 2: How to Get Photos Back on Mac After the macOS Sequoia/Sonoma Update?
Every scroll contains a plethora of recovery software and platforms. Although the majority of them cost a lot and some of them have a lot of bugs, which certainly are not good for your photos. The best software for recovering photos in macOS after the Sonoma update is Tenorshare 4DDiG.
Way 1: Recover Missing Photos with Tenorshare 4DDiG
If you want to recover your photos after the macOS Sequoia/Sonoma update, then 4DDiG Mac Data Recovery Software is the best option. It can support USB flash drives, files, SD cards, external hard drives, and many more. Using it on your Mac will give you the best experience you will ever have.
Features of the 4DDiG Data Recovery Software:
- 4DDiG supports all file types data recovery, which include images, videos, audio files, documents, and more.
- 4DDiG supports data recovery from both internal and external devices, including USBs, SD Cards, external hard drives, etc.
- 4DDiG data recovery is easy to use which allow users to recover almost any data in 3 steps.
- 4DDiG data recovery support data recovery from both Windows and mac OS.
- It can retrieves over 1000+ file formats.
- It supports data recovery from many different scenario, including accidentally deleted, virus attack, system crash, etc.
The steps for recovering photos after updating to macOS Sequoia/Sonoma are as follows.
For PC
Secure Download
For MAC
Secure Download
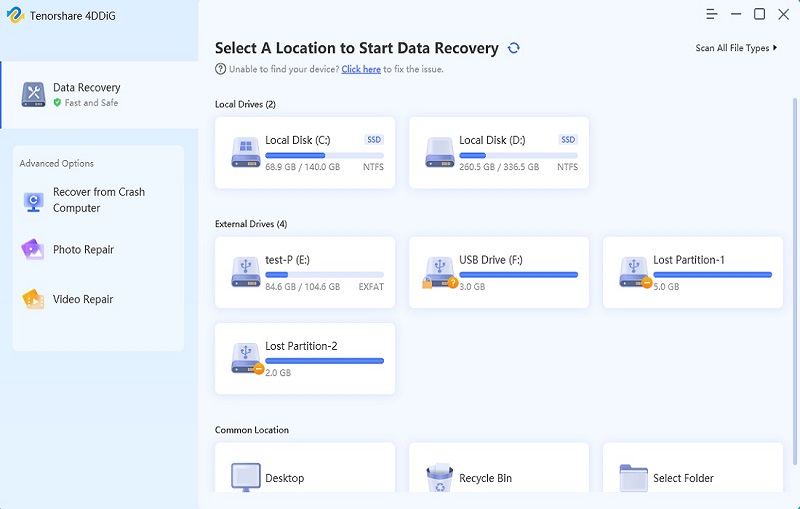
- Download and launch Tenorshare 4DiG. Once the installation is complete, select the location like on your local drive to start Mac Data Recovery. Afterward, click on the desired location. Then click on the Scan button that will appear in the lower right corner. It will take a while to scan and start looking for your lost photos.
- Once the saving is complete, then the result will be generated. In fact, you can click on the specific file type if you want to preview more details about it.
- Then click on the recover button and select the location where you want to save the files. Do not save files in their old location, find a new location for recovered photos.


Way 2: Retrieve Missing Photos from the Mac Photos App
The steps to recover missing photos from the Mac Photo App are as follows:
Step 1: Open your Mac and use your touch ID or passcode to open the deleted album.

Step 2: Now select all the photos and videos you want and click on the recovery button.
In macOS, the recently deleted album stores the files for 30 days. So you need to recover in 30 days, otherwise, it will get removed.
Way 3: Use iCloud to Recover Lost Photos
The following are the steps to restore disappeared photos with iCloud:
Step 1: Open your Mac and get your photos and then go to the settings. Now click on the iCloud icon.
Step 2: Log into it and select iCloud photos. Afterward, connect to the wifi and recheck your photos.
Way 4: Recover Missing Photos from Mac Using Time Machine
You can get back missing photos from the Mac using a time machine. The following are the steps required for it:
Step 1: On macOS Sequoia/Sonoma, launch Time Machine. Now start browsing through the backups to find the photos.

Step 2: Now select the photos and store them in their original location.
Way 5: Look for Missing Photos in the Trash
One of the easiest ways to find the missing photos is through your trash. The following are the ways to do it.
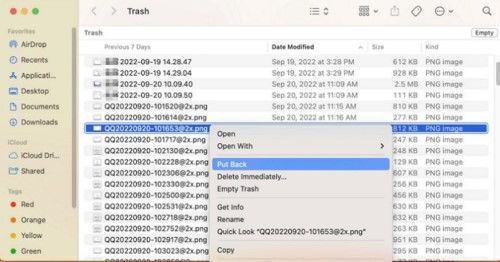
Step 1: Open the trash bin given on the desktop. Now find the missing photos.
Step 2: Once you find it, then right-click on it and click on "Put back".
The above are some of the best ways to recover your photos after updating them to Sequoia/Sonoma.
FAQs:
How Do I Recover Photos after a Mac Update?
You can recover your photos after the Mac update using some of the best softwares. 4DDiG is a software that will help you recover your photos after a Mac update. In fact you can recover your any file if you have accidentally deleted or lost it.
How Do I Recover Photos from the iPhoto Library after a Mac Update?
You can recover photos from the iphoto library after the mac update by going to the recently deleted tab. Afterwards choose the thumbnails of your photos and click on recover.
How Can I Get My Pictures Back after Update?
There are many possible ways to get your pictures back after updating. We recommend you use 4DDiG Mac Data Recovery Software that can find your lost or missing pictures. With one click you can recover all of your missing pictures.
Why Did My Mac Update and Delete Everything?
Mac update deletes everything can be the reason for a bug or malware in the latest update. In fact excessive disk fragmentation is another reason why mac updates delete everything.
Final Viewpoints
Sometimes, updating macOS Sequoia/Sonoma or even any other update can cause damage to your data. In the case of Sonoma, a lot of users faced the photo disappearing issue. If you are one of the victims, then using 4DDiG Mac Data Recovery Software is one of the best ways to recover your lost photos. Using 4DDiG will require just a few clicks and your photos will be saved in their full resolution.
 ChatGPT
 Perplexity
 Google AI Mode
 Grok
Grok

