Are you wondering how to remove write protection from external hard drive? A write-protection error makes the drive, like a USB, disk, or SD card, unusable. So, you can only read the data on the storage device but can’t modify it. But don’t panic. You have come to the right place. In this article, we’ll disclose multiple quick fixes to remove write protection from your external drive. Furthermore, we’ll share a tip to recover your data from a write-protected drive without data loss. You’ll also learn the reasons behind write protection errors.

Part 1: What Causes Write Protection Errors to Occur?
A write-protection error happens when a user tries to save or edit files on a write-protected storage device like a hard disk, SD card, or USB. The primary causes behind write protection could be an encrypted or corrupted drive or Windows registry permission problems. A write-protected storage device allows the user to access data. However, the user can only view or read the data but cannot copy, cut, paste or save the files and folders, making the drive completely unusable. In such a case, removing the write protection from the storage device becomes necessary.
Prepare: How to Recover Data From Write Protected External Hard Drive?
A write-protected drive won’t allow you to make any changes in the data, like copying or pasting it. If you are worrying about data loss due to a write protection error there is a way to recover your data first before you tamper with the drive. Luckily, a third-party tool like the best external hard drive data recovery tool can recover all kinds of data from write-protected and encrypted internal and external drives. Here are some remarkable features of 4DDiG:
- It can recover data from BitLocker encrypted drives and write-protected hard disks, SD cards, and USBs.
- Restores 1000+ file types with a high success rate.
- Recover all kinds of data, including documents, images, videos, and audio files.
- It uses a Deep Scan to dig deeper to recover hidden files.
- Restore, accidentally deleted, hidden, lost, formatted, and corrupted files.
- Retrieves data from corrupted or lost partitions and virus-ridden systems.
- It has a user-friendly interface, so even novices can recover data.
Check out the steps below to recover data from a write-protected external drive:
For PC
Secure Download
For MAC
Secure Download
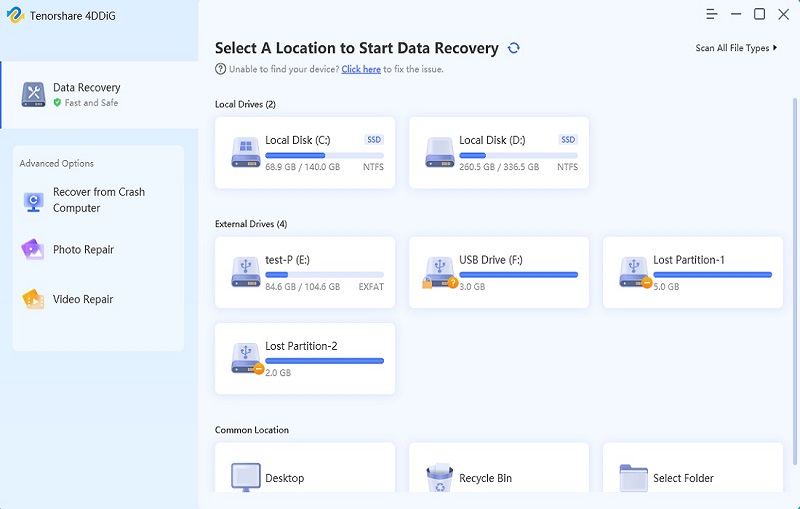
- Connect your write-protected external drive to your PC. Install the 4DDiG tool and open the interface to choose the drive.
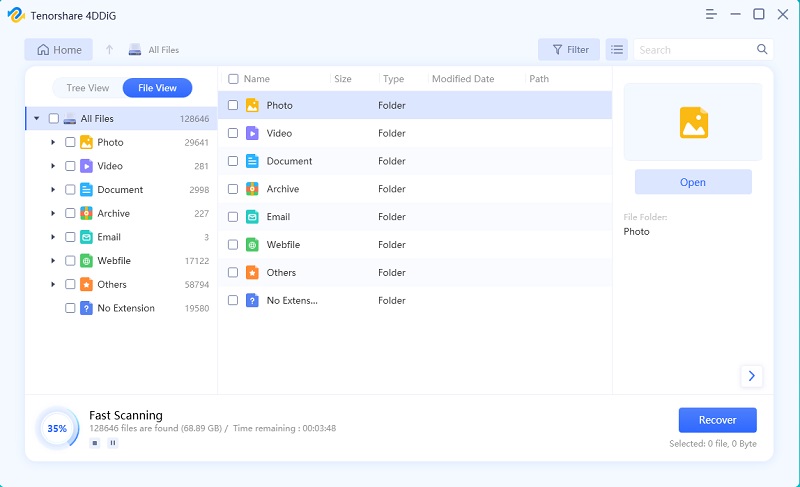
- Select “Start” after choosing the drive to begin the data recovery process. You can choose between Quick and Deep scans for file recovery and pause the scan to preview the details of your targeted files for free.
- Once all data is recovered, the 4DDiG tool will display it in a list form. Check the details and press the “Recover” button to save the files in a safe location on your PC.

Part 2: How to Remove Write Protection From External Hard Drive on Windows 7/8/10/11?
Below we have listed the fixes for your query, “how to remove write protection from external hard drive Windows 7, 8,10, or 11.”
Fix 1: Remove Write Protection From the External Hard Drive By Unlocking the Physical Switch
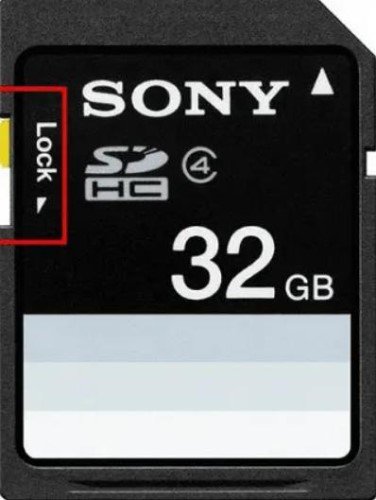
Most external hard drives like SD cards and USBs come with a physical switch on the side. When you switch it on, the drive becomes locked, not permitting anyone to write on it. If you slide the switch to remove the lock, you’ll also be able to remove write protection from external hard drive in Windows.
Fix 2: Use Diskpart to Remove Write Protection From External Hard Drive
Another way to remove write protection from external hard drive Windows 7, 8, 10, or 11 is using the in-built Diskpart tool. It can not only remove write protection from external disks like SD cards and USBs but also from internal hard disks. Here’s how to remove write protection from an external hard drive using Diskpart:
Step 1: Press and hold the “Win and R” keys. Then type “cmd.” Hit "Enter."
Step 2: The “Command Prompt” window will open. Run it as Administrator.
Step 3: Type “diskpart.” Hit "Enter."
Step 4: Type “listdisk.” Hit "Enter."
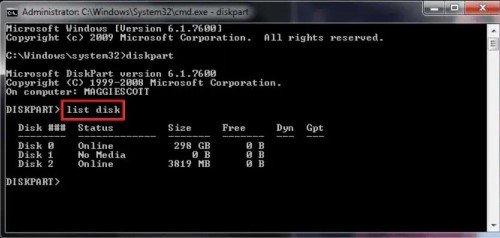
Step 5: Type the disk number of your write-protected disk. Hit "Enter." Then type “attributes disk clear read-only.” Hit "Enter."
This command will clear write protection from your external disk, and you’ll be able to write on it again.
Fix 3: Remove Write Protection With Windows Registry
You can also use the Windows registry to remove write protection from external hard drive Windows 10, 11, 8, or 7. But before tinkering with the registry, keep in mind that if you don’t apply the proper method, it can cause severe issues with your Windows. Here’s how to follow the steps the right way:
Step 1: Open the “Start” menu. Launch the “Run” dialog box and type “regedit.” Hit “Enter.”
Step 2: Choose “HKEY_LOCAL_MACHINE > Expand System.” Then expand the “System” list. Select “Current Control Set.”
Step 3: Press “Control.” And choose “Storage Drive Policies.”
Step 4: Set the value of the digit in the DWORD box as 0 and press “OK.”
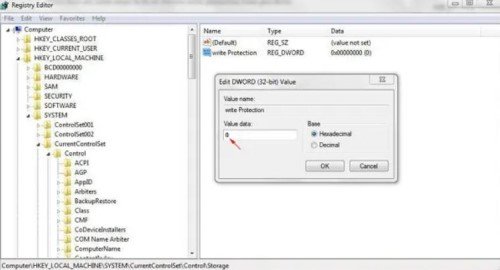
Exit the Windows Registry and restart your PC to apply the changes.
Fix 4: Use Bitlocker to Remove the External Hard Drive Write Protection
If your external disk is encrypted with BitLocker, it could be why you are unable to write on the drive. BitLocker encryption is used to protect files, so your disk will only allow users to read the files and not make any changes. Here’s how to remove the write protection on external hard drive with BitLocker:
Step 1: Launch This PC and right-click on BitLocker encrypted external storage device. Select Manage BitLocker.
Step 2: Choose the partition encrypted and write-protected with BitLocker. Then select Turn off BitLocker. Wait for the removal of write protection.
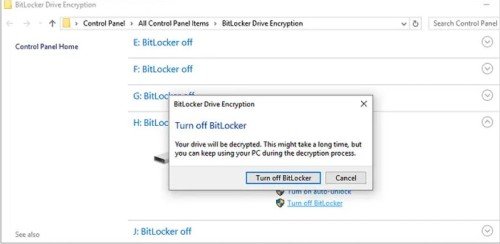
Soon you’ll see your external drive displaying BitLocker off, which means it not-write protected anymore, and you can save or edit files on the disk.
FAQs About Remove Write Protection From External Hard Drive:
Why Is My External Hard Drive Suddenly Write-Protected?
There can be many reasons behind write-protection errors. Your external drive may have gone corrupt, or there might be some issues with the Windows Registry. Or you may have encrypted the drive, making it read-only.
How Do I Remove Write Protection?
You can use Diskpart or Windows Registry to remove write protection from an internal or external drive. If your drive is BitLocker encrypted, use the BitLocker tool to remove the encryption, thus clearing write protection.
How Do I Remove Write Protection From Bitlocker External Hard Drive?
If your external hard drive is write-protected by BitLocker, you can remove it by following the steps below:
Step 1: Launch This PC and then right-click on BitLocker encrypted external storage device. Select Manage BitLocker.
Step 2: Choose the partition encrypted and write-protected with BitLocker.
Step 3: Select Turn off BitLocker. Wait for the removal of write protection.
Can You Remove Write Protection From a USB Drive?
Yes, you can easily remove write protection from a USB drive. Some USBs come with a physical switch you can slide to remove the read-only permission from the device. Or you can use Windows Registry or Diskpart to remove the write protection from the USB.
Conclusion
Hopefully, you now know how to remove write protection from external hard drive after reading the above post. Write protection errors in an external drive can be caused by many reasons. However, we’ve tried identifying every reason and shared its solution above. If you are worried about data loss, we recommend recovering your data first from the write-protected device before trying any technique to remove write-protection. Consider using Tenorshare 4DDiG data recovery software to recover 1000+ file types from encrypted and write-protected internal and external storage devices. It can restore documents, videos, audio, and images with a high success rate and without data loss.
 ChatGPT
 Perplexity
 Google AI Mode
 Grok
Grok
