SD Card Shows Read Only? Here're 6 Proven Solutions!
When you see the SD card read only mode, it means the storage medium has been write-protected. In that case, you won’t be able to modify any files on it. This issue is common across cameras, Android phones, and PC.
In most cases, it’s caused by simple settings or file system errors, both of which you can fix. This guide explains why your SD card shows read only and how to get it working normally again using the following methods.
- Unlock the Write Protection Lock
- Use Diskpart Utility
- Run Check Disk Tool
- Modify Windows Registry Key
- Convert SD Card from FAT32 to NTFS
- Format SD Card

Why My SD Card Shows Read Only?
When an SD card becomes read-only, it stops you from writing, deleting, moving, or saving any files. You can still view the data stored on it, but all changes are restricted.
This problem usually occurs when write protection is turned on. It can happen because the lock switch is turned on, the file system is corrupted, the card is old or damaged, or there’s a malware or permission issue. In some cases, removing the card improperly or interrupting data transfer can also trigger a read-only state.
The good news is that you can utilize the following methods to fix this typical problems. Once the read-only status is removed, your SD card will allow full read-write operations again.
How to Change a Read Only SD Card to Normal?
Now that you know why an SD card becomes read-only, the next step is to switch it back to normal so you can save, delete, and edit files again. Below are the methods to remove write protection and restore full access to your SD card.
Fix 1: Unlock the Physical Write Protection Tab
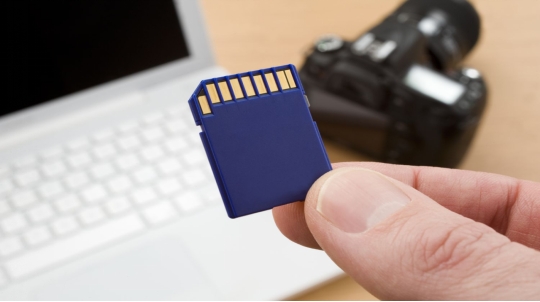
Most SD cards used in Android devices come with a physical write-protection tab. The card usually indicates which direction locks it and which direction unlocks it. If your SD card has this tab, simply slide it to the unlock position to remove the read-only protection. Here's how to fix read-only on SD card:

- Remove the SD card that is currently set to read-only from your device.
- Inspect the card to see if it has a physical write-protection switch.
- Slide the switch from the "Lock" to the "Unlock" position to disable the read-only mode.
Fix 2: Fix the Read Only SD Card Using Diskpart Utility
If the physical lock switch isn’t the issue, you can use Windows’ built-in DiskPart tool. This method lets you clear the read-only attribute from your SD card so it becomes writable again.
Here’s how to remove SD card read-only error using Diskpart:
- Insert the SD card to your Windows computer.
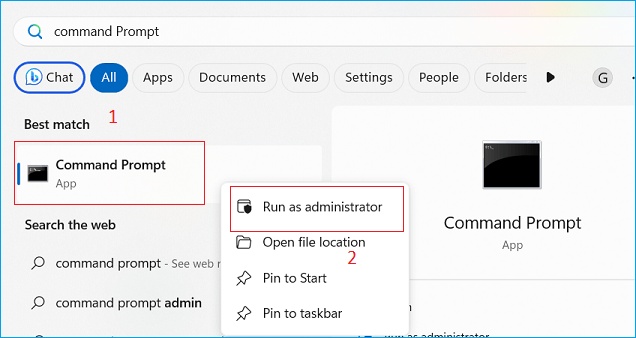
- Search for “Command Prompt” in Windows and choose "Run as Administrator".

- Open the Command Prompt and enter
diskpart, then hit "Enter". - Type
list diskand press Enter to display all drives connected to your PC. - Find your SD card in the list and remember its corresponding disk number (for example, Disk 1).
- Enter
select disk *, replacing * with your SD card’s number, and press "Enter". - Type
attributes disk clear readonlyand hit "Enter" to remove the read-only setting.
- Wait for the confirmation that the disk attributes have been cleared successfully.
Fix 3: Run Check Disk Tool to Disable SD Card Read Only Mode
Running the Check Disk (CHKDSK) tool can sometimes fix an SD card that is stuck in read-only mode, especially if the issue is caused by file system errors or corruption
- Insert the SD card into your computer and note its drive letter (e.g., E:).
- Search for “CMD” in Windows and choose "Run as Administrator".
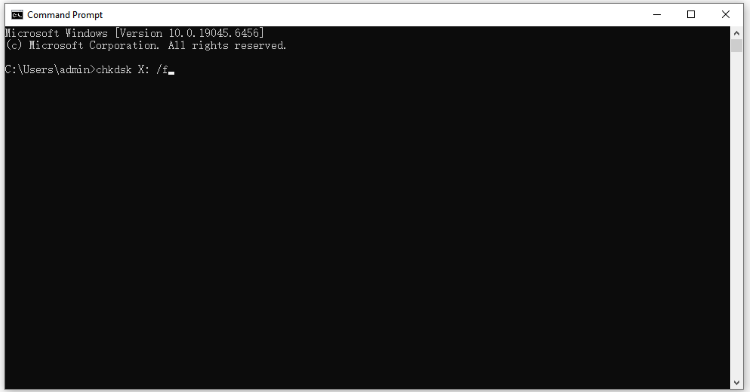
- In the Command Prompt, type
chkdsk X: /f, replacingXwith your SD card’s drive letter, then press "Enter".
- Wait for Windows to scan the SD card and fix any detected file system errors. This may take a few minutes depending on the card size.
- Once the process is complete, safely eject the SD card and reinsert it to check if the read-only issue is resolved.
Fix 4: Use Windows Registry Editor to Change Read Only on SD Card
Windows Registry Editor is a built-in tool that stores configuration settings for your system and connected devices. If your SD card remains read-only, you can try to adjust a specific registry key in the Registry Editor to disable write protection at the system level.
Here's how to edit the Windows Registry key to remove SD card read-only attributes:
- Insert your SD card into a Windows PC using a card reader.
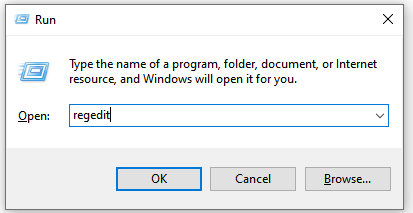
- Press Windows + R to open the Run dialog, type
regedit, and hit "Enter" to open the Registry Editor.
- Navigate to
HKEY_LOCAL_MACHINE > SYSTEM > CurrentControlSet > Control > StorageDevicePolicieswithin the Registry Editor. - Right-click on "StorageDevicePolicies", choose "New", and select "DWORD (32-bit) Value" for 32-bit systems or "QWORD (64-bit) Value" for 64-bit systems.

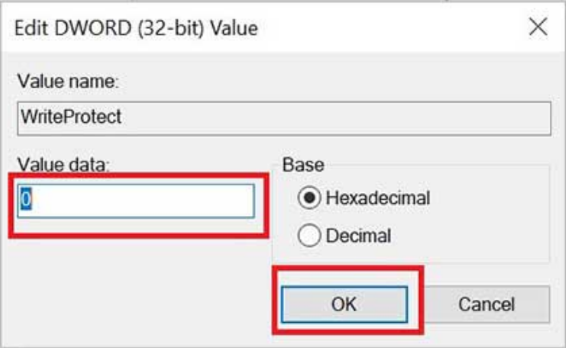
- Name the new value "WriteProtect", then right-click it and choose "Modify".
- Change the number in the "Value data" field to 0 and click "OK".

- Safely eject your SD card and restart your computer.
Fix 5: Convert SD Card from FAT32 to NTFS
Switching your SD card’s file system from FAT32 to NTFS can help resolve persistent read-only issues—especially when they’re caused by file system limitations or errors. Depending on your needs, you can do this using built-in Windows tools or through third-party software.
Here, we'll introduce how to change SD card from read only to normal state by converting the file format using CMD:
- Insert the SD card into your computer and note its drive letter (e.g., E:).
- Press Windows + R to open the Run dialog, type
cmd, and press "Enter". Then choose "Run as Administrator" to open Command Prompt. - In the Command Prompt, type
convert X: /fs:ntfs, replaceXwith your SD card’s drive letter, and press "Enter".
- Wait for Windows to convert the SD card from FAT32 to NTFS. This may take a few minutes depending on the card size.
- Once the process is complete, safely eject the SD card to see if the read-only issue is resolved.
Fix 6: Format SD Card to Fix Read Only
If other methods haven’t worked, formatting your SD card can reset its file system and remove write-protection issues. This essentially wipes the card and gives you a fresh start, just make sure you’ve backed up your important files before you begin.
- Connect your SD card to your Windows via a card reader.
- Locate the SD card under "This PC", right-click on it and select "Format".

- In the Format window, choose a file system (FAT32 or NTFS) and set "Allocation unit size" to Default.

- Uncheck "Quick Format" if you want a full format, then click "Start".
- Wait for the formatting process to complete, then click "OK" when finished.
How to Recover Data from Formatted/Corrupted SD Card?
Formatting an SD card erases everything on it, which means your photos, videos, and other files will be permanently removed. That’s why it’s always best to create a backup before you proceed with formatting.
However, if you weren’t able to back up your data because the read-only error prevented you from doing so, you still have a chance to get your files back. A dedicated recovery tool like Tenorshare 4DDiG can scan formatted, corrupted, or even physically damaged SD cards and restore lost photos, videos, and other media.
Secure Download
Secure Download
It also works with USB drives, internal hard drive, and various storage devices, giving you a reliable way to retrieve important files even after severe data loss.
This is 4DDiG’s compatibility across all aspects:
| Category | Details |
|---|---|
| 💾 Supported Memory Cards | SD, SDHC, SDXC, microSD, microSDHC, microSDXC, CF cards, XD cards, Memory Stick... |
| 📷 Supported Devices | Cameras like Canon, Nikon, Sony, Fujifilm, Olympus, Panasonic, GoPro, Samsung, Pentax, Leic; Others like drones, dashcams... |
| 💿 Supported File Systems | FAT16, FAT32, exFAT, NTFS, HFS+, APFS, EXT2/3/4... |
| 📇 Supported RAW Files | .CR2, .CR3, .NEF, .NRW, .ARW, .ORF, .RAF, .RW2, .DNG, .SR2, .SRW... |
| 🧐 Supported Data Loss Scenarios | Accidental deletion, formatted SD card, SD card corruption or unreadable card, system crash or OS reinstallation, improper ejection or sudden power loss... |
Follow the steps below to recover files from an SD card that is formatted or corrupted.
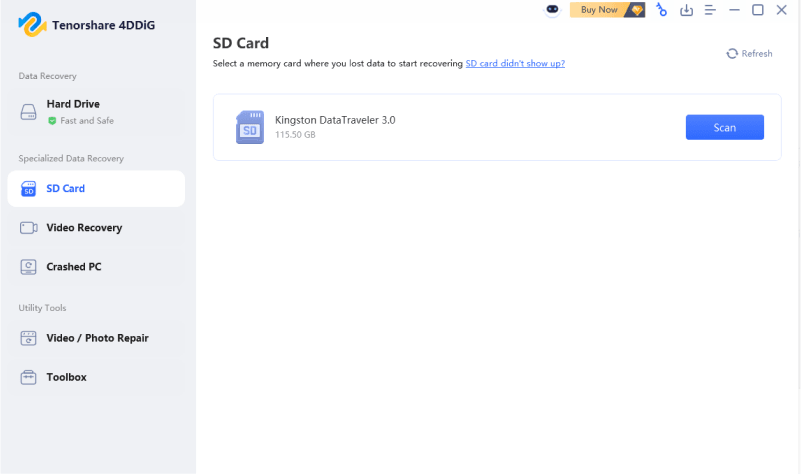
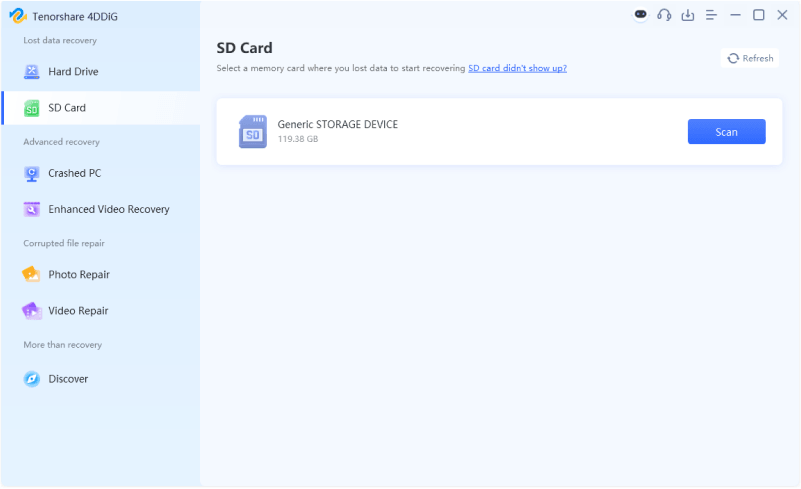
- Insert the SD card into your computer, launch 4DDiG, choose "SD Card" from the home screen, and hit "Scan" to start locating your missing data.

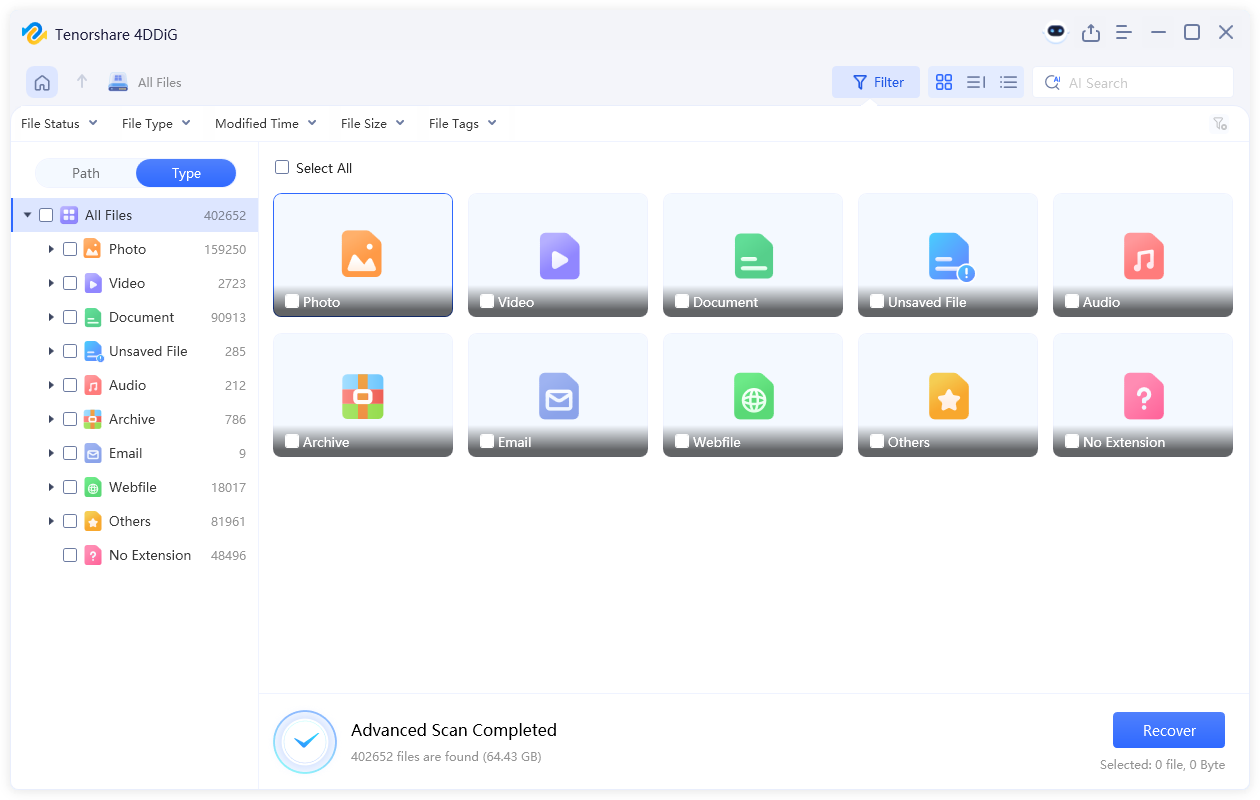
- 4DDiG will immediately scan your SD card for all possible lost files, wait patiently. When it completes, you can search for the file you want to recover using the search bar or the tree-view.

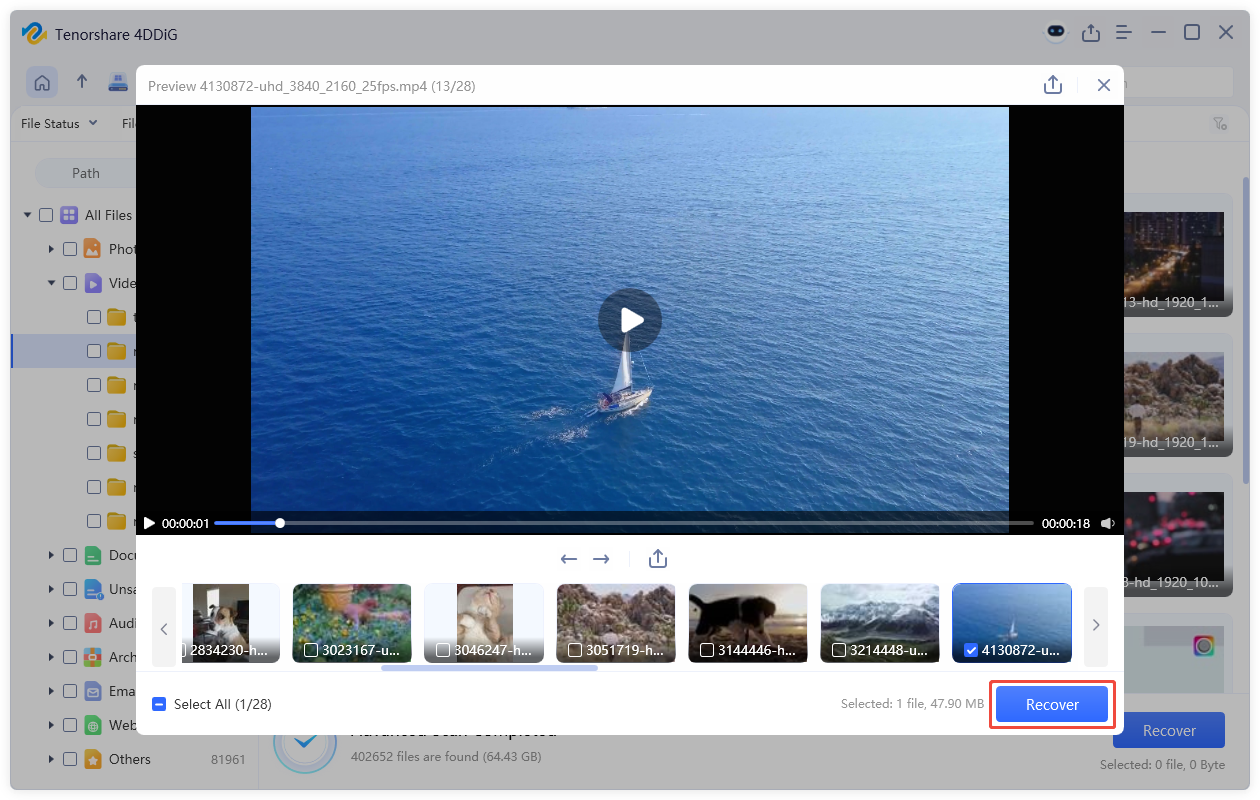
- Double-click any item to view it. After that, select the files you wish to restore and press "Recover".

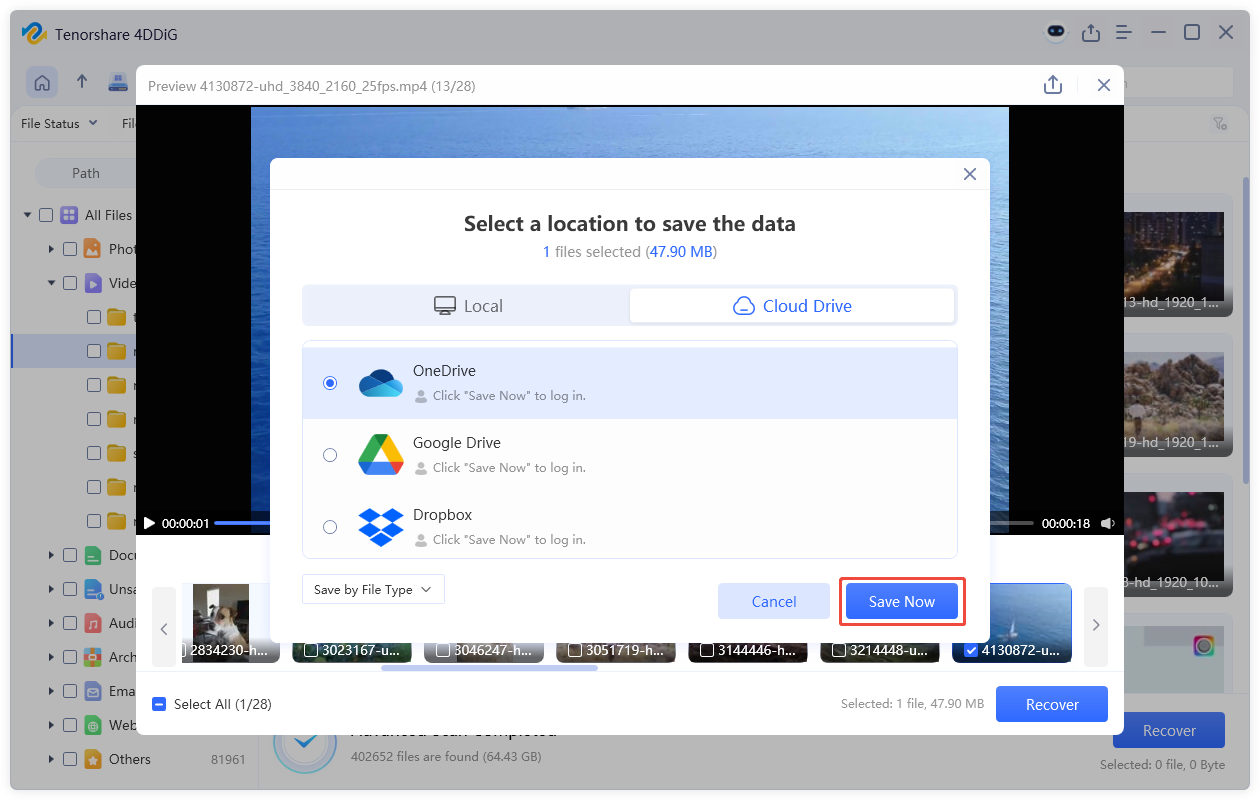
- Finally, save the recovered files to a secure folder on your computer or to another external drive by clicking "Save Now".

Conclusion
The SD card read only issue can be easily resolved once you know what caused it. Whether it’s a locked switch, file system errors or corrupted data, the solutions introduced in this article can usually bring the card back to normal.
However, if your SD card needs to be formatted or has already become inaccessible, remember that your data isn’t necessarily gone, as 4DDiG Data Recovery can help retrieve lost files before you take further action.
With the right methods and tools, you can quickly fix the read-only error and get your SD card working again.
Secure Download
Secure Download




 ChatGPT
 Perplexity
 Google AI Mode
 Grok
Grok

