How to Use 4DDiG Mac Cleaner
This is the official guide of 4DDiG Mac Cleaner. Here you will find step-by-step tutorials about how to clean up and speed up your Mac to boost its performance dramatically.
4DDiG Mac Cleaner, powered by top-notch AI and the MD5 Message-Digest Algorithm, is an all-in-one cleaning and optimizing tool specifically designed for Mac users. It is dedicated to deep cleaning the junk files, similar images, duplicate files, large files, stubborn hidden data, and more on your Mac in a 360° all-around way, fully freeing up space and optimizing your Mac's performance dramatically.
While it quickly reclaims up to 20+ GB of space and reduces Finder lag with one click, completing the previous a week's worth of cleanup work in about one hour, it can also protect your important data without losing it and your privacy. To make the best of this Mac OS file manager & cleaner, please walk through the guide below.
How to Clean the Junk Files on Your Mac?
System junk and app junk files are usually the culprits behind Mac clutter. Read on to check how to use the 4DDiG Mac Cleaner to get rid of the space-hogging in just one click quickly and completely.
![]() Secure Download
Secure Download
-
Step 1:Scan Junk Files on Mac
Firstly, download and install 4DDiG Mac Cleaner on your Mac. Fire up the software and select Junk Files from the left menu bar. Then tap on the Scan button to kick off the scanning process

Wait for the junk scanning process to complete, which just needs minutes. During this time, you can view the real-time scanning process, such as the scanned junk file types and the total number of them.

-
Step 2:Smart Remove Junk Files Scanned
Once done, it will show how many specific system and app junk files are scanned (e.g., system/app caches, log, unused installation packages, Trash Bin). Just select the files you want to remove from your Mac and hit the top-right Smart Remove button.

Wait patiently for the tool to clean up your Mac. You can click Stop to pause at any time.

-
Step 3:Clean the Junk Files Successfully
Congratulations! Now you have cleaned up the junk files on your Mac. Just click Done to exit this section and try other features.

How to Delete Duplicate Files on Mac?
Apart from junk files, many duplicate files also play a role in Mac clutter and out-of-memory issues. But take it easy! 4DDiG Mac Cleaner also contains a built-in duplicate file finder and deleter, which can help you locate and eliminate all of duplicate videos, photos, documents, audio, runtime packages, and any other file type. Follow the steps below to learn how to search and remove duplicate files on Mac.
![]() Secure Download
Secure Download
-
Step 1:Select Duplicate Files
On 4DDiG Mac Cleaner, select Duplicate Files from the left sidebar.

-
Step 2:Add Folders to Scan Duplicates
Click on the Folder box showing Macintosh HD or the large Plus icon to add the folder directory (like Home folder, Photo library, Documents/yesterday) you want to search for duplicate files. Once selected, click Scan to proceed.

On the next screen, you can select more folders you want to search for duplicates. Just click the Plus icon to add more or drag your folders directly to this Mac duplicate file deleter.

-
Step 3:Customize Scanning Settings for Duplicates
Click the top-left 4DDiG Mac Cleaner tab from the top-left menu bar of the screen and select Preferences. This way, you can access and reset the scanning options:
- General: You can skip specific files like hidden files and zero-byte files.
- White List: You can list the folders or files you don't want to scan.
- Duplicate Files: Select file type you want to detect duplicates: video, image, audio, document, and others.
- Similar Photos: Adjust the similarity (such as standard 85%) or file size of images according to your requirements.

Click the Edit icon near each file type and you can modify the file extensions. Afterward, hit Scan to start detecting process.
-
Step 4: Review, Select, and Remove Duplicate Files Scanned
Upon scanning, you can review detailed duplicate items detected for each file type, including Video, Image, Document, Audio, Others, etc.

 Tips:
Tips:
Here are 3 options to display the detected files on the top of the screen:
1) Sort by Size (find the largest-size duplicates)
2) Sort by Time (fins thw oldest duplicates)
3) Sort by Quantity (find the 0item containing most duplicate versions)
.Select those duplicate files you want to remove (You can also click Auto select to select the largest or oldest file), simply hit Remove.
Tips:
While selecting the destination path to remove those duplicate items, you can click the bottom "Discard to Trash" tab. Here are three destination paths: Discard to Trash, Permanently Deleted, and Remove to the Folder.

How to Remove Similar Images on Mac?
How to locate similar images among a large number of files? 4DDiG Mac Cleaner has never made it easier to identify and delete identical photos. Follow the steps below to learn how to find and remove similar images.
![]() Secure Download
Secure Download
-
Step 1:Select Similar Photos
Once launched 4DDiG Mac Cleaner on your computer, go to the Similar Photos section.

-
Step 2:Add Folders to Find Similar Images
Resembling the steps of deleting duplicate files, simply click the Folder box the large "+" icon to add folders to this software for finding similar images on the device.

On the new screen, if you want to add more folders for detecting identical photos, just click the large "+" icon or drag those folders directly to this 4DDiG software.

-
Step 3:Personalize Scanning Settings for Similar Photos
Click on the software name 4DDiG Mac Cleaner from the top-left menu bar and choose Preferences. On the pop-up dialog, you can adjust the similarity of image in the Similar Photos section.
Notes
Also, this dialog allows us to skip hidden or zero-byte files in General, skip spefic folders/files to scan in White List, select file type in Duplicate Files.

When finished, tap on Scan to start.
-
Step 4:Review, Choose, and Remove Similar Photos
Wait for the scanning process to complete. It will display the scanned photos and their names in real time.

Once finished, you can review all scanned similar photos and check their info (e.g., size, name, resolution). Select all you want to remove (You can also click Auto Select to select the largest or oldest file), simply hit Remove.
Tips:
Also, before removing, you can tap on the upper Sort by section to check and sort the scanned photos by Size or Quantity. In this case, you can find the largest-size photo or images containing most similar versions. Meanwhile, while removing, you can pick the bottom Discard to Trash, Permanently Deleted, and Discard to Folder.

How to Find and Remove Large Files on Mac?
Frustrated by the stubborn large files and low disk memory on your Mac? Fortunately, 4DDiG Mac Cleaner also comes with a feature: Locate and delete large files, including the largest one, eating up space on the device. Now, follow the steps below to see how to locate large files on Mac and delete the space-hogging safely in a quick way.
![]() Secure Download
Secure Download
-
Step 1:Scan Large Files on Mac
To find large files on Mac, Please click the left Large Files tab and hit Scan afterward.

Wait patiently for the process to finish. While scanning, this 4DDiG software will display the detected large files and their names.
-
Step 2: Select and Delete Big Files on Mac
After scanning, the software will sort all searched big files by size. Check and select the files you want to remove and click Remove.
Tips:
You can click the the upper Classify by Size tab to sort those detected large files by Size, Time or Type to see the largest files.

-
A prompt will pop up, asking whether you confirm to delete those selected large files. Choose Yes to proceed.
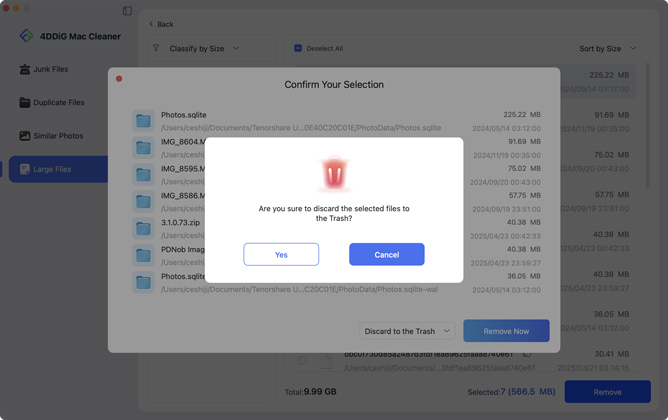
Now, you have removed those space-consuming large files and freed up disk memory on your Mac successfully.
How to Batch Rename Files on Mac?
In our daily work and life, we often need to organize hundreds or even thousands of files: travel photos, work documents, study materials, and more. But messy and unintuitive file names make it hard to find what we need quickly. Besides, manually changing file names one by one is both time-consuming and error-prone.
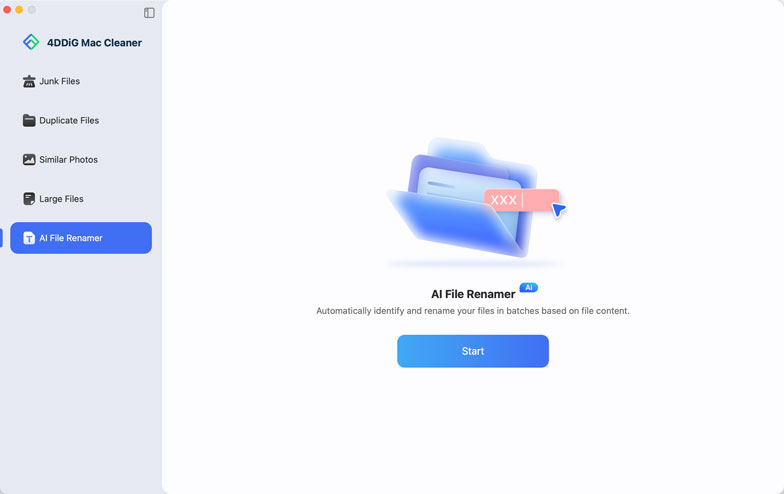
Luckily, 4DDiG Mac Cleaner's built-in AI File Renamer is specifically designed to solve this pain point. This smart batch file renamer can automatically identify and generate standardized and meaningful file names in bulk based on file content, language, and type.
This way, it can help you rename all files at once and organize files quickly, boosting work and study efficiency. Whether you're a designer organizing materials in bulk, a student managing study resources, or a professional categorizing documents, 4DDiG's AI File Renamer can save you significant time and manage files more efficiently.
![]() Secure Download
Secure Download
-
Step 1:Select AI File Renamer
Launch 4DDiG Mac Cleaner,select "AI File Renamer" from the left menu bar, and click the "Start" button to proceed.
-
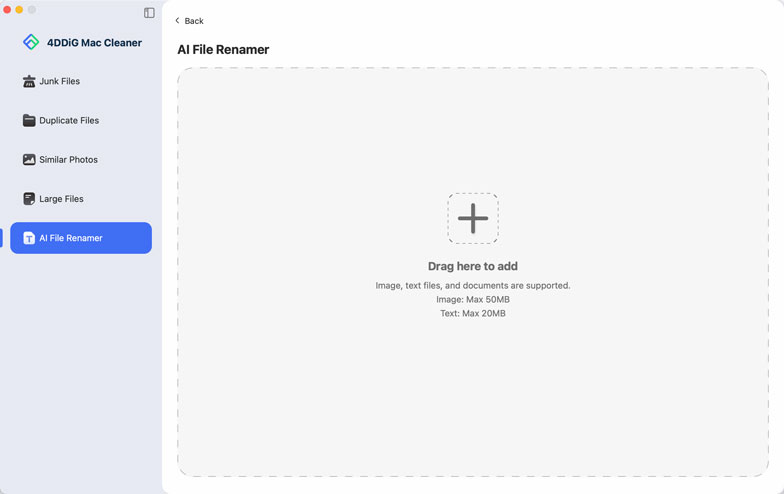
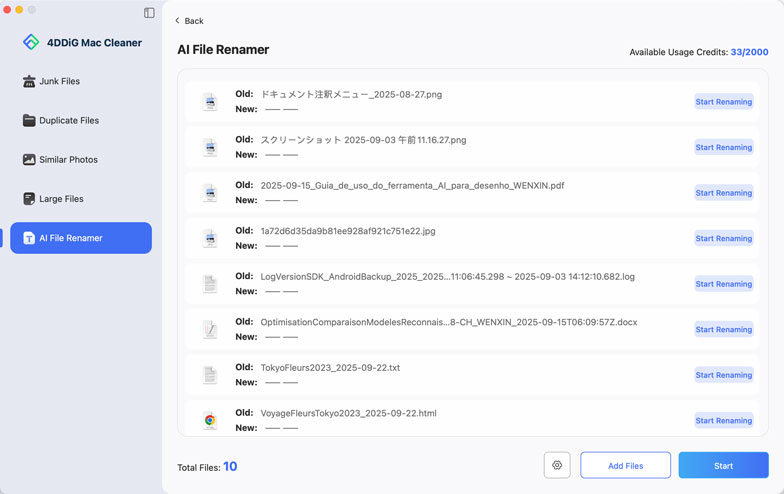
Step 2: Add Files to Rename
On the new screen, tap on the large "+" icon to upload multiple files you want to rename. Alternatively, drag and drop those files to the 4DDiG's interface directly.
 Note:
Note:
Currently, only images and documents are supported, including JPG, PNG, XLSX, DOCX, PDF, PPT, etc. Please ensure you selected the supported files.
Apart from that, this file name changer allows you to continue to import more files to change names by clicking the bottom "Add Files" button on the next screen or using the drag-and-drop action.
-
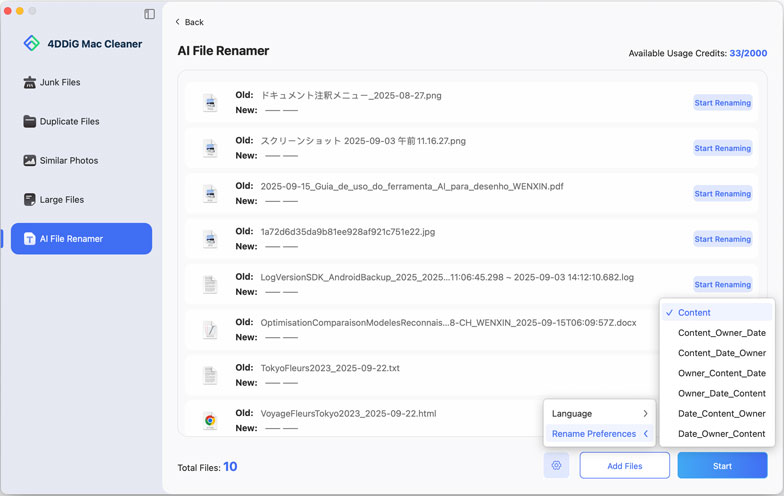
Step 3:Customize Rename Preferences
Click on the bottom Settings option (the gear icon) and then customize the renaming preferences and output settings, including:
Output Language: English, Japanese, Korean, Chinese, etc.
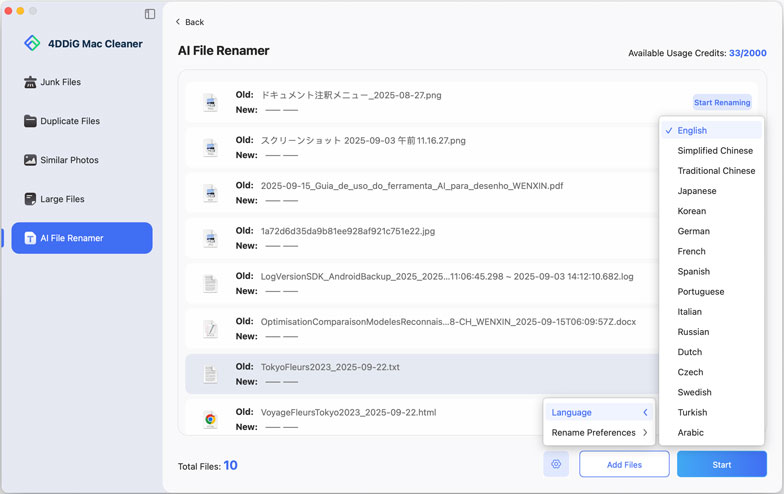
Rename Preferences: Content, Content_Owner_Date, Content_Date_Type, Owner_Content_Type, Date_Content_Owner, and Type_Date_Content
-
Step 4:Start Renaming Files in Batch
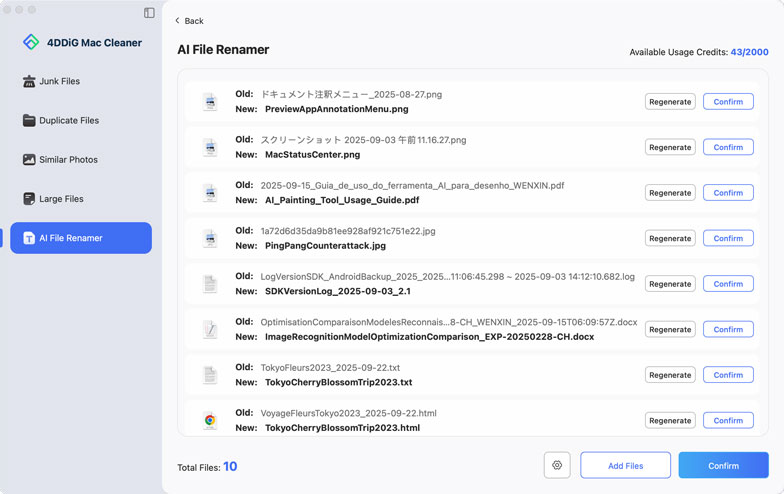
Hit the bottom-right "Start" or "Start Renaming" button to kick off the file rename process. 4DDiG's AI will automatically scan those added files and generate new names according to the file content and your settings. Once done, those renamed files will be displayed in the preview list.
-
Step 5:Preview and Save Renamed Files
Preview those renamed files to check the result. If satisfied, click "Confirm" to save the results. Otherwise, hit the "Regenerate" button to adjust the file names.
➤ CPU & Memory Monitoring and Optimization
When your Mac is multitasking or running large software, high CPU and memory usage will cause system lag, slow response times, or even crashes. Fortunately, 4DDiG Mac Cleaner's built-in gadget — Mac Status Center can help monitor your Mac's CPU and memory usage in real time, and most importantly, free up CPU and memory dramatically to reduce Mac's load at ease.
Whether you're editing videos, gaming, or handling many office documents, this CPU & Memory monitor and optimization feature facilitates you detect performance issues and optimize performance at the same time, making your Mac run faster and smoothly.
![]() Secure Download
Secure Download
-
Step 1:Select CPU and Memory Module
Tap the Mac Status Center icon in the top Mac menu bar to open it. From the dropdown menu, you can select the CPU and Memory modules to check their usage.

-
Step 2:View CPU & Memory Usage Details
Click "Details" to view real-time CPU and memory usage.
➡️ CPU:

➡️ Memory:

-
Step 3:End App Process to Release Space
Based on the displayed usage details, you can hit the "Remove" button to close unnecessary applications to free up system resources.
➡️ CPU:

➡️ Memory:

When CPU or memory usage is high, it’s recommended to close non-essential apps first before considering a system restart.
➤ Trash Usage Monitoring & Cleanup
Many users often overlook the Trash’s capacity and forget to clear it. Thus, over time, accumulated deleted files can take up significant disk space. Amid this, 4DDiG Mac Cleaner's Mac Status Center, featuring Trash Usage Monitoring, can clearly display how much space the Trash is occupying. This way, you can view the capacity taken up by deleted files at any time. With one-click cleanup, you can quickly empty the Trash using this tool, freeing up disk space and ensuring smoother system performance.
![]() Secure Download
Secure Download
-
Step 1:Select the Trash Module
Click the Mac Status Center icon in the top menu bar, then select the Trash module to view its usage.

 Note
Note
If full disk access isn’t enabled, click the "Release" button and then follow the prompts to enable it in Settings.

-
Step 2:Release and Empty Trash
 Important
The files in the Trash are unrecoverable after emptying the Trash. Please make sure you no longer need the files before deleting them.
Once enabled, hit the "Release" button to instantly empty the Trash and free up disk space.

➤ Disk Usage Monitoring
Low disk space is one of the most common culprits behind your Mac running slowly. Fortunately, Mac Status Center (a built-in tool of 4DDiG Mac Cleaner) endows a disk usage monitoring feature that can display the available and used space on all disks. This function makes it easier to detect how much space is taken up by each file or folder.
Whether videos, photos, installed software, or other files are eating up space, this monitoring feature can detect them in real time and allow you to remove them smartly to release disk space, preventing system lag or crash.
![]() Secure Download
Secure Download
-
Step 1:Select Disk Module
Touch on the Mac Status Center icon from the top status bar. Select the Disk module to view the usage of each disk.

-
Step 2:Scan and Clean Disk Space
Based on the displayed information, click the "Clean" button and go to the Mac Cleaner interface. Then tap "Scan" to find and clear junk files, duplicate files, similar images, large files, and other unnecessary data to free up space.
Important
Please ensure that any data to be deleted or moved has been backed up, avoiding losing important files.
➤ Startup Item Management
Too many startup items will consume significant memory resources, letting your Mac slow to boot up and affecting overall system performance. The Startup Items Management feature in 4DDiG Mac Cleaner's Mac Status Center can help you check all programs that auto-launch on your Mac's startup and close them with one click. With it, you can boost the startup speed of the Mac and improve system performance dramatically, making every Mac startup faster and smoother.
![]() Secure Download
Secure Download
-
Step 1:Select Startup Item Management Module
Click the Mac Status Center icon in the status bar. Pick the "Startup item management" module and click "Manage" to view all current startup programs.

-
Step 2:Close Startup Items
Choose unnecessary programs and end their process with the "Remove" or "Remove All" button.
Note
Do not disable essential system startup items, as this may affect core system functionality.

➤ Network Status Monitoring & Speed Test
Unstable or slow network connections can disrupt work and entertainment experiences, such as causing lagging video conferences or slow file downloads. The Network Status Monitor & Speed Test feature in 4DDiG Mac Cleaner’s Status Center can save you from it. This function allows you to monitor your network status in real time and run a speed test, helping users quickly find network issues or limitations. This ensures smooth online work, seamless streaming, and efficient file transfers.
![]() Secure Download
Secure Download
-
Step 1:Select Network Module
Initiate 4DDiG's Mac Status Center by tapping its icon in the top menu bar. Then click on the Network module to view the network connection status.

-
Step 2:Test Download & Upload Speed
Hit the "Speed Test" button to check your current download and upload speeds.
 Tips:
Tips:
Speed test results may vary depending on your network environment. So it is recommended to perform multiple tests with the "Retest Speed" button at different times for more accurate data.