Guide to 4DDiG Windows Data Recovery
This is the official guide of Tenorshare 4DDiG Data Recovery. Here you will find step-by-step tutorials about how to recover files from local & external drives, lost partitions, Bitlocker encrypted drives, crashed computers, Recycle Bin as well as photo and video repair.
Register Tenorshare 4DDiG
First, we will show you how to register Tenorshare 4DDiG.
![]() Secure Download
Secure Download
![]() Secure Download
Secure Download
Part 1: How New Users Can Register an Account
Your Tenorshare 4DDiG ID is the email address you use to access 4DDiG products. It serves as your login for all Tenorshare 4DDiG products. If you are using a Tenorshare 4DDiG product for the first time, you need to create an account.
-
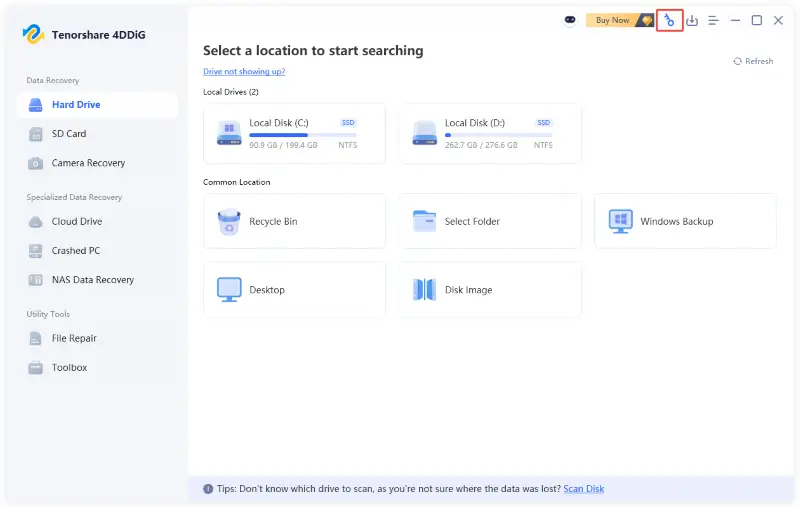
Step 1:Enter the Main Interface
Click the Registration icon in the upper-right corner of the program interface.
-
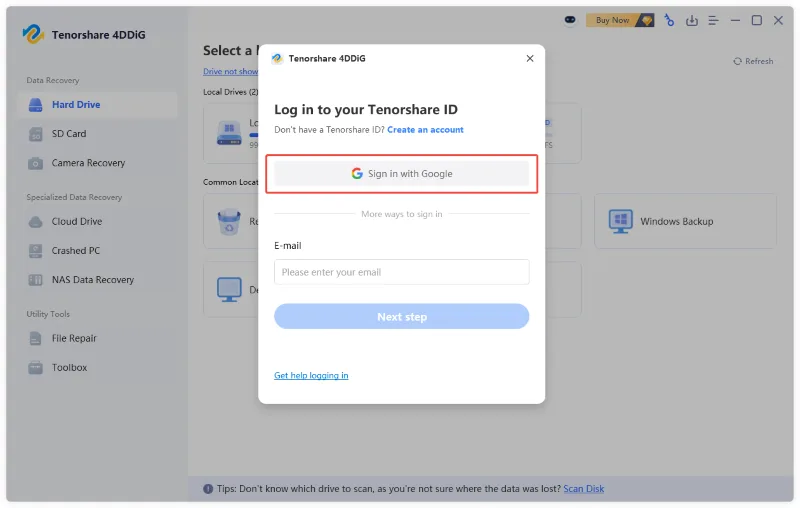
Step 2:Create an Account
Click "Create an account" from the interface.

-
Step 3:Enter Verification Code
Enter your email address and click "Send." Then copy the verification code sent to your email and paste it here.
-
Step 4:Complete Registration
Next, set a password and click "Register." You're all set to start using 4DDiG!

Tips: If you want a faster and easier setup, simply choose "Sign in with Google." This allows you to create an account instantly using your existing Google credentials—no need to remember another password.
Part 2: How Registered Users Can Log In
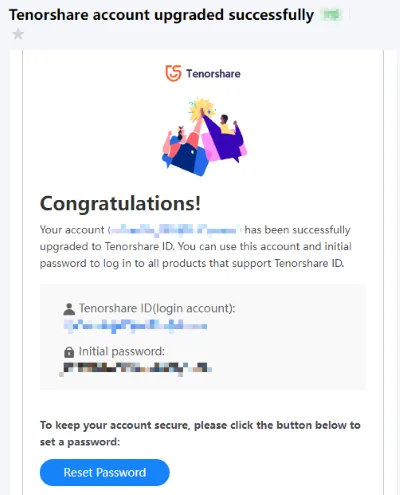
#Case 1: If you've purchased the product and previously registered using your email address and registration code, you may see a pop-up window confirming a successful upgrade when you launch the software. In this case, you will be automatically logged in. Rest assured, your existing benefits will remain unchanged.
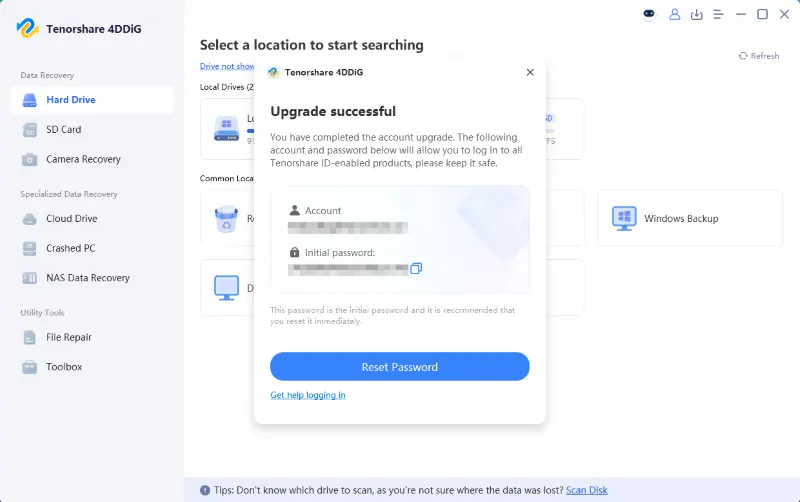
Notes: A confirmation email will also be sent to your email address automatically. It includes the login account used at checkout as well as the initial password. If you do not see the pop-up window, you can check this information in the email.
#Case 2: If you've just purchased a 4DDiG product and have not yet logged in, and received a confirmation email that includes your email address and an initial password, click the Registration icon in the upper-right corner of the interface, then log in directly using your account and the initial password.
#Case 3: If you've just purchased a 4DDiG product and have not yet logged in, and received a confirmation email that includes only your email address and registration code (without an initial password), follow the steps in Part 3, click "Forgot your password?" to set a new password before logging in.
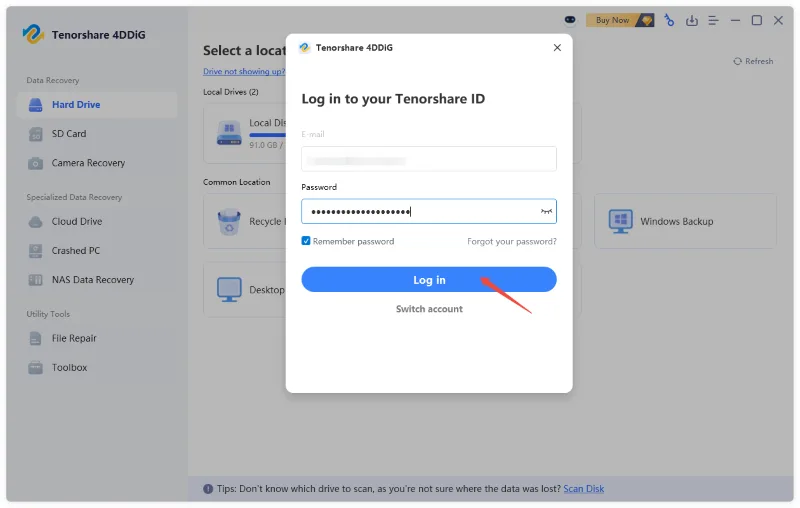
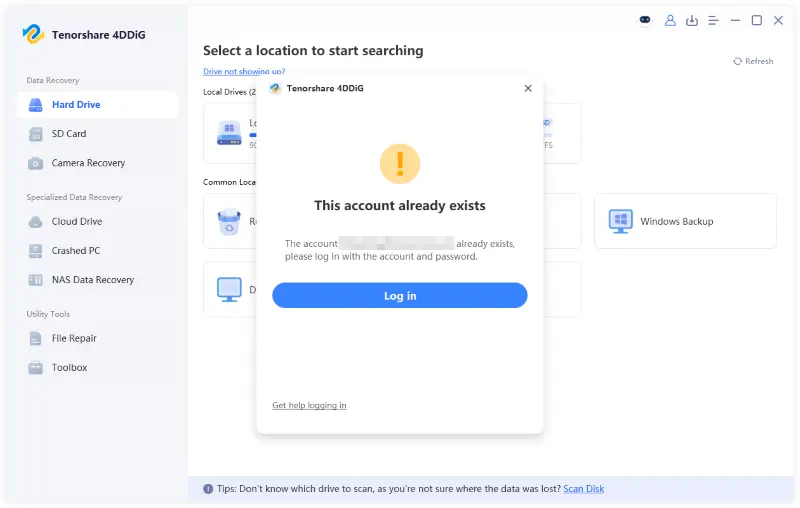
#Case 4: When you see a pop-up saying "This account already exists," it means you've previously registered and received an email with your initial password. This often happens if you've reinstalled the product. In this case, simply click "Log in" and sign in with your existing email and password. If you don't know the password, check steps in Part 3 to reset one.
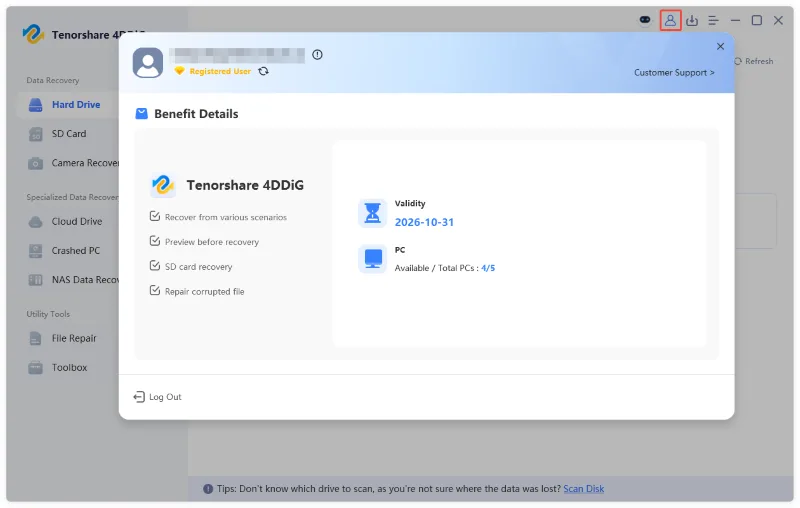
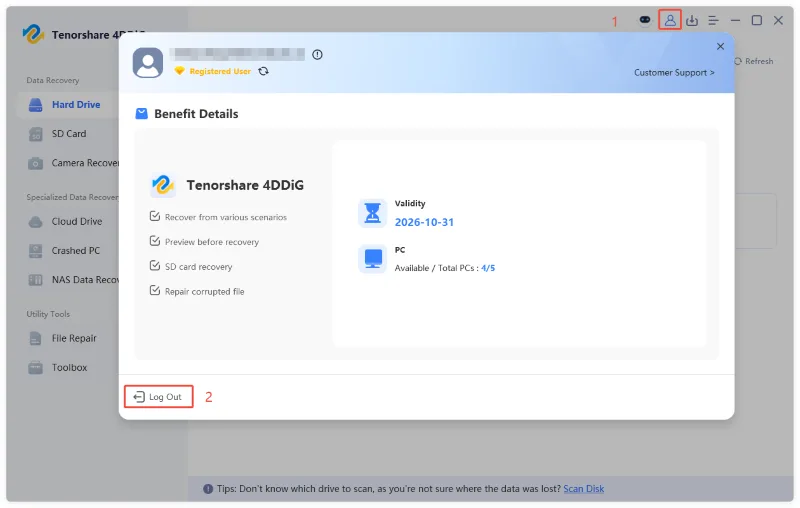
No matter which case you encounter, once you're logged in, you can click the Avatar icon in the top-right corner to view your entitlement details.
Part 3: How to Reset Your Password
Whether you've forgotten your password or simply want to reset the initial password, you can follow the steps below to reset it using your email address. Please note that resetting your password will also update it across all 4DDiG products linked to the same login credentials.
Notes: The new password must be 8–100 characters long and include at least two of the following: numbers, letters, and special characters (e.g., @ $ ! % * # _ ~ ? & ^).
-
Step 1:Log Out of Your Account
If you are logged in, click the Avatar icon and select "Log Out" to sign out of your account.
-
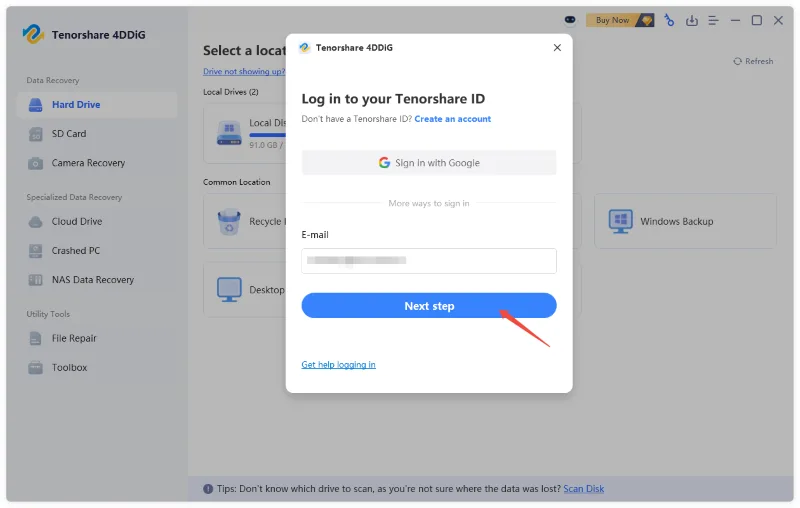
Step 2:Enter Email Address
Enter your email and click "Next step" in the pop-up window.
-
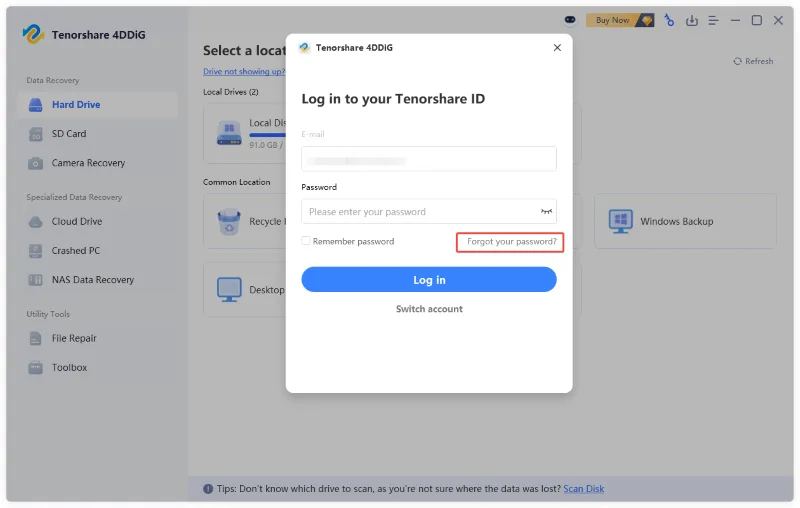
Step 3:Click "Forgot your password?"
Then, click the "Forgot Your Password?" option.

-
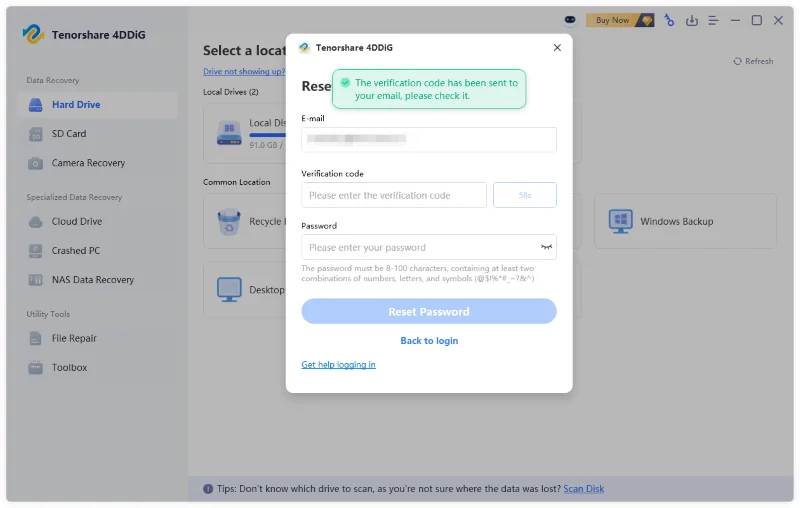
Step 4:Send Registration Code
Enter your email address and click "Send." You will receive a verification code via email.
-
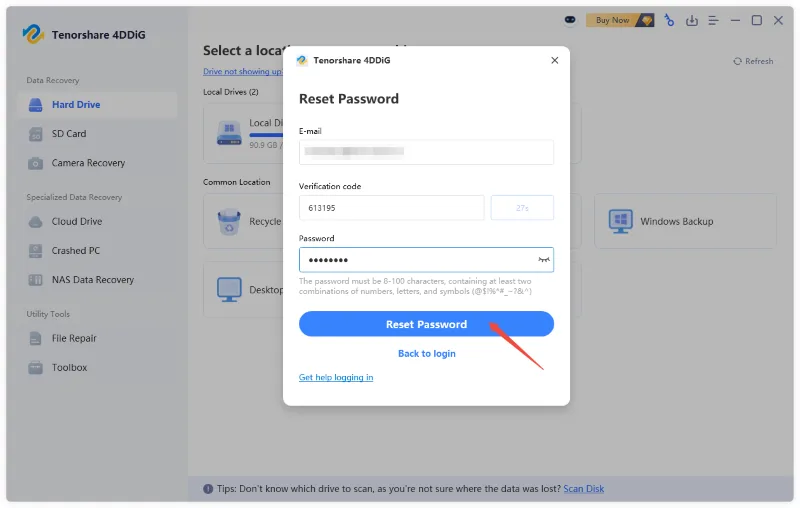
Step 5:Complete Password Resetting
Enter the verification code and set your new password. (If you do not receive the code, please check your spam folder.) Then click "Reset Password." Once complete, you can log in using your new password.
Part 4: If You Used a Virtual Email Address During Purchase
If you used a virtual or temporary email address when purchasing your 4DDiG product, make sure you can still access that inbox. All details, including your 4DDiG ID and initial password, are sent to that address.
If you no longer have access, you may not be able to check your account information. In this case, please contact the support team for further assistance with transferring your benefits.
![]() Secure Download
Secure Download
![]() Secure Download
Secure Download
Recover Data from Local Disk
Is it possible to recover deleted files from hard drives? Is it possible to recover files from a failed hard drive? Yes, most definitely! If you erased files by mistake or your local drives become corrupted or cease operating, and you have important folders stored on them, we'll show you how to recover data from local disks.
![]() Secure Download
Secure Download
![]() Secure Download
Secure Download
-
Step 1:Select a Local Disk
Following the installation and launch of Tenorshare 4DDiG Windows Data Recovery, you will be presented with the home interface shown below, which includes Data Recovery & Advanced Options. In our situation, from a list of hard drives, select the local disk where you lost your data and then click Start to begin. Or you can choose target file types in the upper-right corner before the scanning.

-
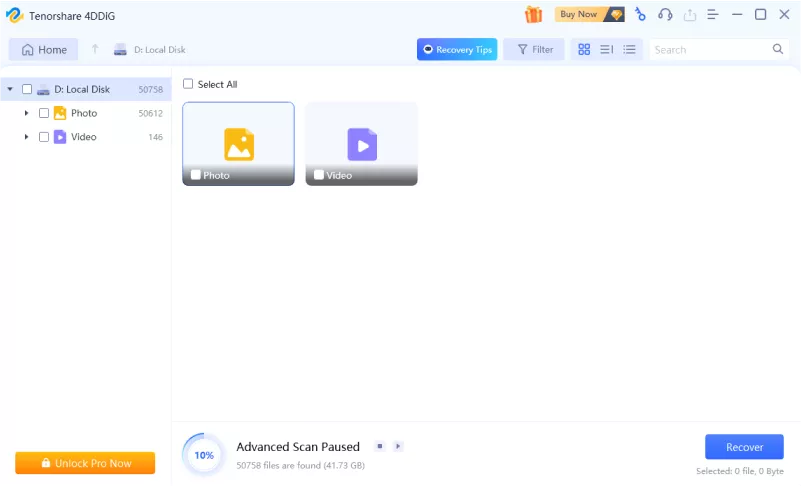
Step 2:Scan the Local Disk
4DDiG immediately examines the selected drive all around for missing data, and you may pause or stop the searching at any time if you've identified the files you want to recover. There are categories like Path View. You can also switch to Type View to check file types such as Photo, Video, Document, Audio, Email, and others. Besides, you can search for target files or use Filter to narrow down your search on the right side of the panel.

-
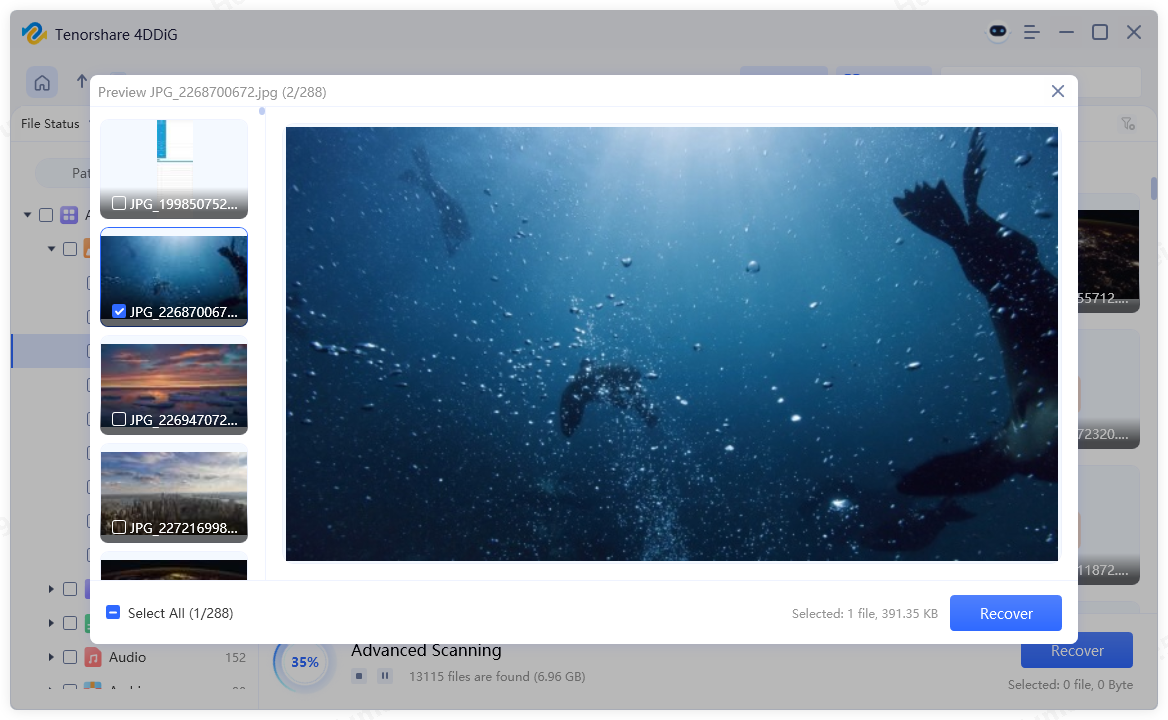
Step 3:Preview and Recover Files from the Local Disk
Following the discovery of the target files, you can preview and recover them to a secure location. In case of disk overwriting and permanent data loss, please do not save to the same partition where you lost them.

-
Preview a Photo

-
Preview a Video

-
Preview an Audio File

-
Preview a PowerPoint File

-
Preview a Word File

-
Preview an Excel File

-
Preview a PDF File

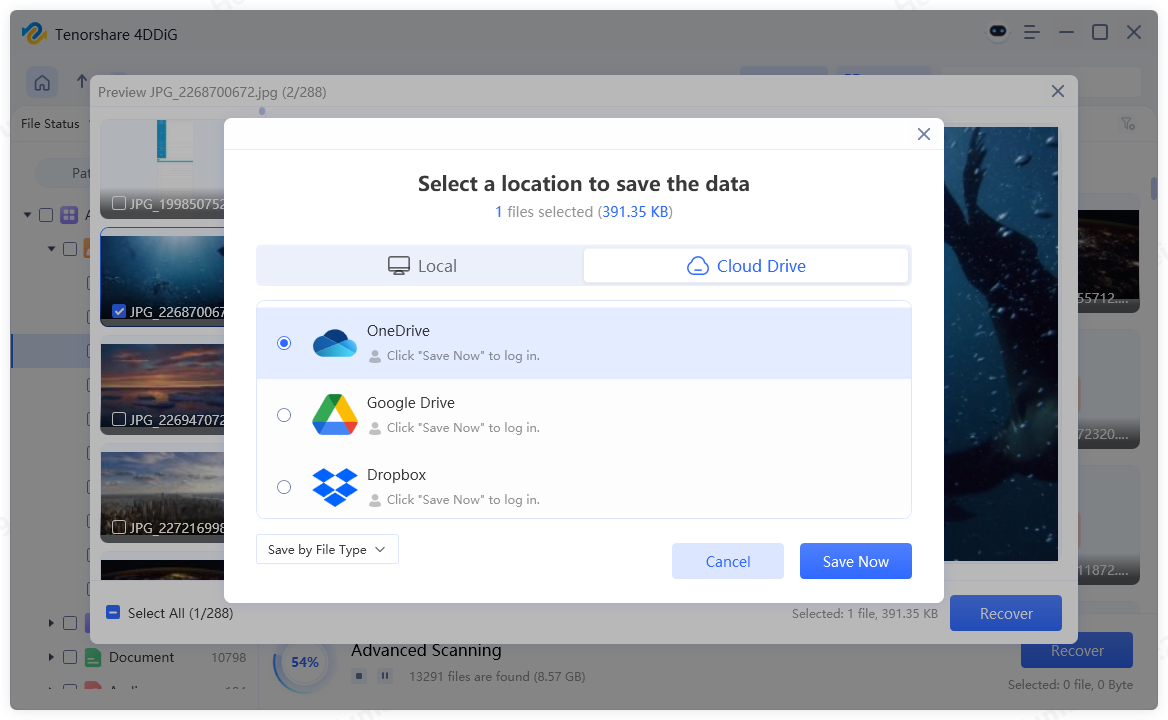
You can restore the recovered data to your local disk or Google Drive.
Watch Video Tutorial Here
![]() Secure Download
Secure Download
![]() Secure Download
Secure Download
Recover Data from External Hard Drives
Tenorshare 4DDiG supports to restore data from external hard drives lost due to accidentally formatting, deleting, virus attack and more for all brands of devices, such as Buffalo, WD, Seagate, Toshiba, Samsung, Lacie, Silicon, ADATA, and more. Now follow the 3-step to get back lost data from external hard drives.
![]() Secure Download
Secure Download
![]() Secure Download
Secure Download
-
Step 1:Connect and Select the External Hard Drive
To begin, get Tenorshare 4DDiG Windows Data Recovery and install it. Start the application, connect your external hard drive to your PC where you lost data, and then select the external hard disk to begin scanning.

-
Step 2:Scan the External Hard Drive
4DDiG immediately examines the external hard drive all around for missing data, and you may pause or stop the searching at any time if you've identified the files you want to recover. There are categories like Path View. You can also switch to Type View to check file types such as Photo, Video, Document, Audio, Email, and others. Besides, you can search for target files or use Filter to narrow down your search on the right side of the panel.
-
Step 3:Preview and Recover from the External Hard Drive
Following the discovery of the target files, you can preview and recover them to a secure location. In case of disk overwriting and permanent data loss, please do not save to the same partition where you lost them.
If the external drive can't be recognized by 4DDiG , you can follow the video below to get the removable drive detected by Windows PC first.
Watch Video Tutorial Here
![]() Secure Download
Secure Download
![]() Secure Download
Secure Download
You can restore the recovered data to your local disk or Google Drive.
Watch Video Tutorial Here
![]() Secure Download
Secure Download
![]() Secure Download
Secure Download
Recover Data from SD Card
Losing treasured photos and videos from your SD card can be heartbreaking. Luckily, Tenorshare 4DDiG Windows Data Recovery is here to help you bring them back. Here's a step-by-step guide:
![]() Secure Download
Secure Download
![]() Secure Download
Secure Download
-
Step 1:Connect Your SD Card
Firstly, make sure your SD card is securely connected to your computer. Use a card reader if needed. If Tenorshare doesn't automatically detect your card, click "Refresh" or double-check the connection.

-
Step 2:Select Your Memory Card
When the program represents your SD card, you click "Scan" to enter scanning page. Then you can choose specific file types (photos, videos, etc.) and quickly start scanning.

-
Step 3:Scan for Lost Data
4DDiG will thoroughly scan your SD card for recoverable data. The process may take some time, depending on the size and condition of your card. You can pause or stop the scan at any time if you find the files you're looking for.
-
Step 4:Preview and Recover Your Data
Once the scan is complete, you can preview any file to confirm its quality before recovering. Remember, to avoid overwriting and permanent data loss, never recover files to the same location they were lost from. Choose a different hard drive or partition for a safe and successful recovery.
You can restore the recovered data to your local disk or Google Drive.
Watch Video Tutorial Here
![]() Secure Download
Secure Download
![]() Secure Download
Secure Download
Recover Data from Recycle Bin
Accidentally deleting important files can be a disaster. The Windows Recycle Bin is designed to prevent you from losing your data, but what if you have emptied the Recycle Bin and the files are gone? Don't panic! Tenorshare 4DDiG can get back deleted files even from emptied Bin.
![]() Secure Download
Secure Download
![]() Secure Download
Secure Download
-
Step 1:Choose Recycle Bin
Firstly, you need to download and install Tenorshare 4DDiG Data Recovery. Launch the program, select the Recycle Bin and then click on Start to further your step.
-
Step 2:Scan Recycle Bin
4DDiG immediately examines the selected drive all around for missing data, and you may pause or stop the searching at any time if you've identified the files you want to recover. There are categories like Path View. You can also switch to Type View to check file types such as Photo, Video, Document, Audio, Email, and others. Besides, you can search for target files or use Filter to narrow down your search on the right side of the panel.
-
Step 3:Preview and Recover Data from Recycle Bin
Following the discovery of the target files, you can preview and recover them to a secure location.
You can restore the recovered data to your local disk or Google Drive.
Watch Video Tutorial Here
![]() Secure Download
Secure Download
![]() Secure Download
Secure Download
Recover Data from Lost Partition
Partition loss can be caused due to various reasons. Many users think the partition has gone forever after deleting or cleaning. The truth is you can still recover data from lost partition with Tenorshare 4DDiG data recovery tool.
![]() Secure Download
Secure Download
![]() Secure Download
Secure Download
-
Step 1:Choose the Lost Partition
After you dowload and install 4DDiG on computer, launch the program and the lost partition will be recognized by the software so that you can choose it to scan. You can also select target file types before the scanning.

-
Step 2:Scan the Lost Partition
4DDiG immediately examines the lost partition all around for missing data, and you may pause or stop the searching at any time if you've identified the files you want to recover. There are categories like Path View. You can also switch to Type View to check file types such as Photo, Video, Document, Audio, Email, and others. Besides, you can search for target files or use Filter to narrow down your search on the right side of the panel.
-
Step 3:Preview and Recover Data from the Lost Partition
Following the discovery of the target files, you can preview and recover them to a secure location. In case of disk overwriting and permanent data loss, please do not save to the same partition where you lost them.
You can restore the recovered data to your local disk or Google Drive.
Recover Data from Cloud Drive
Tenorshare 4DDiG makes it easy to recover lost or deleted files from popular cloud storage services like iCloud, Google Drive, OneDrive, and Dropbox. It supports the recovery of deleted data from both local and cloud drives, ensuring comprehensive protection for all your files. Here's a step-by-step guide:
![]() Secure Download
Secure Download
![]() Secure Download
Secure Download
-
Step 1:Select the Cloud Drive
Download and open Tenorshare 4DDiG. Click on the "Cloud Drive" option and select the cloud drive from which you want to recover data, you can choose from Dropbox, OneDrive, Google Drive or iCloud.

-
Step 2:Log in to your cloud drive account
Now please authorize your cloud drive account by logging in through the browser page.

-
Step 3:Scan the Cloud Drive
Click the cloud drive logged in, 4DDiG will immediately scan the drive for missing data. You can pause or stop the scan at any time once you've identified the files you want to recover.
-
Step 4:Preview and Recover Files from Cloud Drive
After locating the target files, preview them and recover to any location on your computer.
![]() Secure Download
Secure Download
![]() Secure Download
Secure Download
Recover Data from Bitlocker Encrypted Drive
Microsoft offers BitLocker encryption feature for Windows to encrypt entire volumes, thus protecting data from unauthorized access. At times, you format the encrypted hard drive, resulting in data loss. Follow the guide below to figure out how to recover data from the Bitlocker encrypted drive.
![]() Secure Download
Secure Download
![]() Secure Download
Secure Download
-
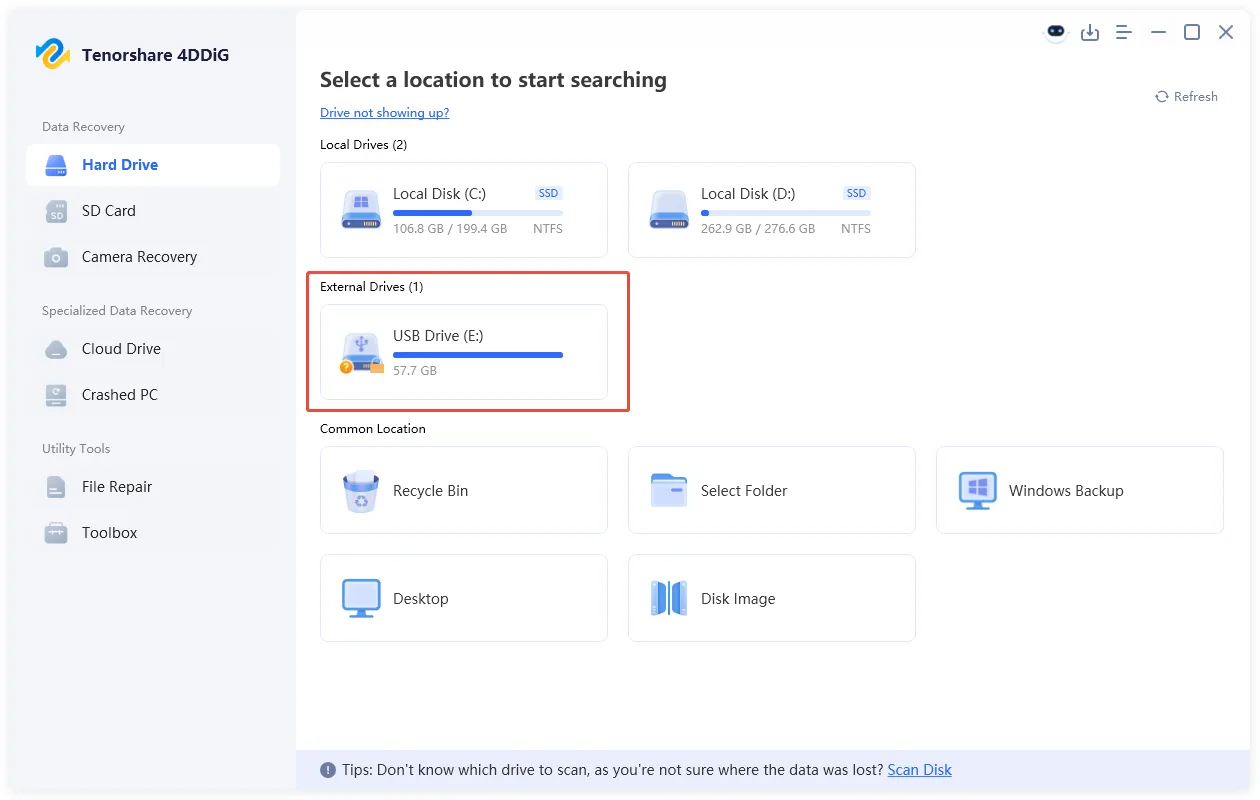
Step 1:Select the Bitlocker-encrypted Drive
Launch the program after you download and install 4DDiG on Windows. There will be a lock icon on the disk if you have a BitLocker-encrypted drive on your computer. Now hover your mouse over the BitLocker partition you want to recover data from, and then click on it.
-
Step 2:Decrypt the Bitlocker Device
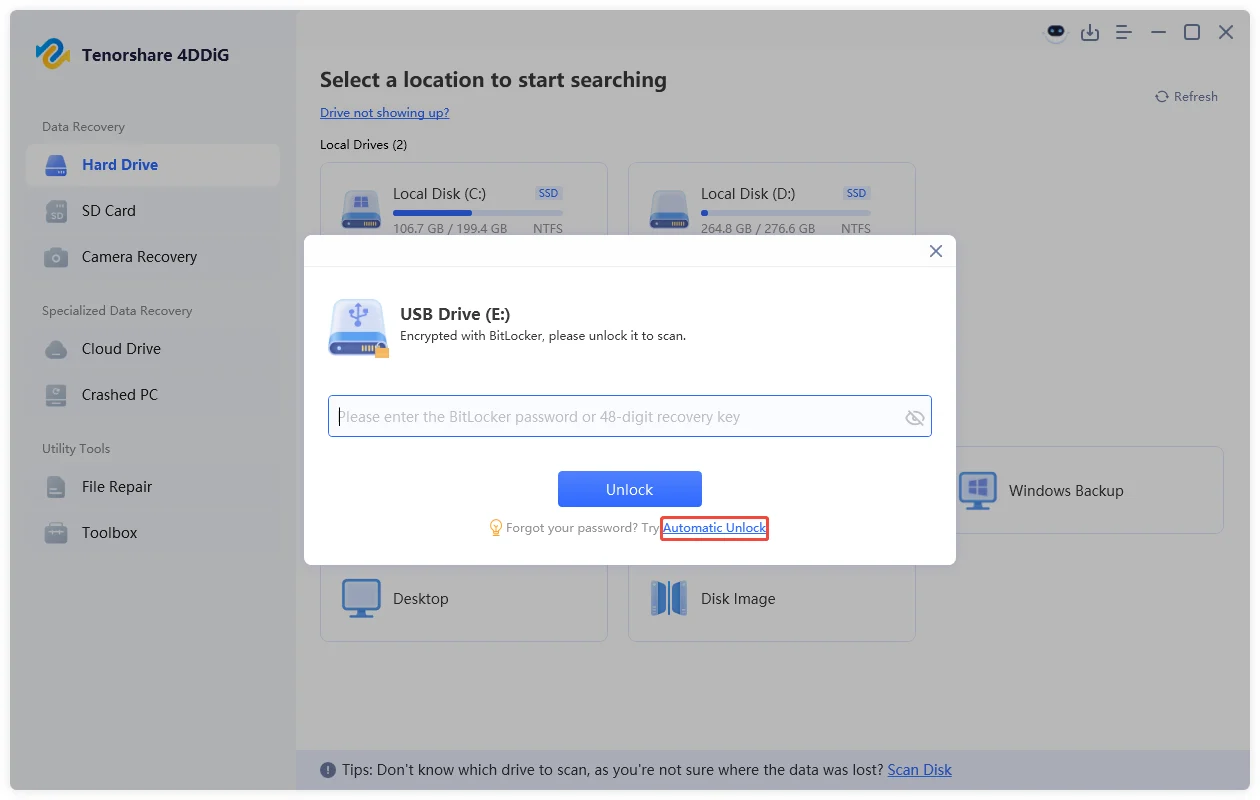
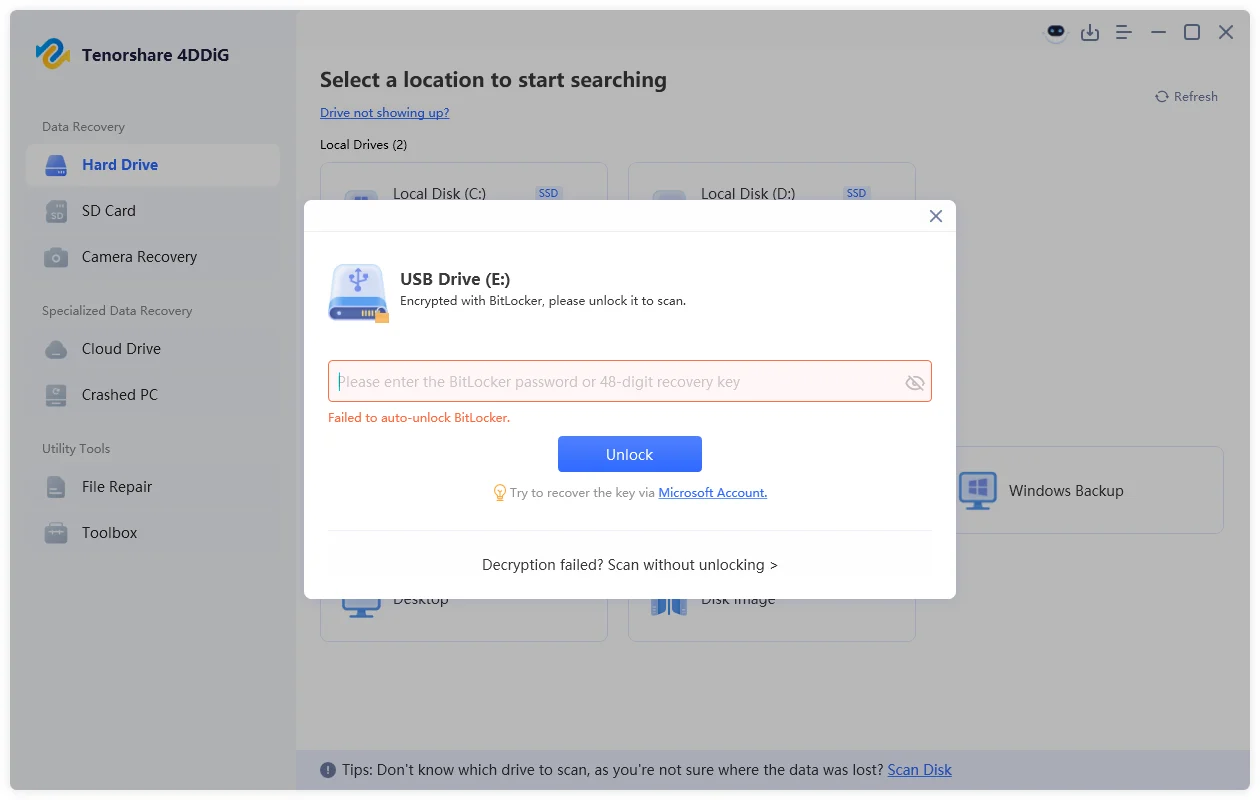
Method 1: Unlock BitLocker with Password or Recovery Key
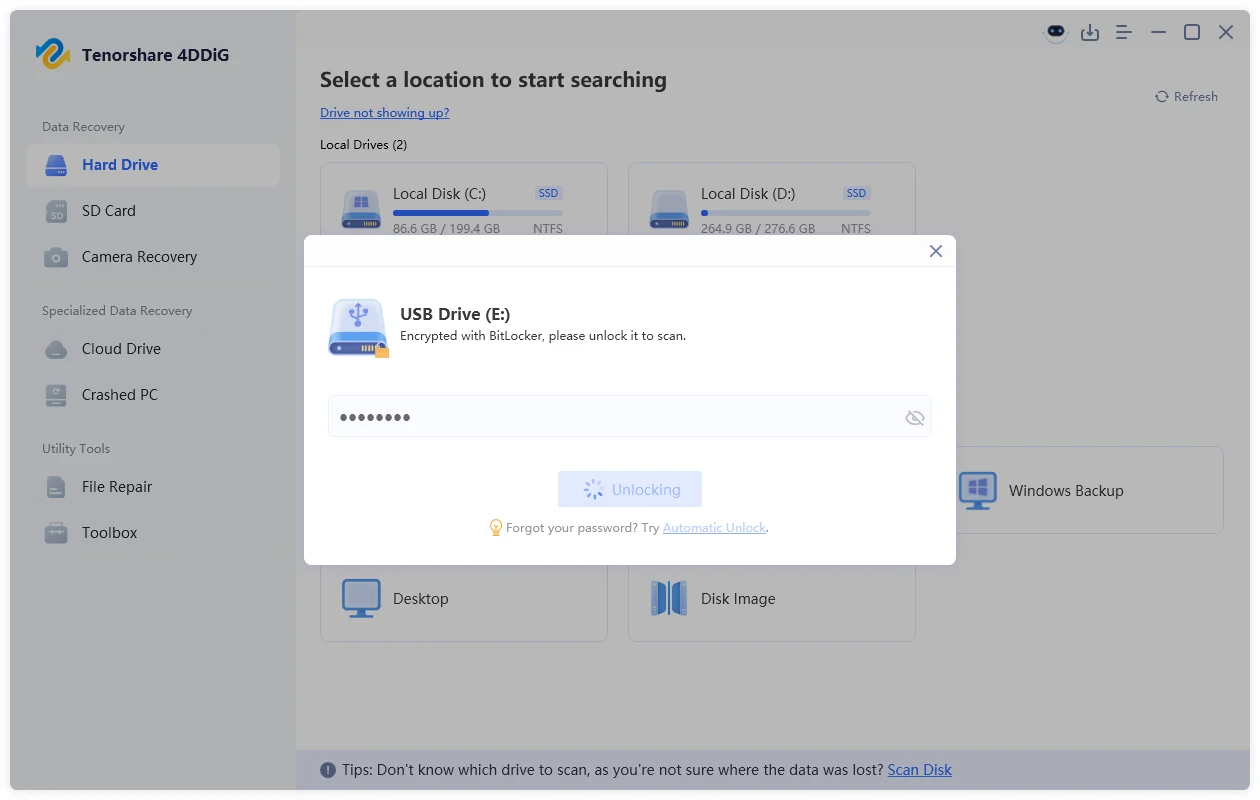
A pop-up window will prompt you to enter the password or recovery key to unlock the BitLocker-encrypted drive. If you know the password or recovery key, enter it directly and hit the "Unlock" button to begin the unlocking process.
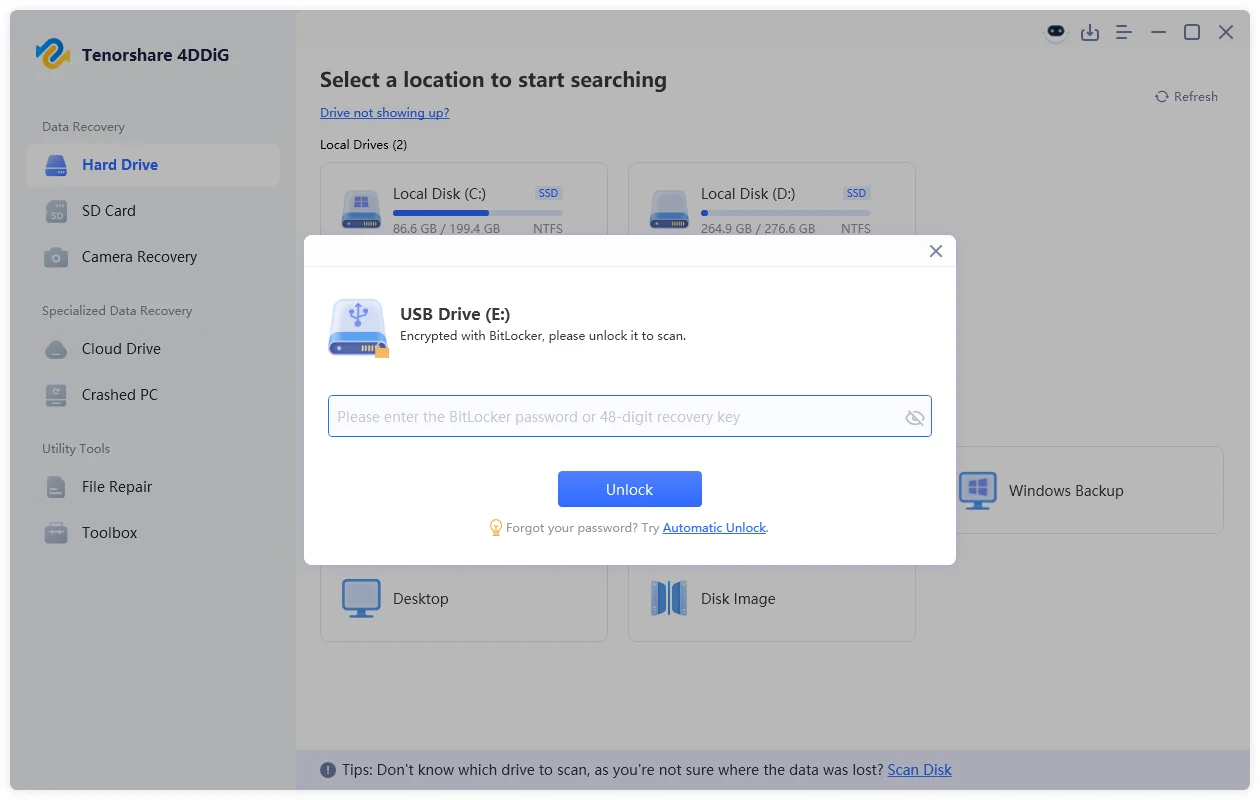
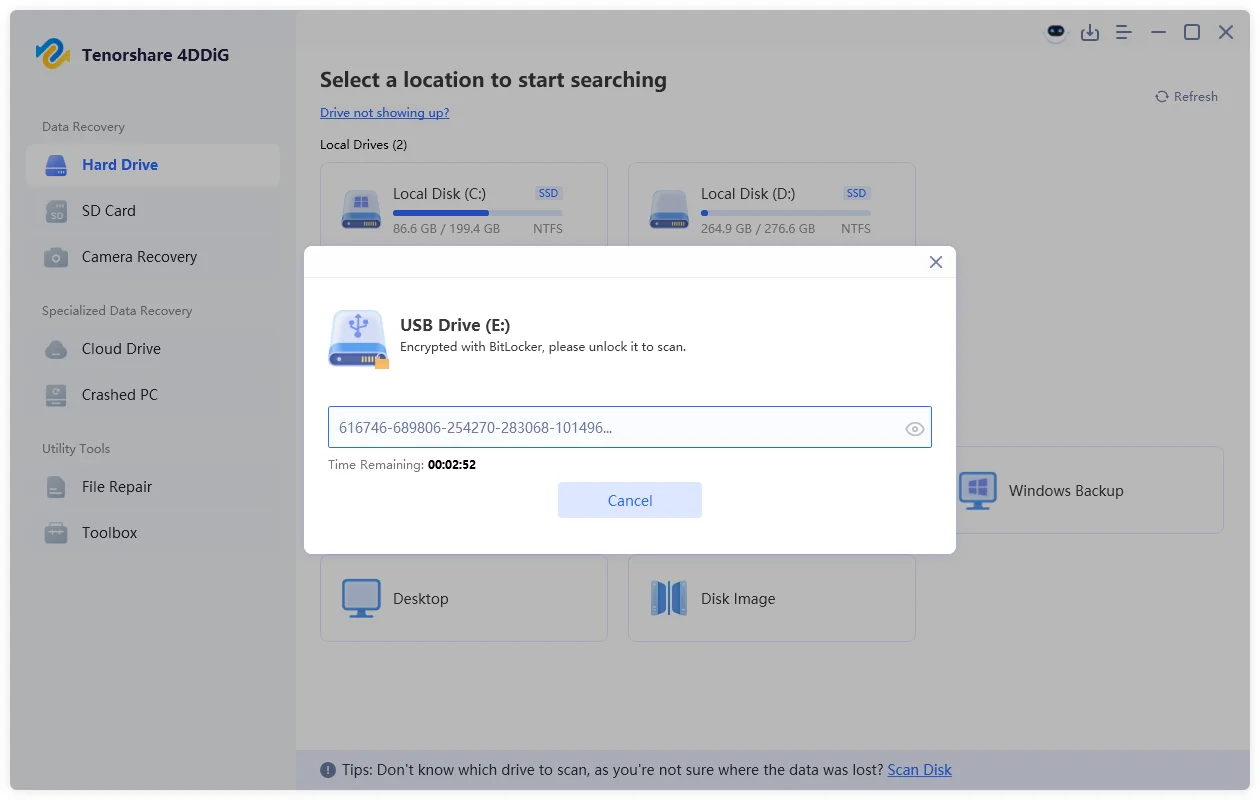
Note: If you don’t have the password or recovery key, you can click the "Automatic Unlock". This option may help locate your recovery key from your Microsoft account, local drive or any connected external drives, allowing you to decrypt the BitLocker drive without manually entering the password.
-
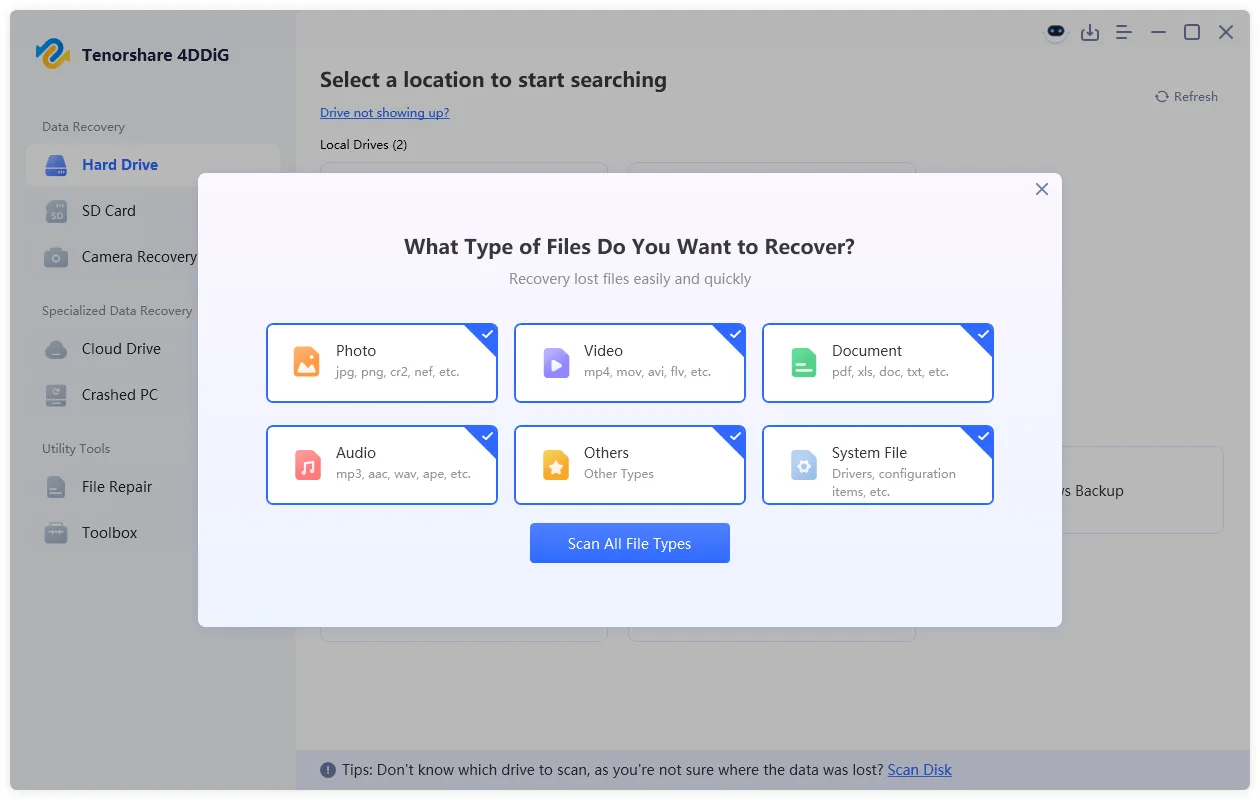
Step 3:Select and Scan the Drive
Once the decryption is complete, you’ll be asked to choose the file types you want to scan. After making your selection, the software will begin an advanced scan to search for deleted files on the BitLocker drive.
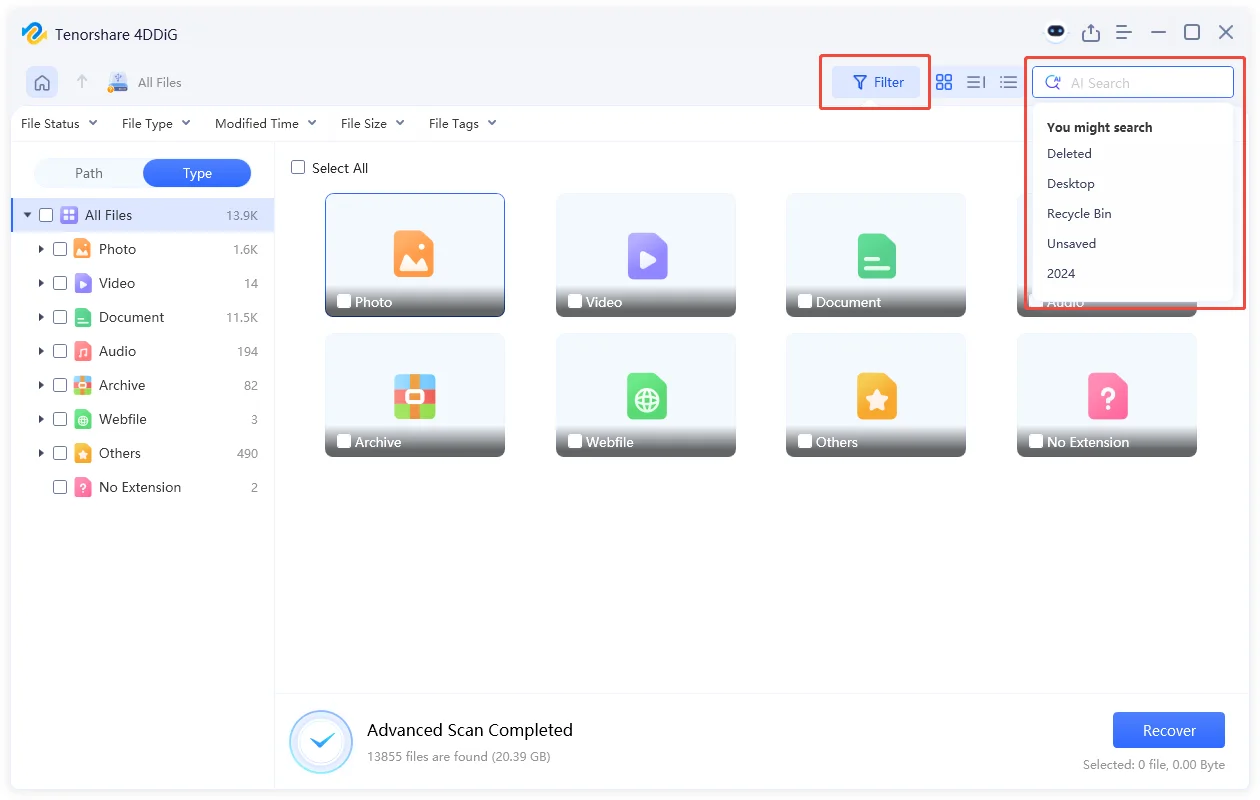
When the scan finishes, you can use the Filter or Search feature to quickly find the files you want to recover.
-
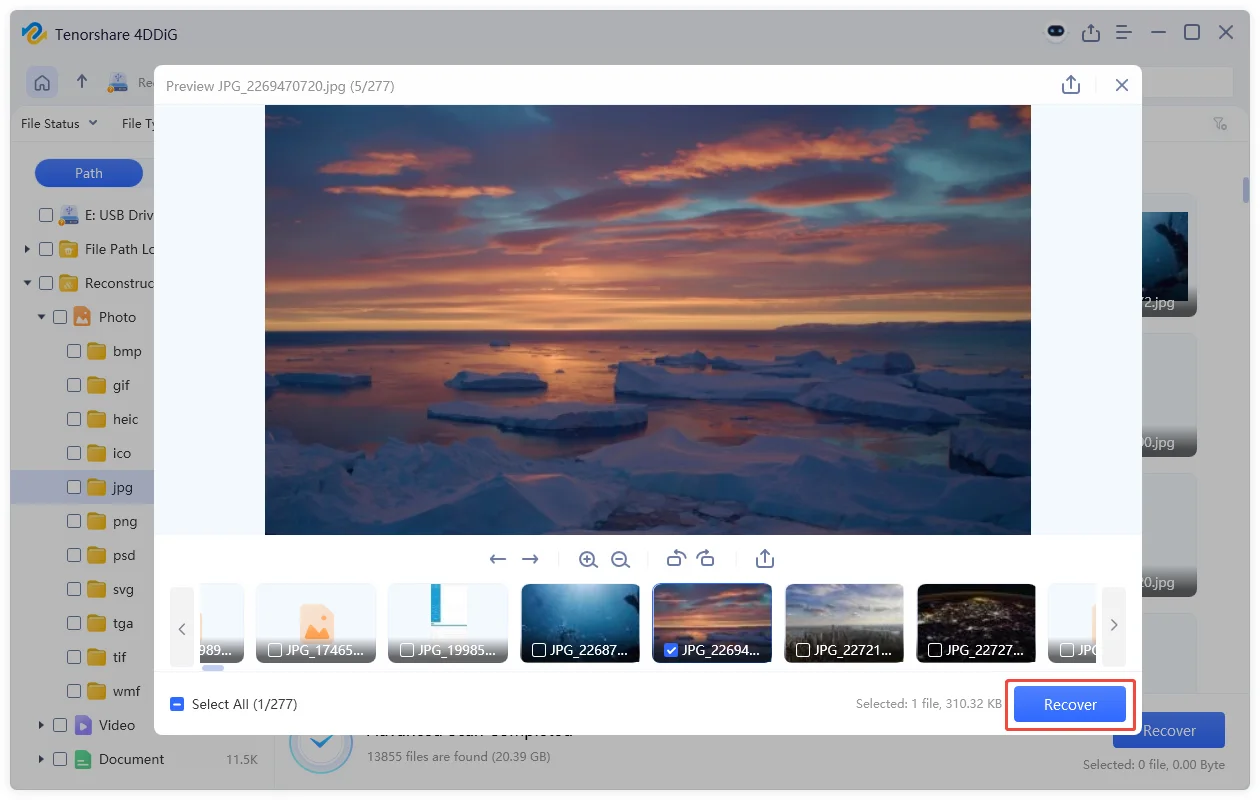
Step 4:Recover Files from Bitlocker-encrypted Drive
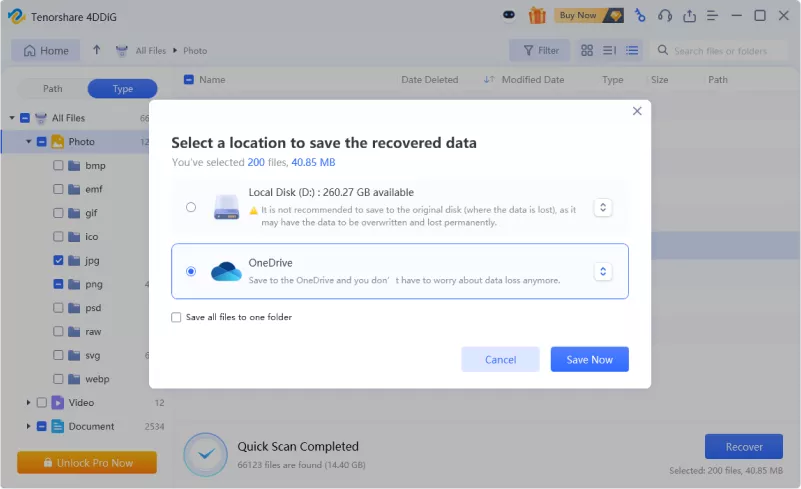
After the scan, you can preview the files you want to restore and click the “Recover” button to get them back from the BitLocker-encrypted drive on Windows.
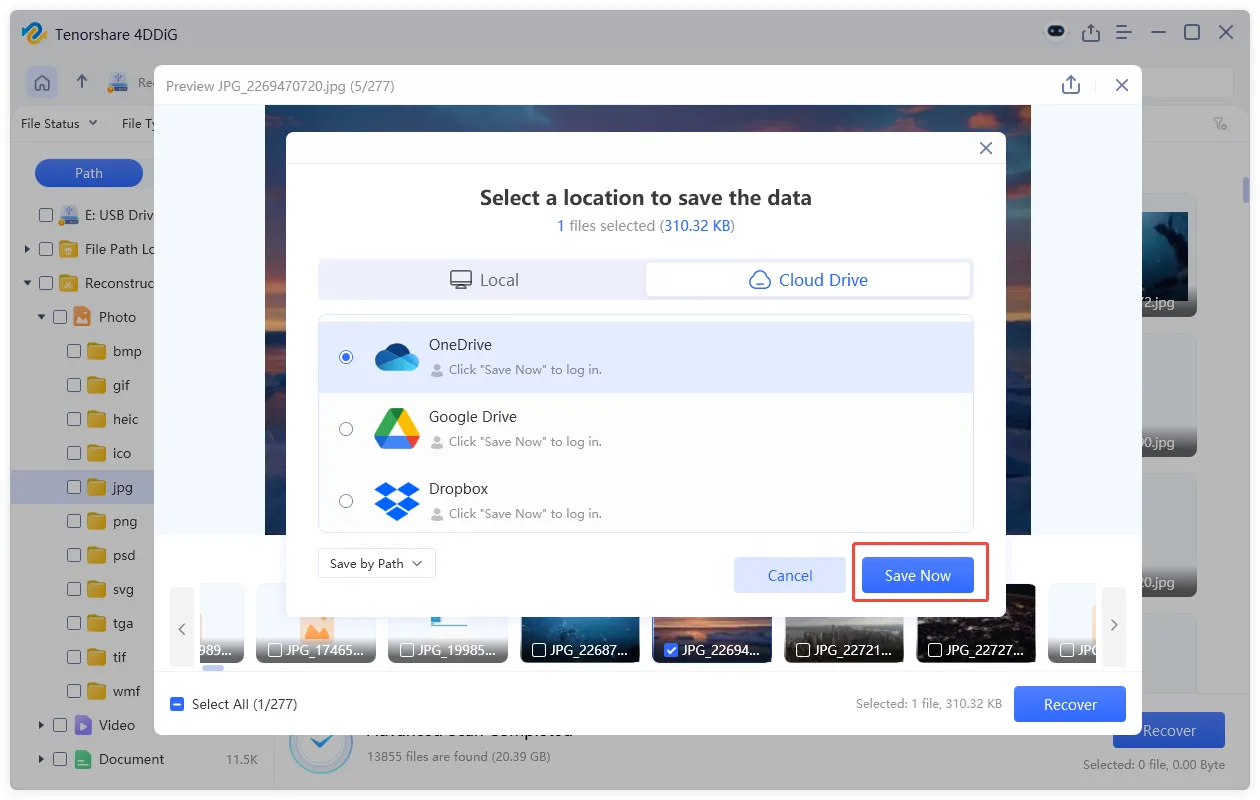
You can then save the recovered files to a local disk or to cloud storage, such as OneDrive or Google Drive, then click "Save Now".
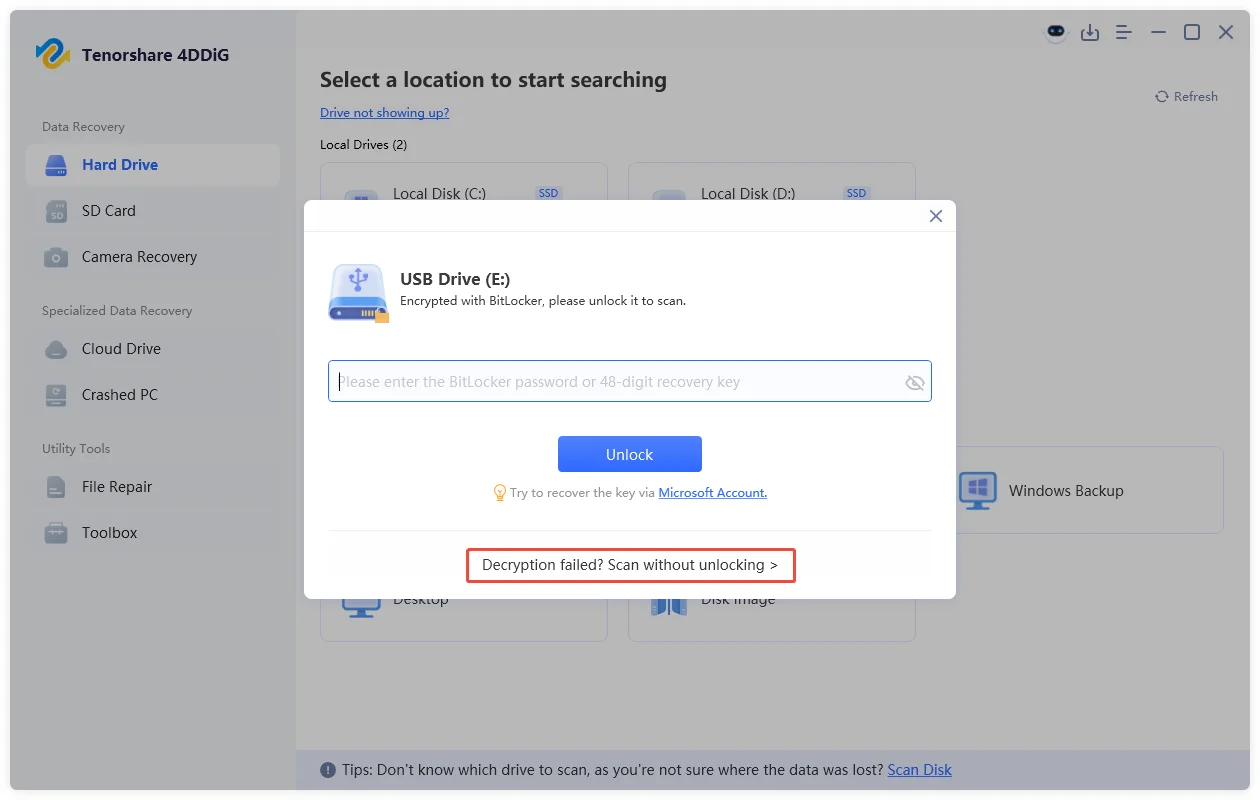
Method 2: Scan BitLocker Without Unlocking
It may take a few minutes to locate your BitLocker password or recovery key, so please be patient. If the "Automatic Unlock" method doesn’t work, you can choose to bypass BitLocker and scan the encrypted drive directly without unlocking it first.
To do that, click "Scan without unlocking". This option lets you bypass the BitLocker password or recovery key and scan the encrypted drive directly to find and recover your data.
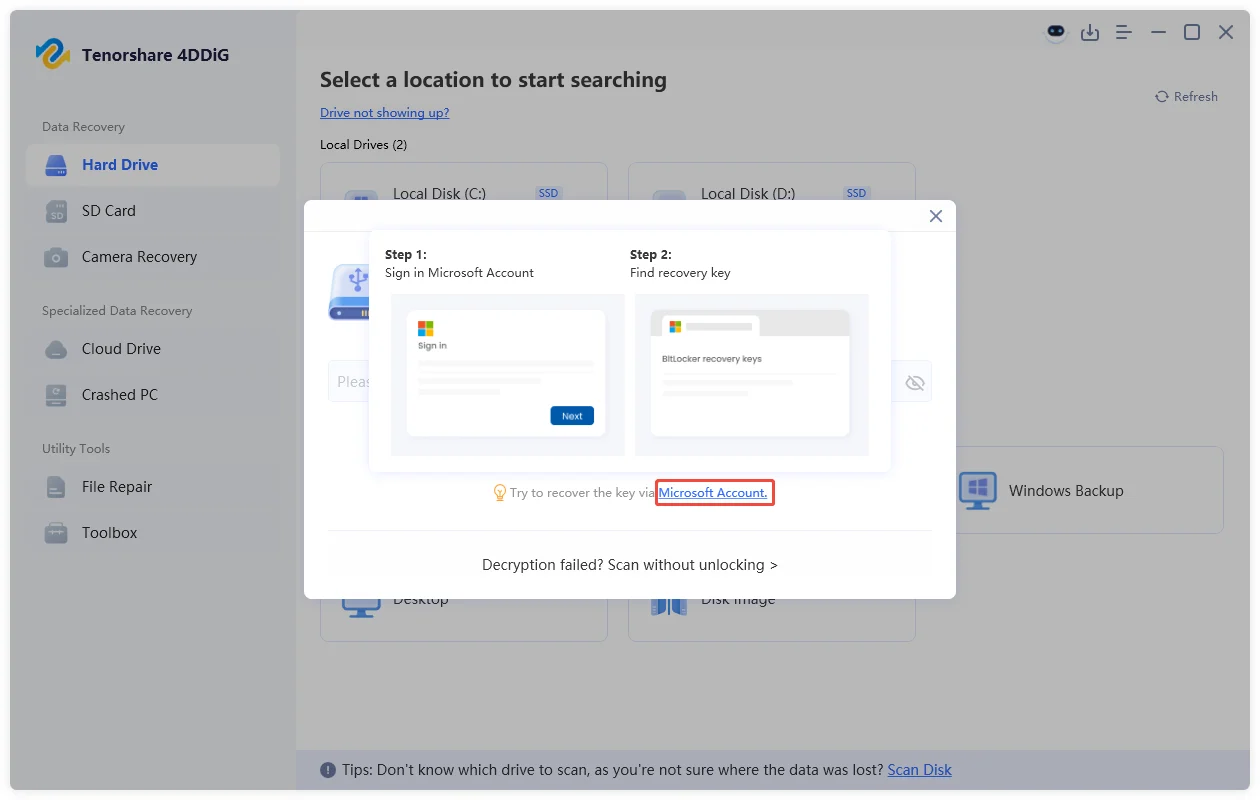
Method 3: Find BitLocker Recovery Key via Microsoft Account
You can also unlock BitLocker through your Microsoft account. If you chose to save the recovery key to your Microsoft account when setting it up, simply click the "Microsoft Account" option to go directly to the Microsoft sign-in page. Log in and locate your saved recovery key.
Once you’ve found it, return to the software and enter the key. After it’s successfully verified, the program will automatically scan your BitLocker-encrypted drive to locate and recover your data.
Watch Video Tutorial Here
![]() Secure Download
Secure Download
![]() Secure Download
Secure Download
Recover Data from Disk Image
Don't risk your data by scanning a failing storage media (e.g., SSD or hard drive) directly. Here's a safer way:
- First, use 4DDiG Data Recovery to make a perfect, full copy of your drive (this is called a "disk image").
- Then, let the software recover your files from that safe copy.
This simple two-step process protects your original drive from further damage while you retrieve your valuable data.
![]() Secure Download
Secure Download
![]() Secure Download
Secure Download
-
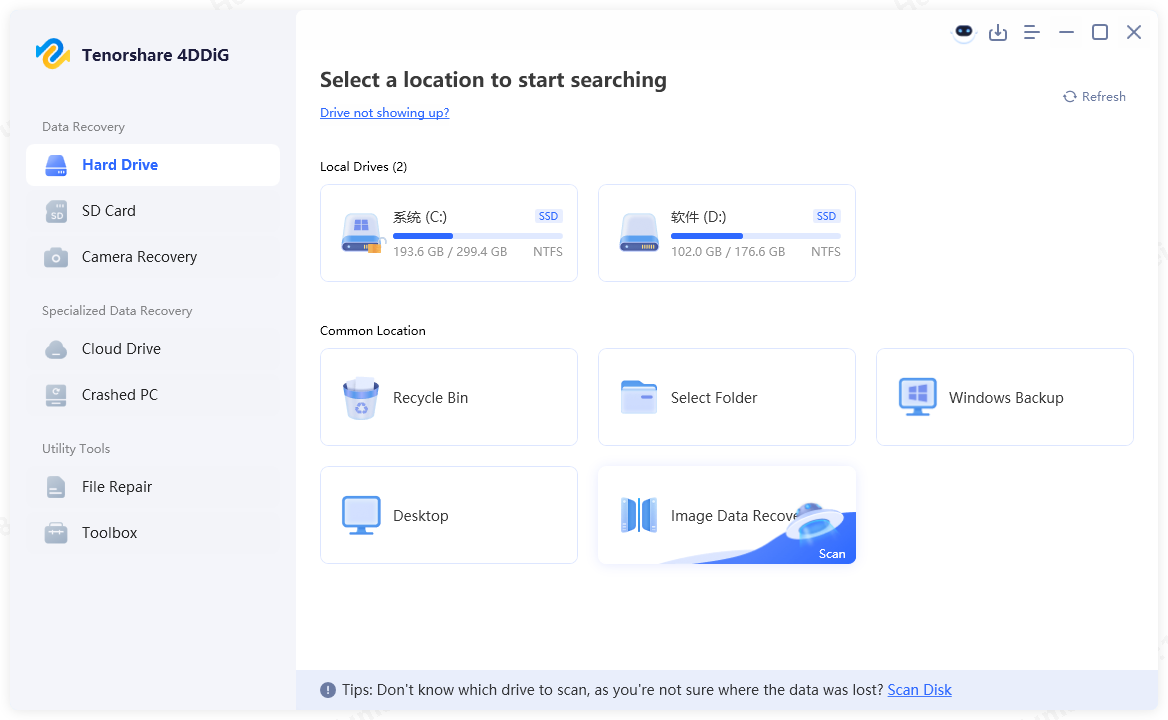
Step 1:Choose the "Disk Image"
Go to "Hard Drive" in the left panel of 4DDiG and choose "Disk Image" under "Common Location".
-
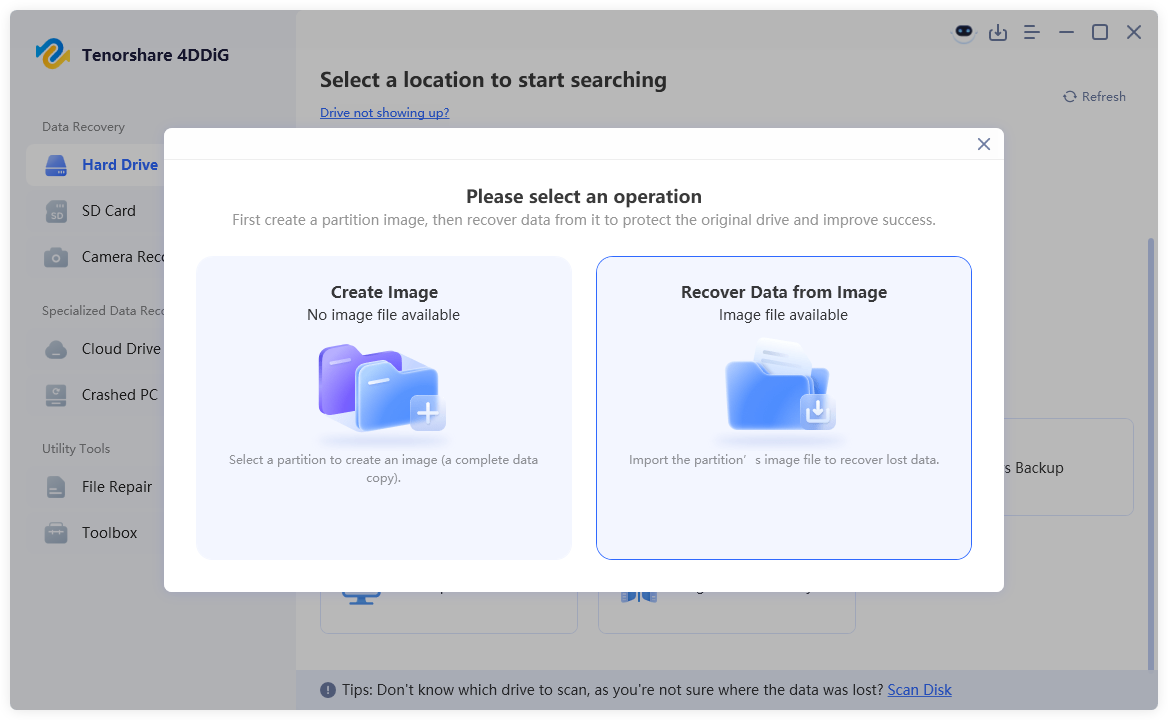
Step 2:Create or Import Disk Image
You can choose to create a new disk image file with 4DDiG, or import one that you've created before.
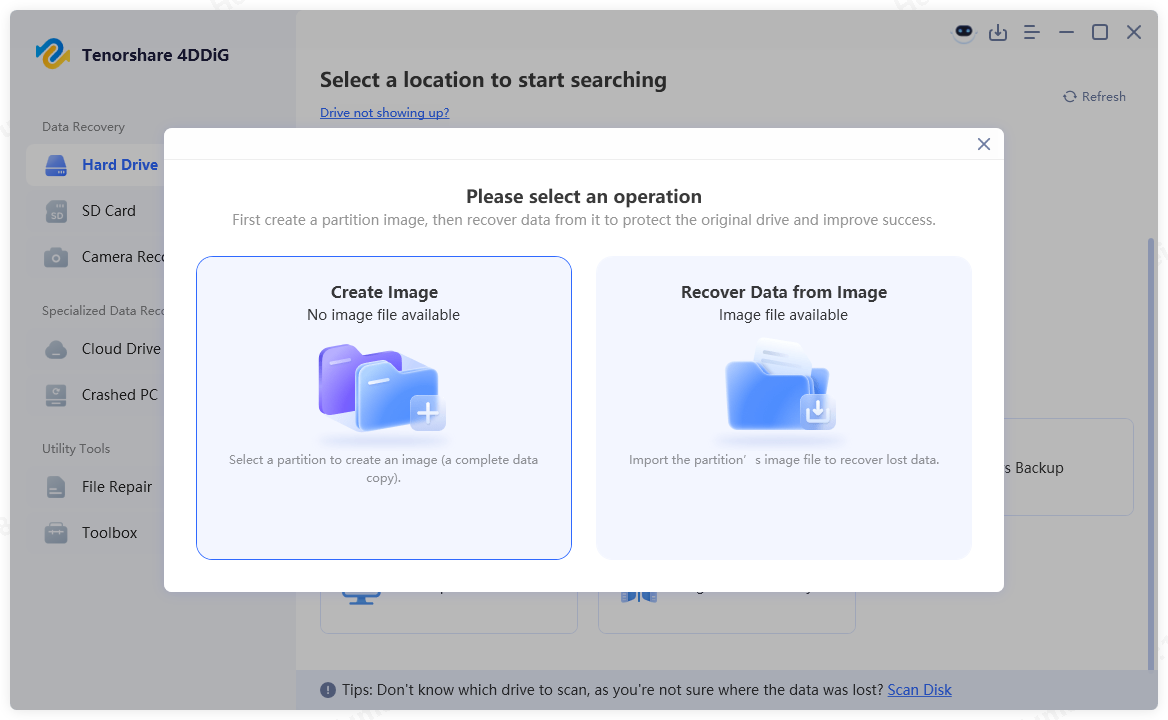
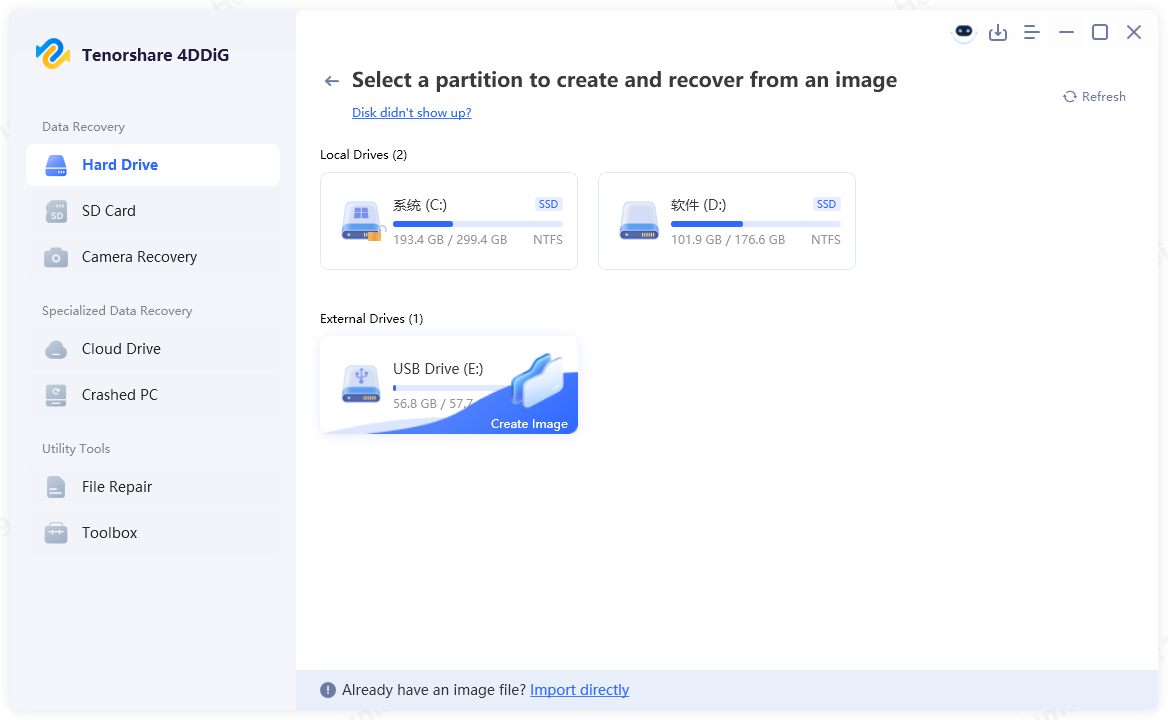
Option 1: Create a New Disk Image
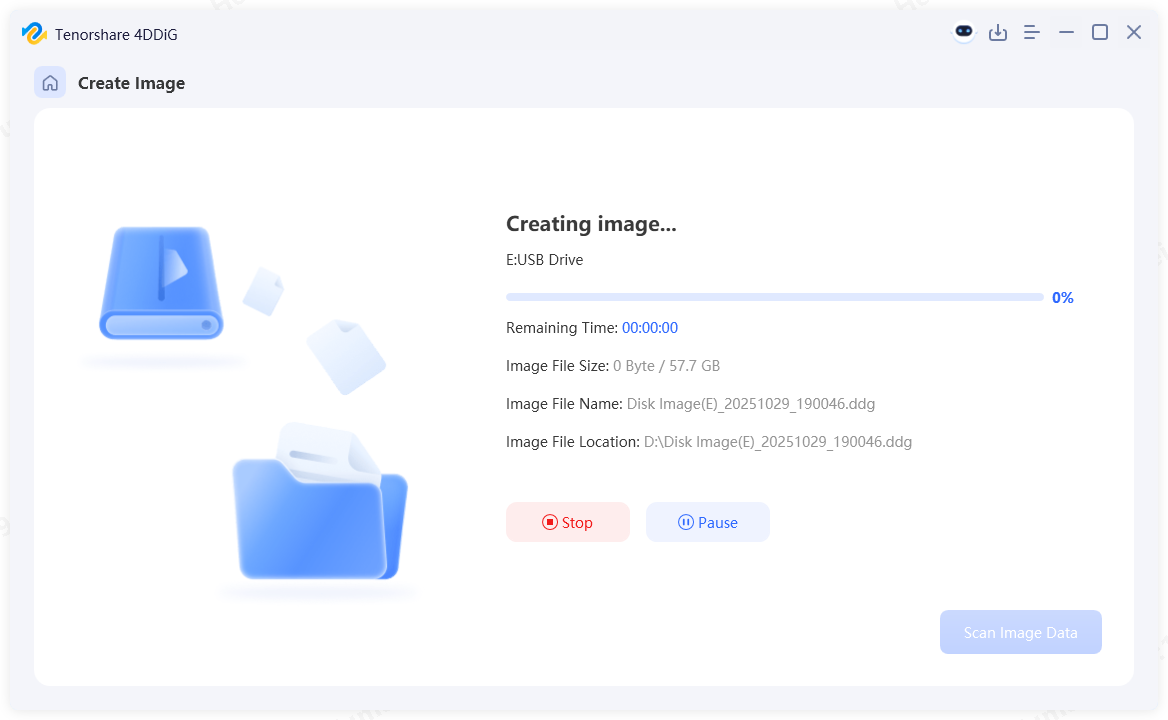
Select a partition or disk to start creating the disk image.
Then, choose the location where you want to save the imge file.
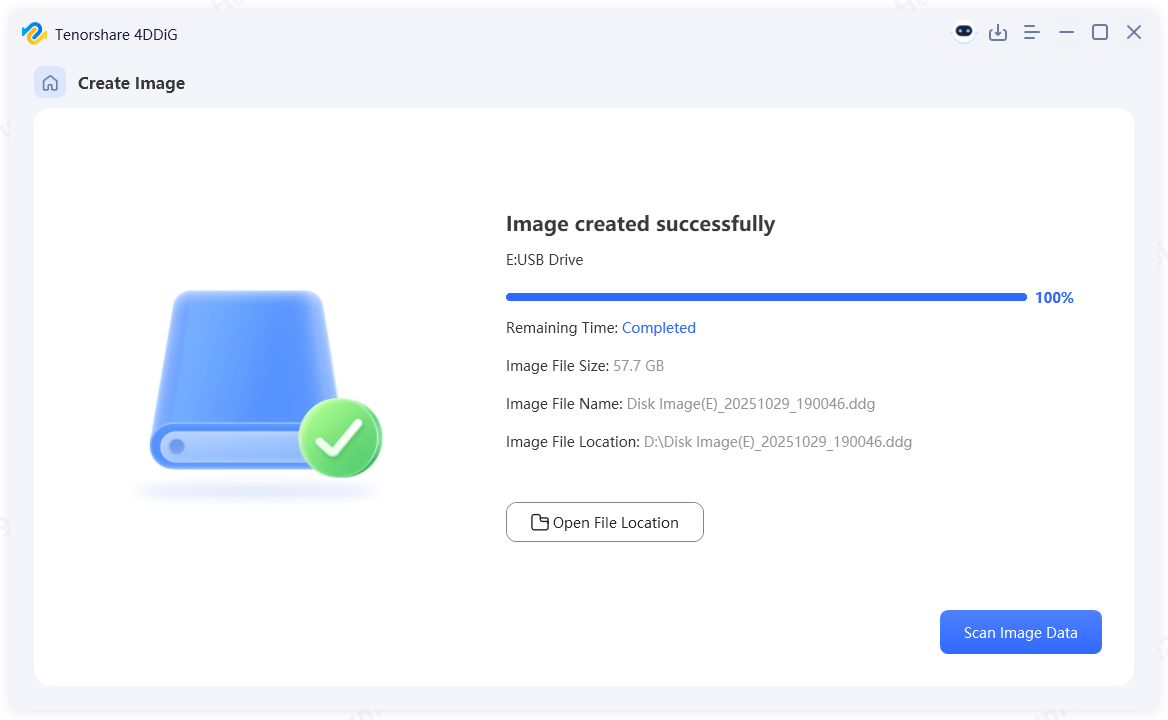
The disk image creation will now begin automatically. Please wait for the process to complete.
Once the disk image is created, 4DDiG will display an on-screen notification with the details, as shown below.
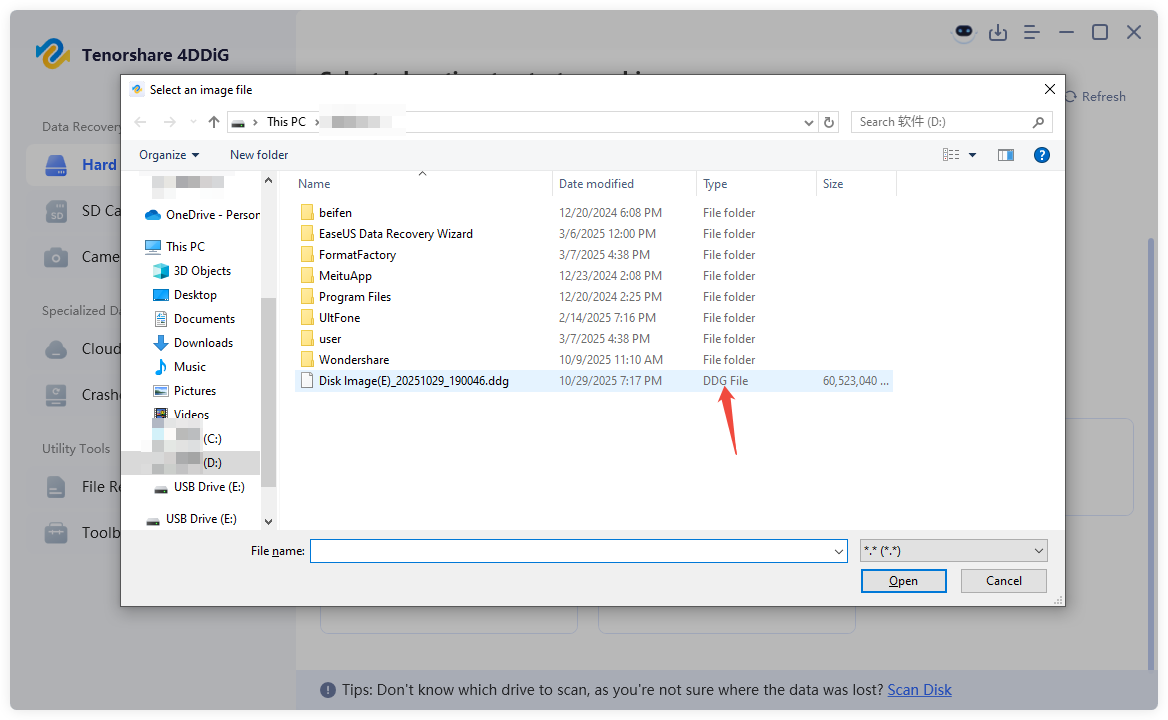
Option 2: Recover Data from Disk Image
Return to the image recovery interface and tap on the 'Recover Data from Image' option. 4DDiG will then automatically start the import process.
Select the image file you created with 4DDiG. (The file type is DDG.)
4DDiG will now scan the imported disk image file. Once the scan is complete, you can preview files before recovery.
The final step is to select a destination path to save the recovered data from the disk image.
Enhanced Video Recovery
No matter the situation, 4DDIG Data Recovery -“Enhanced video Recovery” feature can easily retrieve data that has been deleted, formatted, or corrupted, and restores a wide range of video formats, like mp4, mov, 3g2, 3gp, asf, avi, flv, m2ts, m4v, mkv, mpg, mts, wmv, etc.
Easily recover & repair videos from a range of devices including Canon, GoPro, Nikon, Sony, Fujifilm, DJI, and so on.
![]() Secure Download
Secure Download
![]() Secure Download
Secure Download
-
Step 1:Select the “Enhanced Video Recovery” Option
Download and launch 4DDIG Data Recovery on your computer. Once done, select "Enhanced Video Recovery" Option on the left side of the main interface. Then click Get Started and select a drive where you lost videos to start recovering.

-
Step 2:Select the video format, and optionally choose your video device
After you enter the desired drive, 4DDIG will ask you to select the video format you want to recover. The more video types selected, the longer it will take. Then, you can also choose the device that the videos are from. Because correct source device contributes to the targeted and precise recovery, significantly improving the recovery quality.

-
Step 3:Wait for quick and deep video scanning
4DDiG immediately examines the selected drive all around for missing videos, and you may pause or stop the searching at any time if you've identified the video you want to recover.
-
Step 4:Preview and Recover Videos
Following the discovery of the target videos, you can preview and recover them to a secure location.
You can restore the recovered data to your local disk or Google Drive.
![]() Secure Download
Secure Download
![]() Secure Download
Secure Download
Recover Data from the Crashed Computer
Things may happen that your Windows computer crashed or stopped working. Before you head for a shop to fix it, it's necessary to retrieve your significant data from it. So how to recover data from crashed system? Simply follow the steps below to get back your lost data from a crashed computer with 4DDiG.
![]() Secure Download
Secure Download
![]() Secure Download
Secure Download
-
Step 1:Prepare for Crash Recovery
Prepare yourself with the following stuffs before data recovery from crash computer: another working computer, a blank USB drive of more than 1.5G or CD/DVD together with 4DDiG Data Recovery program installed on the computer that works.
-
Step 2:Connect USB Drive and Select Location
Launch 4DDiG software on your computer and get your USB flash drive well connected. Choose Recover from Crash Computer from the home interface and then click on Start to proceed.

-
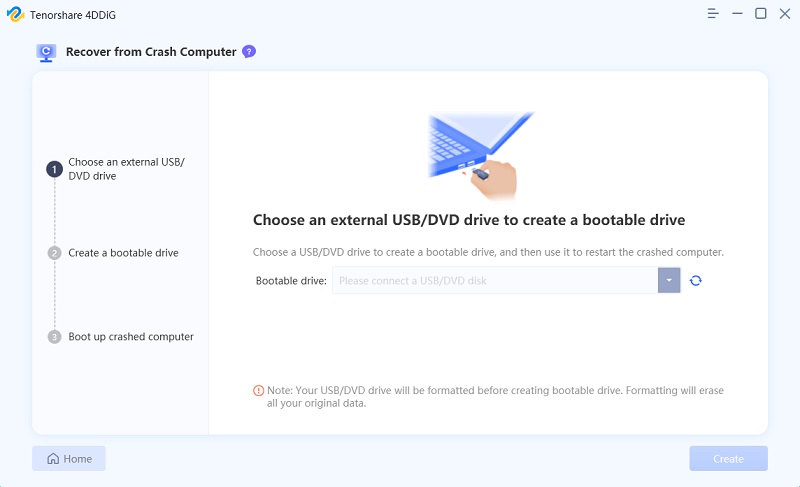
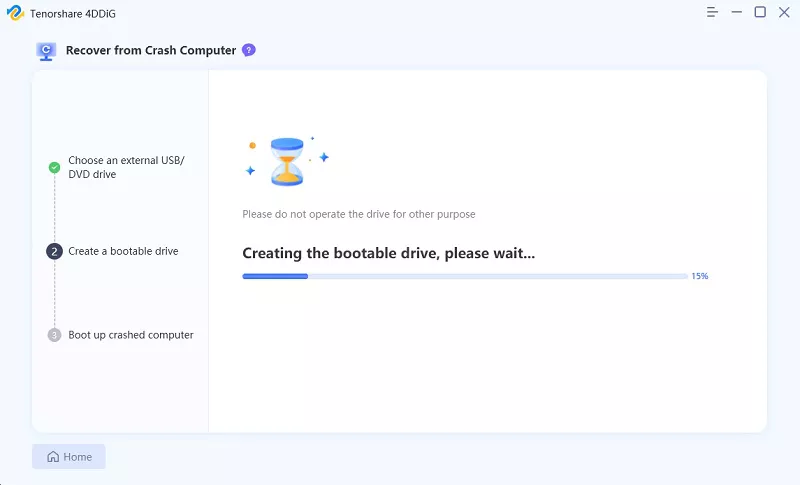
Step 3:Create a Bootable Drive
Choose an external USB/DVD drive to create a bootable drive then click on Create. You should be noted that your USB/DVD will be formatted for creating the bootable drive. And please do not operate the drive during the creating.
-
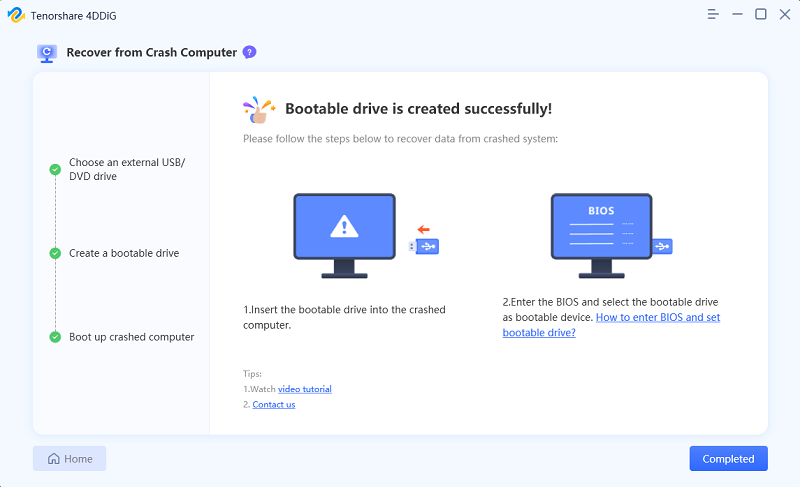
Step 4:Create Bootable USB Drive Successfully
After a while, the bootable drive will be created successfully and then you can turn to your crashed computer to start data recovery.
-
Step 5:Boot Crashed Computer from USB/CD/DVD Drive
Insert the USB flash drive or CD/DVD drive into the crashed computer then restart your device. Afterwards, you would see the computer brand logo on the screen, then press the corresponding key until you get into your device's BIOS settings. (The start key can vary from one system from another, and you may refer to this page
-
Step 6:Recover Data from Crashed Computer
After you enter the BIOS, switch to the boot tab using the arrow keys and select boot device. Then your crashed system will start loading files and please wait patiently for the configuration. Now 4DDiG will be launched automatically and you can select a location to start recovering data. For the data security, we highly recommend you to save your recovered data to an external drive instead of local disks.
You can restore the recovered data to your local disk or Google Drive.
Watch Video Tutorial Here
![]() Secure Download
Secure Download
![]() Secure Download
Secure Download
Repair Photos
Photos got corrupted happens a lot. Tenorshare 4DDiG as a powerful photo recovery tool can repair unlimited distorted, blurry, pixelated and greyed-out images at one go. Follow the steps below to know how to use 4DDiG to start photo repair.
![]() Secure Download
Secure Download
![]() Secure Download
Secure Download
-
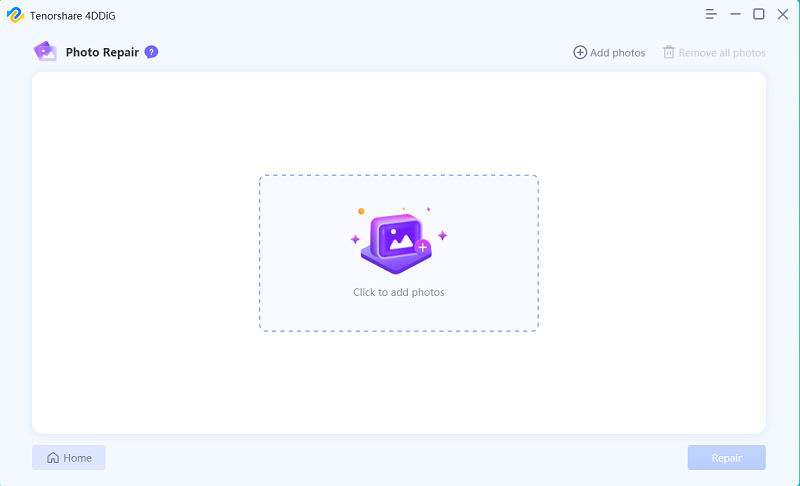
Step 1:Select Photo Repair
Download and install Tenorshare 4DDiG on your computer and run it. From the Advanced Options, select Photo Repair.

-
Step 2:Add Photos to Start Repairing
Tap Click to add photos to import damaged or corrupt photos and then tap Repair to start repairing them.
-
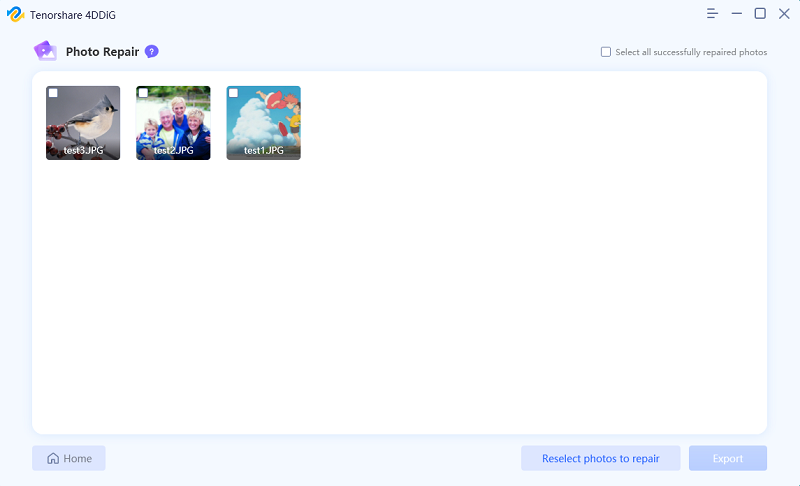
Step 3:View Repaired Photos and Export
After the repairing, you can choose photos to preview and then click Export to save them to a safe location.
Repair Videos
Tenorshare 4DDiG makes it simple to repair corrupted, broken or unplayable video files. Follow the steps below to learn how to repair damaged videos in 3 steps.
![]() Secure Download
Secure Download
![]() Secure Download
Secure Download
-
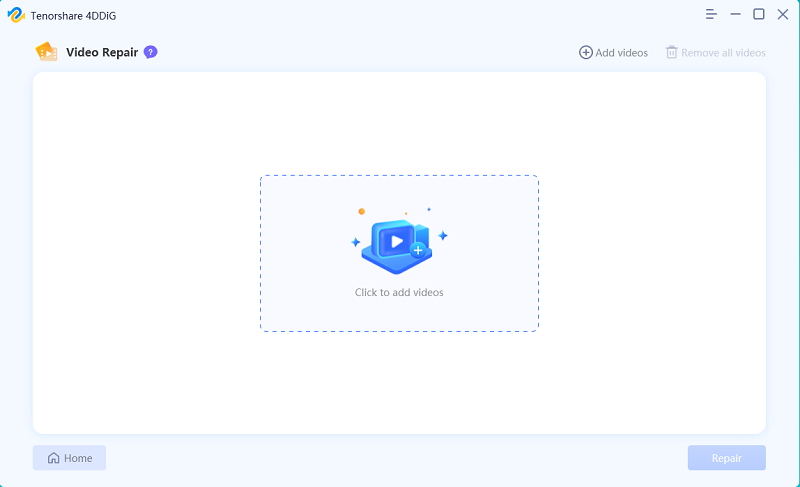
Step 1:Select Video Repair
Download and install Tenorshare 4DDiG on your computer and run it. From the Advanced Options, select Video Repair to proceed.

-
Step 2:Add Videos to Start Repairing
Tap Click to add videos to import damaged or corrupt videos and then click Repair to start repairing them.
-
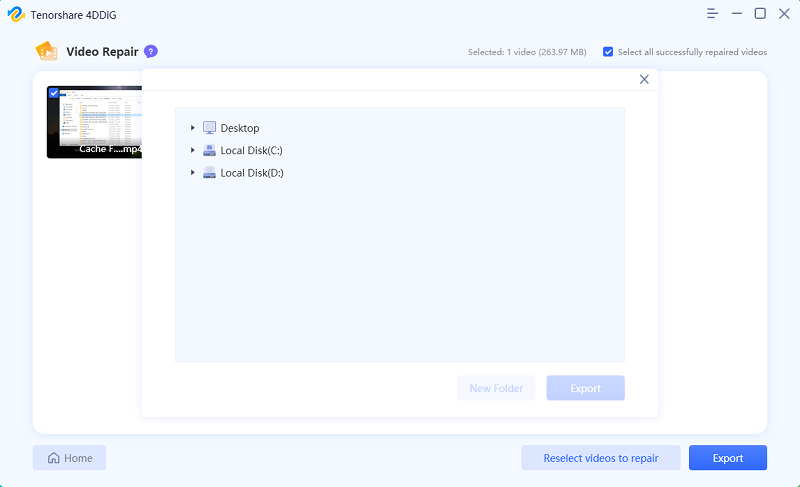
Step 3:View Repaired Videos and Export
After the repairing, you can choose videos to preview and then click Export to save them to a safe location.
Watch Video Tutorial Here
![]() Secure Download
Secure Download
![]() Secure Download
Secure Download
This is all about how to recover data with Tenorshare 4DDiG Windows Data Recovery.
Recover Data from NAS
Tenorshare 4DDiG supports to restore data from NAS due to due to accidental deletion, virus attack, hardware failure, or server overheating. Tenorshare 4DDiG also supports to get all lost data restored from a wide variety of failed NAS storage devices, including Synology, Western Digital, QNAP, ASUSTOR, Thecus, Seagate BlackArmor, etc. You can get all recovered only in simple steps.
![]() Secure Download
Secure Download
![]() Secure Download
Secure Download
-
Step 1:Select the "NAS Data Recovery" Mode
After you install Tenorshare 4DDiG Windows Data Recovery, please launch and open the program. Next, select "NAS Data Recovery" tab and click "Connect to NAS" to establish a connection. This will allow the program to connect to the NAS storage devices on which you lost the data.

-
Step 2:Enter Information to Connect to NAS
Now, you should fill in the information of your NAS device, including IP Address, Port Number, Username and Password. Then, click the "Connect Now".

-
Step 3:Select a Location
After entering the corresponding information, you can see different locations on your NAS device. Select a specific one to start recovery.

-
Step 4:Preview and Recover from NAS Devices
Now, you can select and preview the file you want to recover. When you've decided what to recover, click the "Recover" button to proceed.

When prompted, choose to recover them to a secure location. In case of overwriting and permanent data loss, please do not save to the same path where you lost them.

Case 1: If the NAS device can be detected
If your NAS device can be detected, 4DDiG will show it on the list, and you can hit the "Connect" button to proceed to the next step.

Case 2: If the NAS device cannot be detected
If no NAS devices can be found, you can hit the "Connect Manually" button to enter the information to connect to the NAS manually.

The process won't take long. When it's done, you can use the Filter or Search feature to find the files you want to recover.

Watch Video Tutorial Here
![]() Secure Download
Secure Download
![]() Secure Download
Secure Download