How to Undo ESD USB?“I inadvertently turned my 1TB external hard drive into an ESD-USB.” “How can I restore my files?”
If you accidentally converted an external hard drive to ESD-USB format and now see it as an ESD-USB drive rather than an NTFS drive, this article will explain how to repair this. Several people have shown their dissatisfaction with the situation on various social media platforms. One such instance is provided above. We will detail the best technique for you to recover your data from an ESD-USB-converted drive. Then, we'll give you some pointers on avoiding making this mistake in the future.
Part 1: What is ESD USB?
If you’re wondering what is ESD-USB, then keep reading. You will receive an answer as ESD is an abbreviation for electronic software delivery. And ESD USB meaning refers to a storage device format commonly used to install Windows on a machine. It is necessary to install Windows (including Windows 11) on a system. It typically formats your entire drive before allocating a 32GB partition from your device to this Format.
Part 2: How to Recover Lost Data after Converting a Drive to ESD-USB Drive?
If accidentally converted a disk to ESD-USB drive, it may be formatted and you may therefore lose data stored in it. Tenorshare 4DDiG Data Recovery can recover data from external hard drives that have been accidentally formatted, deleted, or infected with a virus. It works with all brands of devices. With this utility, you can recover data after converting a drive to an ESD-USB drive. Now, go through the three steps to recover lost data from external hard drives.
- Recover any lost files from formatted drives.
- Recover files from Windows/Mac/USB flash drives/SD cards/external hard drive/digital camera, etc.
- Support various loss scenarios like deletion, formatting, RAW, corrupt, damaged, etc.
- Support 1000+ data types such as photos, videos, audio, documents and more.
- Fast scan with 100% security.
Secure Download
Secure Download
- Connect and Select the USB Drive
- Scan the USB Drive
- Preview and Recover Files
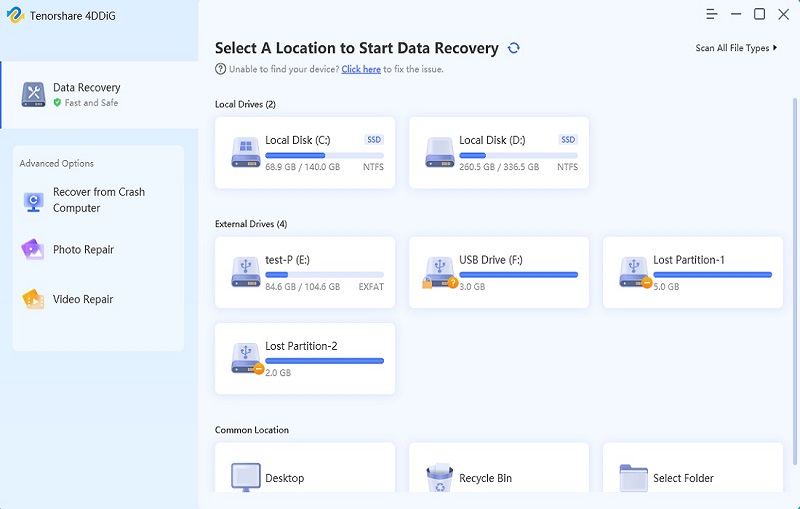
To start, download and install Tenorshare 4DDiG Data Recovery. Start the application, connect the formatted USB drive on your PC, and select it to begin scanning.
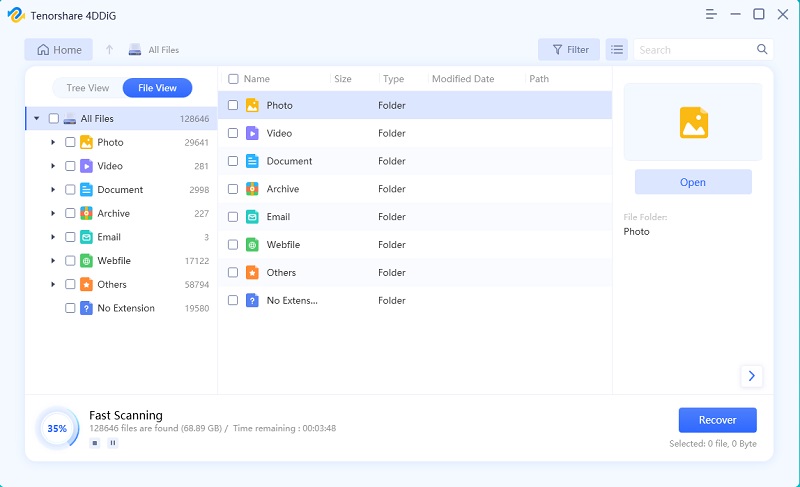
4DDiG quickly searches the USB drive for missing data, and you may pause or terminate the search at any time if you've found the files you wish to recover. The Tree View has categories such as Deleted Files, Existing Files, Lost Location, RAW Files, and Tag Files. You may also use File View to look at file kinds, including Video, Photo, Document, Email, Audio, etc. Furthermore, you can search for target files on the left side of the panel or utilize Filter to refine your search.
After locating the target files, you can preview and recover them in a secure place. Kindly do not save to the same partition where you lost your data in the event of disc overwriting and permanent data loss.
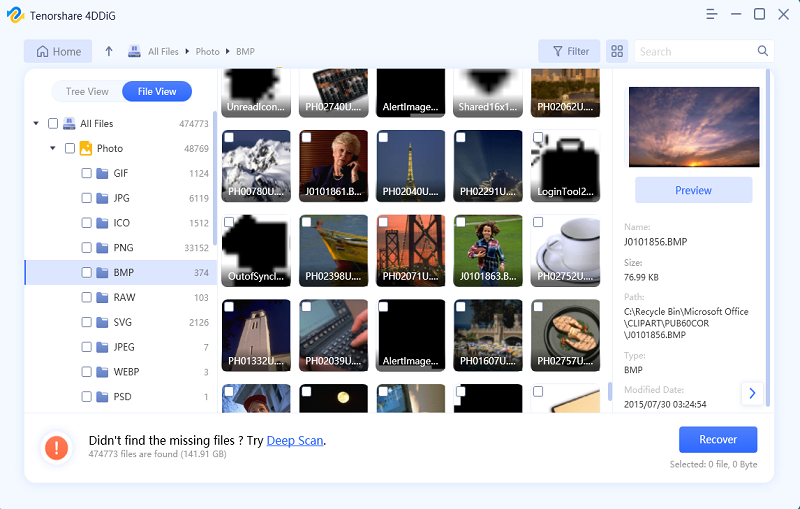
This is all about how to recover lost data after converting a drive to ESD-USB drive.
Part 3: How to Convert ESD USB back to Normal?
There are three methods to convert your ESD-USB back to normal. Let’s go over them one by one.
Fix 1: Format External Hard Drive
This step will delete the data on your hard drive and restore it to the desired Format: NTFS. This Format allows you to store and transfer files on an external hard disc. To accomplish this, follow the steps below:
Step 1: On Windows, launch File Explorer.
Step 2: Identify the external hard disc.
Step 3: Select Format from the context menu by right-clicking on it.
Step 4: The file system is configured to NTFS, and the allocation unit size is set to 2048 bytes.
Step 5: Select “Quick format” and begin the process.
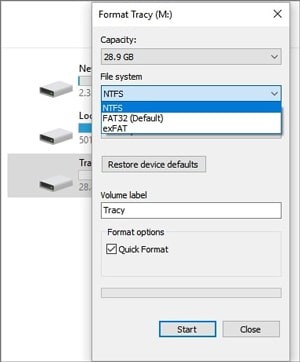
You can now use this gadget usually.
Fix 2: Undo ESD-USB via Command Prompt
Command Prompt is a program that allows users to quickly implement adjustments to your machine and its peripheral devices by utilizing command lines rather than manually selecting options in settings. Locate the disc in your File Explorer and note the letter allocated to that drive. Then, open Command Prompt as administrator by right-clicking on the Windows button and selecting Command Prompt from the menu that appears (admin).
After that, enter the following command, replacing Y with the letter assigned to your drive.
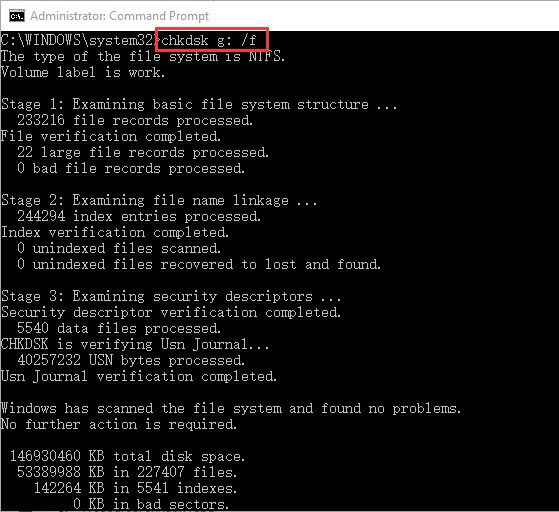
Wait for the command to complete. This should automatically detect and repair any problems with your external hard disc.
Formatting the external hard drive is another option for resolving this issue with the command prompt. Execute the following commands:
- Diskpart
- List disk
Find the disc number corresponding to your external drive in the list of discs.
- X (where the number of your disk replaces x).
- Clean
- Create partition primary
- Format fs=ntfs
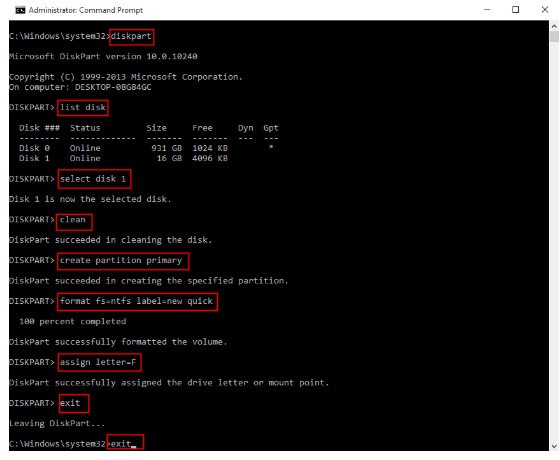
- Assign
This will format your external drive manually back to NTFS.
Fix 3: Create a New Volume
Creating a new partition will also destroy all of your data, so if you wish to save the data on this drive, use the procedure described in Part 2. Because ESD-USB formats your disc and only allocates 32GB of your total capacity to this Format, you can use the NTFS Format with the remaining power.
Step 1: Open Windows Disk Management by searching for it in the Start menu.
Step 2: Locate the external hard drive in the list of drives and right-click on the unallocated space.
Step 3: Click “New Simple Volume” and specify the partition size (we recommend entering the maximum disc space).
Step 4: Choose to format this volume and the NTFS Format on the next screen afterward.
Step 5: Select “Perform a quick format” and proceed.
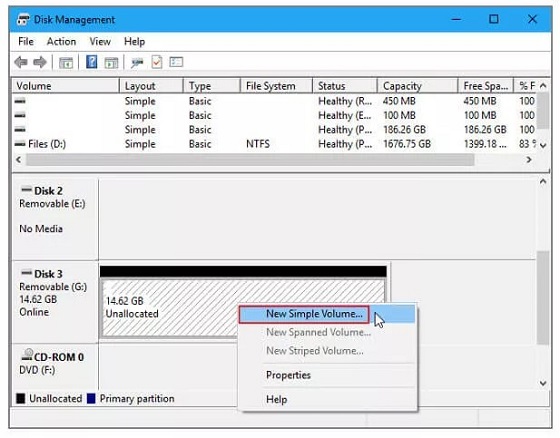
After this is done, you will be capable of utilizing your hard drive as a storage device again.
Part 4: Tips to Prevent USB Data Loss
Some Windows users are unaware that the Windows Media Creation Tool deletes anything on external storage devices. As a result, to avoid data loss before converting your external storage devices to ESD USB, we have prepared some helpful advice for you.
Tip 1: Create Bootable Media on a Blank Hard Drive
This problem always comes from the customer attempting to construct a bootable media drive for Windows on their hard drive. Although you could utilize your primary external disc, you risk losing your data. As a result, we recommend using an alternative drive. Such as a USB with 32GB of capacity or more, rather than this one. This will save you from encountering this issue on your primary external drive.
Tip 2: Back up Data to Somewhere Else
The second point you can make to prevent yourself from data loss in the future before your external hard drive is inadvertently changed to ESD-USB is to create a backup of the drive. You can accomplish this in a variety of methods, some of which are given below:
- Transfer the files from one external hard disc to another.
- Copy your files to a different location on your PC, such as a documents folder.
- Enable automatic cloud backup with Google or OneDrive whenever you connect your drive to your PC. Because the storage space of these cloud storage services is limited, it is suggested that you only use this option if you are not utilizing a lot of space on your external hard drive.
Format USB to FAT32 | 32GB/64GB/128GB Supported!!!
Secure Download
Secure Download
ESD-USB FAQs
1. How do I remove ESD from the USB?
Step 1: Attach your external drive to your computer and launch Disk Management.
Step 2: Locate and right-click on your device’s ESD-USB 32GB partition, then select “Delete Volume.”
Step 3: To verify, click “OK.”
Step 4: Choose a drive and begin scanning.
Step 5: Examine and preview scanned files.
Step 6: Return lost data to a safe location.
2. What is a Windows 10 ESD USB?
When you upgrade from a previous Windows 10 to the most recent build of Windows 10, the ESD file is created. The ESD USB Windows 10 file contains all of the files needed to install the Windows 10 operating system and is typically smaller than the ISO file for the same version and edition of Windows 10.
3. Can I format ESD USB?
Yes, the ESD USB can be formatted on Windows; launch File Explorer. Identify the external hard disc—select Format from the context menu by right-clicking on it. The file system is configured to NTFS, and the allocation unit size is set to 2048 bytes. After you format the drive, you may lose data on it. No worries, just try ,USB data recovery tool which can retrieve any formatted,deleted, corrupted data.
4.How to use ESD USB?
Microsoft ESD files used when installing software upgrades should not be opened manually (unless converted as explained below). Instead, they are used internally by Windows throughout the update process.
Summary
We hope this article has demonstrated how to correct the ESD-USB problem and retrieve your contents from a device that has been inadvertently changed to the ESD-USB Format. Don't forget to look into the Tenorshare 4DDiG data recovery software to recover any lost files from USB drive!
 ChatGPT
 Perplexity
 Google AI Mode
 Grok
Grok
