In Mac solution forums, you will often find users with the question: where are photos stored on mac? Some even confess to accidentally deleting these photos and can’t find them anywhere. This is proof that they are a lot of people facing such problems, and the majority of them are on the hunt for photo recovery solutions. If you are here then we assume you are among those persons. We will not only tell you where photos are stored on Mac in this article, but educate you on how photos work, the difference between iPhotos and photos, how to quickly find your photos, and how to safely store them on Mac. Here, we will also let you on the basic principles behind photo storage, as well as how to recover lost, damaged, or corrupted photos.

Prepare: How Do Photos Work on Mac?
Let’s take a closer look at how photos work on Mac before answering the question; where are my photos on my Mac? The Photos app is designed to store not only your photos but videos as well. It efficiently organizes all the photos taken by your device or the ones shared with your device. It allows users to seamlessly access their photos, allowing them to reminisce on the memories they’ve accumulated.
Are iPhoto and Photos the Same?
The Photos app is widely regarded by Mac users as the ideal photo management tool. Before Photos became popular, there were two applications created by Apple for managing both videos and photos – they are iPhotos and Aperture. The former was an ideal tool for users with less photography experience, while the latter was preferred by users who went deeply into editing. The introduction of the Photos app blurs the line between iPhotos and Aperture as it represents the best of both and also comes with additional features such as iCloud Photo Sharing and iCloud Photo Library. It is also easy to use as all photos, collections, and albums can be found in the main window. Its navigation sidebar allows for easy navigation. There is also a variety of viewing options to choose from at the upper part of the interface. Performance is what sets the Photos app aside from iPhotos. iPhotos do not perform well with large libraries and tend to lag or choke up. There were also arbitrary limitations that led to restraining photo sizes on collections and albums. But with the Photos app, it is an entirely different case as there are no limitations and it is capable of functioning properly even with larger libraries.
How Do You Store Photos on Mac?
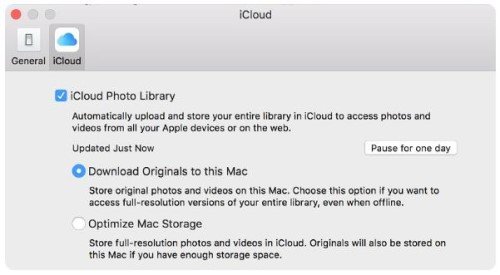
On Mac, photos can be either stored on iCloud or the computer’s local storage. Photos saved on your Mac take up a lot of disk space, especially when they are many. To save space, Mac automatically syncs these photos to iCloud, and the original photos become purgeable files. To store your photos on iCloud, click on “Preferences” after opening the Photos app and then select the iCloud tab. Select “Download Originals to this Mac” if you must store your photos on iCloud. Doing this will make sure your photos remain on your hard disk and all you’ll need to do is find them whenever you need them.
Part 1: Where are Photos Stored on Mac?
The importance of knowing where photos are stored on Mac can’t be overly stressed. It is necessary, especially in the event of drive failure resulting in data loss, or accidental deletion, as knowing where to locate your photos will facilitate your recovery process.
The Basic Principle Behind Photos Storage in Mac
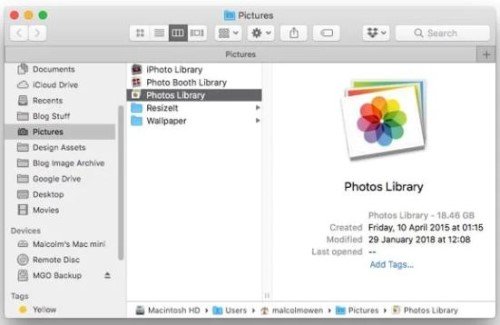
By default, all imported photos on Mac get stored in the photos library which can be located in the pictures folder on your PC. In simple terms, your photos can be found in this directory; ~/Pictures/Photos Library.photoslibrary/Masters/. Your home directory is represented by the symbol ~. This means that navigating through this directory with the “Go To Folder” option will require making use of the prefix ~. However, this is for locating local image files, but being a first-timer with the photos app, you can either select or create a library.
Where Do Photos Get Stored on Mac Computers?
Where do photos live on Mac? Both imported and transferred photos from either your iPhone or memory card can be found in the Photos app on your Mac, as this app was designed to manage and organize all the photos on your computer. If you do not have the Photos app installed on your Mac computer, you may be wondering where your photos go to. Truth is, your photos do not go to your computer’s library. You’d want to search for them using the Finder option from your generic pictures folder. Below are some points to further help you understand the pictures folder on your Mac computer.
- Your mac’s Photos Library stores your photos. However, endeavor not to alter its contents to prevent corruption or accidental deletion of your photos.
- Your photos are categorized into day, month, and year, and the Master’s folder is where you can find these categories. The exact date these photos were taken is documented and attached to each folder.
- The master’s directory is always hidden as it is not meant to be used, however, it can be accessed at will. It would be in your best interest to note that deleting a photo from the master’s directory will remove it from the Photos app.
Part 2: How to Find Mac Photos Quickly
We all know finding photos on Mac can be a bit tricky, and sometimes, this can be overwhelming as it becomes uncertain whether these photos were deleted, corrupted, or were never saved, to begin with. In this section, we will show you how to easily access the different types of photos on a Mac.
How to Quickly Access All Photos
Photos imported from iOS devices like iPhones and iPad can be easily located, accessed, and managed as they are saved to the Photos app. It is an entirely different case with image files as they can’t be saved to the Photos app. Instead, they are kept in the photos library and saved in a different format. The format in which image files are saved becomes readable when using certain platforms and applications like the photo app or iCloud Library. These image files can be accessed by following the steps below.
Step 1: On your Mac computer, navigate to and open “Finder”, then search for your Home Directory.
Step 2: Open the “Pictures” folder by clicking on it.

Step 3: Choose “Show Package Contents” after right-clicking on “Photos Library.photoslibrary”.
Step 4: Access your image files stored in the Photos app by opening the “Masters” folder. At this point, it is clear that direct access to this folder wasn’t part of the plan, and that is why and that is why the pictures folder on your Mac computer remains hidden. However, with this method, you can access your photos. These photos are categorized into folders alongside the dates they were created.
Although you can do whatever you like with these photos after accessing them, do note that deleting any of these files will prevent them from showing up on your Photos app.
How to Locate Specific Photos on Mac
Users need to be able to quickly access any photo of their choice, especially in situations where time is of the essence. To seamlessly get to a particular photo of your choice, quickly filtering the photos in an album becomes the best option. This method is quite effective when searching for recently edited photos with assigned specific keywords. Where do your airdrop photos go to? These photos are sent to the Photos app because it is the only app on your device that supports them. And it may also require the use of the filter feature in a photo album to find them, albums such as Recents, Shared, Imports, Favorites, etc. follow the steps below to locate specific photos on your Mac computer.
Step 1: Navigate to your Photos app on your Mac computer and then click on an album from the sidebar.
Step 2: On the Showing popup menu, enter a keyword related to the particular image you want to find or select from the Photos option.
Step 3: You will be presented with a result associated with the keyword you entered into the keyword manager under Quick Group. Display a particular image by selecting the keyword that represents the photo you are searching for.
How to Access the Photos that Were Imported on Mac
The pictures folder of your Photos library is where you can find imported photos on your Mac computer. And as earlier mentioned, a first-time user of the Photos app has the liberty of choosing between creating a new photo library or using the existing one. When moving, copying, or transferring these photo files using the Finder, try not to manually access or alter the library as doing so may result in accidental deletion or corruption of your photos. Furthermore, when importing photos from another folder on your Mac computer or other external storage devices, make sure they are stored and remain in their original locations to prevent them from taking up large storage space on your Mac computer. Also, storing these photos on iCloud automatically makes them inaccessible to other Mac devices that make use of iCloud Photos. These photos also become inaccessible when the devices they are stored on become inaccessible or disconnected.
How to Find Your Backup Photos on Mac
For every Mac computer, uploading photos to iCloud is the standard way of backing them up. This is a cloud-based storage method that does not require the use of a third-party platform or software and is available to anyone with an Apple ID. Aside from being easy to use, iCloud automatically synchronizes and backs up your photos when turned on. With all being said, iCloud is an ideal location to start searching for your backed-up photos. Furthermore, the amount of free space available to a Mac user on iCloud is 5GB and will require purchasing more storage if you want more.
Bonus Tip: How to Restore Lost Photos on Mac
We can all agree that it becomes terrifying and painful when our precious photos become missing, corrupt, or damaged due to some events which may include accidental deletion, lost partition, or even virus and malware attacks. In this section, we will go through the reasons why photos get missing on Mac computers and also how to retrieve them when such events occur.
Why Do Photos Get Lost on Mac?
When photos get missing on Mac due to accidental deletion, the deleted photos are sent to the “Recently Deleted” folder. Here is where they wait for 30 days before being permanently deleted. This process was established should in case the user changes his or her mind about deleting a photo. These photos tend to delete quicker when disk space reduces. The 30 days recovery period also applies to deleted iPhotos that were imported. However, deleting these photos from the Photos app is ideal because recovering them with the process may be difficult. Fortunately, lost, corrupted, or damaged photos can be recovered.
3 Steps to Restore Lost Photos on Mac
The easiest, fastest, and most efficient way to recover lost photos in Mac due to accidental deletion, corruption, lost partition, or any other scenario is through the use of third-party software. And a good third-party recovery software should be easy to use, accessible, and capable of recovering lost photos with just three steps. The software that fits this description is 4DDiG Mac Data Recovery software. It is capable of:
- Completely recovering all lost data from a Mac computer and other Mac-supported devices such as digital cameras, USB flash drives, and SD cards.
- It also supports macOS Ventura, M1 Pro, M1 Max, M1, and T2 chip Mac computers.
- It has a high recovery success rate.
- It is fast and easy to use as it only requires three clicks to recover lost data from a Mac computer, even without disabling SIP.
Below you will find the using steps involved in recovering lost photos with the use of the Tenorshare 4DDiG Mac data recovery software.
For PC
Secure Download
For MAC
Secure Download
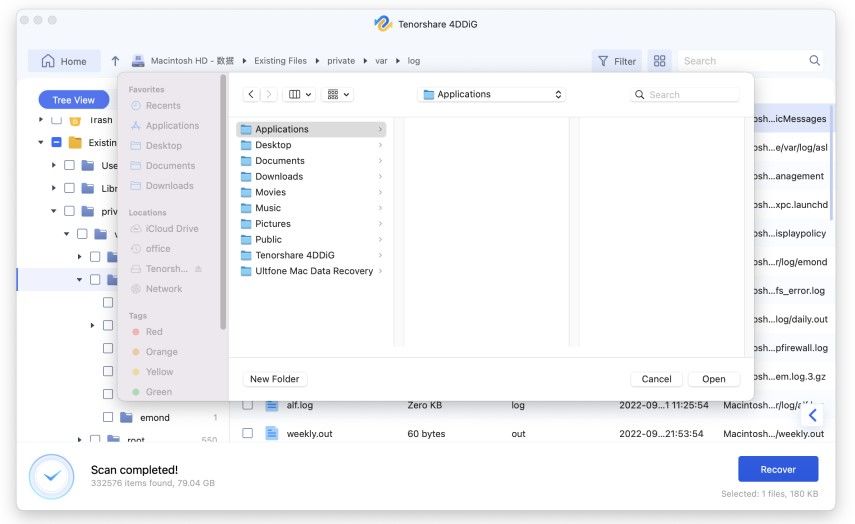
- Launch the software after installing it and then find the location with the lost photos on your Mac computer. Place your cursor over the location and click on the “Scan” icon that pops up to begin the recovery process.
- Once the scan process is complete, you will be presented with the scanned result. Here, you can preview more details by clicking on specific file types.
- After inspecting the results, it is time to recover your photos to a safe location. Click on the “Recover” button then choose a secure location to store your recovered photos. On no account should you recover your precious photos to the same location you first lost them.


Part 3: How to Avoid Losing Photos on Mac
Learning how to avoid losing photos on Mac is as important as learning how to retrieve them. It will not only save you time but prevent you from stressing over them. Properly moving and storing videos on your Mac computer is one way to avoid losing them in the process. Below are some useful tips you can adhere to when importing, moving, and storing photos on your Mac to avoid losing them.
- Make use of a supported USB cable to connect your iPhone or digital camera to your Mac computer. When connecting an iPhone, you will see a prompt that says “Trust This Computer”, tap on “Trust” to proceed.
- Usually, the Photos app opens automatically but if it doesn’t, then you can manually open the Photos app.
- After launching the Photos app, you will be presented with an import screen carrying the photos on your iPhone and digital camera. In situations where you can’t find the import screen, click on your iPhone or digital camera storage from the sidebar on your screen.
- Here is where you can safely import any photo(s) of your choice by selecting them and clicking on “Import Selected”.
Aside from moving and storing photos on your Mac computer from an iPhone or digital camera, you can also import and save photos from an external hard drive to a folder or Finder. To do so safely and without losing data will require connecting the external hard drive to your computer. You can proceed by doing the following:
- Move your photo files onto the Photos app icon located in the Dock using the drag-and-drop method
- Import your photos from the hard drive by navigating to the Photos app and clicking on “File” which has the import option. Proceed by clicking on “Review” after selecting the photos you wish to import.
Conclusion
At this point, we can all agree that this article has thoroughly addressed and answered the question; where are mac photos stored? Whenever you begin to feel insecure about the safety of your photos, ensure you make backups to avoid regrets in the future. And although these photos can be retrieved, you’d want to save your time and strength for something else. In situations where your valuable photos get lost due to accidental deletion, lost partition, or any other scenario, you can always make use of 4DDiG Mac Data Recovery Software to get them back.
 ChatGPT
 Perplexity
 Google AI Mode
 Grok
Grok


