How to Use 4DDiG Mac Data Recovery
Learn how to use 4DDiG Mac Data Recovery to recover files from hard drives, SD cards, crashed Macs, and even iCloud. Plus, get tips on repairing recovered photos and videos.
Recover from Hard Drives
-
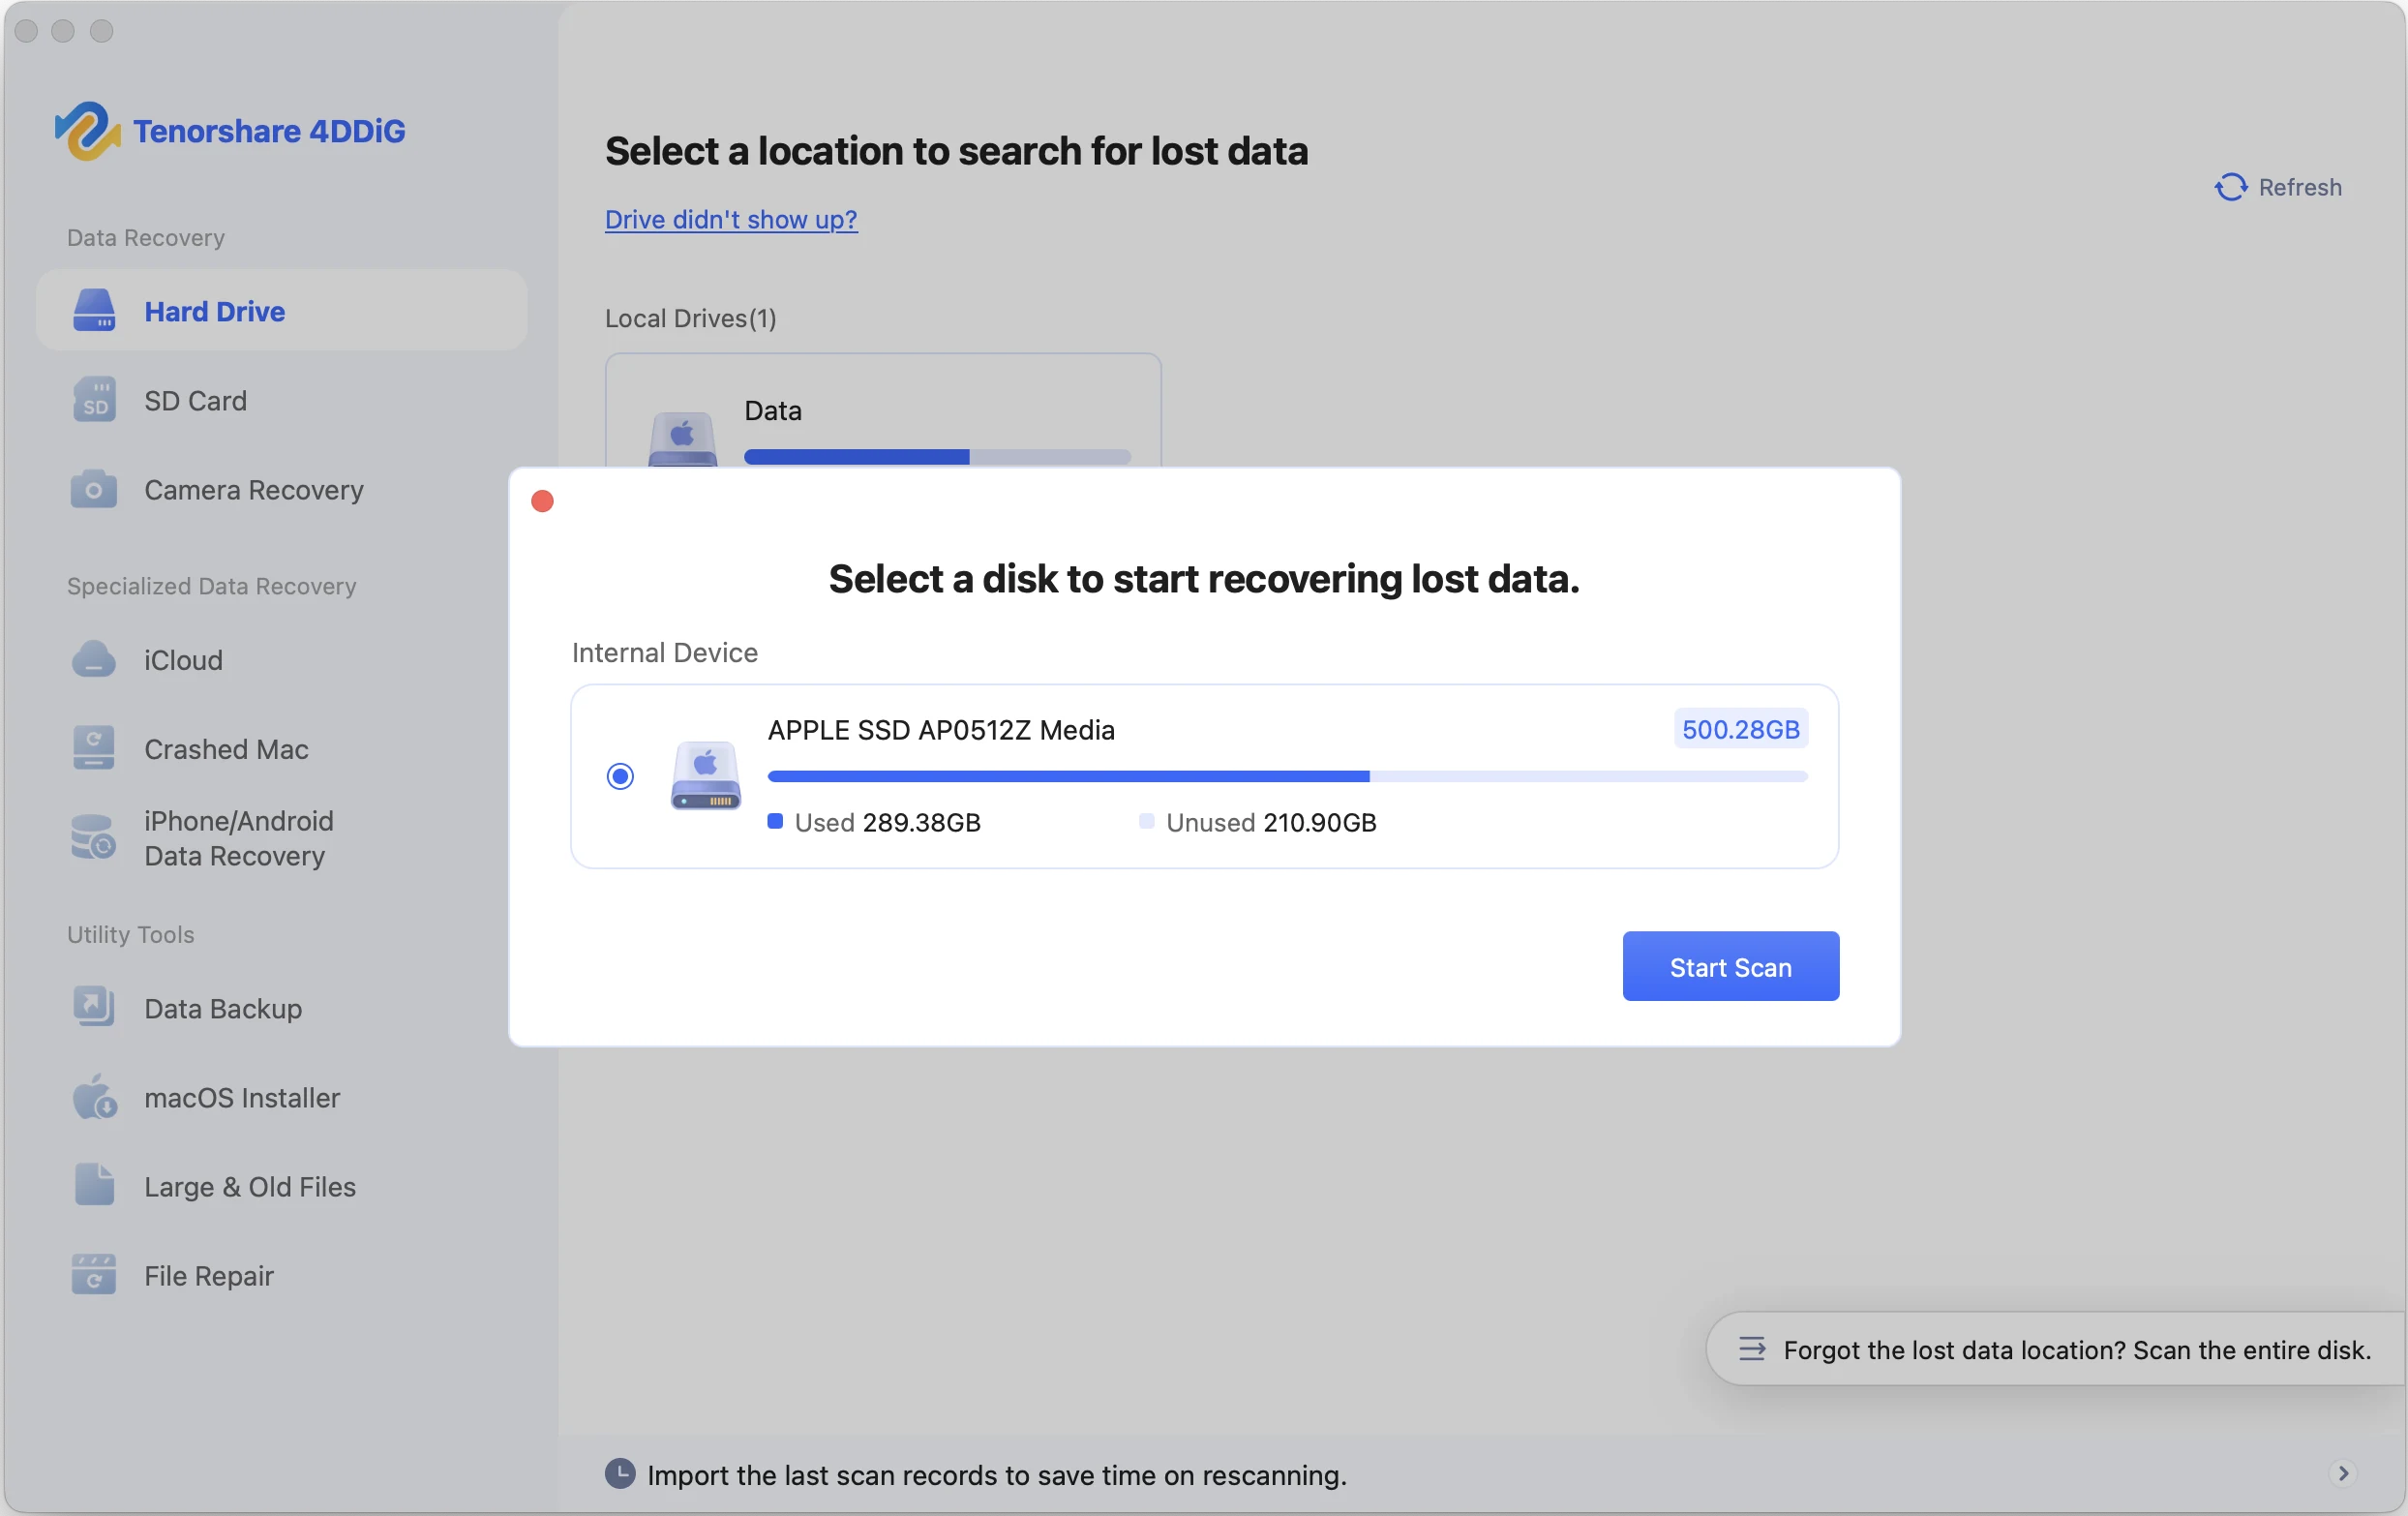
Step 1:Select a Location
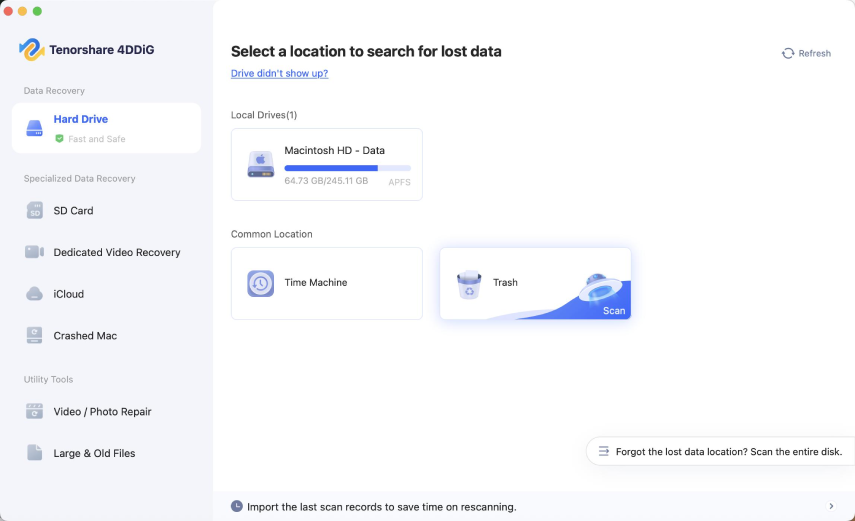
Launch 4DDiG Data Recovery for Mac and select the location where you lost your data, such as a local drive or a common location like 'Time Machine' or 'Trash'. Then click 'on the location to begin. (For external drives, make sure they're connected to your Mac first.)
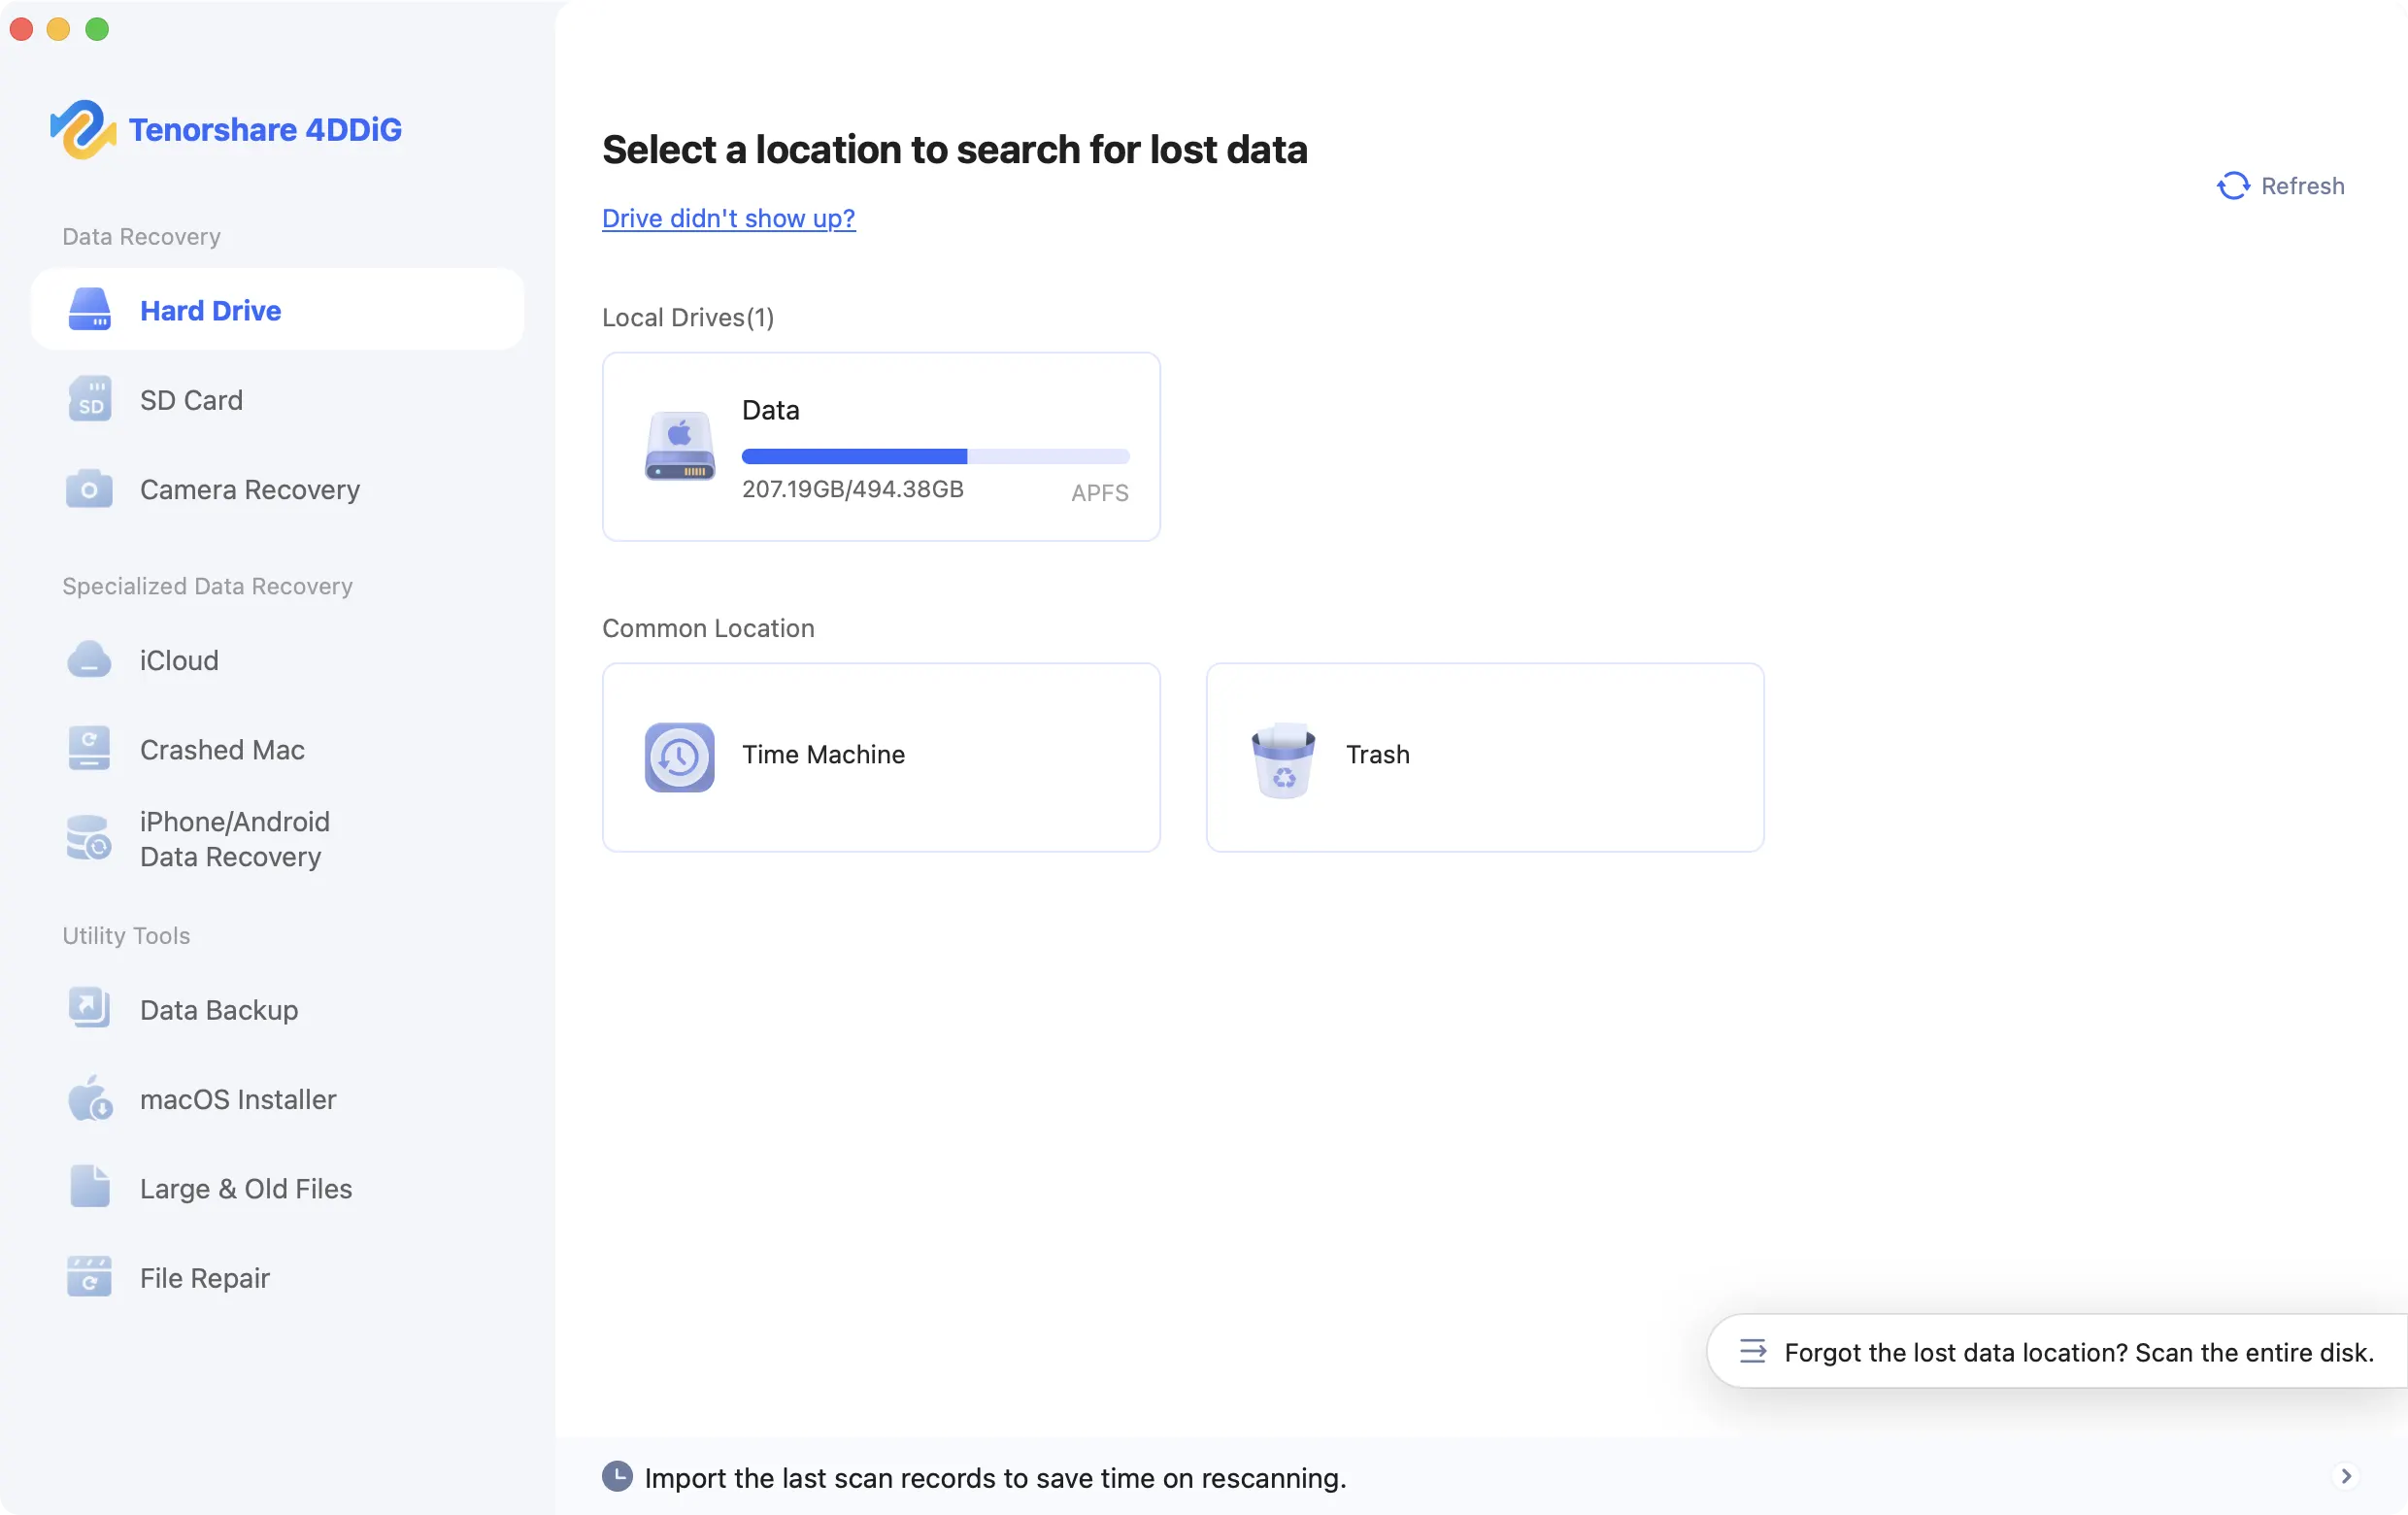
You can choose to scan only the specific files you want to recover, or scan all file types.

Quick Tip: If you're unsure of the lost data location, just follow the guidelines to scan the entire disk.
-
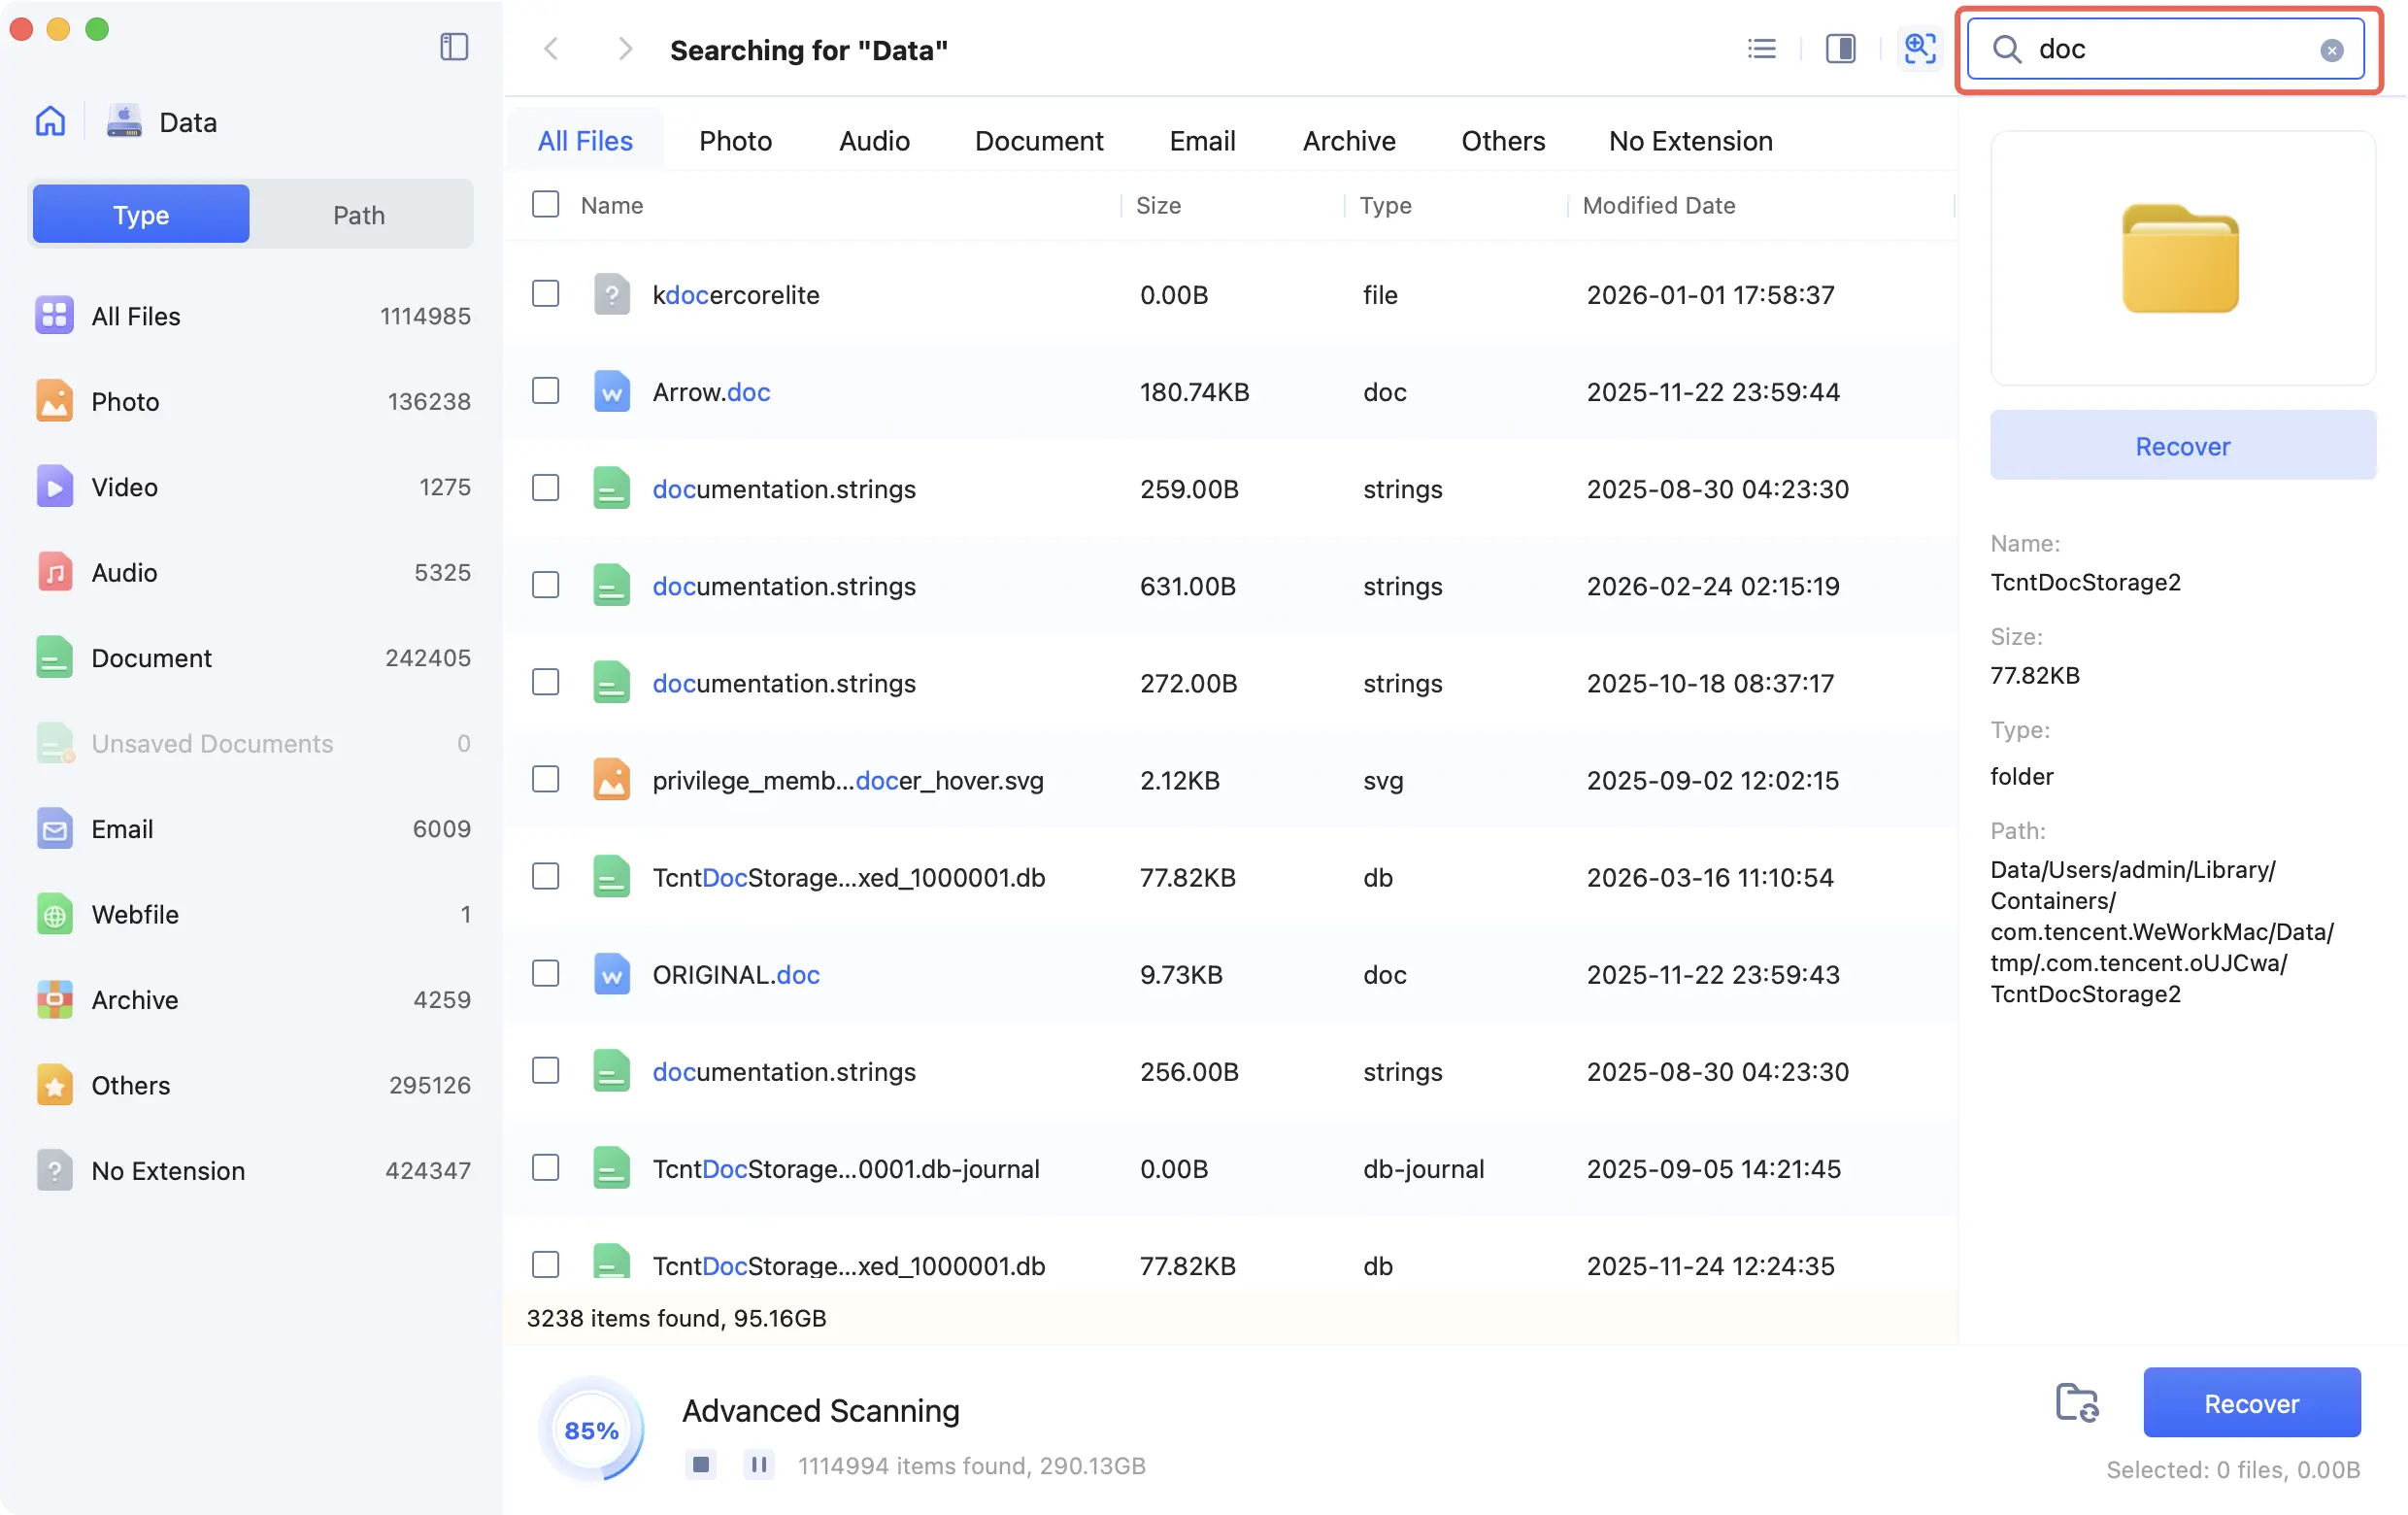
Step 2:Scan the Lost Files
4DDiG Mac will automatically begin a comprehensive scan. You can pause or stop the scanning process at any time.
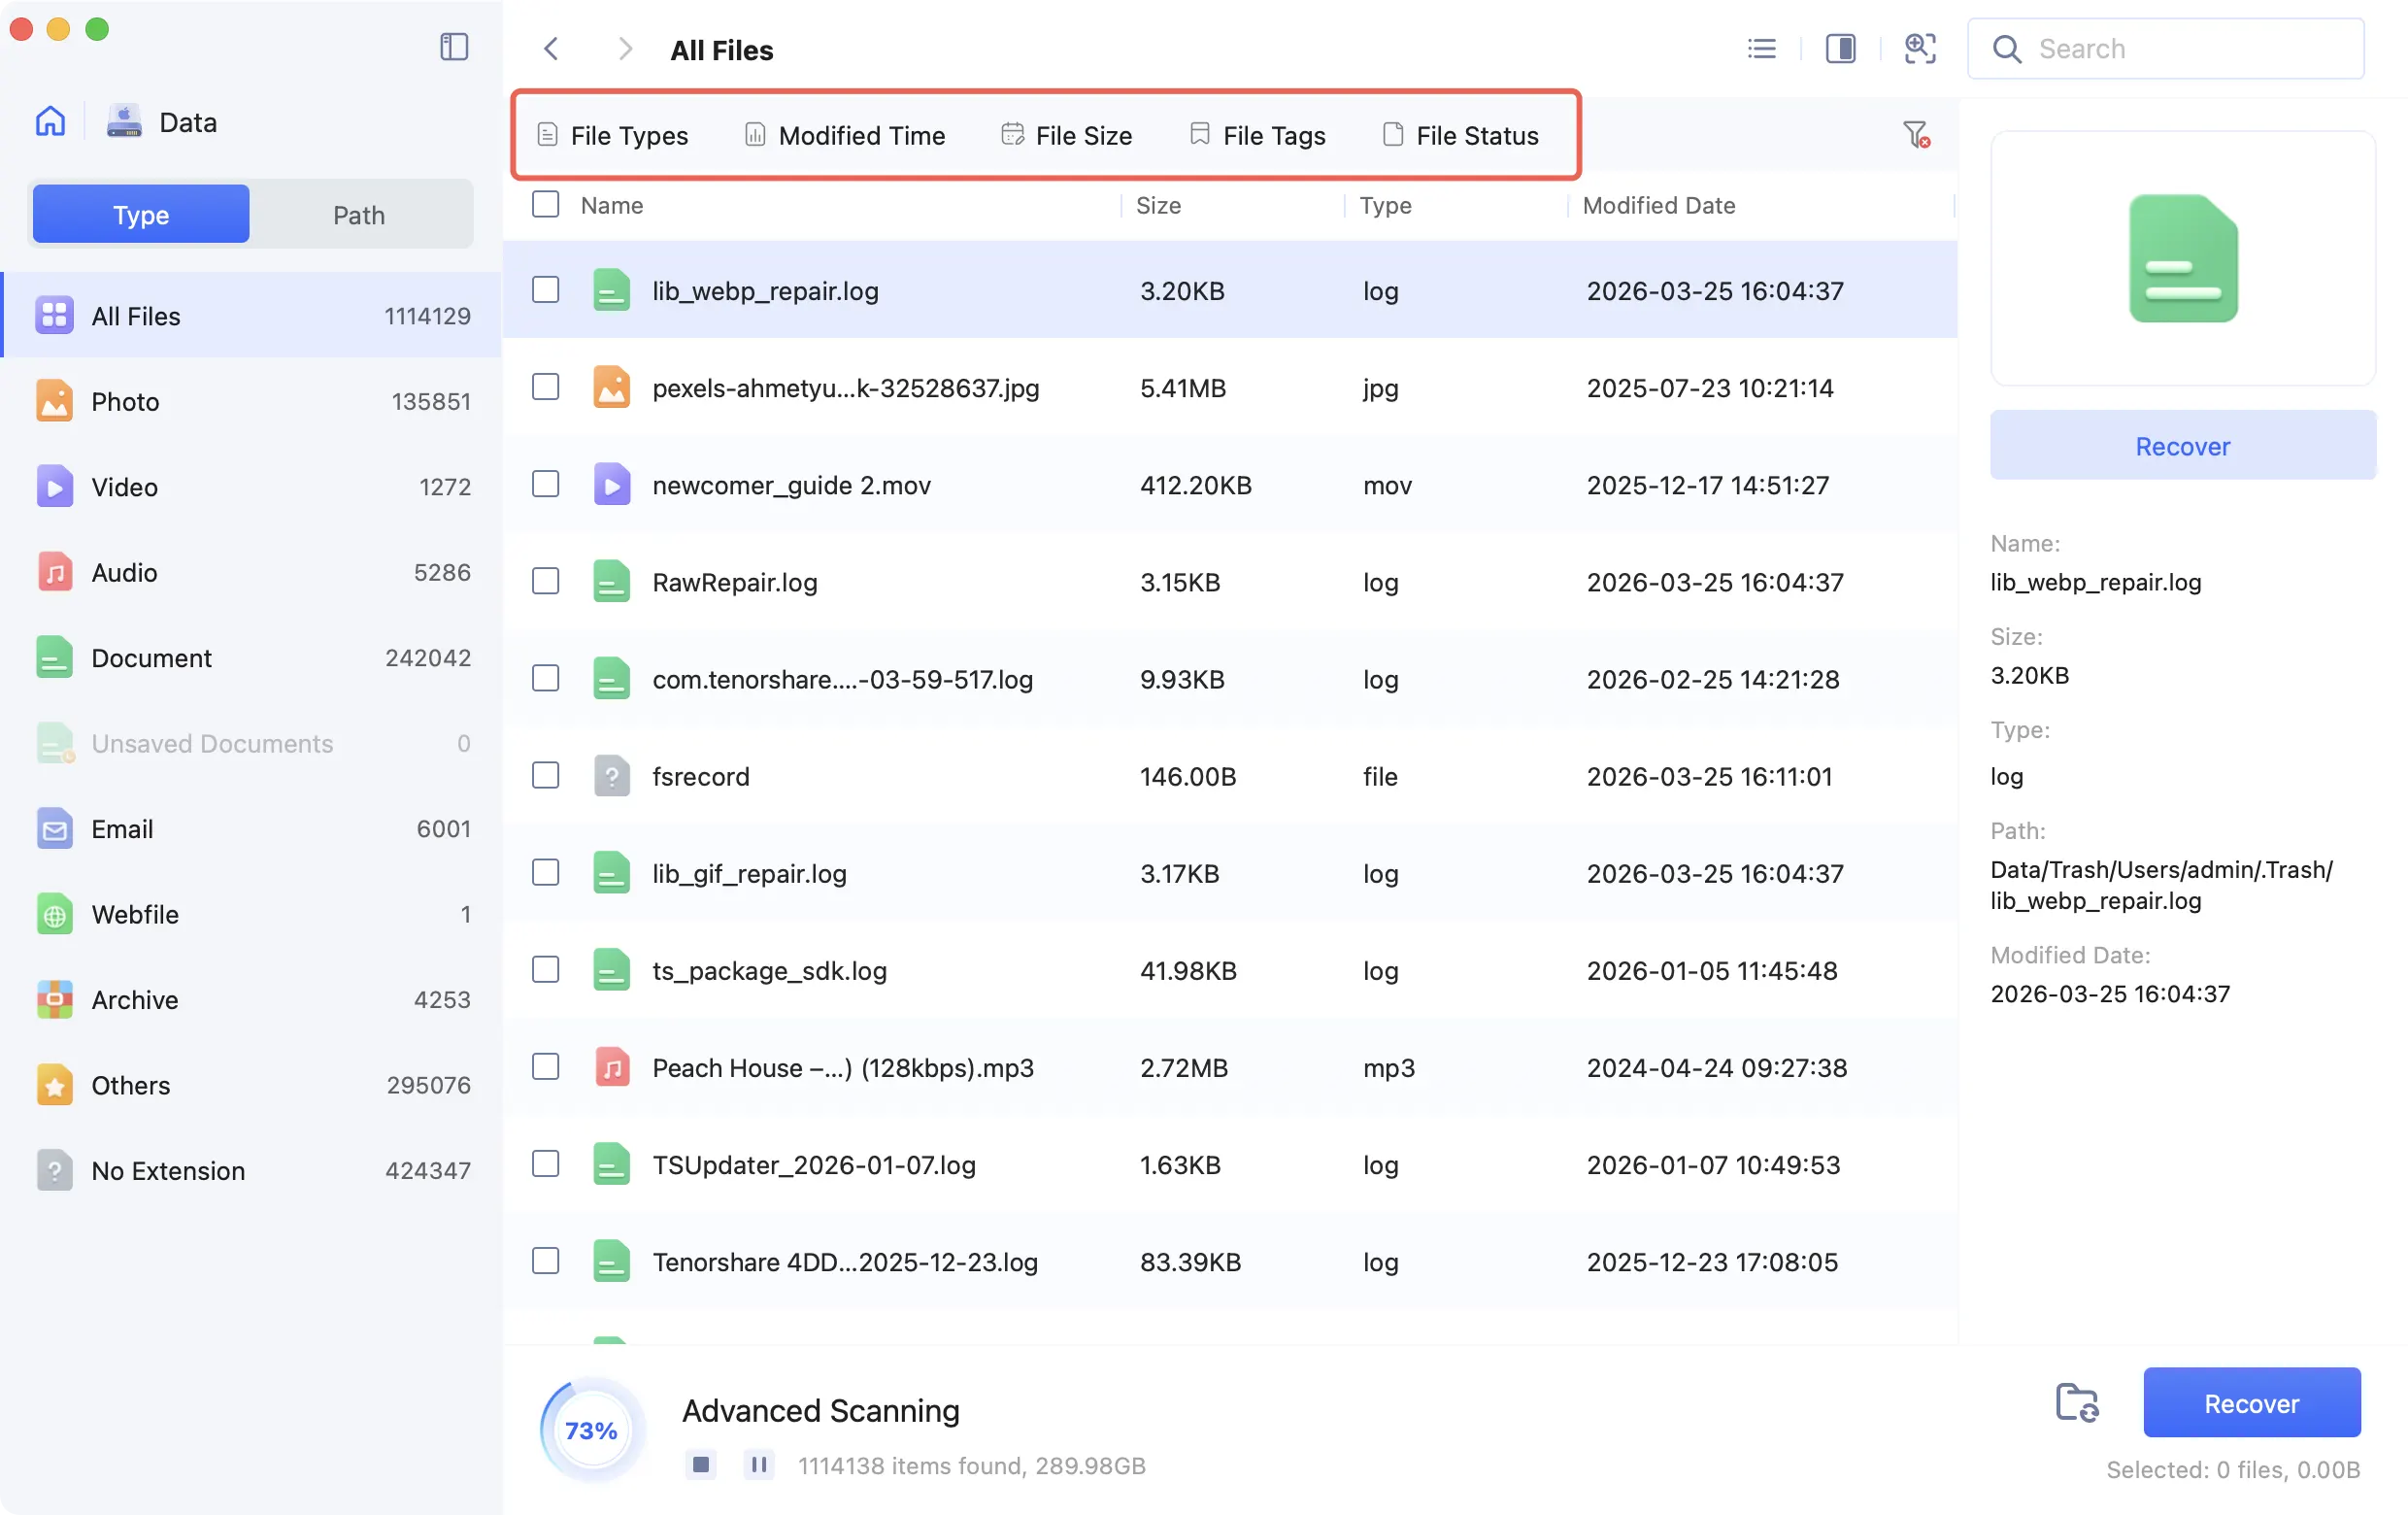
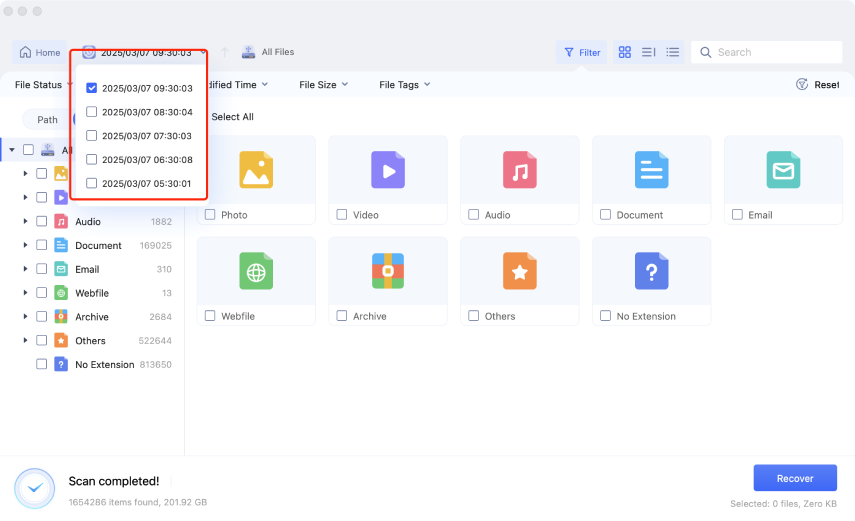
As the scan runs, you can filter and select files to recover by ‘File Status’, 'File Types', 'Modified Time', 'File Size', 'File Tags' or 'File Status'. Also, you can enter keywords in the top-right search box to easily find all matching files.
-
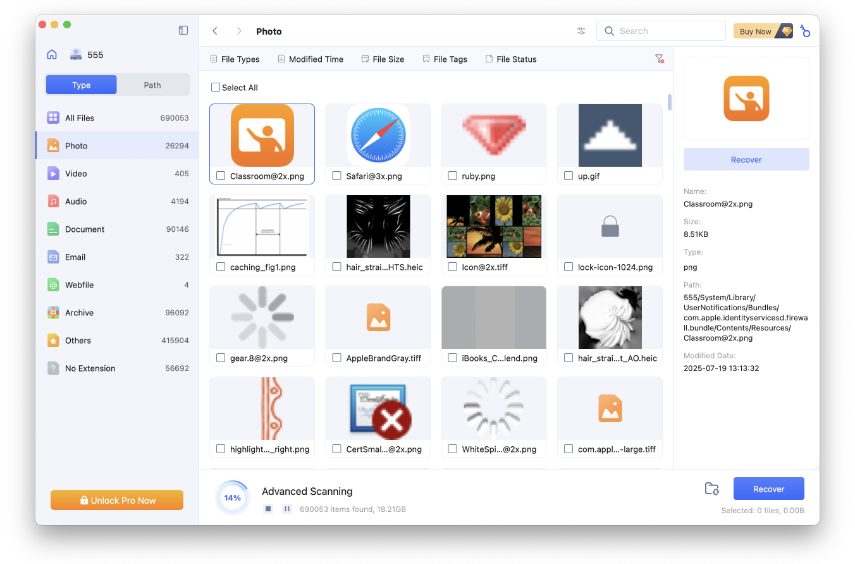
Step 3:Preview & Recover the Files
When the scan completes, you can click any file to preview its details then click the "Recover" button.
Quick Tip: 4DDiG has upgraded its recovery algorithm. When previewing recoverable files, you'll now see intelligent recommendations for your files, including similar content, potential duplicate, and related item. This helps users locate target files faster, avoid missing important data, and streamline the recovery process.
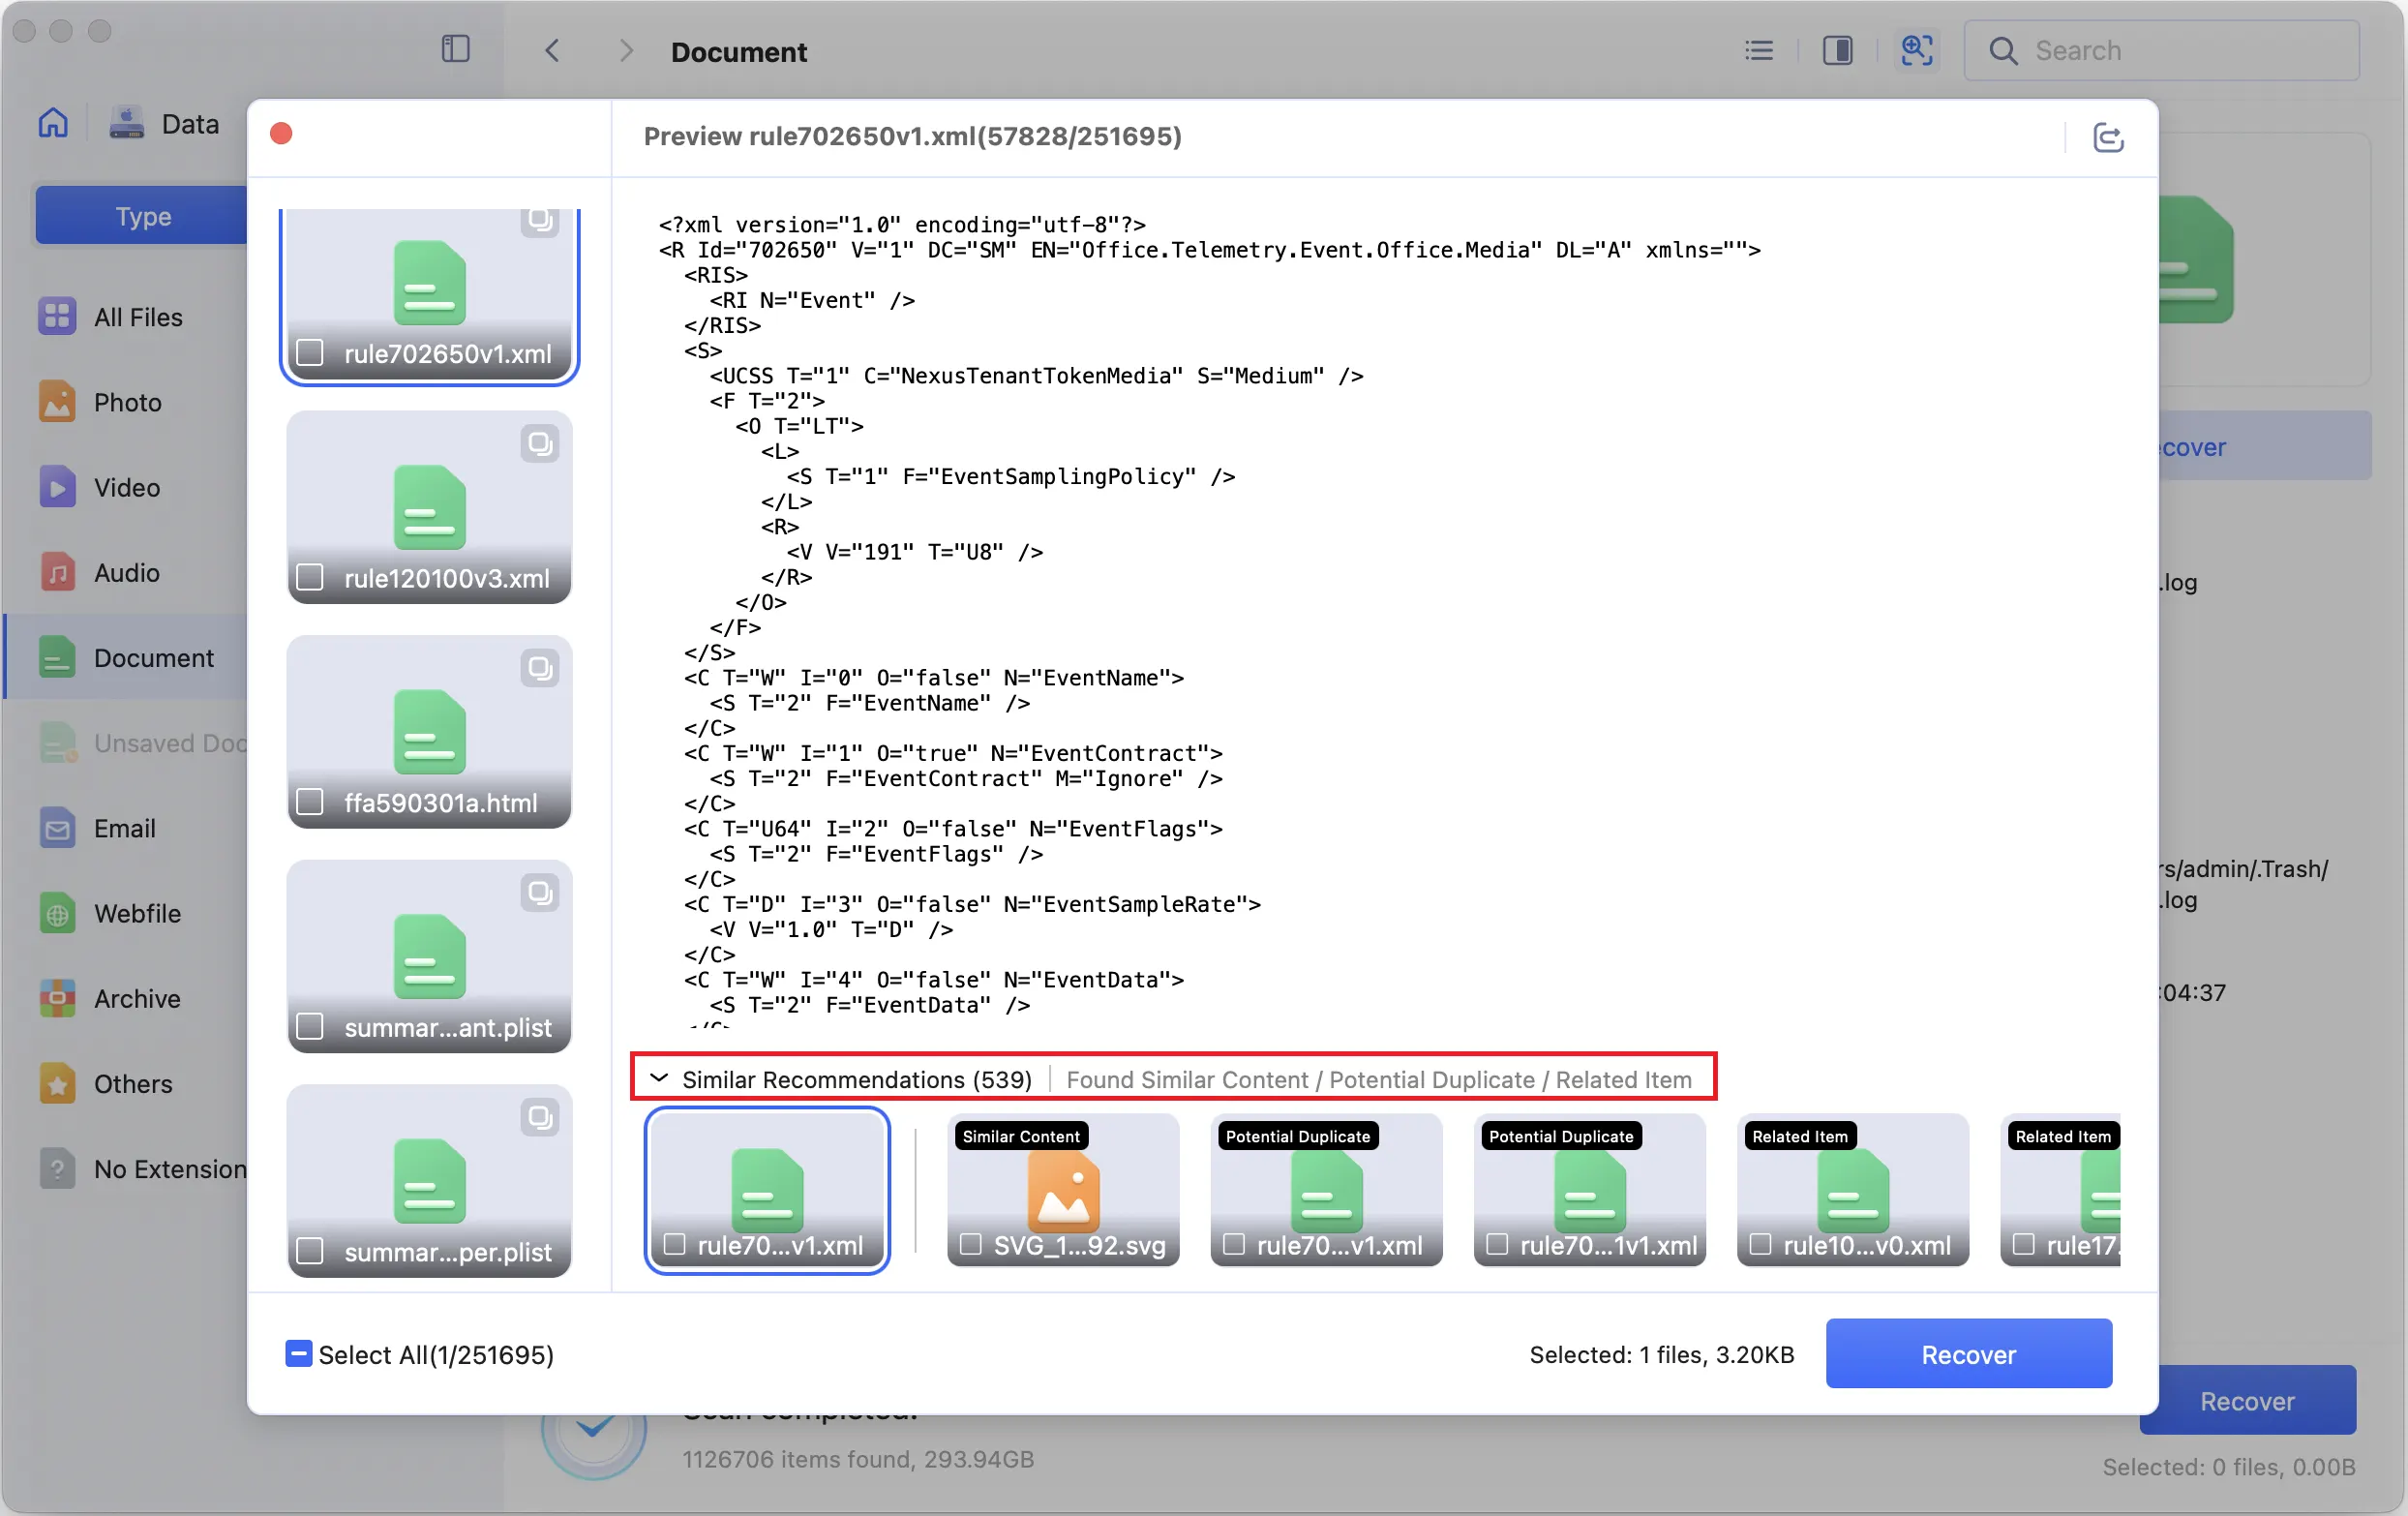
 What does the Similar Recommdations feature do:
1. Users may not remember file names but recognize the content. With similar content, they can start from one file and quickly find others of the same type.
2. Potential duplicates help users find repeated or redundant files. This avoids restoring the same file multiple times and saves time and storage space.
3. Data loss often happens in batches, such as within the same folder or time period. Related items bring up connected files together, reducing the chance of missing key data.
-
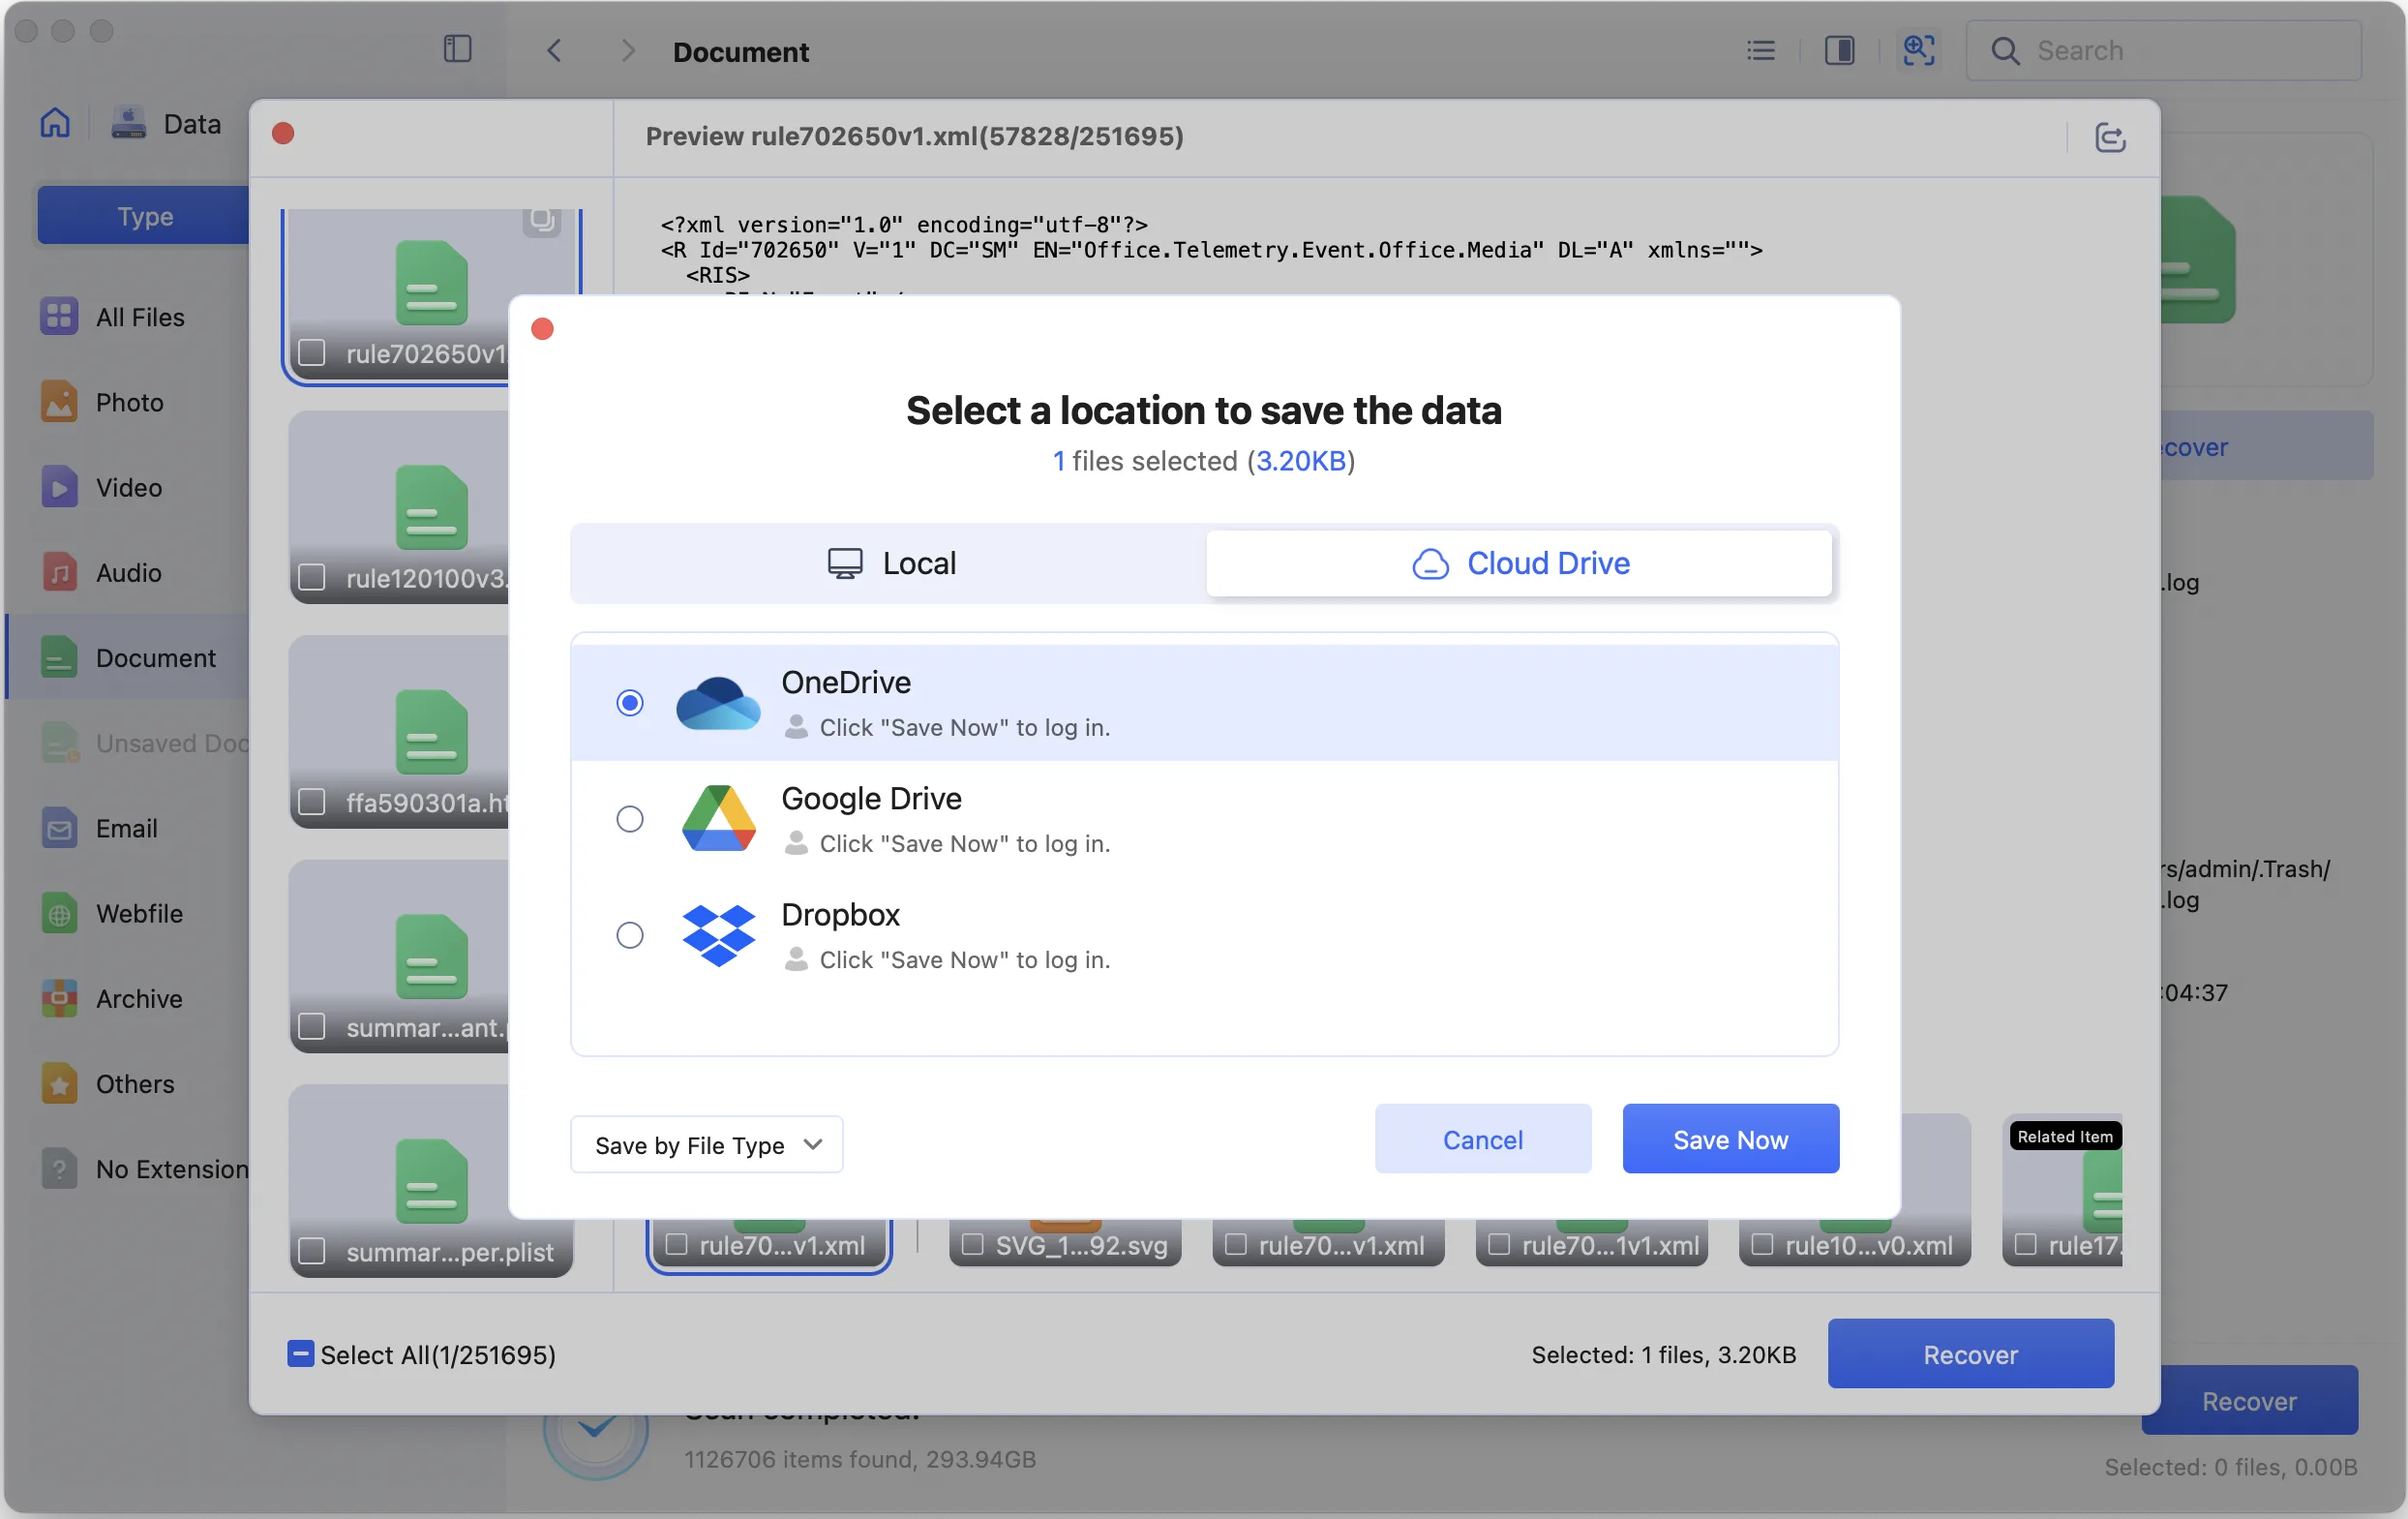
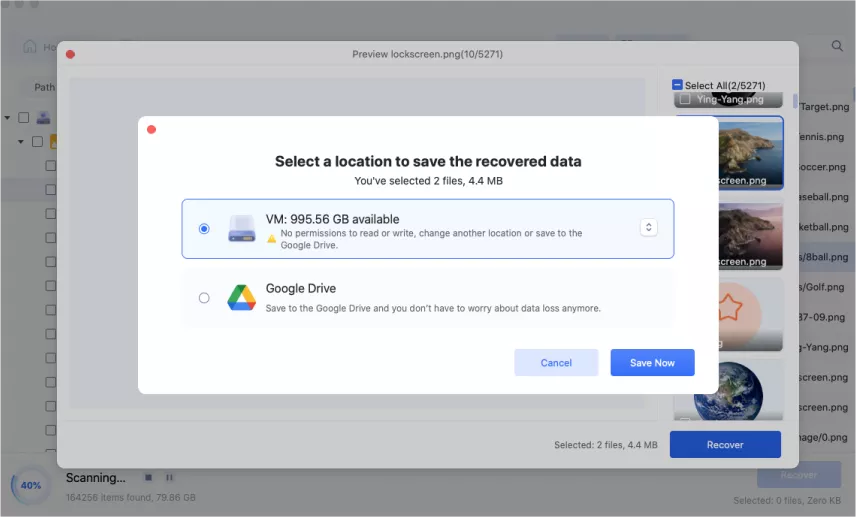
Step 4:Recover the Files
Now, you can choose a save path for the recovered files. You can save them either on your Mac or directly to the Cloud Drive. To ensure your data safety, avoid saving them back to the same location.
Video Tutorial on Mac Computer Data Recovery
![]() Secure Download
Secure Download
![]() Secure Download
Secure Download
Recover from Emptied Trash
To recover files emptied trash on Mac or permanently deleted files, choose 'Trash' under 'Common location' as the scan location.
Video Tutorial on Emptied Trash Recovery
![]() Secure Download
Secure Download
![]() Secure Download
Secure Download
Recover from Time Machine
Time Machine backs up your entire Mac by default—including system files, apps, and user data—but doesn’t support restoring individual file types (e.g., photos or documents alone).
However, 4DDiG Mac data recovery can accurately scan specific file types, support quick preview and selective recovery, and greatly save retrieval time. Follow the steps below to restore from a Time Machine backup:
-
Step 1:Select the Time Machine
Open the software and select 'Time Machine' to begin scanning. (Note: If your backup files are stored on an external hard drive, connect it to your Mac first.)

-
Step 2:Select a Backup File You Need
4DDiG will automatically detect available Time Machine backups on your Mac. Select the desired backup, then click 'Import' to continue.

-
Step 3:Recover the Files
After the scan completes, select the files you need to recover. Tip: You can click the time option at the top of the interface to select a specific backup point.
Recover from iCloud
-
Step 1:Select the ‘iCloud’
After launching the program, select iCloud tab from the left list After that, Click "Get Started" to prepare to scan all data on your iCloud.

-
Step 2:Sign in to Your iCloud Account
Enter your Apple ID and password to sign in to your iCloud account.

-
Step 3:Scan the Selected File Types
Select the types of iCloud data you want to recover, such as Photos, Contacts, Notes, and more, then click 'Confirm' to proceed.

-
Step 4:Recover the iCloud Files
Select the files you want to recover and restore them. Save deleted files from iCloud to your Mac locally or to the cloud drive.
![]() Secure Download
Secure Download
![]() Secure Download
Secure Download
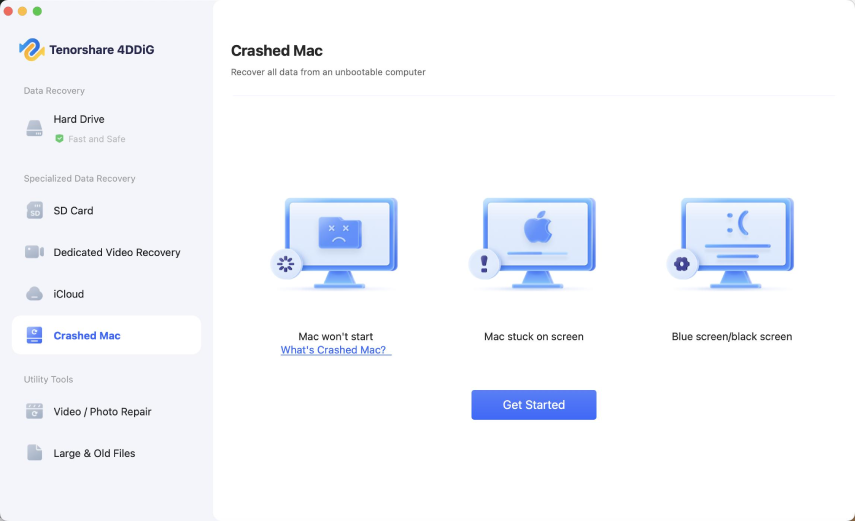
Recover from Crashed Mac
To begin, click the 'Get Started' button. Then, there are two modes for your chosen option: 'USB Recovery' and 'macOS Recovery Mode'.
Option 1. USB Recovery
First, you'll need another Mac to create a bootable USB drive. Then, use this drive to install the software on your target computer.
![]() Secure Download
Secure Download
![]() Secure Download
Secure Download
-
Step 1:Insert your USB Drive
Launch the 4DDiG Mac on the working Mac computer. Then insert the USB drive and select the USB Recovery, click the ‘Confirm’ button.

-
Step 2:Create a Bootable USB Drive
Select "Recover from a bootable USB drive" and create a bootable drive using an external USB/DVD drive, then click "Create Now".
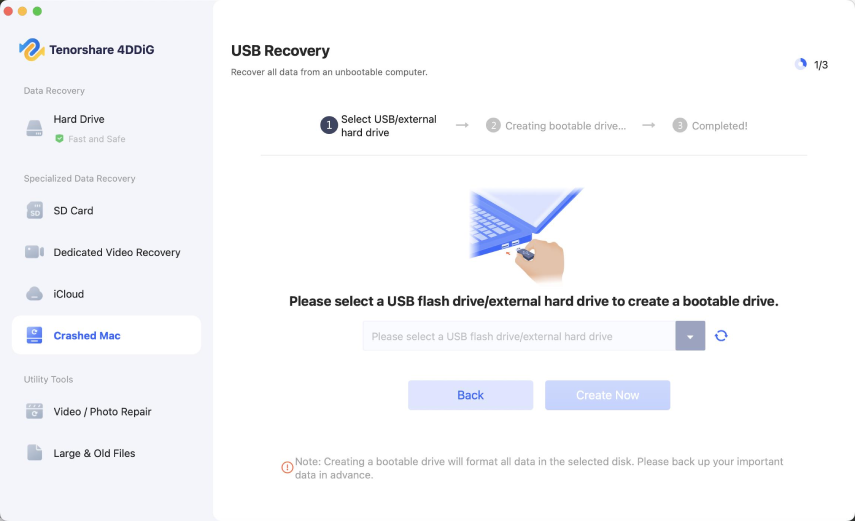
 Note
Note
The USB/DVD will be formatted to create a bootable drive. Also, do not operate the drive during the creation.
-
Step 3:Boot Crashed Mac from USB Drive
Connect the bootable USB drive or external hard drive to your crashed Mac. Start the Mac and hold the Option key to select the bootable drive from the startup menu.
-
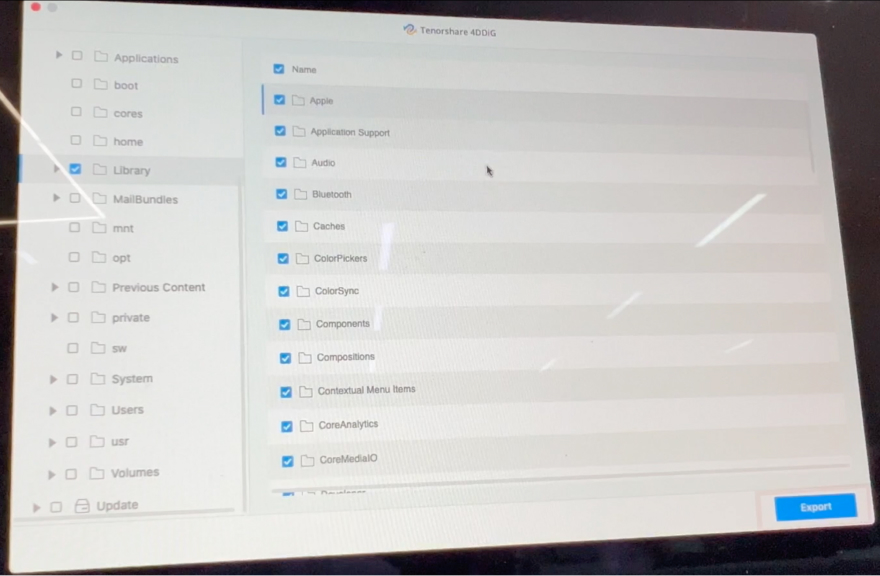
Step 4:Recover Data from Crashed Computer
Launch 4DDiG Mac, select the internal hard drive, and click 'Scan' to find lost files. After scanning, preview and select the files to recover. Click 'Export' and choose an external drive to save them.
Option 2: Recover from macOS Recovery Mode
If creating a bootable USB drive seems troublesome, you can instead enter macOS Recovery Mode on your crashed Mac to recover your data.
-
Step 1:Select the ‘macOS Recovery Mode’
After your selection, click 'Confirm' to proceed.

-
Step 2:Step 2. Enter the macOS Recovery Mode
Follow the instructions on the interface to enter recovery mode step by step.

Watch the Video Tutorial Here
![]() Secure Download
Secure Download
![]() Secure Download
Secure Download
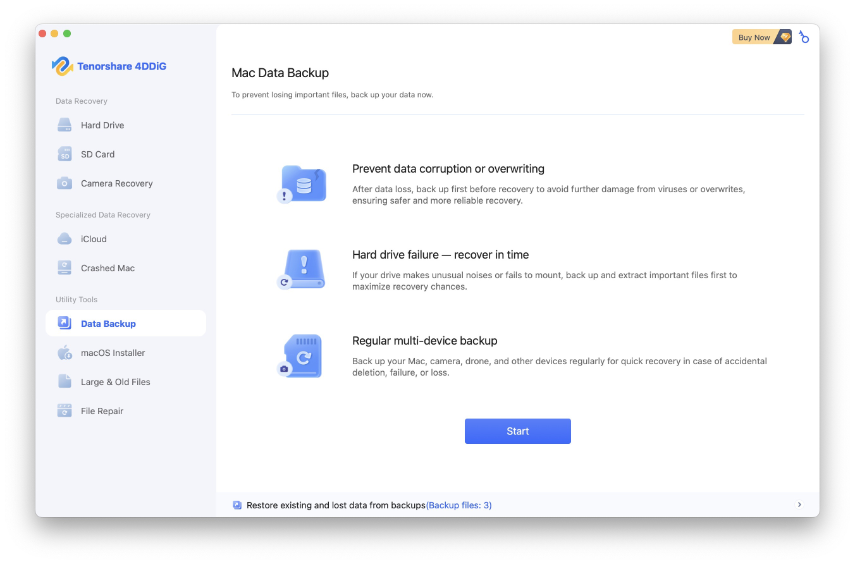
Data Backup
If your source disk (like Macintosh HD) is unstable or at risk of failing, start by creating a full disk image. All scans and recovery are done on this image to keep your original data safe. 4DDiG’s Data Backup feature makes an exact copy of your disk, so you can easily recover any lost data.
![]() Secure Download
Secure Download
![]() Secure Download
Secure Download
Create A Drive Backup Image File
-
Step 1:Select the function
Launch the software and click on the Data Backup in the left sidebar. After learning why backup matters, just click Start to get it going.
-
Step 2:Connect an external drive
Connect an external drive or make sure your local storage has enough free space. The storage must be at least as large as the used space on the disk you want to back up.
-
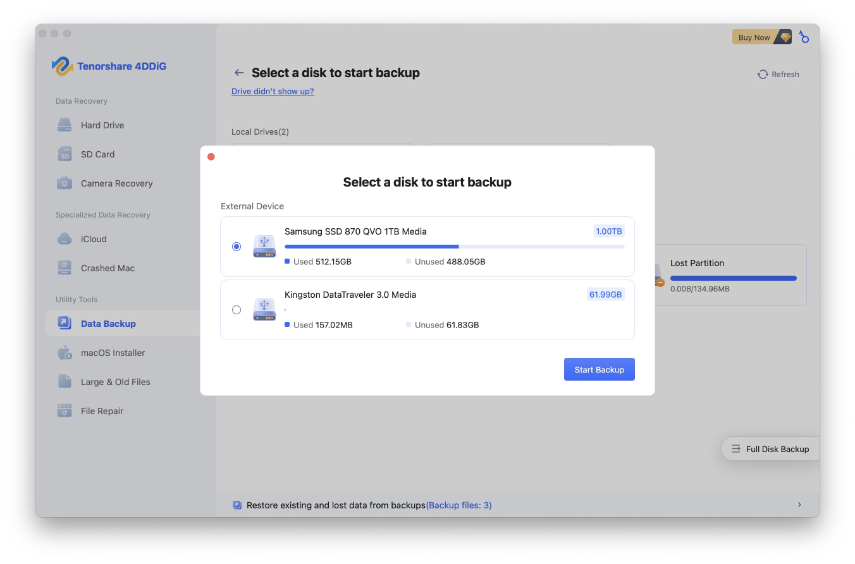
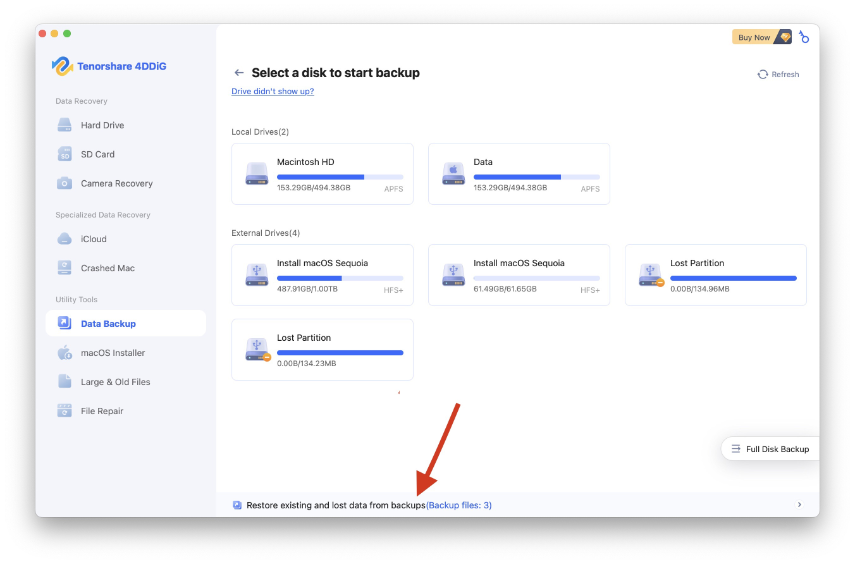
Step 3:Select a disk to start backup
All available disks and partitions on your computer will be shown. Select the source disk you want to back up, for example, Macintosh HD.
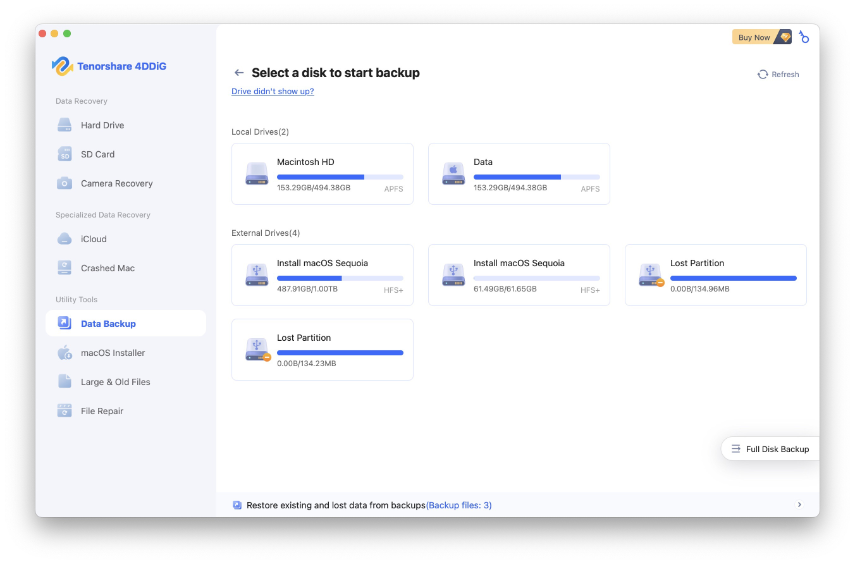
You can also back up your external disk by clicking "Full Disk Backup" on the right. After selecting it, click the "Start Backup" button.
-
Step 4:Select the save location
Next, a pop-up window will appear. You can rename your backup and choose the backup type—it's recommended to leave the default settings.
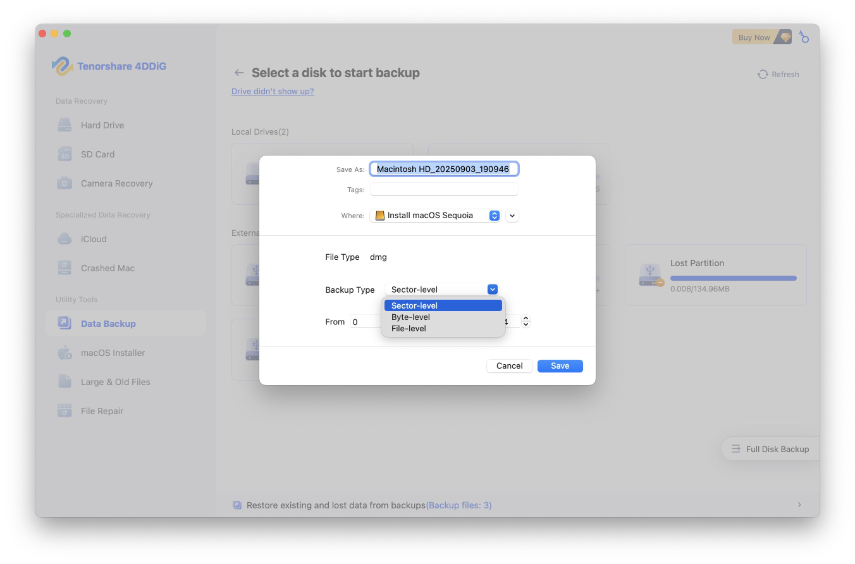
Select the storage location where you want to save the backup file. Once done, click Save, and 4DDiG will start the backup. (Note: Make sure the target location has enough free space. For example, if your Macintosh HD is 256GB, the external drive needs at least 256GB free.)

-
Step 5:Start backup
During the backup, you'll see a progress bar at the bottom displaying progress, speed, and estimated time left. You can pause or cancel the backup at any time.
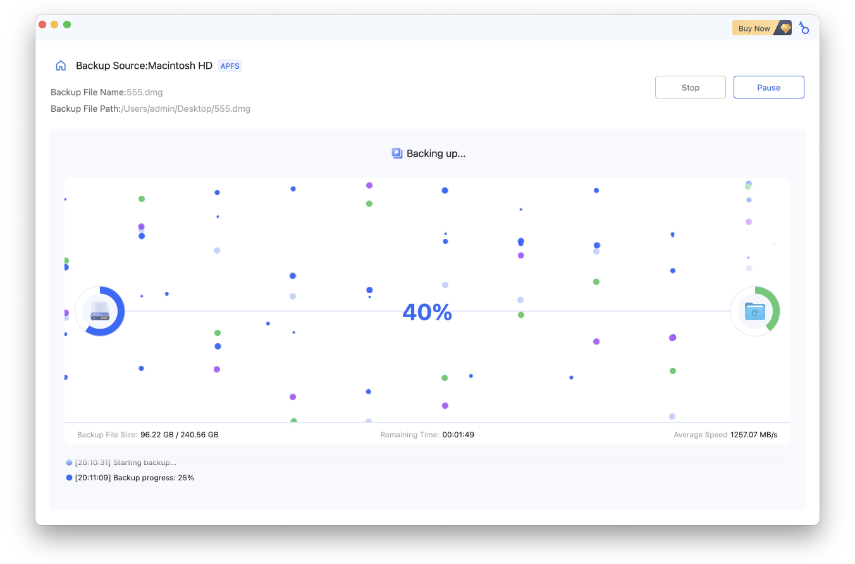
Just wait for the process to complete. The time required may vary depending on your drive’s size and condition.
-
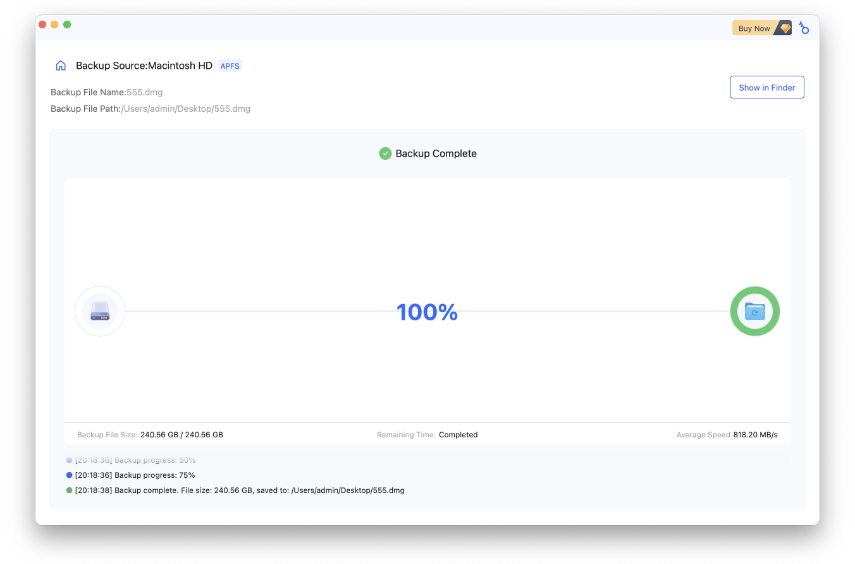
Step 6: Complete backup
When the process is complete, you’ll have a DMG file containing an exact copy of your drive. Click “Show in Finder” to view it or back to home.
Restore The Image Backup File
-
Step 1:Click the Restore option
You’ll find the Restore option at the bottom of the program.
-
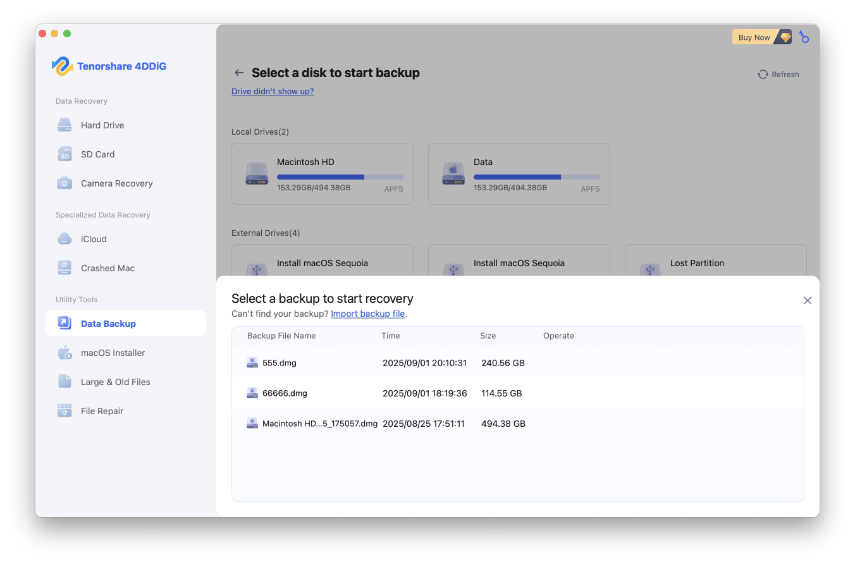
Step 2:Select and Scan the backup file
Select the backup file you want to restore, and click ‘Scan’ button. It will then scan the image to recover the existing and lost data.
-
Step 3:Recover the backup file
Select the file you want to recover, you can use the filter buttons to organize the results. When ready, click Recover.
Video Tutorial on How to Backup Mac
![]() Secure Download
Secure Download
![]() Secure Download
Secure Download
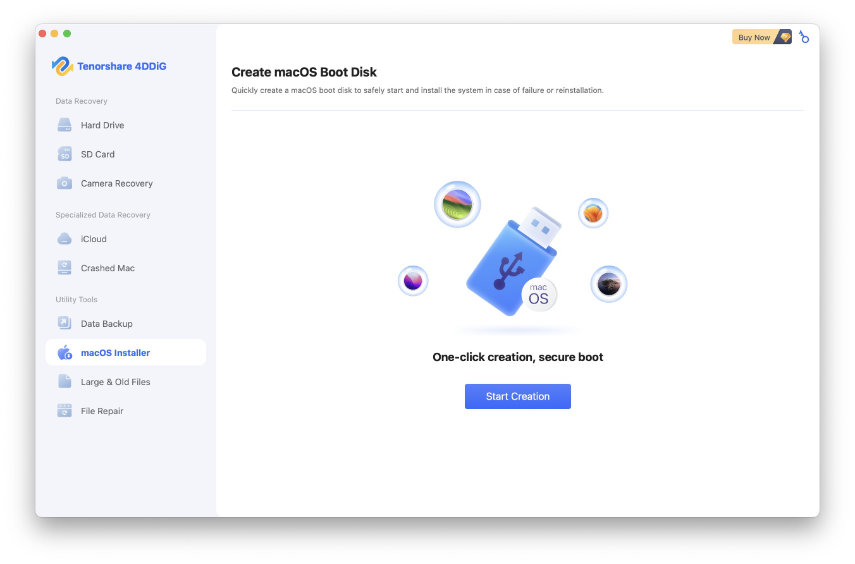
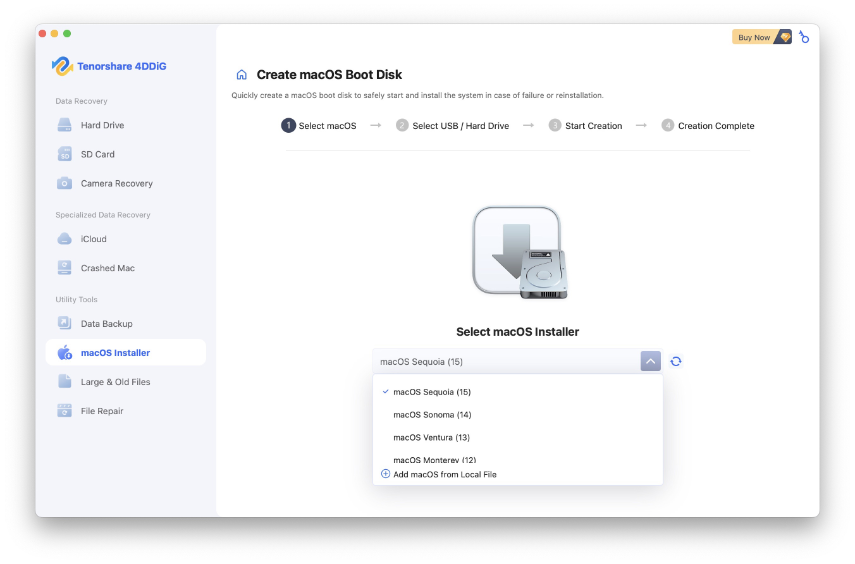
macOS Installer
A bootable macOS installer lets you start up your Mac directly from the media and install a specific version of macOS. This tool is especially handy for clean installations, troubleshooting with macOS Recovery, or setting up multiple Macs. The following is how to create macOS boot disk.
-
Step 1:Select the function
Launch 4DDiG Mac data Recovery, go to Utility Tools, choose "macOS Installer", then click "Start Creation".
-
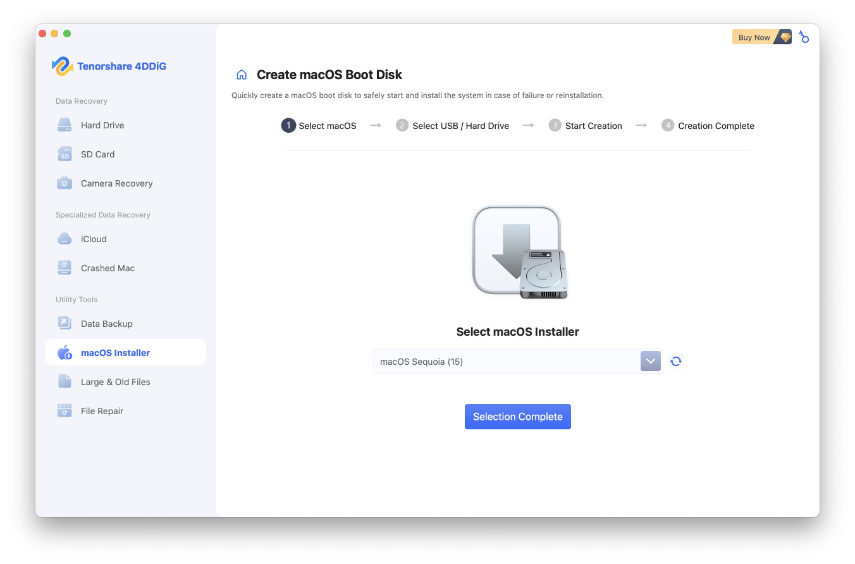
Step 2:Choose a macOS Version
From the drop-down list, you can select various macOS versions like macOS Sequoia, Sonoma, Ventura, Monterey, Big Sur, and older versions. Choose the version you want to install, and click “Selection Complete” to start creating the bootable installer.
-
Step 3:Connect a USB flash drive/external hard drive
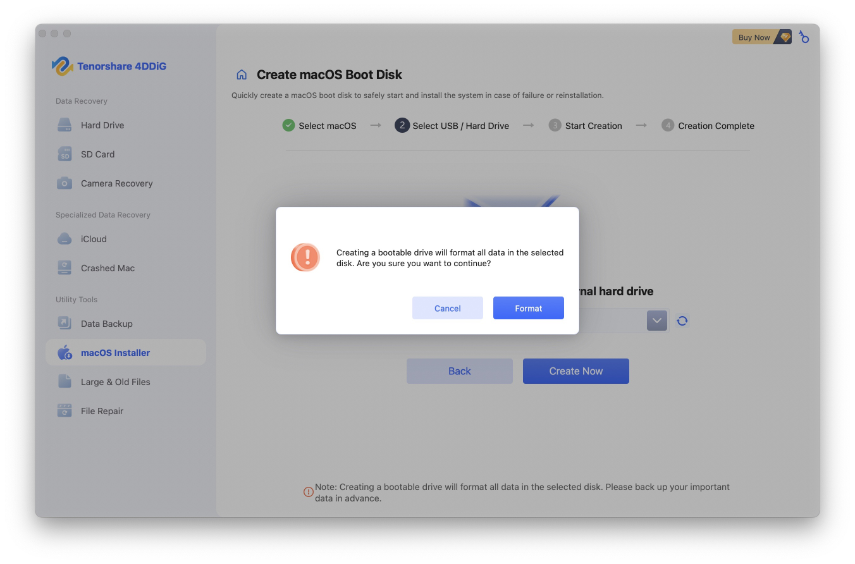
Insert an external drive that has more than 19GB of free storage space. Select the drive and then click "Create Now".
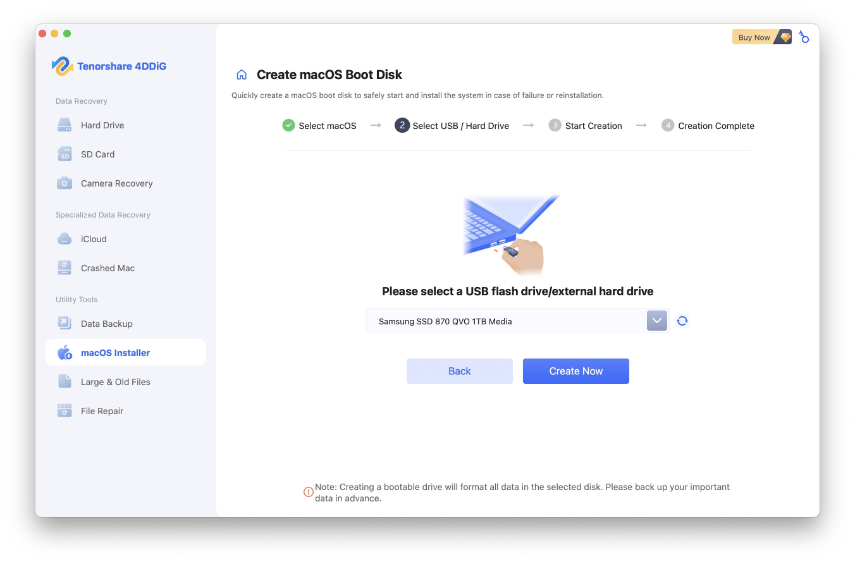
Warning: This process will erase all data on the USB. Back up important files before you continue.
-
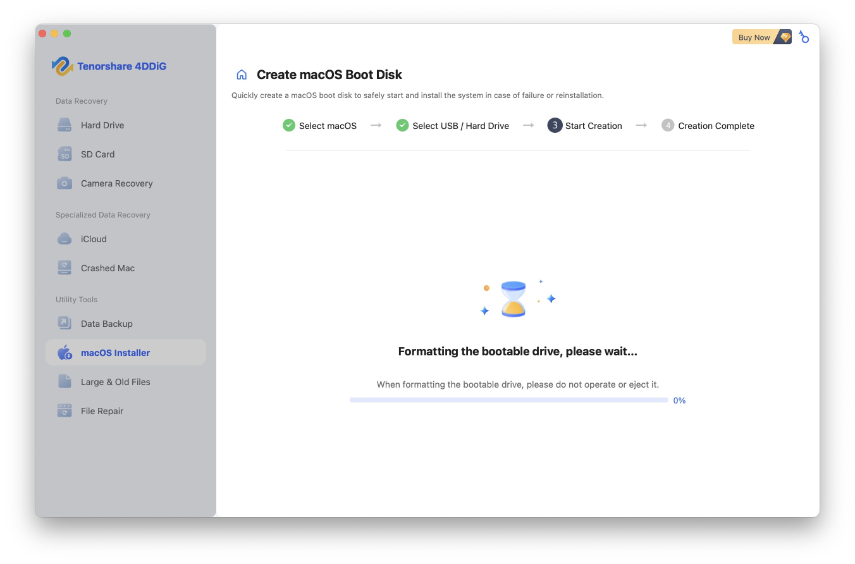
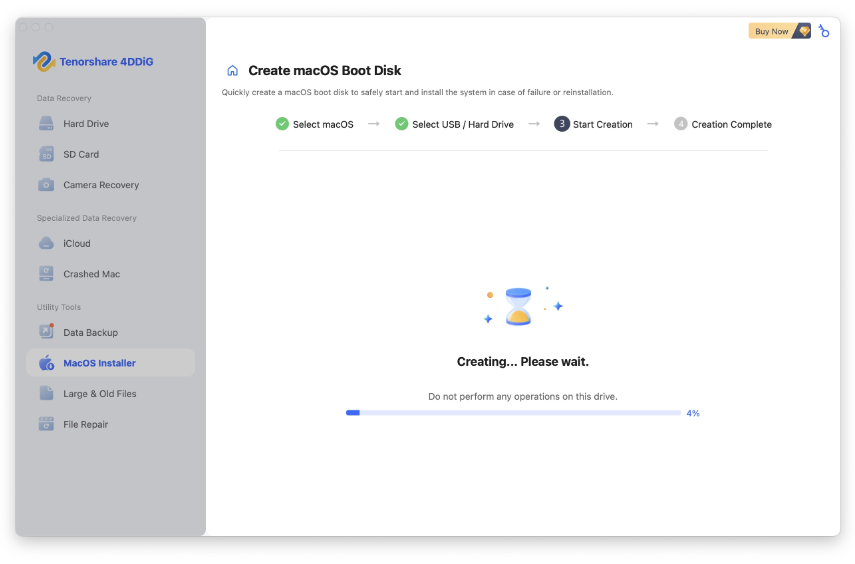
Step 4:Start creation
The software will automatically format the USB and create the macOS boot disk. Do not perform any operations on this drive during the creation process.
-
Step 5:Complete the creation
After creating the bootable macOS installer, you can follow the on-screen guide to reinstall macOS on the faulty computer.
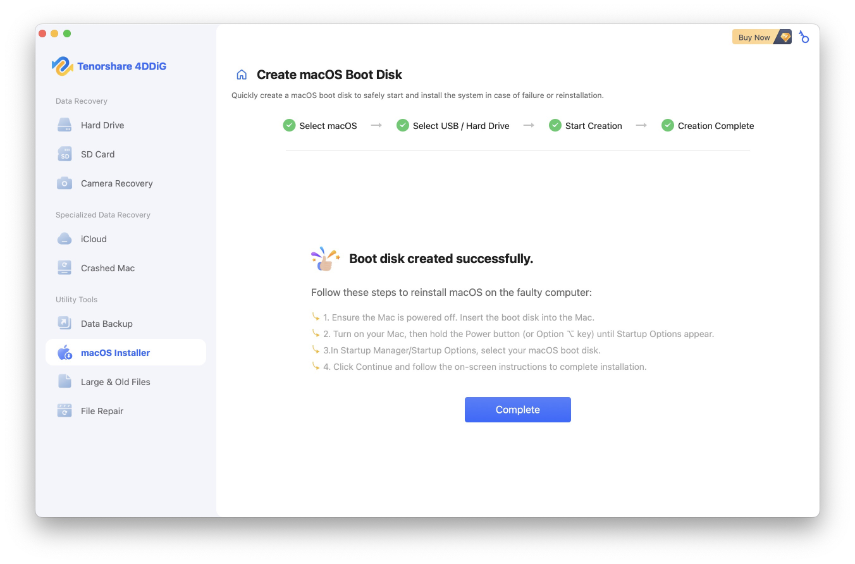
If you have already downloaded macOS installer, click "+" icon and select the installer you have downloaded.
Video Tutorial on Creating macOS Bootable Disk
![]() Secure Download
Secure Download
![]() Secure Download
Secure Download
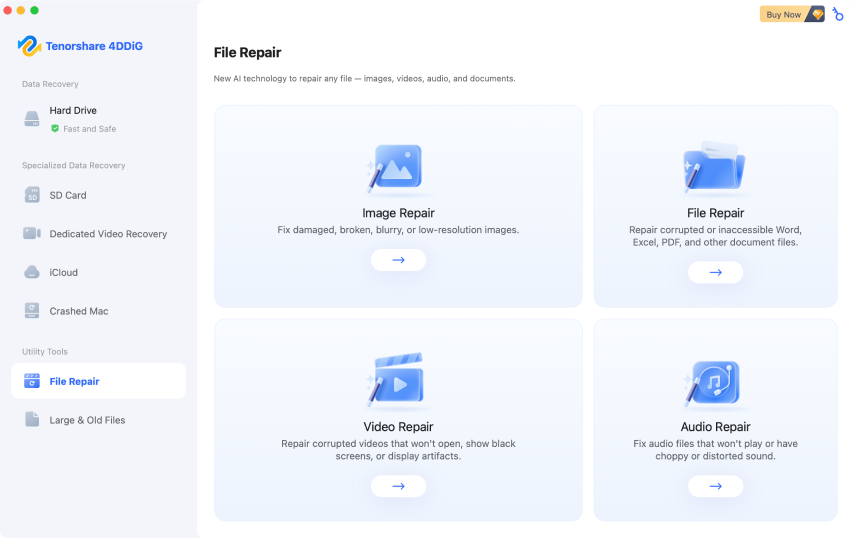
File Repair
Videos and photos may get corrupted due to storage errors, software issues, or other causes. 4DDiG includes a file repair feature that can fix files that cannot be opened.
-
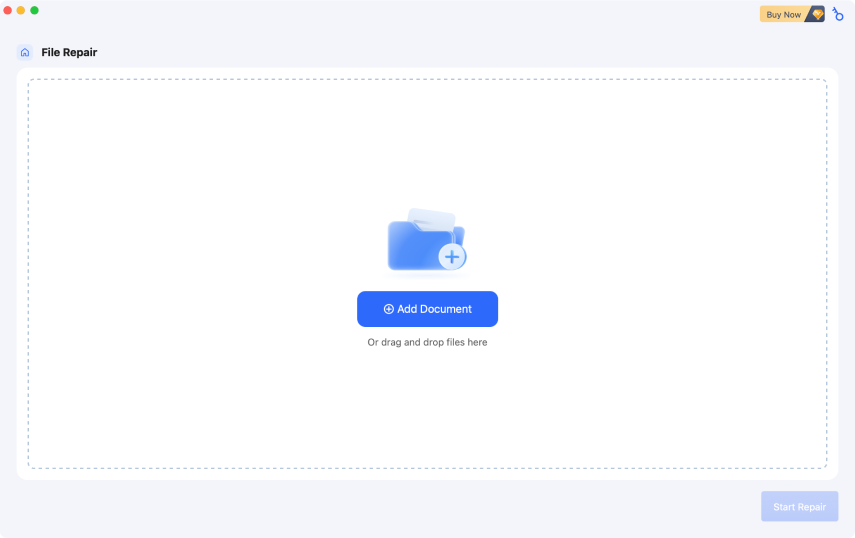
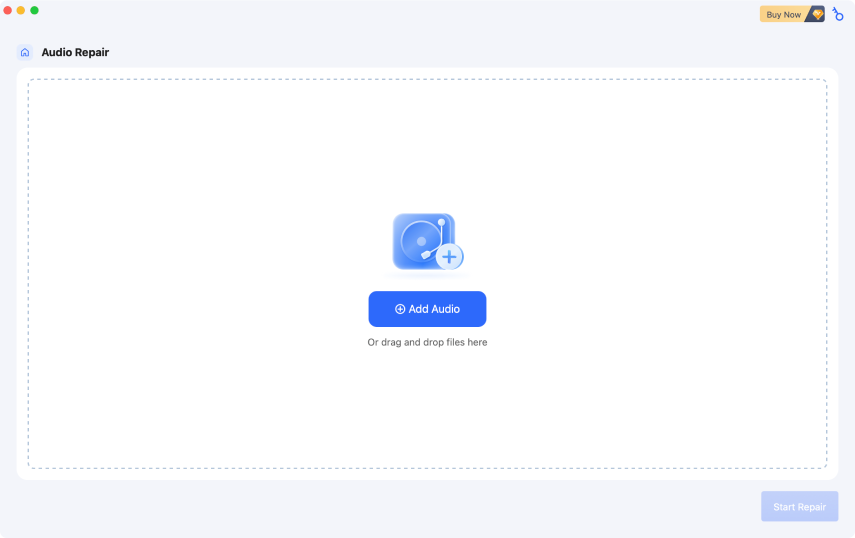
Step 1:Select the Repair Feature
Start the program and select the file repair feature from the menu on the left. Choose the file type you need.
-
Step 2:Add the Corrupted file
Click the Add button to import the corrupted photos. Then click "Start Repair" in the bottom right corner.


-
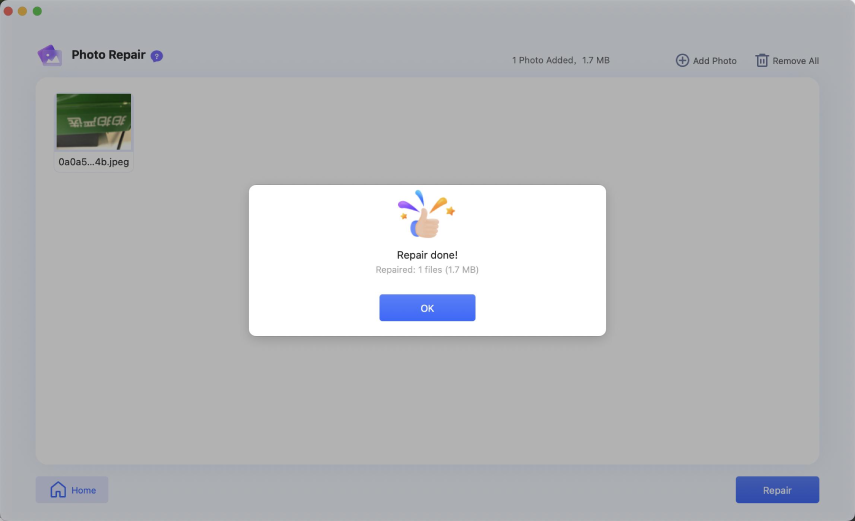
Step 3:Preview and Recover the File
You can preview the repaired photo or video and click "Export" to save it to a safe location.

![]() Secure Download
Secure Download
![]() Secure Download
Secure Download
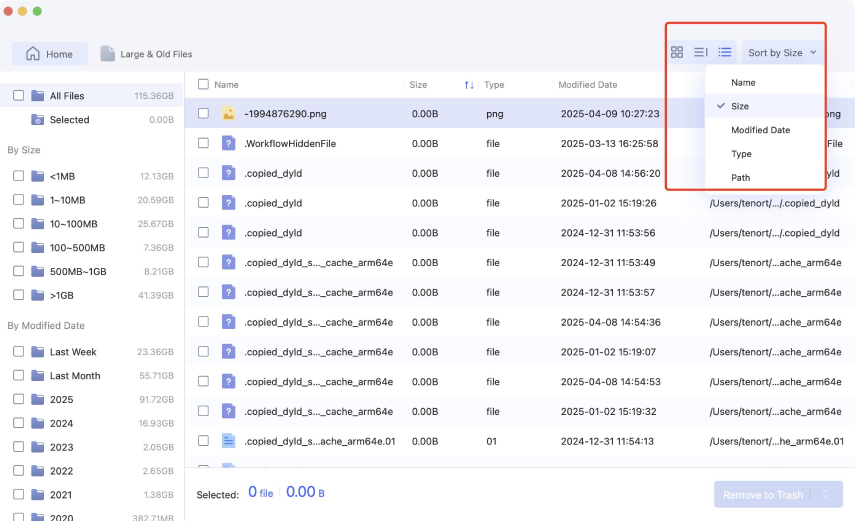
Find Large & Old Files
Your Mac may have large, outdated files that are no longer needed. Removing them helps free up SSD or HDD space and improve performance. 4DDiG Mac can help you locate and remove unneeded files in minutes.
-
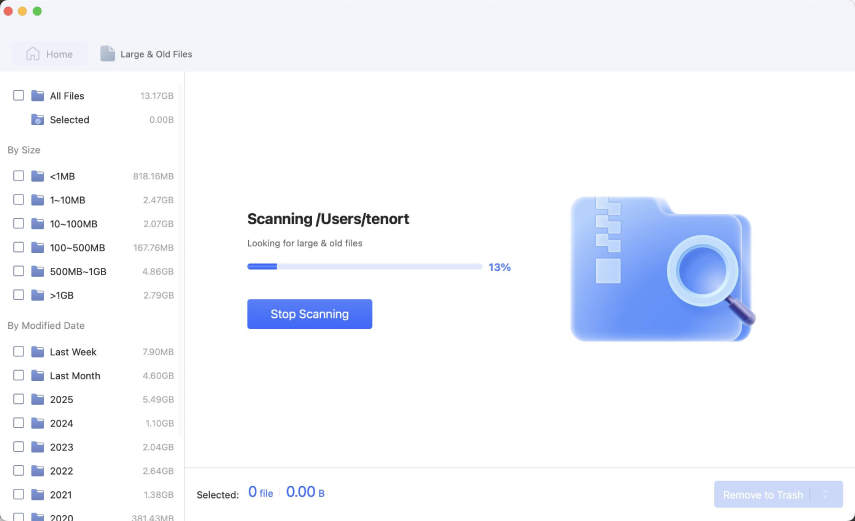
Step 1:Scan the Disk
Go to 'Large & Old Files' in the lower-left corner, then select 'Scan Now'.

-
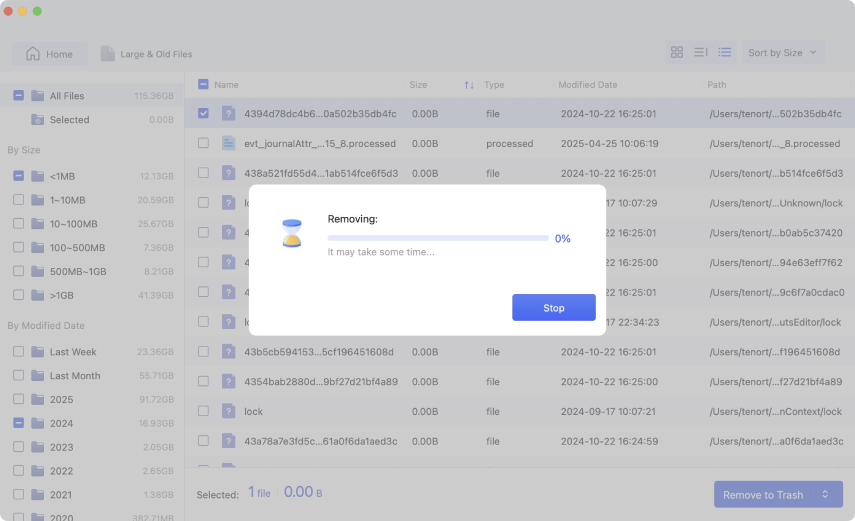
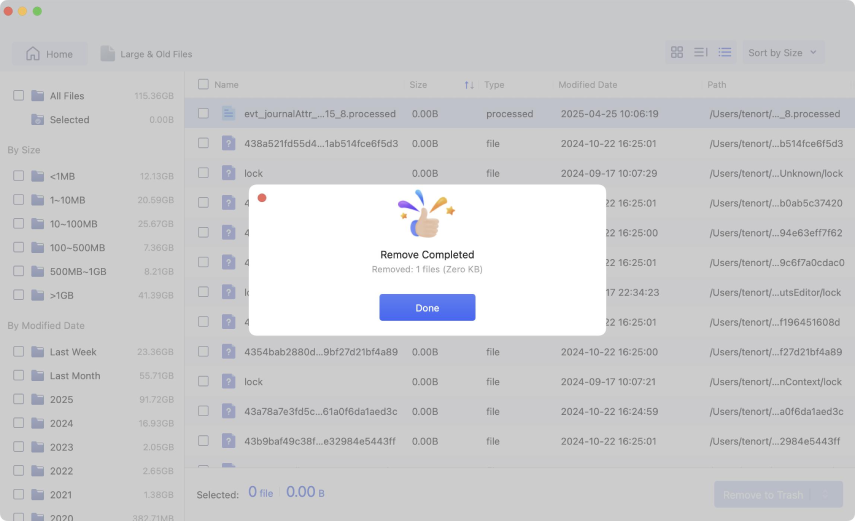
Step 2:Select the Unneeded Files and Remove
Select the files and then click the ‘Remove to Trash’ in the bottom right corner.
You can sort the files by Name, Size, modified date, type and path.
![]() Secure Download
Secure Download
![]() Secure Download
Secure Download