How to Recover Unsaved or Deleted QuickTime Recording on Mac?
Is it possible to recover deleted QuickTime recording on Mac even from the emptied Trash? Follow our detailed guide TO learn how to recover unsaved QuickTime recording on Mac using 4DDiG Data Recovery.
macOS QuickTime is an excellent free tool for creating our recordings and video clips, and some YouTube stars even use it to release tutorial videos publicly. But, if QuickTime Player crashes while recording screen/movie/audio on Mac, leaving QuickTime files unsaved, what should you do? For how to recover unsaved or deleted quicktime recording on Mac, we have discussed the 3 most effective ways here.
Part 1: How to Recover Unsaved QuickTime Screen or Audio Recording on Mac?
First, we should understand that QuickTime on Mac creates three types of files: audio, screen recording, and movie using your Mac camera. The audio is stored in an M4A file, while the video and movie are stored in a MOV file. You must understand these files in the accurate file extensions to regain QuickTime audio and access them without loss.
Way 1: Recover Unsaved QuickTime Screen or Audio Recordings from AutoSave Location
One of the most significant advantages macOS provides to users is the AutoSave function, which will automatically save your recordings before you press the Save tab in various macOS applications such as Preview and QuickTime Player. That is, if you can discover the AutoSave destination of QuickTime Player files, you may be able to retrieve an unsaved QuickTime audio.
-
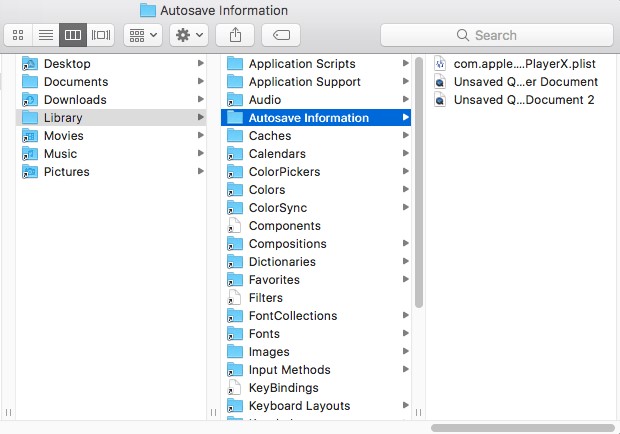
Hit the apple Icon from the top, move to GO, and click Go to Folder.

-
Copy and paste the link and click on Go.
-
Look for the Autosave location for Quick Time audio and video recordings.
-
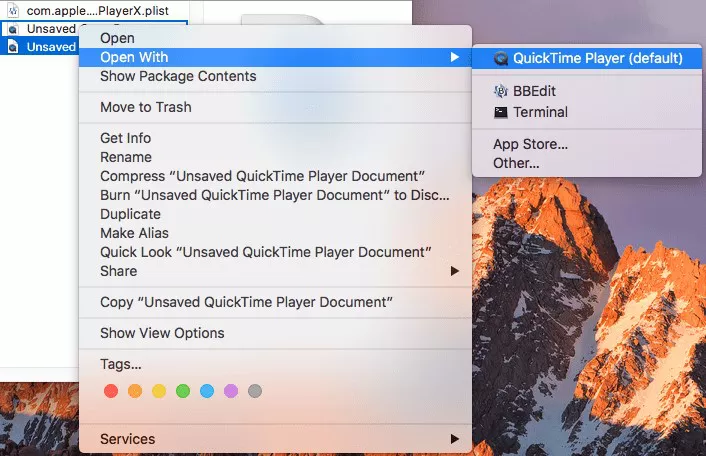
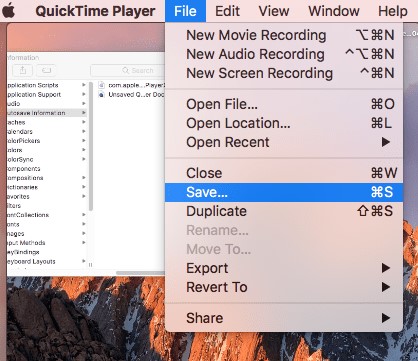
Right-click the desired recording file, move to Open With> select QuickTime Player.
Then save the File.
- Rename the recording and then save it from recovering the screen recording.


Way 2: Recover Unsaved QuickTime Screen or Audio Recordings from Temporary Folder
Another method for recovering unsaved QuickTime audio is to use Temporary folders. This is a game of luck, but based on our previous success in recovering unsaved files, you should give it a try.
-
Navigate to Finder>Applications and launch Terminal. Then type "open $TMPDIR" and click Enter to launch the command line.
-
Move to the Temporary folder, then to TemporaryItems to see if your unsaved QuickTime video or voice recording is there. Access with QuickTime Player, then save to a directory of your choice.


Part 2: How to Recover Deleted QuickTime Recordings on Mac?
When you accidentally deleted QuickTime recordings on Mac, go to Trash firstly which will retain your deleted items for 30 days. But what if you've emptied the Trash? In this case, you need to resort to a reliable data recovery tool such as Tenorshare 4DDiG to retrieve your lost data from Mac. Tenorshare 4DDiG Mac Data Recovery is an expert yet simple software for recovering any file from your Mac hard drive or external memory cards, such as photos, video files, documents, or others. Check out this comprehensive guide to learn how to restore QuickTime on Mac.
- High productivity with easy preview option
- Protect the validity of your data
- Recover lost documents without rewriting any other files, ultimately safeguarding other files from just being rewritten.
- A high rate of data recovery
- Restoring data is as simple as three clicks. There is no need for technical knowledge.
- Support macOS Monterey, macOS Big Sur, macOS 10.15 (Catalina) and below versions
Follow these steps to recover unsaved QuickTime recording through 4DDiG:
![]() Secure Download
Secure Download
![]() Secure Download
Secure Download
-
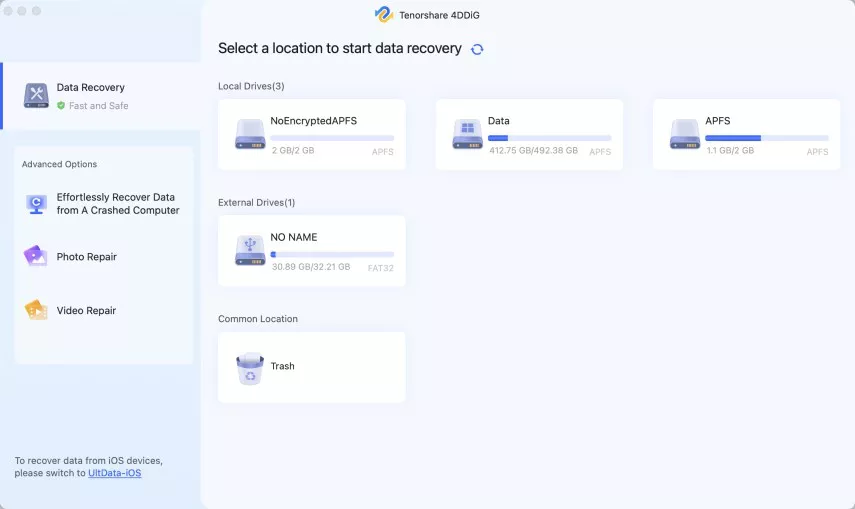
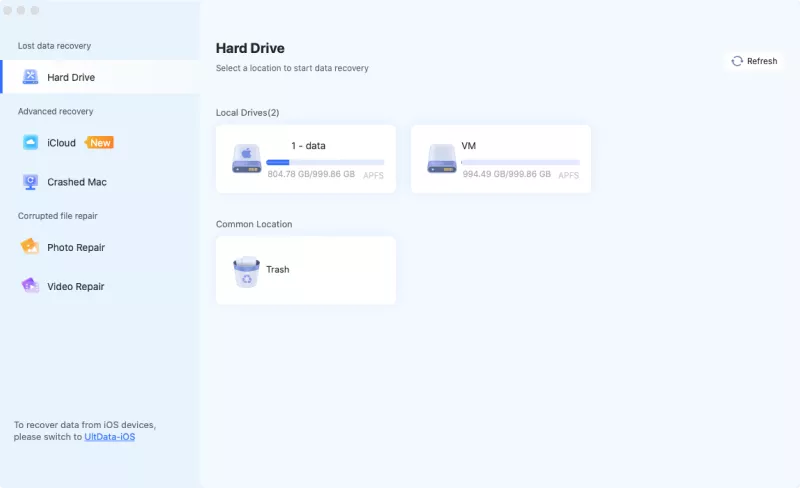
Select a Location
After installing 4DDiG-Mac, launch it and choose a location, such as your hard drive, to begin Mac restore. Then, hit the Scan button to initiate the search process for all lost files.
-
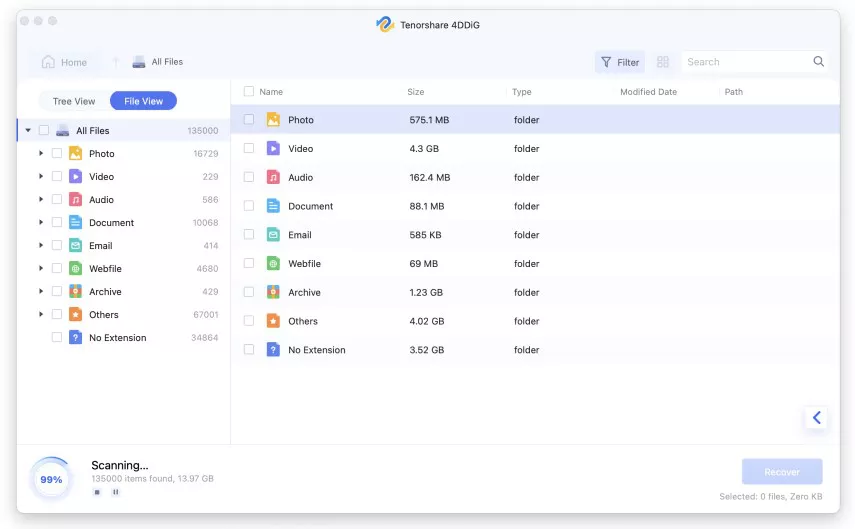
Scan and Preview
Scanning completely removed data takes some time. Once the scanning outcome is generated, you can open more details by clicking on a particular file type.
-
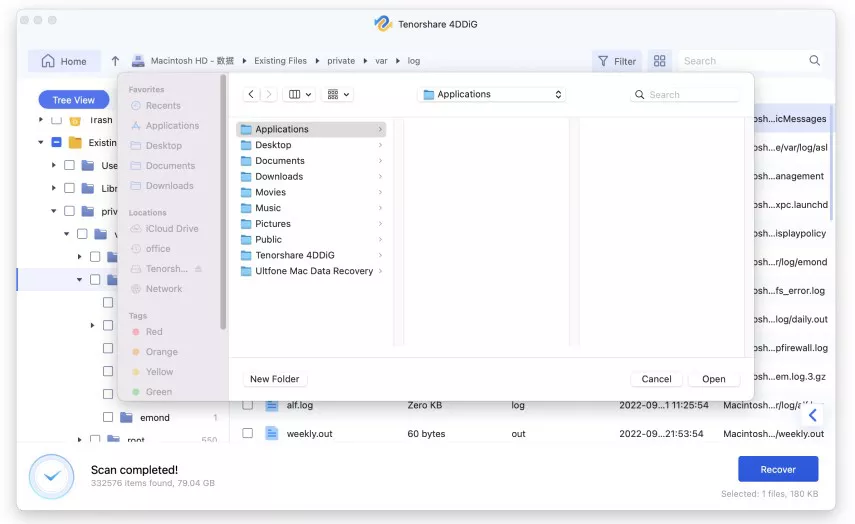
Recover Deleted QuickTime Recording from Mac
Select a destination to save recovered files by clicking the "Recover" button. It is not advised to keep the recovered files to the separation where they were lost. This could result in permanent loss.
Part 3: Tips to Avoid QuickTime Screen/Audio Recording Not Saving
- Tip 1: Choose the QuickTime Player Variant That Best Corresponds to Your macOS
- Tip 2: Allow Enough Space on Your Mac For Freshly Formed Recordings
- Tip 3: Stop Running Apps That Consume a Lot of CPU Power
- Tip 4: Stop Any Additional QuickTime Tasks
When macOS and its app stores release new versions, it's advised to upgrade to the latest edition. But this is not always necessary, especially for iMovie and QuickTime Player. According to several Mac users, there will always be a failure when upgrading to the newest version, but everything works properly again after a slowdown. It's difficult to say why, but if your prior or existing QuickTime player runs fine, stick with it instead of upgrading to the latest one.
A QuickTime recording isn't minimal; you must leave space for a recently founded recording video or crash the program. This also demonstrates the importance of maintaining a good routine of Mac cleanup, file backup, etc.
When one or more heavy programs run on your Mac and consume a large amount of CPU, it becomes more difficult for other applications to operate normally, your Mac responds slowly, or some programs stop working. As a result, before starting a QuickTime recording, you should close as many Apps as possible.
QuickTime Player can work efficiently at once, such as playing or recording videos. Still, if you'd like to avoid unsaved QuickTime audio, we recommend focusing on one task at hand to prepare your QuickTime player for the existing recording task.
FAQs for QuickTime Screen Recording
Q1. Where are my screen recordings saved on Mac?
QuickTime can store your audio immediately under: /Library/Containers/com.apple.QuickTimePlayerX/Data/Library/Autosave Information/, as long as the audio files are not stored by tapping Save as follows, the recordings will be saved in the AutoSave destination.
Q2. How do I reduce the size of a QuickTime screen recording?
- Launch QuickTime Player.
- A popup should often seem to prompt you to choose your video. If not, go to File> Open File.
- Next, go to File> Export As.
- A list of video resolutions will appear. Select the next-lowest settlement.
- Give your video a suitable name and choose a location to save it.
Q3. Why Can't I Save My QuickTime Video?
It is not saved due to a lack of storage capacity or a file size limitation. As a result, retrieving the File that's not saved is impossible. It is better to ensure sufficient storage before recording any lengthy recordings or to make them portion by portion and sync those using Imovies or other third-party applications. If you have enough storage and register a video, but the QuickTime player was stuck, QuickTime recording didn't save. In this case, you need to go back to let it work fine by force-stop the app. It will end up with a starting interface, and your recording will be lost.
Conclusion:
Although we have multiple options to regain our lost media from macOS through its Autosave option, it's your luck; either you recover the recording before any other file is overwritten to its place. If it doesn't work in your case, don't worry!
You can get over the issue of "QuickTime screen recording not saving" through a third-party application that is 100% efficient and works for all types of media. For this purpose, 4DDiG Mac Data Recovery is the best and most secure app to recover your lost recordings and videos. It will end up with a detailed search of your recording without any compromise to its quality.

You May Also Like


- Home >>
- Mac Recovery Solutions >>
- How to Recover Unsaved or Deleted QuickTime Recording on Mac?